U.S. ARMY CADET COMMAND
|
|
|
- Damian Armstrong
- 5 years ago
- Views:
Transcription


1 U.S. ARMY CADET COMMAND BASIC CAMP CADET HANDBOOK DISTRIBUTION RESTRICTION: APPROVED FOR PUBLIC RELEASE; DISTRIBUTION IS UNLIMITED. USACC, G3, CST Planning Branch, 2018.
2 CADET CREED I am an Army Cadet. Soon I will take an oath and become an Army Officer committed to defending the values, which make this nation great. HONOR is my touchstone. I understand MISSION first and PEOPLE always. I am the PAST: the spirit of those WARRIORS who have made the final sacrifice. I am the PRESENT: the scholar and apprentice soldier enhancing my skills in the science of warfare and the art of leadership. But, above all, I am the FUTURE: the future WARRIOR LEADER of the United States Army. May God give me the compassion and judgment to lead and the gallantry to WIN. I WILL do my duty.
3 Chain of Command President of the United States Secretary of Defense Secretary of the Army TRADOC Commander United States Army Cadet Command Commander Brigade Commander PMS SMSI MSI CST Chain of Command TF Commander Regimental Training Officer Company Training Officer 1SG Drill Sergeant
4 Table of Contents Chapter 1 The Army Why we have an Army What the Army uniform represents Why we serve The Army s Motto This We ll Defend 03 Chapter 2 The Army as a Profession The Army Profession What it means to be a Cadet Army Ethic Who we are not The Army s commitment to You 05 Chapter 3 Entrance to the Army The Battle Buddy System Army Values SHARP Suicide Prevention 09 Chapter 4 Cadet Summer Training What to expect Safe and Secure environment Drill Sergeants Military time 11 Chapter 5 Personal Appearance and Uniforms Personal appearance Army Combat Uniform (ACU) 18 Chapter 6 Critical Information Required for Cadets Rank insignia Customs and Courtesies Bugle calls Drill and Ceremonies 27 Chapter 7 Physical Readiness Army Physical Fitness Uniform (APFU) Army physical fitness test (APFT) 33 Chapter 8 Health and Safety Nutrition Sleep Activity Hygiene 38 Chapter 9 Infantry Squad and Platoon Movement Techniques Duties and Responsibilites Infantry Squad Squad formations Infantry Platoon Platoon Formatin 54
5 9-6. Infantry Platoon Weapons Guide Range Cards and Sector Sketches 62 Chapter 10 First Aid Preform First Aid for Bleding Evaluate a Casualty Preform First Aid for an Open Chest Wound Preform First Aid to Restore Breathing and/or Pulse First Aid for Heat Illness First Aid for Cold Weather Injury Transport a Casualty Request Medical Evacuation 96 Chapter 11 Communications Procedure Words (PROWORDS Radio Call Procedure Batteries and Loading Frequency 108 Chapter 12- Weapons Overview M16/M M M Chapter 13- Land Navigation 123 Chapter 14- Perform Individual Camouflage 131 References USACC Uniform Standards 133 Blank Range Card 136 Blank Medical Evacuation Card 137 Send recommendations for change with a summary letter to: DEPARTMENT OF THE ARMY G3, TRAINING DIVISION (CST Planning Branch) BUILDING 5931, ALSACE STREET FORT KNOX, KENTUCKY 40121
6


7 Chapter 1 The Army U.S. Army Mission The U.S. Army s mission is to fight and win our Nation s wars by providing prompt, sustained land dominance across the full range of military operations and spectrum of conflict in support of combatant commanders. We do this by: Executing Title 10 and Title 32 United States Code directives, to include organizing, equipping, and training forces for the conduct of prompt and sustained combat operations on land. Accomplishing missions assigned by the President, Secretary of Defense and combatant commanders, and Transforming for the future. On 14 June 1775, the Second Continental Congress established the American Continental Army. The United States Army is the senior Service of the Armed Forces. As one of the oldest American institutions, it predates the Declaration of Independence and the Constitution. For almost two and a half centuries, Army forces have protected this Nation. Our Army flag is adorned with over 187 campaign and battle streamers to date, each one signifying great sacrifices on behalf of the Nation Why we have an Army It is the intent of Congress to provide an Army that is capable, in conjunction with the other armed forces, of Preserving the peace and security, and providing for the defense of the United States, the Commonwealths and possessions, and any areas occupied by the United States; Supporting the national policies; Implementing the national objectives; and Overcoming any nations responsible for aggressive acts that imperil the peace and security of the United States. Title 10, U.S. Code, Section 3062(a)


8 1-2. What the Army uniform represents For Cadets it means that they are part of something far bigger than themselves it is an opportunity to serve this great country and to make a difference in this world. 2

9 For Army Families, the uniform is a source of both pride and knowing the sacrifices ahead. Living by and upholding the Army Ethics is our life-long commitment. For our veterans, it represents one of the most important periods of their lives pride in honorable service, accomplishments as part of a team, and a lifelong connection to the comrades with whom they served with and in some cases lost during their time in uniform. When Cadets return to society as Cadet citizens, they are expected to continue to be moral-ethical role models for their Families and communities, contributing to the well-being of the United States of America, as Cadets for Life. For the American citizen, Cadets are their sons, daughters, relatives, neighbors, and during disaster, their lifeline. They see in us patriotism and selfless service men and women in whom the Nation takes collective pride and who they see as heroes. Being seen as heroes you are expected to uphold a higher standard and represent yourself and community as a source of pride and commitment. People around the world recognize the American Cadet as a symbol of the United States Cadets represent freedom, democracy, and stability. To our enemies, the Cadet represents American strength, resolve, and a commitment to defend the values that we hold dear as a Nation and as a people Why we serve We are committed to do our duty to contribute to the common defense; we share a love of our country and of our Army Family; we defend American values that frame the nation as expressed in the Declaration of Independence and the Constitution of the United States; and we serve not to promote war, but to preserve peace The Army s Motto This We ll Defend The Army s motto remains as relevant today as it did at our Nations founding. The pronoun We reinforces our collective or team effort and Defend remains our Army s main mission. The Army continues this pledge into the future, as we have done since Department of the Army Emblem 3

10 Chapter 2 The Army as a Profession Professionals are guided by their ethic; the set of principles by which they practice, in the right way, on behalf of those they serve demonstrating their Character. This is their identity. Likewise, as Army Professionals we perform our Duty according to our Ethic. Doing so reinforces Trust within the profession and with the American people. General Raymond T. Odierno 38 th Chief of Staff, United States Army 2-1. The Army Profession Our identity, as trusted Army professionals, proceeds from our shared understanding of and respect for those whose legacy we celebrate. We honor this cherished inheritance in our customs, courtesies, and traditions. Units and organizations preserve their storied histories and proudly display distinctive emblems (regimental colors, crests, insignia, patches, and mottos). The campaign streamers on the Army flag remind us of our history of honorable service to the Nation. These symbols recall the sacrifices and preserve the ties with those who preceded us. Our Army Profession has two mutually supporting communities of practice The Profession of Arms, Cadets of the Regular Army, Army National Guard, and Army Reserve. The Army Civilian Corps, composed of civilian professionals serving in the Department of the Army. Profession of Arms: Uniformed members of the Army Profession Cadets. This includes the Regular Army, Army National Guard, and Army Reserve. The Army Ethic: An evolving set of laws, values, and beliefs, deeply embedded within the core of the Army culture and practiced by all members of the Army Profession to motivate and guide the appropriate conduct of individual members bound together in common moral purpose. 2-2 What it means to be a Cadet The Army is an honored profession, founded on a bedrock of Trust trust between Cadets; trust between Cadets and Leaders; Trust between Cadets and Army Civilians; trust between Solders, their Families and the Army; and trust between the Army and the American people. By our solemn oath, we are morally committed to support and defend the Constitution. This duty requires a foundation of trust with the American people who grant us autonomy to use lethal force on their behalf, only because we have earned their trust. Army professionals understand and accept that they may give their lives and justly take the lives of others to accomplish the mission. The moral implications of this realization compel essential bonds of mutual trust within cohesive teams. 4
11 The nation tasks the Army to do many things besides combat operations, but ultimately, the primary reason the Army exists is to fight and win our Nation s wars through prompt and sustained land combat as part of the joint force. The Army and each of its members must maintain the readiness to accomplish this mission, now and in the future The Army Ethic. The Army Ethic is the heart of the Army Profession and the inspiration for our shared professional identity. It defines who we are, as well as why and how we serve. It motivates our conduct as Cadets and Army Civilians who are bound together in common moral purpose to support and defend the Constitution and the American people. The Army Ethic is expressed as follows: Army Professionals treat each other with dignity and respect; treating others as you, yourself, would want to be treated. They build Trust within the Profession and with the Nation through Honorable Service. Trust is belief and confidence in the, Character, Competence, and Commitment of Army Professionals to ethically and efficiently accomplish the mission. All members of the Army Profession are our comrades. Acts of sexual harassment, sexual assault, and hazing are corrosive to our culture, breaking the bonds of trust that are essential to our Profession. These acts destroy morale and diminish the overall effectiveness of our formations Who we are NOT Army Professionals do not engage in or tolerate acts of misconduct or unethical decisions. Actions such as sexual harassment, sexual assault, and hazing are dishonorable and contrary to the Army Values and the Army s Professional Ethos and destroy esprit de corps. One incident is one too many. Sexual Harassment is a form of gender discrimination that involves unwelcome sexual advances, requests for sexual favors, and other verbal or physical conduct of a sexual nature. Sexual Assault is a CRIME and can result in a felony offense. Sexual assault is defined as intentional sexual contact, characterized by use of force, threats, intimidation or abuse of authority, or when the victim does not or cannot consent. Sexual assault includes rape, forcible sodomy and other unwanted sexual contact that is aggravated, abusive, or wrongful or attempts to commit these acts. This includes touching of the breasts, buttocks, genitalia or any other part of the body to satisfy sexual desires. During training, there is no such thing as a consensual relationship. Hazing is defined as any conduct whereby one military member or employee, regardless of Service or rank, unnecessarily causes another military member or employee, regardless of Service or rank, to suffer or be exposed to an activity that is cruel, abusive, or harmful The Army s commitment to you Our commitment to you is to help guide you on this journey from an aspiring member of the Army Profession to a Cadet. We are committed to providing you with a safe and secure environment where everyone can live, train, and learn, while developing into Cadets of 5
12 Character: Cadets who understand, adhere to, and uphold the Army Ethic, as demonstrated by their decisions and actions. Competence: Cadets who demonstrate the ability to perform basic combat skills and who demonstrate entry-level proficiency in their designated occupational specialty. Commitment: Cadets who understand the calling to honorable service and sacrifice, in the defense of our Nation, who perform their duties successfully with discipline and to standard, and who successfully and ethically accomplish the mission despite adversity, obstacles, and challenges. In turn, you join the ranks of generations of Cadets who previously answered the call to defend America s freedoms; you join a band of brothers and sisters who are prepared to serve this Nation in peace and in war; and join the Profession of Arms, a profession dedicated to upholding the values and ideals of our Country and its people that we serve and represent. Our desired outcome as you complete your initial certification process is to provide the Army with a Cadet Who has internalized the Army Ethic, accepting the calling to the shared identity of being a Trusted Army Professional, as demonstrated by your decisions and actions. Who is agile, adaptive and resilient Who is physically ready to execute required warfighter and occupational specialty skills Who is ready to serve as a trusted member of a team in their first unit of assignment. 6

13 Chapter 3 Entrance to the Army Wars may be fought with weapons, but they are won by men. It is the spirit of men who follow and the man who leads that gains the victory. General George S. Patton Jr The Battle Buddy System Cadets rely on one another to stay motivated and reach peak performance. Although required in Initial Military Training, Cadets will form natural bonds with their fellow Cadets as part of Army culture. To contribute to this team spirit, we live by the buddy system. A buddy team is usually defined as two Cadets in the same unit who look after each other at all times. By getting to know other Cadets on a professional and personal level, you learn how to improve yourself and encourage others. Working together, you and your battle buddy learn initiative, responsibility, trust, and dependability. While at the Cadet Summer Training, same-gender Cadets (male-male and female-female) are placed in buddy teams. With the requirement to excel in Army training, some Cadets need more positive reinforcement than others. For that reason, you may also be paired based on your strengths, so you and your buddy can complement each other s weaknesses. Battle Buddy responsibilities: Never leave your buddy alone Never let your buddy go into an office or room by themselves Keep your buddy safe and free from harm Know the whereabouts of your buddy at all times Pass information to your buddy Encourage and support your buddy to train harder and do better Help your buddy solve problems Inform Cadre of any changes in your buddy s behavior In the end, the most rewarding part of the buddy system is making every Cadet your buddy; for any one of them could help you accomplish your mission or save your life in combat Army Values Our ethical and moral foundation as Cadets are solidified in the seven Army Values Loyal, Duty, Respect, Selfless Service, Honor, Integrity, and Personal Courage. They are at the core of who we are as individuals, as Cadets, as Professionals and as Americans. Whether on or off-duty, Cadets live these values every day. The easiest way to remember the Army Values is through the acronym LDRSHIP. 7
14 LOYALTY: Bear true faith and allegiance to the U.S. Constitution, the Army, your unit, and other Cadets. Bearing true faith and allegiance is a matter of believing in and dedicating yourself to the United States of America and the U.S. Army. A loyal Cadet is one who supports his or her leader and stands up for fellow Cadets. By wearing the uniform of the U.S. Army you are expressing your loyalty to the Nation, Family, and your fellow Cadets. DUTY: Fulfill your obligations. Doing your duty means carrying out your assigned tasks and being able to accomplish the mission as part of a team. Duty also requires you to work hard every day to be a better Cadet. Everyone in our Army contributes to the mission if they do their duty. RESPECT: Treat people as you yourself would want to be treated. In the Cadet s Creed, we pledge to treat others with dignity and respect while expecting others to do the same. Respect allows us to appreciate the best in other people. Respect is trusting that all people have done their jobs and fulfilled their duty. Self-respect is also a vital ingredient and is a result from knowing you have put forth your best effort. The Army is one team, and all contribute best when they are treated with respect. SELFLESS SERVICE: Put the welfare of the Nation, the Army, and your subordinates before your own. In serving your country, you are doing your duty loyally without thought of recognition, reward, or personal comfort. Selfless services is the commitment of each team member to go a little further, endure a little longer, and look a little closer to see how he or she can add to the team effort without thought of personal gain. HONOR: Live up to Army Values. Honor is a matter of carrying out, acting, and living the values of respect, duty, loyalty, selfless service, integrity, and personal courage in everything you do. It is always doing what you know is right even when no one is looking. INTEGRITY: Do what s right, legally and morally. Integrity is a quality you develop by adhering to moral principles. Once lost, it is the hardest to recover. It requires that you do and say nothing that deceives others. As your integrity strengthens, so does the trust others place in you. Trust is one of the most important things in our Profession. The more choices you make based on integrity, the more this highly prized value will characterize your relationships with Family and friends, and finally, define you as a person and a Cadet. PERSONAL COURAGE: Face and overcome fear, danger or adversity (physical or moral). Personal courage has long been associated with our Army. Courage is a matter of enduring physical duress and at times risking personal safety. Facing fear or adversity may require continuing forward on the right path, especially if taking those actions is not popular with others. You can build your personal courage by daily standing up for and acting upon the things that you know are right. 3-3 Sexual Harassment /Assault Response & Prevention (SHARP) A Cadet in the United States Army stands strong a member of a band of brothers and sisters bound together by timeless values and sharing a sense of trust with and duty and loyalty to their fellow Cadets that is unlike any other in the world. Their willingness to sacrifice for each other, to never leave a fallen comrade, is what makes a Cadet strong on the battlefield, and off. 8
15 When sexual harassment or sexual assault occurs, it is not only a direct violation of our Army Values and Warrior Ethos, but also an assault on what it means to serve in the Profession of Arms and the Army way of life a life in which it is our duty to protect and take care of each other no matter the time, place, or circumstance. As a band of brothers and sisters, we have a personal and professional duty to intervene and prevent sexual harassment and sexual assault. Sexual assault is a crime. It betrays victims and their Families; erodes the bedrock of trust upon which the Profession of Arms is grounded; and has a corrosive effect on our unit readiness, team cohesion, and command environment. The damage resulting from sexual assault extends far beyond the victim, weakening the very health and morale of our Cadets, breaking the bond of trust within our team, shattering the confidence Cadets have in one another, and undermining unit readiness. Sexual assault can be prevented. As Cadets, our Army Values demand that we act to stop these behaviors. There are no passive bystanders. Passive bystanders who do not assist, do not report, and do not try to help their fellow Cadets as they see sexual harassment or sexual assaults occur are part of the problem. We must protect our team members. When we see or sense the risk of sexual harassment or sexual assault, we have a duty to intervene and protect our fellow Cadets At the Reception Battalion and during the initial phase of CST and OSUT, Army leaders will provide you with information designed to inform, protect and prevent you from becoming a victim of sexual harassment and assault, and if you do become a victim, provide you with options for reporting the incident and getting help. WHAT IS I. A.M. STRONG? Intervene, Act, and Motivate (I. A.M.) STRONG is the Army s campaign to combat sexual harassment and sexual assault by engaging all Cadets in preventing sexual assault before they occur. INTERVENE When I recognize a threat to my fellow Cadets, I will have the personal courage to INTERVENE and prevent sexual assault. I will condemn acts of sexual harassment. I will not abide obscene gestures, language, or behavior. I am a Warrior and a member of a team. I will INTERVENE. ACT You are my brother, my sister, my fellow Cadet. It is my duty to stand up for you, no matter the time or place. I will take ACTION. I will do what s right. I will prevent sexual harassment and sexual assault. I will not tolerate sexually offensive behavior. I will ACT. MOTIVATE We are American Cadets, MOTIVATED to keep our fellow Cadets safe. It is our mission to prevent sexual harassment and sexual assault. We will denounce sexual misconduct. As Cadets, we are all MOTIVATED to take action. We are strongest...together Suicide Prevention Everyone has the power and responsibility to protect Cadets on and off the battlefield. This includes recognizing uncharacteristic and suicidal behaviors. Effective suicide prevention requires everyone in the unit to be aware of the risk factors for suicide and know how to respond. Commanders, NCOs, supervisors and battle buddies must lead the way. If a Cadet seems suicidal, the time to take action is NOW. Talk to the Cadet before it is too late. 9
 are in the best position to recognize changes due to distress and to provide support.")
 Depressed mood; hopelessness Withdrawal from social activities DO report")
16 What to look for: Warning Signs Distress can lead to the development of unhealthy behaviors. People closest to the Cadet (fellow Cadets, Family, friends) are in the best position to recognize changes due to distress and to provide support. Look For: Comments that suggest thoughts or plans of suicide Rehearsal of suicidal acts Giving away possessions Obsession with death and dying Uncharacteristic behaviors Significant change in performance Appearing overwhelmed by recent stressor(s) Depressed mood; hopelessness Withdrawal from social activities DO report violations of policies and regulations to your platoon and company leadership 10

17 Chapter 4 Cadet Summer Training Only well-armed and equipped, adequately trained and efficiently led forces can expect victory in future combat.. General Matthew B. Ridgway 4-1. What to expect All phases of training builds character, instills discipline and Army Values, improves physical conditioning, and teaches basic combat and occupational skills. All of these contribute in the development of your individual skills and knowledge, resulting in a Cadet capable of serving as a member of a team Safe and Secure Environment The Army provides a safe living and learning environment for all Cadets and Cadets. When you arrive at your company you will notice security measures established to protect you and your battle buddy. Upon arrival to your Cadet Summer Training you will receive a briefing on SHARP and introduced to the individuals who are assigned as the Sexual Assault response Coordinator (SARC) and the Victim Advocate (VA). These are the NCOs and or civilians that will provide you with contact information to be used if violations are observed during your training. Their names and contact information are posted throughout the barracks and company area Drill Sergeants A Drill Sergeant is a symbol of excellence in initial entry training, is an expert in all warrior tasks and battle drills, lives the Army Values, exemplifies the Warrior Ethos, and most importantly is the epitome of the Army as a Profession Military time Being a Cadet is a 24-hour a day job, it is only fitting that military time is expressed using 24 hours. As a global military force, the U.S. Army constantly coordinates with bases and personnel located in other time zones. To avoid confusion due to time differences, the military uses Greenwich Mean Time, commonly referred to as military time. Below is a conversion table from civilian time to military time. 11
18 Civilian Time Military Time Civilian Time Military Time 12:00 Midnight :00 Noon :01 AM :00 PM :00 AM :00 PM :00 AM :00 PM :00 AM :00 PM :00 AM :00 PM :00 AM :00 PM :00 AM :00 PM :00 AM :00 PM :00 AM :00 PM :00 AM :00 PM :00 AM :00 PM :00 AM :59 PM
19 Chapter 5 Personal Appearance and Uniforms When you put on a uniform, there are certain inhibitions that you can accept. General Dwight D. Eisenhower 5-1. Personal appearance Personal appearance is important it demonstrates the pride and self-discipline you feel as a Cadet in the U.S. Army. Being neat and well groomed contributes to the esprit de corps in your unit. Your uniform should fit well and be clean, serviceable, and pressed as necessary. Your uniform is only part of your appearance. To look like a Cadet, you need to be physically fit, meet acceptable weight standards, and have a neat hairstyle in accordance with Army regulations. Note: While attending CST/OSUT/AIT some of the personal appearance allowances may be restricted while undergoing training. Your Drill Sergeants, Platoon Sergeants and instructors will inform you of these restrictions. Note: Reference AR or DA PAM for additional inquiries concerning Army uniforms and awards. Note: When traveling from CST to AIT wear of the Army Service Uniform (ASU), the Army combat uniform, or appropriate civilian attire, unless restricted by the commander. Hairstyles While at CST, you will receive a standard haircut which will be shorter than many of you have had since grade school. The purpose of the short cut is for hygiene purposes because of the extensive physical and outdoor activities you will undertake over the next 10 weeks. Once you graduate from CST, you can get a haircut that may be more in taste to your desires but it will still need to stay within the hairstyle mandated by Army regulation. Most Army Air Force Exchange Store (AAFES) barbers have a poster which shows authorized haircut styles. Male Grooming Standards For male personnel, (a) The hair on top of the head must be neatly groomed. The length and bulk of the hair may not be excessive and must present a neat and conservative appearance. The hair must present a tapered appearance. A tapered appearance is one where the outline of the Cadets s hair conforms to the shape of the head), curving inward to the 13
20 natural termination point at the base of the neck. When the hair is combed, it will not fall over the ears or eyebrows, or touch the collar, except for the closely cut hair at the back of the neck. The block-cut fullness in the back is permitted to a moderate degree, as long as the tapered look is maintained. Males are not authorized to wear braids, cornrows, twists, dreadlocks, or locks while in uniform or in civilian clothes on duty. Haircuts with a single, unta-pered patch of hair on the top of the head (not consistent with natural hair loss) are considered eccentric and are not au-thorized. Examples include, but are not limited to, when the head is shaved around a strip of hair down the center of the head (mohawk), around a u-shaped hair area (horseshoe), or around a patch of hair on the front top of the head (tear drop). Hair that is completely shaved or trimmed closely to the scalp is authorized. (b) Sideburns are hair grown in front of the ear and below the point where the top portion of the ear at-taches to the head. Sideburns will not extend below the bottom of the opening of the ear. Side-burns will not be styled to taper, flair, or come to a point. The length of the individual hairs of the sideburn will not ex-ceed 1/8 inch when fully extended. (c) Facial hair. Males will keep their face clean-shaven when in uniform, or in civilian clothes on duty. Mustaches are permitted. If worn, males will keep mustaches neatly trimmed, tapered, and tidy. Mustaches will not present a chopped off or bushy appearance, and no portion of the mustache will cover the upper lip line, extend sideways beyond a vertical line drawn upward from the corners of the mouth. Handlebar mustaches, goatees, and beards are not authorized. If appropriate medical authority allows beard growth, the maximum length authorized for medical treatment must be spe-cific. For example, The length of the beard cannot exceed 1/4 inch. Cadets will keep the growth trimmed to the level specified by the appropriate medical authority, but are not authorized to shape the hair growth (ex-amples include, but are not limited to, goatees, Fu Manchu, or handlebar mustaches). For female personnel, the requirements for hair regulations are to maintain uniformity within a military population for female Cadets while in uniform, or in civilian clothes on duty, unless otherwise specified. Female hairstyles may not be eccentric or faddish and will present a conservative, professional appearance. For the purpose of these regulations, female hairstyles are organized into three basic categories: short length, medium length, and long length hair. Short length. Short hair is defined as hair length that extends no more than 1 inch from the scalp (excluding bangs). Hair may be no shorter than 1/4 inch from the scalp (unless due to medical condition or injury), but may be evenly tapered to the scalp within 2 inches of the hair line edges. Bangs, if worn, may not fall below the eyebrows, may not interfere with the wear of all headgear, must lie neatly against the head, and not be visible underneath the front of the headgear. The width of the bangs may extend to the hairline at the temple. Medium length. Medium hair is defined as hair length that does not extend beyond the lower edge of the collar (in all uniforms), and extends more than 1 inch from the scalp. Medium hair may fall naturally in uniform, and is not required to be secured. When worn loose, graduated hair styles are acceptable, but the length, as measured from the end of the total hair length to the base of the collar, may not exceed 1 inch difference in length, from the front to the back. Layered hairstyles are also authorized, so long as each hair s length, as measured from the scalp to the hair s end, is generally the same length giving a tapered appearance. The regulations for the wear of bangs detailed above, apply. No portion of the bulk of the hair, as measured from the scalp, will exceed 2 inches. Long length. Long hair is defined as hair length that extends beyond the lower edge of the collar. Long hair will be neatly and inconspicuously fastened or pinned, except that bangs may be worn. The regulations for the wear of bangs detailed above, apply. No portion of the bulk of the hair, as measured from the scalp, will exceed 2 inches (except a bun, which may extend a maximum of 3 inches from the scalp) and be no wider than the width of the head. 14

21 Braids, cornrows, and twists. Medium and long hair may be styled with braids, cornrows, or twists (see glossary for definitions). Each braid, cornrow, or twist will be of uniform dimension, have a diameter no greater than 1/2 inch, and present a neat, professional, and well-groomed appearance. Each must have the same approximate size of spacing between the braids, cornrows, or twists. Each hairstyle may be worn against the scalp or loose (freehanging). When worn loose, such hairstyles must be worn per medium hair length guidelines or secured to the head in the same manner as described for medium or long length hair styles. Ends must be secured inconspicuously. When multiple loose braids or twists are worn, they must encompass the whole head. When braids, twists, or cornrows are not worn loosely and instead worn close to the scalp, they may stop at one consistent location of the head and must follow the natural direction of the hair when worn back, which is either in general straight lines following the shape of the head or flowing with the natural direction of the hair when worn back with one primary part in the hair. Hairstyles may not be styled with designs, sharply curved lines, or zigzag lines. Only one distinctive style (braided, rolled, or twisted) may be worn at one time. Braids, cornrows, or twists that distinctly protrude (up or out) from the head are not authorized. 15


22 Dreadlocks or locks. Any style of dreadlock or lock (against the scalp or free-hanging) is not authorized. Jewelry A wrist watch, identification bracelet, and up to two rings (a wedding set is considered to be one ring) may be worn with your uniform as long as they are conservative and tasteful. Cadets may also wear one activity tracker, pedometer, or heart rate monitor. You may wear a religious medal on a chain around your neck provided neither medal nor chain can be seen. 16
23 Earrings may be screw-on, clip-on, or post-type earrings, in gold, silver, white pearl, or diamond. The earrings will not exceed 6 mm or 1 4 inch in diameter, and they must be unadorned and spherical. When worn, the earrings will fit snugly against the ear. Females may wear earrings only as a matched pair, with only one earring per ear lobe. Note: Females are not authorized to wear earrings with any class C (utility) uniform (ACU, hospital duty, food service, physical fitness, field, or organizational). The use of gold caps, platinum caps, or caps of any unnatural color or texture (permanent or removable) for purposes of dental ornamentation is prohibited. Teeth, whether natural, capped, or veneered, will not be decorated with designs, jewels, initials, or similar ornamentation. Unnatural shaping of teeth for nonmedical reasons is prohibited. Body Piercing Except for earrings worn by female Cadets when wearing the ASU, no displaying objects, articles, jewelry, or ornamentation attached or affixed to or through the skin may be worn while in uniform. Neither can such adornments be worn while wearing civilian clothes (on or off duty) when on any military installation, or other places under military control. When females are not in uniform and off duty, earring wear is not restricted as long as the earrings do not create or support ear gauging (enlarged holes in the lobe of the ear, greater than 1.6mm). Cosmetics Standards regarding cosmetics are necessary to maintain uniformity and to avoid an extreme or unprofessional appearance. Males are prohibited from wearing cosmetics, except when medically prescribed. Females are authorized to wear cosmetics with all uniforms, provided they are applied modestly and conservatively, and that they complement both the Cadet s complexion and the uniform. Leaders at all levels must exercise good judgment when interpreting and enforcing this policy. Eccentric, exaggerated, or faddish cosmetic styles and colors, to include makeup designed to cover tattoos, are inappropriate with the uniform and are prohibited. Permanent makeup, such as eyebrow or eyeliner, is authorized as long as the makeup conforms to the standards outlined above. Eyelash extensions are not authorized unless medically prescribed. Females will not wear shades of lipstick that distinctly contrast with the natural color of their lips, that detract from the uniform, or that are faddish, eccentric, or exaggerated. Females will comply with the cosmetics policy while in any military uniform or while in civilian clothes on duty. Fingernails All personnel will keep fingernails clean and neatly trimmed. Males will keep nails trimmed so as not to extend beyond the fingertip. Females will not exceed a nail length of 1 4 inch, as measured from the tip of the finger. Females will also trim nails shorter if the commander determines that the longer length detracts from the military image, presents a safety concern, or interferes with the performance of duties. Females may wear clear acrylic nails, provided they have a natural appearance and conform to Army standards. Tattoos Note: Violation of tattoos policy by Cadets may result in adverse administrative action and/or charges under the provisions of the Uniform Code of Military Justice (UCMJ). Tattoos and brands are permanent markings that are difficult to reverse (in terms of financial cost, discomfort, and effectiveness of removal techniques). Before obtaining either a tattoo or a brand, Cadets should consider talking to unit leaders to ensure that they understand the Army tattoo and brand policy. The words tattoo and brand are interchangeable in regards to this policy. The following types of tattoos or brands are prejudicial to good order and discipline and are, therefore, prohibited anywhere on a Cadet s body: 17
24 Extremist. Extremist tattoos or brands are those affiliated with, depicting, or symbolizing extremist philosophies, organizations, or activities. Extremist philosophies, organizations, and activities are those which advocate racial, gender, or ethnic hatred or intolerance; advocate, create, or engage in illegal discrimination based on race, color, gender, ethnicity, religion, or national origin; or advocate violence or other unlawful means of depriving individual rights under the U.S. Constitution, and Federal or State law (see AR ). Indecent. Indecent tattoos or brands are those that are grossly offensive to modesty, decency, propriety, or professionalism. Sexist. Sexist tattoos or brands are those that advocate a philosophy that degrades or demeans a person based on gender. Racist. Racist tattoos or brands are those that advocate a philosophy that degrades or demeans a person based on race, ethnicity, or national origin. Tattoos or brands, regardless of subject matter, are prohibited on certain areas of the body as follows: Cadets are prohibited from having tattoos or brands on the head, face (except for permanent makeup, neck (anything above the t-shirt neck line to include on/inside the eyelids, mouth, and ears), wrists, hands, except Cadets may have one ring tattoo on each hand, below the joint of the bottom segment (portion closest to the palm) of the finger. Accessing applicants must adhere to this same policy. Cadets may not cover tattoos or brands with bandages or make up in order to comply with the tattoo policy Army Combat Uniform (ACU) Boots New boots should fit properly when you receive them. They should have a chance to air out between uses, so you should wear one pair one day and another pair the next. Scrape dirt or mud from boots and wash with just a little water and soap. Wipe insides dry with a clean cloth and remove all soapsuds from the outside. Stuff paper in the toes and let boots dry in a warm, dry place. Do not put boots in the hot sun or next to a strong source of heat. Let boots dry. Heels of boots should be replaced after wear of 7/16 of an inch or more. As an option, Cadets may wear commercial boots of a design similar to that of the Army combat boot (tan or coyote), as authorized by the commander. The boots must be between 8 to 10 inches in height and made of tan or coyote flesh-side out cattlehide leather, with a plain toe and a soling system matching the color of the tan or coyote upper materials. Rubber and polyether polyurethane are the only outsole materials that are authorized. The soling materials will not exceed 2 inches in height, when measured from the bottom of the outsole, and will not extend up the back of the heel or boot or over the top of the toe. The exterior of the boot upper will not contain mesh but will be constructed of either all leather or a combination of leather and nonmesh fabric. Cadets may wear optional boots in lieu of the Army combat boot (tan or coyote), as authorized by the commander; however, they do not replace issue boots as a mandatory possession item. Optional boots are not authorized for wear when the commander issues and prescribes standard organizational foot-wear for safety or environmental reasons (such as insulated boots or safety shoes). Personnel may wear specialty boots authorized for wear by specific groups of Soldiers, such as the tanker boot, only if the commander authorizes such wear. Soldiers may not wear optional boots in formation when uniformity in appearance is required. 18

25 Insignia placement Each Cadet is responsible for having the correct insignia properly placed on their uniform, as follows: U.S. ARMY insignia: ACU Worn immediately above and parallel to the top edge of the left chest pocket. This insignia consists of black, 3/4-inch high block letters on a 1-inch wide by 4-1/2 inch long (or to the edges of the pocket flap) strip. The background can be either olive green or the universal camouflage pattern. Name tape: ACU Worn immediately above and parallel to the top edge of the right chest pocket of all field and work uniform coats and shirts. It consists of black letters on a 1-inch wide by 4-1/2 inch long (or to the edges of the pocket flap) strip of cloth. Names of 10 letters or less will be printed in 3/4-inch high Franklin Gothic Condensed. Names of 11 letters or more will be printed in 1/2-inch high Franklin Gothic Extra Condensed. The name and U.S. Army tapes will be the same length. Grade insignia: Cadets wear subdued (cloth) last name and U.S. Army identification insignia attached to Velcro. Grade insignia is attached to Velcro area provided in center of the jacket flap. Cadet may sew on the U.S Army tape, name tape, rank and all authorized badges, as an option. Rank insignia placement Belts and Buckles The Desert Sand Riggers belt will be worn with the ACU. The coyete tan belt will be worn with the OCP Uniform. Information of Army Uniforms is located in Army Regulation Patrol Cap The patrol cap is standard headgear worn with the combat uniform in the garrison environment. The patrol cap has a visor, circular top crown, side crown with an outside crown band, and a hook-and-loop pad on the back of the patrol cap 19


26 Cadets will wear the patrol cap straight on the head so that the cap band creates a straight line around the head, parallel to the ground. The patrol cap will fit snugly and comfortably around the largest part of the head without bulging or distortion from the intended shape of the headgear and without excessive gaps. No rolling of, blocking, or alterations to the cap are authorized. Rank insignia will be wore center front of the cap between the top seam and the bottom seam 20

27 Chapter 6 Critical Information for Cadets Always do more than is required of you. General George S. Patton Jr Rank Insignia Military customs and courtesies dictate that you render the appropriate greeting and salute to officers when you encounter them in the performance of your duties. The chart can assist you in understanding the Army rank structure. The individual s title reflects the rank of the person. You should never address a person by their pay grade. Title Pay Grade Rank Remarks Cadet (PVT) E-1 No Chevron Cadet (PV2) E-2 Cadet First Class (PFC) Specialist (SPC) E-3 E-4 Non-Commissioned Officers NCOs are the backbone of the Army. They are responsible for executing a military organization s mission and serve as the principal instructor for training military personnel so they are prepared to execute those missions. Senior NCOs are considered the primary link between enlisted personnel and the commissioned officers. If they are the senior NCO in a staff section they may be referred to as an NCO-in-charge (NCOIC). Their advice and guidance is particularly important for junior officers, who begin their careers in a position of authority but generally lack practical experience. Corporal (CPL) E-4 A SPC recognized with NCO authorities Sergeant (SGT) Staff Sergeant (SSG) Sergeant First Class (SFC) E-5 Team leader E-6 Squad leader or section chief E-7 Senior NCO in a platoon 21
 E-9 Senior enlisted advisor at battalion and higher HQs Sergeant Major of the Army (SMA) E-9 Senior NCO in the Army; advisor to the Chief of Staff of the")
28 Master Sergeant (MSG) E-8 NCOIC at battalion and brigade First Sergeant (1SG) E-8 Senior NCO in a company; advisor to the commander Sergeant Major (SGM) E-9 Principal advisor on a battalion and higher HQs staff Command Sergeant Major (CSM) E-9 Senior enlisted advisor at battalion and higher HQs Sergeant Major of the Army (SMA) E-9 Senior NCO in the Army; advisor to the Chief of Staff of the Army Warrant Officers are highly specialized technicians and trainers in their career fields. By gaining progressive levels of expertise and leadership, these leaders provide valuable guidance to commanders and subordinate Cadets in their units. Warrant Officer 1 (WO1) Chief Warrant Officer 2 Chief Warrant Officer 3 Chief Warrant Officer 4 Chief Warrant Officer 5 W-1 Company and battalion staffs W-2 Company and battalion staffs W-3 Company and higher staffs W-4 Battalion and higher staffs W-5 Brigade and higher staffs 22

29 Commissioned Officers are responsible for planning and leading demanding missions while ensuring the welfare, morale and professional development of the Cadets entrusted to them. At the Captain, Lieutenant Colonel and Colonel level they may serve as commanders for companies, battalions and brigades. In that capacity, they have disciplinary authorities over you under the Uniformed Code of Military Justice. 2 nd Lieutenant (2LT) O-1 Platoon Leader 1 st Lieutenant (1LT) Captain (CPT) O-2 Company Executive Officer O-3 Company Commander; Battalion Staff Officer Major (MAJ) Lieutenant Colonel (LTC) Colonel (COL) O-4 Battalion Executive Officer; Brigade Staff Officer O-5 Battalion Commander; Division Staff Officer O-6 Brigade Commander; Division Staff Officer General Officers are commissioned officers who serve as commanders at division-size units and larger, as commanders of installations, and as principal advisors to senior national and state civilian leaders and higherranking general officers. Brigadier General O-7 Major General Lieutenant General (LTG) General (GEN) O-8 O-9 O Customs and Courtesies Saluting The origin of the hand salute is uncertain. Some historians believe it began in late Roman times when assassinations were common. A citizen who wanted to see a public official had to approach with his right hand raised to show that he did not hold a weapon. Knights in armor raised visors with the right hand when meeting a 23


30 comrade. This practice gradually became a way of showing respect and in early American history sometimes involved removing the hat. By 1820, the motion was modified to touching the hat, and since then has become the hand salute used today. While in the Army, you salute to show respect toward an officer, flag, or our country. The proper way to salute with or without a weapon is described in Field Manual (FM) Training Circular (TC) , paragraph 4-4. Follow these rules: When you meet someone outside, salute as soon as you recognize that he or she is an officer, or if you are walking toward the officer, wait until you are about six steps away. Salute all officers (recognized by grade) in official vehicles identified by special plates or flags. Salute only on command when in a formation. If in a group and an officer approaches, the first Cadet to recognize the officer calls the group to attention and all personnel salute. If you approach an officer while you are double-timing alone, assume quick time march and render the hand salute and give the proper greeting. When the salute is returned, execute order arms and resume double-timing. The salute is always initiated by the subordinate and terminated only after acknowledgment by the individual saluted. Accompany the salute with an appropriate greeting, such as, Good morning/afternoon, sir /ma am. Salutes are not required to be rendered by or to personnel who are driving or riding in privately owned vehicles. It is not customary for enlisted personnel to exchange salutes, except in some ceremonial situations. Never render a salute with a noticeable object in your mouth or right hand. If you are on detail and an officer approaches, salute if you are in charge of the detail. Otherwise, continue to work. When spoken to, come to the position of attention while addressing an officer. Hand salute The Hand Salute is a one-count movement. The command is Present, ARMS. The Hand Salute may be executed while marching. When marching, only the Cadet in charge of the formation salutes and acknowledges salutes. 24
31 When wearing headgear with a visor (with or without glasses), on the command of execution ARMS, raise the right hand sharply, fingers and thumb extended and joined, palm facing down, and place the tip of the right forefinger on the rim of the visor slightly to the right of the right eye. The outer edge of the hand is barely canted downward so that neither the back of the hand nor the palm is clearly visible from the front. The hand and wrist are straight, the elbow inclined slightly forward, and the upper arm horizontal. When wearing headgear without a visor (or uncovered) and not wearing glasses, execute the Hand Salute in the same manner as previously described, except touch the tip of the right forefinger to the forehead near and slightly to the right of the right eyebrow. When wearing headgear without a visor (or uncovered) and wearing glasses, execute the Hand Salute in the same manner as previously described, except touch the tip of the right forefinger to that point on the glasses where the temple piece of the frame meets the right edge of the right brow. Order Arms Order Arms from the Hand Salute is a one-count movement. The command is Order, ARMS. On the command of execution ARMS, return the hand sharply to the side, resuming the Position of Attention. When reporting or rendering courtesy to an individual, turn the head and eyes toward the person addressed and simultaneously salute. In this situation, the actions are executed without command. The Salute is initiated by the subordinate at the appropriate time (six paces) and terminated upon acknowledgment. Rendering customs and courtesies to NCOs and Warrant Officers When addressing an NCO you will need to be in the position of Parade Rest. The NCO may direct you to At ease, Stand at Ease; or Rest. When walking with someone of higher rank, walk on the left side of the individual. Always greet individuals with the greeting of the day. Be respectful at all times. Warrant Officers are treated in the same respect as Officers. Rendering Honor to the Flag The flag of the U.S. is the symbol of our nation. The union, white stars on a field of blue, is the honor point of the flag. The union of the flag and the flag itself, when in company with other flags, are always given the honor position, which is on the right. The flag of the U.S. is displayed outdoors at all Army installations. The flag is displayed daily from reveille to retreat. If illuminated, it may be displayed at night during special events or on special occasions deemed appropriate by the commander. When the flag is being raised in the morning or lowered in the evening, stand at attention on the first note of Reveille or To the Colors. Colors refer to the flag of the U.S. and can include the unit flag. Give the required salute. You normally face the flag when saluting, unless duty requires you to face in some other direction. At the conclusion of the ceremony, resume your regular duties. The flag, when flown at half-staff, is hoisted to the peak/top of the flagpole and then lowered to the half-staff position. At the end of the day, the flag is hoisted to the peak before lowered. Half-staff means lowering the flag to one-half the distance between the top and bottom of the staff. Whenever Reveille is played, and you are not in formation and not in a vehicle, come to attention at the first note, face the flag, and give the required salute. If no flag is near, face the music and salute. If you are in formation, 25
32 salute only on the order Present arms. If you are in civilian clothing, stand at attention and place your right hand over your heart. Courtesies The following rules will help you conduct yourself appropriately in the presence of officers and those senior in grade: When talking to an Officer or Warrant Officer, stand at attention unless given the order At ease. When you are dismissed, or when the officer departs, come to attention and salute. When an officer enters a room, the first Cadet to recognize the officer calls personnel in the room to attention but does not salute. When a Cadet reports indoors render a salute to the officer. When accompanying a senior, walk on his/her left. When an officer enters a dining facility, unless he directs otherwise or a more senior officer is already present, the diners will be given the order At ease by the first person who sees the officer. You will remain seated at ease and will continue eating unless the officer directs otherwise. If you are directly addressed, you should rise to attention when seated in a chair. If you are seated on a bench, stop eating and sit at attention until the conversation ends. Note: The officer or NCO may give the directive Carry on. This means the Cadet or Cadets should continue with whatever they were doing previously. This same directive is used in many other situations outside of formation, such as in the barracks and break areas. When outdoors and approached by an NCO, you should stand (when seated) and greet the NCO by saying, Good morning, sergeant, Good afternoon, sergeant, or Good evening, sergeant (last name, if known). While going through CST, you will address all Drill Sergeants as Drill Sergeant. When you report to an officer and you are outdoors, approach the officer to whom you are reporting and stop about two steps from him, assume the position of attention. Give the proper salute and say, for example, Sir/Ma am, Cadet Smith reports. If you are indoors, use the same procedures as above, except remove your headgear before reporting Bugle Calls Bugle calls are the musical signals that announce scheduled and certain non-scheduled events on an Army installation. Scheduled calls are prescribed by the installation commander. According to Army customs, bugle calls traditionally signal troops for everything from meal times and recall formations, to rendering honors to the nation. Bugle calls normally sound in accordance with the major calls of the day-reveille, Retreat, and Taps. Reveille The call signals the troops to awaken for morning roll call. Most often heard at physical training, it is used to accompany the raising of the National Colors. If outdoors at the first sound of Reveille, you should come to the position of attention and salute, facing the flag or the sound of the music. If not in uniform, come to attention and place your right hand over your heart. Retreat The call signals the end of the duty day and lowering of the National Colors. If alone, you should come to attention in the direction of the music or flag. Then, salute when you hear the first note of music after the cannon sounds. If not in uniform, come to attention and place your right hand over your heart. Taps The call signals that unauthorized lights are to be extinguished. It is the last call of the day. The call is also sounded at the completion of a military funeral ceremony. You should come to attention and salute until the music completes. If not in uniform, come to attention and place your right hand over your heart. 26


33 6-4. Drill and Ceremonies Many drill procedures used by the U.S. Army today were developed during the Revolutionary War. The purpose of the drill then was to instill discipline in American Cadets. As these Cadets mastered the art of the drill, they began to work as a team and develop a sense of pride in themselves and in their unit. In today s Army, the same objectives teamwork, confidence, pride, alertness, attention to detail, esprit de corps, and discipline are accomplished by drill. A drill consists of a series of movements by which a unit or individuals are moved in an orderly, uniform manner from one formation or place to another. Units vary in size, but in CST, you will ordinarily be part of a squad, platoon, company or Regiment. You will need to know the following drill terms: Element is an individual, squad, section, platoon, company, or larger unit formed as part of the next higher unit. Formation is an arrangement of the unit s elements in a prescribed manner such as a line formation in which the elements are side-by-side, or a column formation in which the elements are one behind the other. In a platoon column, the members of each squad are one behind the other with the squads abreast. Front is a space from one side to the other side of a formation, and includes the right and left elements. Depth is a space from the front to the rear of a formation, including the front and rear elements. Distance is the space between elements that are one behind the other. The distance between individuals is an arm s length, plus 6 inches, or approximately 36 inches measured from the chest of one Cadet to the back of the Cadet immediately to his front. Interval is the space between side-by-side elements. 27
34 Rank is a line that is only one element in depth. File is a column that has a front of one element. Guide is the person responsible for maintaining the prescribed direction and rate of march. Post is the correct place for an officer or NCO to stand in a prescribed formation. Head is a column s leading element. Base is the element around which a movement is planned or regulated. Cadence is a uniform rhythm or number of steps or counts per minute. Quick Time is a cadence of 120 counts (steps per minute). Double Time is a cadence of 180 counts (steps per minute). Drill commands are oral orders given by your commander or leader, usually in two parts. The preparatory command states the movement to be carried out and gets you ready to execute the order. The command of execution tells when the movement is to be carried out. In the command Forward, march, the preparatory command is Forward, the command of execution is March. In some commands, the preparatory command and the command of execution are combined. For example, Fall in, at ease, and Rest. These commands are given without inflection and at a uniformly high pitch and loudness comparable to that of a normal command of execution. If you are in a group of three or more, marching is required when moving from one location to another. POSITION OF ATTENTION Two commands can be used to put personnel at the Position of Attention: FALL IN is used to assemble a formation or return it to its original configuration. The two-part command for Attention is used for Cadets at a rest position. Assume the Position of Attention on the command FALL IN or the command Squad (Platoon), ATTENTION. a. To assume this position, bring the heels together sharply on line, with the toes pointing out equally, forming a 45-degree angle. Rest the weight of the body evenly on the heels and balls of both feet. Keep the legs straight without locking the knees. Hold the body erect with the hips level, chest lifted and arched, and the shoulders square. b. Keep the head erect and face straight to the front with the chin drawn in so that alignment of the head and neck is vertical. c. Let the arms hang straight without stiffness. Curl the fingers so that the tips of the thumbs are alongside and touching the first joint of the forefingers. Keep the thumbs straight along the seams of the trouser leg with the first joint of the fingers touching the trousers d. Remain silent and do not move unless otherwise directed. 28


35 REST POSITIONS AT THE HALT Any of the positions of rest may be commanded and executed from the Position of Attention. a. Parade Rest. Parade Rest is commanded only from the Position of Attention. The command for this movement is Parade, REST. (1) On the command of execution REST, move the left foot about 10 inches to the left of the right foot. Keep the legs straight without locking the knees, resting the weight of the body equally on the heels and balls of the feet. (2) Simultaneously, place the hands at the small of the back and centered on the belt. Keep the fingers of both hands extended and joined, interlocking the thumbs so that the palm of the right hand is outward. (3) Keep the head and eyes as in the Position of Attention. Remain silent and do not move unless otherwise directed. Stand at Ease, At Ease, and Rest may be executed from this position. 29


36 b. Stand At Ease. The command for this movement is Stand at, EASE. On the command of execution EASE, execute Parade Rest, but turn the head and eyes directly toward the person in charge of the formation. At Ease or Rest may be executed from this position. c. At Ease. The command for this movement is AT EASE. On the command AT EASE, the Soldier may move; however, he must remain standing and silent with his right foot in place. The Soldier may relax his arms with the thumbs interlaced. Rest may be executed from this position. d. Rest. The command for this movement is REST. On the command REST, the Soldier may move, talk, smoke, or drink unless otherwise directed. He must remain standing with his right foot in place. AT EASE must be executed from this position to allow Cadets to secure canteens, other equipment, and so forth. NOTE: On the preparatory command for Attention, immediately assume Parade Rest when at the position of Stand at Ease, At Ease, or Rest. If, for some reason, a subordinate element is already at attention, the members of the element remain so and do not execute parade rest on the preparatory command, nor does the subordinate leader give a supplementary command. FACING AT THE HALT Five facing movements can be executed from the Position of Attention: Left (Right), FACE, Half Left (Half Right), FACE, and About, FACE. 30
. a. Facing to the Flank is a two-count movement. The command is Left (Right), FACE.")
 On count two, place the right foot beside the left foot, resuming the Position of Attention.")
 On the command of execution FACE, move the toe of the right foot to a point touching the marching surface about half the length of the foot to the rear and slightly to the left of the left heel.")
37 NOTE: Half Left (Half Right), FACE should only be used in situations when a 90-degree facing movement would not face an element in the desired direction (for example, for a stationary element to face the direction of the flag to render honors [reveille or retreat]). a. Facing to the Flank is a two-count movement. The command is Left (Right), FACE. (1) On the command of execution FACE, slightly raise the right heel and left toe, and turn 90 degrees to the left on the left heel, assisted by a slight pressure on the ball of the right foot. Keep the left leg straight without stiffness and allow the right leg to bend naturally. (2) On count two, place the right foot beside the left foot, resuming the Position of Attention. Arms remain at the sides, as in the Position of Attention, throughout this movement. b. Facing to the Rear is a two-count movement. The command is About, FACE. (1) On the command of execution FACE, move the toe of the right foot to a point touching the marching surface about half the length of the foot to the rear and slightly to the left of the left heel. Rest most of the weight of the body on the heel of the left foot and allow the right knee to bend naturally. (2) On count two, turn to the right 180 degrees on the left heel and ball of the right foot, resuming the Position of Attention. Arms remain at the sides, as in the Position of Attention, throughout this movement. 31

38 Chapter 7 Physical Readiness The more you sweat in peace, the less you bleed in war. General Norman Schwarzkopf As a Cadet, you are required to maintain a high level of personal readiness and resilience. Optimal personal readiness in building and maintaining the Cadet Athlete requires you to get sufficient sleep, maintain physical fitness and strength, and fuel your body with the right diet. These three key attributes (sleep, activity, and nutrition) are often described as the Performance Triad. The Performance Triad along with regular hygiene and resilience skills ensure you are optimally prepared to perform at the elite level Army Physical Fitness Uniform (APFU) The components of the APFU are: 1. Jacket, running, black and gold. 2. Pants, running, black. 3. Trunks, running, black, moisture-wicking. 4. T-shirt, black, short sleeve, moisture-wicking. 5. T-shirt, black, long sleeve, moisture-wicking. 6. Cap, knit, black The only insignia authorized for wear on the APFU is the Physical Fitness Badge. When the physical fitness badge is worn, it is sewn on the upper left front side of the APFU T-shirt. On the APFU running jacket, the insignia is sewn centered 1 2 inch above the word Army. You are authorized to wear commercially purchased black spandex shorts under the APFU trunks. The length of the shorts must end above the knee or higher. The commercial shorts must be plain, with no logos, patterns, or obtrusive markings. Cadets are not required to buy the spandex shorts. This is an optional purchase. Only pregnant Cadets are authorized to wear the APFU shirt outside of the trunks. Commanders may authorize the wear of commercial running shoes, calf-length or ankle-length plain white/black socks with no logos, gloves, reflective belts or vests, long underwear, and other items appropriate to the weather conditions and type of activity. If Cadets wear long underwear or other similar items, they must conceal them from view when wearing the running jacket and pants of the APFU. 32

39 7-2. Army physical fitness test (APFT) References: FM 7-22, Army Physical Readiness Training DA Form 705, Army Physical Fitness Test Scorecard The intent of the APFT is to provide an assessment of your physical readiness. Physical Fitness testing is designed to ensure that every Cadet is maintaining a high level of physical performance, regardless of MOS or duty assignment. The APFT provides a measure of upper and lower body muscular endurance. It is a performance test that indicates a Cadet s ability to perform physically and handle his or her own body weight. APFT standards are adjusted for age and physiological differences between male and female. The APFT consists of three events: 1. Push-ups 2. Sit-ups 3. 2-mile run Cadets must attain a score of at least 60 points on each event and an overall score of at least 180 points to graduate. The maximum score a Cadet can attain on the APFT is 300 points. This should be your goal. 33
40 Chapter 8 Health and Safety Physical fitness is not only one of the most important keys to a healthy body, it is the basis of dynamic and creative intellectual activity. President John F. Kennedy 8-1. Nutrition As a cadet, you are expected to achieve and maintain a high level of fitness. Good nutrition plays an important role in your daily life. A well-balanced and nutritious diet is part of the foundation of maintaining peak performance and good health. Maintaining healthy eating habits will help you: Improve your performance and quality of life as you age. Reduce your risk of heart disease, cancer, osteoporosis, and other debilitating diseases. Protect your immune system. It s never too late to practice healthy eating. Aim to improve your eating habits by controlling your portions, choosing nutrient-dense foods, planning and preparing meals ahead of time, and snacking smart. Fueling with the right amount of Carbohydrate, Protein, and Healthy Fats promotes energy, endurance, stamina, and muscle growth. Benefits of proper fueling include: Maintaining a healthy weight. Decreased post-exercise muscle soreness. Stronger and healthier muscles. Plan your meals like you plan your workouts! A plan for eating and hydrating before, during, and after physical training is essential. Pre-Workout: Don t start your workout on an empty tank! Eat a snack or small meal 2-4 hours before exercise. Drink 2-3 cups of water approximately 2-3 hours prior to exercise. Early morning workouts can be fueled with 8-16 ounces of sports beverage, piece of fruit, toast, or other light snack. During: Finish the workout as hard as you started! Most people don t need anything other than water during exercise lasting less than 1 hour. For sessions lasting minutes or more: Starting at the 20-minute mark, consume grams of carbohydrate (fruit or sports drink). Use a sports drink (containing sodium and carbohydrate) as your fuel and fluid. Energy drinks are not the same as sports drinks and should never be used for hydration. Post-Workout: Don t waste your workout! Timing is crucial for optimum growth and recovery from your workout. Refuel and rehydrate within minutes after strenuous activity. Eat a mixed fuel of carbohydrate and protein. 34

 and the only fuel source for your brain (helps you focus).")
41 Great post-activity muscle recovery and energy boosters include: low-fat chocolate milk, 100% fruit juice (8 oz), whole-grain bread with peanut butter, bananas, low-fat yogurt plus fruit, or a commercial protein-containing sports bar. You can t out-exercise a poor diet. Follow this guidance EVERY MEAL, EVERY DAY! Fruits and vegetables are loaded with carbohydrates, natural antioxidants, vitamins, and minerals that enhance recovery and support your immune system. Carbohydrates are the primary fuel source for your muscles (especially after high-intensity activities) and the only fuel source for your brain (helps you focus). Whole-grain sources have more fiber and vitamins essential for energy metabolism. Sources: whole-grain breads, cereal and pastas, rice, oatmeal, legumes (beans), and fruit. Lean proteins provide the amino acids your muscles need to grow, repair, and recover. Sources: skinless poultry, fish, lean beef, and pork; low-fat milk and yogurt; legumes (beans), eggs, and tofu. Nuts and seeds are also a good protein (and healthy fat) source. Healthy Fats Unsaturated fats, especially omega fatty acids, can be healthy when eaten in small amounts. Sources: olives, salmon, walnuts, almonds, flax, and avocados. Your plate should be proportioned like the plate below EVERY MEAL, EVERY DAY! Portion sizes and snacks will vary based on your energy needs and training goals. In addition to nutrition, you should also be educated on supplements. Military and clinical studies of basic combat training (BCT) and collegiate athletic programs show that 25% of females have poor iron status at the beginning of training, increasing to 50% at the end of training. Due to the decline in iron status during training, most females in an IET environment would benefit from a multivitamin with iron (MVI), especially as normal iron status is paramount for the sustainment of normal physical and cognitive performance. 35

42 Although the Army is taking steps to improve the overall health and attrition rates during training by introducing supplements, many Soldiers have taken supplements without thinking of the health consequences, or if they are banned from use. Many dietary supplements on the market are tainted and unsafe. The most common tainted dietary supplements are those intended for body building, weight loss, diabetes, and sexual enhancement. Many think supplements may be superior to natural foods, but in fact, most ingredients in supplements come from food, whereas others are synthetic. Dietary supplements cannot offset the unfavorable effects of poor food choices. Before taking a dietary supplement, ask yourself: What is in it? Does it work? Is it safe? Do I really need it? Has it been third-party tested? Remember: Talk to a health care provider or your local Military Treatment Facility s Registered Dietitian. Read the label to see if the product is safe. The Food and Drug Administration (FDA) does not test or approve dietary supplements before they are marketed to the public. Many products on the market are dangerous to your health and physical activity may increase the risk. If you decide to use a supplement, BE SMART: Use well-known brands. Take no more than the recommended serving size. Look for evidence of third-party testing on the label, which ensures: What s on the label is inside the bottle- and nothing more. The quality of manufacturing. The Department of Defense (DoD) does not maintain a list of dietary supplements or supplement ingredients that are either allowed or banned. If the FDA or the Drug Enforcement Administration (DEA) has not banned or declared an ingredient or dietary supplement product illegal, then DoD does not consider it banned or illegal. Substances banned for use by U.S. military service members include: Anything on the DEA s controlled substance list (spice, marijuana, synthetic cannabinoids, amphetamines, mood-altering substances, anabolic steroids); Any substance the FDA has declared illegal or not allowed for use in dietary supplements (such as ephedra /ephedrine alkaloids, DMAA, DMBA, BMPEA); Any prescription drug without a current prescription written specifically for you.however, the FDA has found that many dietary supplements especially weight-loss, bodybuilding, and sexual-enhancement products contain undeclared drug ingredients, which could be potentially harmful and/or produce unwanted urinalysis test results.the DEA s controlled substance list can be found at: Supplements tagged as High Risk can be found at: 36
43 8-2. Sleep The Performance Triad, composed of Sleep, Activity, and Nutrition will be foundational for Army Medicine s transformation to a System for Health. Health for the Army means we have Soldiers who are fit, ready and resilient. About one-third of life is spent working, another third with family and friends and another third sleeping. Sleep is a basic biological need for proper brain and body functioning and a critical element for Soldier performance. Soldiers need a minimum of 7 hours of high quality sleep to sustain operational readiness. Sleep is vital for health, performance, and well-being and the better the sleep, the greater its benefits. This is why proper sleep hygiene practices (i.e. that promote optimal sleep duration and quality) are important for all. Top 10 Sleep Habits for Adults Create a quiet, dark, comfortable sleeping environment. Use the bedroom only for sleep and sex. Stop caffeine at least 6 hours before bedtime. Don t drink alcohol before bed. Get your exercise in by early evening. Don t go to bed hungry. Maintain a consistent regular routine that starts with a fixed wake-up time. Get out of bed if you can t sleep. Nap wisely (preferably in the late morning/early afternoon, for minutes). Move the bedroom clock to where you cannot see it. *These sleep hygiene habits are especially critical for those experiencing sleep problems Activity Physical activity is more than just exercise or working out - it s living an active lifestyle. Whether it s walking the dog, doing yard work, or playing with your kids, regular movement throughout the day inspires positive health outcomes over time. How does physical activity improve health? Lowers risk of some chronic diseases and conditions such as type 2 diabetes, high blood pressure, stroke, and cancer (e.g. breast, colon). Aids in weight loss and prevents weight gain. Helps manage stress and may reduce depression. Strengthens bones, muscles, and joints. Boosts confidence and self-esteem. How much physical activity do I need? To receive positive health outcomes strive for at least: 150 minutes of moderate-intensity aerobic activity per week. 2 days of muscle strengthening activities (e.g. weight/resistance band training, calisthenics, yoga). 10,000 steps during your everyday routine. Save time by bumping up the intensity. Do 75 minutes of vigorous-intensity activities per week (e.g. jogging, swimming laps, or hiking uphill). 37
44 How can I build activity into my day? Divide it up your way. 150 minutes is also: 2 hours & 30 minutes per week OR 30 minutes a day for 5 days OR 10 minutes of activity 3 times a day for 5 days. Pick activities you enjoy. Moderate-intensity activities include: brisk walking, doubles tennis, golf, and leisure biking. Invite family, friends, and fellow Soldiers to join you. Take a fitness class, join a recreation league, signup for a 5K run/walk, or start a walking group in your neighborhood. Save time by bumping up the intensity. Do 75 minutes of vigorous-intensity activities 2 times per week (e.g. running, swimming laps, basketball, or hiking uphill). Be a good role model. Your health is critical to the wellbeing of your family. The more active you are, the more likely your kids will follow suit. Children and adolescents (ages 6-17) need at least: 60 minutes of moderate to vigorous physical activity each day. 11,000 steps for girls and 13,000 steps for boys each day. 3 days of muscle strengthening physical activity per week. Try to avoid sitting for long periods of time. Prolonged sitting increases the risk of blood clots, obesity, and heart disease. Move at least 10 minutes of every hour. You can make small changes in your daily routine to increase your physical activity. The American College of Sports Medicine suggests taking the stairs whenever you can, walking to a co-worker s desk instead of ing or calling him/her, picking up a new active hobby (ex. Cycling), standing or moving when talking on your cell phone just to name a few. Don t let chronic conditions prevent you from being active. Even low intensity activity is good for your health. Remaining physically active can help you maintain your physique, mobility, flexibility, and coordination. Talk to your health care provider about what activities would suit you best Hygiene In addition to Army training, personal hygiene plays a crucial role in your overall physical readiness as a strong, productive cadet. Personal hygiene is defined as the measures each individual must employ to keep in good physical condition and the precautions he must take to protect himself/herself from disease. There are numerous health concerns that can arise if you do not conduct proper personal hygiene at home and in field environments. Hazard of communicable diseases Communicable diseases are caused by specific infectious organisms, such as viruses and bacteria being transmitted from one person to another. The person who is infected may feel and look sick, or might carry the illness without any signs or symptoms. Communicable diseases can rapidly degrade the medical readiness of military units and their ability to carry out the mission. They also have the potential to cause significant suffering and the ability to overwhelm the military health care system. 38
45 You received vaccinations to protect you against the increased risk of these infections when you entered the Army, and you will continue to receive vaccinations periodically and before traveling to foreign areas. There are many communicable illnesses that do not have vaccines, such as the common cold or hepatitis C and D to name a few. Resistance to illness Vaccines do part of the job; the rest is up to you. Most of the time, your immune system protects you from illnesses and infection. Through a series of steps called immune response, the immune system attacks organisms and substances that invade our system and cause diseases. Protection continues through your personal actions like, keeping yourself and the environment clean; wearing clean uniforms that are appropriate for the season; and avoiding contact with persons who are ill. Coughing into your arm and frequently washing your hands are two examples of the measures you can take to prevent the spread of and receiving of germs. Immediate hazards to your health Do not take chances with your health, if in doubt seek medical attention. Injuries that pose a threat to your health or life are: Any eye injury. Any human or animal bite that breaks the skin. Allergic reaction to an insect bite, chemicals, or medications. Bleeding that cannot be stopped. Burns, including severe sunburns. Feeling very hot and/or confused after being out in the heat. Exposure to cold temperatures and you think you may have a cold injury (Hypothermia can happen during summer months). Other symptoms of illness that can threaten your health or life include: Tightness, pressure, or pain in your chest that spreads to your neck, jaw, arm or back. Shortness of breath, or wheezing while resting. Difficulty breathing, or the feeling of choking. Coughing up blood. Difficulty speaking, swallowing, or opening your mouth. Stiff neck with fever. Sudden loss of vision. Very bad pain anywhere on your body. Weakness and dizziness. Blood in urine or brown urine. Vomiting up blood or what looks like coffee grounds. Blood in your stool or black, tar-like stools. You feel like you might hurt yourself or others. Hip, knee, shoulder, and elbow injuries. Painful teeth or swelling in your mouth or jaw. Blisters on feet, hands or other parts of the body. Toenails that grown into the skin (Ingrown toenail). Body rashes with/without itching. Flea/tick bites. *If you experience any injuries or symptoms of illness, report them to your Drill Sergeant/Cadre immediately to get medical care. 39
46 Bathe / shower daily Regularly bathing with soap and water is important for both cleanliness and personal appearance. Bathing prevents hygiene-related diseases such as scabies, ringworm, athlete s foot, skin infections, and pink eye. You should especially wash your hands, face, ears, armpits, groin, and feet. In addition to washing your skin, regularly you should wash your hair at least twice a week, shave daily, and avoid sharing combs or razors with others. *Most Soldiers take baby wipes with them out to the field. Baby wipes are the next best thing to a shower for personal hygiene. Wash hands regularly Normally your immune system protects you against invasion by bacteria, viruses, and parasites; however, if your hands become contaminated with organisms and you put them up to your nose, mouth, or eyes diseases and germs can invade your body causing infection. Many aspects of basic camp can make you more vulnerable to respiratory illnesses, including close contact with other cadets. The physical and psychological stresses of military training can make you more vulnerable to illness. In addition, your immune system may not be ready to withstand the new organisms you are exposed to when first brought together as a group. Almost 90 percent of initial entry Soldiers get symptoms of respiratory illness at some point during basic combat training. In most cases, these illnesses are mild and trainees are able to continue training, but sometimes they progress to worse infections like pneumonia or meningitis. Washing your hands with soap and water is the most effective way to prevent the spread of bacteria and viruses which are a major cause of food borne diseases and other illnesses. Although the use of hand sanitizers is effective for killing most of these harmful organisms on hands, they are ineffective on hands that are heavily soiled with dirt, grease, and other debris. Therefore hand sanitizer should not be used in place of hand washing, rather as a supplement to or a temporary alternative when hand washing is not available. Wash or sanitize your hands every time: After using the latrine or restroom. Before eating or handling food. After sneezing or blowing your nose. It is important to practice good hygiene habits when you are in basic camp, because it will become more difficult to wash your hands and bathe regularly when you are in the field. Taking care of your feet One of the most important things cadets can do is take care of his/her feet. Moving and walking, sometimes running long distances is what we do in the profession, so foot care is of the utmost importance. Some measures that you can take during your field training exercise are: Periodically between missions and at night, remove boots to let feet and boots air dry and inspect feet for blisters, ingrown toenails, athlete s foot, and any other abnormalities. Wipe sweaty feet with baby wipes and between toes, let air dry and apply foot powder in clean socks. Wear appropriate boots for weather and correct size, keeping in mind that your feet will naturally swell from the long ruck marches (Your toes should have wiggle room). Address any issues with toenails immediately (Ingrown toenails). Your feet should stay clean and dry as much as possible. Do this and you will save yourself a lot of time and pain in the near future. 40
, cold injuries, insect bites, acute trauma (pressure), or repeated rubbing (friction) of the skin.")
47 Blister Prevention Blisters are fluid-filled sacks of skin that can be caused by burns (e.g., heat, electrical, chemical), cold injuries, insect bites, acute trauma (pressure), or repeated rubbing (friction) of the skin. Friction blisters are the most common type of blister and one of the most common injuries in the military. They typically form on the toes, feet, and ankles, but can also occur on the hands or other places where there is repeated rubbing (Such as on the torso from the straps of a heavy backpack) Friction Blisters form when an object (such as a glove or sock/shoe) is repeatedly moved across the skin with enough force to cause the layer of skin to release heat. The heat causes redness and a separation (or cleft ) between the outermost layer of the skin and the rest of the epidermis. The cleft fills with serum-like fluid causing a raised area of the skin. Though often only causing minor discomfort, blisters can become severe enough to temporarily restrict a person s physical activity including training and job duties. In some cases, friction blisters have developed into serious complications and infections requiring antibiotics and medical treatment. As one of the most common injuries among active duty military, blisters present a notable adverse impact to military readiness. Activities such as marching and running are the most common causes of blisters in the military. There are also individual risk factors that appear to increase both the likelihood and the severity of a blister. The more risk factors you have, the higher your chance of developing a blister. Potential risk factors identified in scientific studies are listed below. Wearing cotton socks Having moist sweaty skin Having no arch or flat feet Being of an ethnicity other than African American/Black Tobacco use (includes smokeless) Caring for a blister Wash with mild soap and water and keep skin dry and clean Cover with bandage or second skin to prevent from opening DO NOT purposely open a blister If blister opens, treat it as you would any open wound Always leave the top skin of an drained blister, as pulling off the top layer of skin can damage the sensitive layer beneath and making you more vulnerable for infection. Ingrown toenails Ingrown toenails are a concern that you should be aware of as they can become very painful and require medical attention if not immediately tended to. You can identify this early by paying attention to tenderness, redness, and swelling of skin around the corner of the toenail on one of the big toes. Ingrown toenails are caused by improper cutting of the toenails, tight fitting boots, or a combination of the two. As noted earlier your feet will swell on ruck marches increasing friction. This combined with tight boots can force the cuticle and your nail to be smashed together and improper cutting of the nail compounds the issue. 41


48 Below are steps to avoid ingrown toenails: Trim the nail straight across. Rounding the nail s corners or cutting the sides at an angle can lead the corners to grow toward your skin and become ingrown Eliminate jagged edges that might snag and tear as the nail grows Wear appropriate boots that will give your feet room to expand Athlete s foot Athlete s foot is caused by a fungus that lives in damp, warm, and dark areas like shower rooms, rubber boots, and old running shoes. Athlete s foot usually looks like little blisters between the toes. These can pop, causing itching and little sharp pains. The skin might also crack or look scaly. The fungus that causes athlete s foot can cause an infection any place on your body that is often damp, like the groin area, armpits, and under women s breasts. If you think you have athlete s foot, use this symptom evaluation chart. Use self-care measures: Wash feet every morning and evening Dry feet well, especially between toes Change your socks and shoes at least one extra time during the day 42
49 Sprinkle foot powder in boots when they are not being worn Use an over-the-counter anti-fungal cream as directed To prevent fungal infections, wear shower shoes when using common shower areas *Go to sick call if the symptoms have not cleared up in 7 to 10 days. Follow the chart if you get any of the symptoms listed. Dental health and readiness Brush and floss your teeth. Keeping your mouth healthy maintains your dental readiness, and ensures that you won t suffer from pain, infection, or inability to eat high-performance foods. Poor oral health takes more cadets out of the fight than the enemy does. Wisdom teeth and gum disease cause problems, but most dental emergencies are caused by tooth decay or its complications. Tooth decay is usually caused by bacteria (germs) that feed on starchy or sugary snacks and beverages, and by acids that wear away at the surface of the teeth. Soda, juice, sweet tea, sports drinks, and energy drinks all contain sugar and acids that can damage teeth. Saliva is critical for protecting your teeth from decay by neutralizing acids, hardening teeth, and fighting germs. Stressful training or operations can decrease saliva flow, leaving you vulnerable to decay. Prevent dental problems in two ways: Watch what you put into your mouth and clean your mouth every day. Follow the guidelines in the nutrition section earlier, and you will contribute to a healthier mouth. Your teeth and gums need the same water intake, calcium, vitamins and minerals, and protein that the rest of your body does, as well as protection from sugars acid content, and simple starches. In addition to a healthy diet: If you drink sugary drinks, make sure they are cold and minimize contact with your teeth. You can use a straw that reaches to the back of your tongue, or just chug the drink down all at once. Rinse your mouth with plain water after drinking sugary drinks. If you drink juice, choose juice that has calcium added to minimize acid damage. Use xylitol-sweetened gum or mints for 5-10 minutes after meals and snacks to fight cavities. Avoid tobacco. Tobacco can cause gum disease and oral cancer. Use lip balm with sunscreen during sun exposure to prevent lip cancer. Clean your mouth every day: Brush 2-3 times a day, every day, with fluoride toothpaste to remove food particles and harmful bacteria from your teeth. Fluoride helps repair early stages of tooth decay. Brush before going to sleep to provide greater protection for your teeth. Use a soft or ultra-soft toothbrush that is small enough to fit around your back teeth. Brush your teeth, areas around fillings, and crowns or bridges. Brush your tongue and the roof of your mouth to remove germs that cause tooth decay and bad breath. If you have an appliance such as orthodontic retainer or partial denture, remove it before brushing your teeth. Brush all surfaces of the appliance also. Do not rinse your mouth after brushing, just spit several times to remove excess toothpaste. Do not eat or drink anything for at least 30 minutes after brushing so the fluoride will stay on your teeth longer and give you better protection. 43

50 If you cannot brush Swish with water after eating or drinking. Wipe your teeth with a clean cloth wrapped around your finger. Rub toothpaste on the surface of your teeth with your finger. Floss once a day. Flossing removes food and bacteria between your teeth, where a simple toothbrush cannot reach. Use 18 inches of floss. Wrap the ends of the floss around your middle finger and use your index finger to guide the floss. Insert the floss between your teeth then pull gently side to side cautiously not to saw your gums. Use a different part of the floss for each space. Gently move the floss up and down against the tooth in back, then tooth in front. Wrap the floss around the teeth as your moving it up and down. Your gums may bleed at first when flossing daily. If bleeding continue after a week or two of flossing, see your dentist. Remember- YOU control whether or not you have cavities! Whenever a dentist tells you that there is an issue at your annual exam, get it treated as soon as possible. Note: Females should be extra vigilant about brushing with fluoride toothpaste 2-3 times a day, to prevent cavities and bleeding gums. This is because females generally produce less saliva than males, which can leave them more vulnerable to tooth decay. Fluctuations in female hormones can also negatively affect oral health. Hormones and oral contraceptives can increase bacteria levels in the mouth and cause changes in the blood vessels in the gums, leading to gingivitis, an inflammation of the gums and oral mucosa. Females who have gingivitis can experience an increase in symptoms during monthly hormonal fluctuations, resulting in tenderness, swelling, and bleeding when brushing. Smokers and females who use oral contraceptives are twice as likely to develop a dry socket after dental extraction. Hormone Fluctuations and stressful environments have been associated with development of painful mouth ulcers or canker sores. Nutritional Deficiencies (vitamins B1, B2, B6, B12, folate, C and iron, magnesium or zinc) may also increase your risk of developing mouth ulcers, so eating fruits and vegetables can help. Over-the-counter remedies are effective for the discomfort caused by small ulcers. Larger or more painful ulcers may interfere with a normal diet. A dentist can prescribe medicine to reduce pain and accelerate healing of larger ulcers. 44
51 Protect your hearing Survival on the battlefield could depend on your ability to hear. Hearing loss caused by noise is painless, progressive, permanent, and also preventable. To protect your hearing, insert your earplugs correctly whenever instructed to wear them. Do not lose your earplugs. If you lose your earplugs, notify your Drill Sergeant immediately. Wearing your earplugs properly will protect your hearing and overall effectiveness on and off the battlefield. Protect against the effects of heat and cold Protect against the effects of heat, cold, and insects. While you are in CST you may be exposed to extremes of heat, cold, and biting insects. To protect you from the heat, cold, and insects your cadre will ensure that you have the following things: Safeguards against over-stress from heat, or over-exposure to cold, especially in your first couple weeks. Water and nutritional meals. Although there may be beverages available to you, water will be the main source of hydration. Protective clothing, sunscreen, and insect repellent. Your uniform is factory treated with a conventional insect repellent for clothing. Instructions on what items of your uniform to wear and how much water you should be consuming daily. It may be cool in the morning, but DO NOT wear your cold weather gear if not instructed to do so, this will raise your risk level to become a heat casualty once you begin training. Reminders about symptoms and signs of hot and cold weather illnesses, to watch for in both yourself and your buddy. Questions about whether you have been ill, or are taking medication, in an effort to identify early that you may have an increased chance of heat and cold weather illness. Hyponatremia or (water intoxication) can mimic heat illness. Hyponatremia is caused by fluid overload (that is, drinking more than 12 quarts of water per day) and under-replacement of salt losses (not eating enough salted food). This condition can be deadly. It is important that Soldiers regulate their fluid intake and diets, and battle buddies and supervisors be generally aware of fellow Soldiers fluid and dietary intake. Salt replacement tablets are not authorized. Repeated vomiting is a sign that suggests over hydration in the presence of heat illness. Any Soldier who is vomiting repeatedly and possibly has a heat illness should be evacuated to emergency care. If hyponatremia is suspected external cooling measures should be continued. Oral rehydration should be held unless requested by the casualty. Note: In case of a severe hot weather illness, your cadre may remove the outer clothing and apply ice water-soaked sheets to the affected cadet. 45
52 Here are a few things to remember all the time: DO NOT eat the wild berries, touch any insects, or attempt to grab any wildlife animals that you may encounter. Eat all your meals and drink all the water and beverages provided to you. Food and fluids are needed to fuel your body s regulatory systems for both heat and cold. Make sure your uniform is clean, worn as instructed, and all buttons / fasteners are serviceable. Apply sunscreen and insect repellent to your face, neck, and hands as instructed. Let your cadre know if you aren t feeling well, taking medication, and/ or have unusual insect bite marks that look infected. Also let your cadre know if you think your buddy is not feeling well. Watch the amount and color of your urine as an indicator of whether you are drinking enough water and fluids. This is just as important in cold weather as it is in hot weather. If you purchase energy drinks, sports drinks, or supplements, during training, ensure that you continue eating all meals and drink all the water and beverages provided to you. 46
53 Chapter 9 Infantry Squad and Platoon Movement Techniques There are no secrets to success. It is the result of preparation, hard work, and learning from failure. General Colin Powell 9-1. DUTIES AND RESPONSIBILITIES This section describes the duties and responsibilities of personnel and habitual attachments in the Infantry rifle platoon and squad. Note. The duties and responsibilities of leadership and platoon members must be executed even in the absence of a particular leader to ensure mission accomplishment in accordance with the commander s intent. PLATOON LEADER The platoon leader leads his Cadets by personal example and is responsible for all the platoon does or fails to do, having complete authority over his subordinates. This centralized authority enables him to maintain unit discipline, unity, and to act decisively. He must be prepared to exercise initiative within his company commander s intent and without specific guidance for every situation. The platoon leader knows his Cadets, how to employ the platoon, its weapons, and its systems. Relying on the expertise of the platoon sergeant, the platoon leader regularly consults with him on all platoon matters. During operations, the platoon leader Leads the platoon in supporting the higher headquarters missions. He bases his actions on his assigned mission and intent and concept of his higher commanders. Conducts troop leading procedures. Maneuvers squads and fighting elements. Synchronizes the efforts of squads. Looks ahead to the next move of the platoon. Requests, controls, and synchronizes supporting assets. Employs mission command systems available to the squads and platoon Checks with squad leaders ensuring 360-degree, three-dimensional security is maintained. Checks with weapons squad leader controlling the emplacement of key weapon systems. Issues accurate and timely reports. Places himself where he is most needed to accomplish the mission. Assigns clear tasks and purposes to the squads. Understands the mission and commander s intent two levels up (company and battalion). Receives on-hand status reports from the platoon sergeant and squad leaders during planning. Coordinates and assists in the development of the obstacle plan. Oversees and is responsible for property management. The platoon leader works to develop and maintain situational understanding. This is a product of four elements. First, the platoon leader attempts to know what is happening in present terms of friendly, enemy, neutral, and terrain situations. Second, he knows the end state representing mission accomplishment. Third, he determines the critical actions and events occurring to move his unit from the present to the end state. Finally, he assesses the risk throughout. 47
54 PLATOON SERGEANT The platoon sergeant is the platoon s most experienced NCO and second-in-charge, accountable to the platoon leader for leadership, discipline, training, and welfare of the platoon s Cadets. He sets the example in everything. He assists the platoon leader by upholding standards and platoon discipline. His expertise includes tactical maneuver, employment of weapons and systems, sustainment, administration, security, accountability, protection warfighting functions, and Cadet care. As the second-incharge, the platoon sergeant assumes no formal duties except those prescribed by the platoon leader. However, the platoon sergeant traditionally Ensures the platoon is prepared to accomplish its mission, which includes supervising precombat checks and inspections. Updates platoon leader on appropriate reports and forwards reports needed by higher headquarters. Prepares to assume the role and responsibilities of the platoon leader. Takes charge of task-organized elements in the platoon during tactical operations, which may include but is not limited to, quartering parties, support elements in raids or attacks, and security patrols. Monitors the morale, discipline, and health of the platoon. Positions where best needed to help the engagement (either in the base of fire or with the assault element). Receives squad leaders administrative, logistical, and maintenance reports, and requests rations, water, fuel, and ammunition. Requests logistical support from the higher headquarters, and usually coordinates with the company s first sergeant or executive officer. Ensures Cadets maintain all equipment. Ensures ammunition and supplies are properly and evenly distributed after the platoon consolidates on the objective and while the platoon reorganizes. Manages the unit s combat load prior to operations, and monitors logistical status during operations. Establishes and operates the unit s casualty collection point (CCP). This includes directing the platoon medic and aid/litter teams in moving casualties, maintains platoon strength level information, consolidates and forwards the platoon s casualty reports, and receives and orients replacements. Employs the available digital mission command systems to the squads and platoon. Ensures Cadets distribute supplies according to the platoon leader s guidance and direction. Accounts for Cadets, equipment, and supplies. Coaches, counsels, and mentors Cadets. Upholds standards and platoon discipline. Understands the mission and commander s intent two levels up (company and battalion). SQUAD LEADER The squad leader directs team leaders and leads by personal example. He has authority over his subordinates and overall responsibility of those subordinates actions. Centralized authority enables him to act decisively while maintaining troop discipline and unity. Under the fluid conditions of close combat, the squad leader accomplishes assigned missions without constant guidance from higher headquarters. The squad leader is the senior Infantry Cadet in the squad and is responsible for everything the squad does or fails to do. He is responsible for the care of the squad s Cadets, weapons, and equipment, and leads the squad through two team leaders. During operations, the squad leader Is the subject matter expert on all battle and individual drills. Is the subject matter expert for the squad s organic weapons employment, and employment of supporting assets. Knows weapon effects, surface danger zones, and risk estimate distances for all munitions. 48
55 Uses control measures for direct fire, indirect fire, and tactical movement effectively. Controls the movement of the squad and its rate and distribution of fire (including call for and adjust fire). Fights the close fight by fire and movement with two fire teams and available supporting weapons. Selects the fire team s general location and temporary sector of fires in the defense. Communicates timely and accurate situation reports (SITREPs) and status reports including Size, activity, location, unit, time, and equipment (SALUTE) spot reports (SPOTREPs). Status to the platoon leader (including squad location and progress, enemy situation, enemy killed in action [KIA], and security posture). Status of ammunition, casualties, and equipment to the platoon sergeant. Employs digital mission command systems available to the squad and platoon. Operates in all environments to include the urban environment. Conducts troop leading procedures. Assumes duties as the platoon sergeant or platoon leader as required. Understands the mission and commander s intent two levels up (platoon and company). TEAM LEADER The team leader leads his team members by personal example and has authority over his subordinates and overall responsibility of their actions. Centralized authority enables him to maintain troop discipline and unity and to act decisively. Under the fluid conditions of close combat, he accomplishes assigned missions using initiative without needing constant guidance from higher headquarters. The team leader s position on the battlefield requires immediacy and accuracy in all of his actions and is a fighting leader who leads by example. He is responsible for all his team does or fails to do, and is responsible for caring of the team s Cadets, weapons, and equipment. During operations, the team leader Is the subject matter expert for all the team s weapons and duty positions and all squad battle drills. Leads his team in fire and movement. Controls the movement of his team and its rate and distribution of fire. Employs digital mission command systems available to the squad and platoon. Ensures security of the team s area of operations. Assists the squad leader as required. Is prepared to assume the duties of squad leader and platoon sergeant. Enforces field discipline and preventive medicine measures. Determines his team s combat load and manages its available classes of supply as required. Understands the mission two levels up (squad and platoon). When maneuvering the team, the team fights using one of three techniques. This includes: Individual movement techniques. This is the lowest level of movement. Buddy team fire and movement. Fire team fire and movement (maneuver). Determining a suitable technique is based on the effectiveness of the enemy s fire and available cover and concealment. The more effective the enemy s fire, the lower the level of movement. Because the team leader leads his team, he is able to make this assessment firsthand. Other leaders must be sensitive to his decision on movement. 49
56 9-2. Infantry squad fire team The Infantry squad fire team is designed to fight as a team and is the fighting element within the Infantry platoon. Infantry platoons and squads succeed or fail based on the actions of their fire teams. The Infantry squad fire team is designed as a self-contained team. The automatic rifleman provides an internal base of fire with the ability to deliver sustained suppressive small arms fire on area targets. The rifleman provides accurate, lethal direct fire for point targets. The grenadier provides high explosive (HE) indirect fires for both point and area targets. A team leader leads his team by example. 50

57 Infantry squad Currently, there is only one type of Infantry squad and its primary role is a maneuver or base-of-fire element. While the platoon s task organization may change, the Infantry squad s organization generally remains standard. The Infantry squad is a model for all tactical task organizations. It is comprised of two fire teams and a squad leader. It can establish a base of fire, providing security for another element, or conducting fire and movement with one team providing a base of fire, while the other team moves to the next position of advantage or onto an objective. The squad leader has two subordinate leaders to lead the two teams, freeing him to control the entire squad. Note. The combat load for an SLM is two per rifle squad. Either two M72-series light antitank (AT) weapon, M136-series antitank (AT4), M141 bunker defeat munitions (BDMs), or a combination of are normally issued to the rifleman Squad Formations The term squad formation refers to the relative locations of the fire teams. Squad formations include the squad column, the squad line, and squad file The squad leader adjusts the squad s formation as necessary while moving, primarily through the three movement techniques. The squad leader exercises mission command primarily through the two team leaders and moves in the formation where he can best achieve this. The squad leader is responsible for 360-degree security, for ensuring the team s sectors of fire are mutually supporting, and for being able to rapidly transition the squad upon contact. The squad leader designates one of the fire teams as the base fire team. The squad leader controls the squad s speed and direction of movement through the base fire team while the other team and attachments cue their movement off the base fire team. This concept applies when not in contact and when in contact with the enemy. 51
58 Weapons from the weapons squad (a medium machine gun or a Javelin) may be attached to the squad for movement or throughout the operation. These high value assets need to be positioned so they are protected and can be quickly brought into the engagement when required. Ideally, these weapons should be positioned so they are between the two fire teams. Squad column The squad column is the squad s main formation for movement unless preparing for an assault. It provides good dispersion both laterally and in-depth without sacrificing control. It also facilitates maneuver. The lead fire team is the base fire team. Squads can move in either a column wedge or a modified column wedge. Rough terrain, poor visibility, and other factors can require the squad to modify the wedge into a file for control purposes. As the terrain becomes less rugged and control becomes easier, the Cadets resume the original positions Squad Line The squad line provides maximum firepower to the front and is used to assault or as a pre-assault formation. To execute the squad line, the squad leader designates one of the teams as the base team. The other team cues its movement off the base team. This applies when the squad is in close combat as well. From this formation, the squad leader can employ any of the three movement techniques or conduct fire and movement. 52
59 Squad File The squad file has the same characteristics as the fire team file. In the event the terrain is severely restrictive or extremely close, teams within the squad file also may be in file. This disposition is not optimal for enemy contact, but provides the squad leader with maximum control. He increases control over the formation moving forward to the first or second position. Moving forward enables him to exert greater morale presence by leading from the front, and to be immediately available to make vital decisions. Moving a team leader to the last position can provide additional control over the rear of the formation Infantry Platoon The actual number of useful combinations of squad and fire team combat formations within the platoon combat formations is numerous, creating a significant training requirement for the unit. Add to the requirement to modify formations with movement techniques, immediate action drills, and other techniques, and it is readily apparent what the platoon leader needs a few simple methods. These methods should be detailed in the unit SOP Platoon Formations Platoon formations include the column, the line (squads on line or in column), the vee, the wedge, and the file. The leader should weigh these carefully to select the best formation based on his mission and on METT-TC analysis. Comparisons of the different formations are in table below. 53


60 54

61 Platoon Column In the platoon column formation, the lead squad is the base squad. It normally is used for traveling only. 55
62 Platoon Line, Squads on Line In the platoon line, squads on line formation, or when two or more platoons are attacking, the company commander chooses one of them as the base platoon. The base platoon s center squad is its base squad. When the platoon is not acting as the base platoon, its base squad is its flank squad nearest the base platoon. The weapons squad may move with the platoon or it can provide the support-by-fire position. This is the basic platoon assault formation. The platoon line with squads on line is the most difficult formation from which to make the transition to other formations. It may be used in the assault to maximize the firepower and shock effect of the platoon. This normally is done when there is no intervening terrain between the unit and the enemy when antitank systems is suppressed, or when the unit is exposed to artillery fire and must move rapidly. 56
63 Platoon Line, Squads in Column When two or more platoons are moving, the company commander chooses one of them as the base platoon. The base platoon s center squad is its base squad. When the platoon is not the base platoon, its base squad is its flank squad nearest the base platoon. The platoon line with squads in column formation is difficult to transition to other formations. 57
64 Platoon Vee This formation has two squads up front to provide a heavy volume of fire on contact. It also has one squad in the rear either overwatching or trailing the other squads. The platoon leader designates one of the front squads as the platoon s base squad. 58
65 Platoon Wedge This formation has two squads in the rear overwatching or trailing the lead squad. The lead squad is the base squad. The wedge formation Can be used with the traveling and traveling overwatch techniques. Allows rapid transition to bounding overwatch. 59
66 Platoon File This formation may be set up in several methods. One method is to have three-squad files follow one another using one of the movement techniques. Another method is to have a single platoon file with a front security element (point) and flank security elements. The distance between Cadets is less than normal to allow communication by passing messages up and down the file. The platoon file has the same characteristics as the fire team and squad files. It normally is used for traveling only. 60

67 9-6. INFANTRY PLATOON WEAPONS GUIDE 1. TYPES OF INFANTRY PLATOON WEAPONS There are five types: small arms; machine guns; grenade launchers; shoulder-launched munitions (SLM) i.e. AT4 / Close Combat Missile System (CCMS) i.e. Javelin; and mortars. 2. FIRE TEAM WEAPONS The rate of fire is the number of rounds fired in a minute by a particular weapon system. The leader dictates the rate of fire for each weapon system under his control. There are two factors that contribute to leader decisions about rates of fire: achieving fire superiority; and ammunition constraints. a. RIFLE Rifleman and Infantry leaders are currently armed with the M4 rifle. The M4 rifle is a direct fire weapon that fires ball and tracer 5.56-mm ammunition. The rifleman s primary role is to kill the enemy with precision fire. In this capacity, the rate of fire for the M4 rifle is not based on how fast the Cadet can pull the trigger. Rather, it is based on how fast the Cadet can accurately acquire and engage the enemy. The second role of the rifleman is to engage likely or suspected enemy targets with suppressive fire. b. M249 MACHINE GUN The automatic rifleman is currently armed with an M249 machine gun. The M249 is a direct-fire, low trajectory weapon that is primarily used to fire ball tracer 5.56-mm ammunition linked at area targets. The M249 also has the ability to fire unlinked 5.56-mm ammunition in 30-round magazines, but reliability is greatly reduced. Firing with a magazine should be limited to emergency situations. c. M240B MACHINE GUN Two medium machine guns and crews are found in the Infantry platoon s weapons squad. Machine gunners are a self-contained support by fire element or with a rifle squad to provide long range, accurate, sustained fires against enemy Infantry and apertures in fortifications, buildings, and lightlyarmored vehicles. Machine gunners also provide a high volume of short-range fire in self-defense against aircraft. The M240B fires 7.62-mm ammunition. d. SHOULDER-LAUNCHED MUNITIONS Shoulder-launched munitions (SLM) are lightweight, selfcontained, single-shot, disposable weapons that consist of unguided free flight, fin-stabilized, rocket-type cartridges packed in launchers. SLM provide the Cadet a direct fire capability to defeat enemy personnel within field fortifications, bunkers, caves, masonry structures, and lightly armored vehicles. Cadets use SLM to engage enemy combatants at very close ranges across the street or from one building to another. Likewise, SLM may be fired at long distances to suppress the enemy or kill him. Cadets may employ the SLM as a member of a support- 61
68 by fire element to incapacitate enemy forces that threaten the friendly assault element. When the assault element clears a building, the leader may reposition the SLM gunner inside to engage a potential counterattack force RANGE CARDS AND SECTOR SKETCHES, (ATP APR 16) Range cards are used to record firing data for individual or crew-served weapons and sector sketches are used to record a unit s positioning of its weapons and direct fire control measures. Range Cards A range card (DA Form 5517, Standard Range Card) is a sketch of the assigned area for a direct fire weapon system on a given sector of fire. (Refer to TC for more information.) A range card aids in planning and controlling fires and aids the crews and squad gunners in acquiring targets during limited visibility. Range cards show possible target areas and terrain features plotted with a firing position. The process of walking and sketching the terrain to create a range card allows the individual Cadet or gunner to become more familiar with his area of operation. He should continually assess the area and, if necessary, update his range card. The range card is an aid for replacement personnel or platoons or squads to move into the position and orient on their area of operation. The individual Cadet or BFV gunner should make the range card so that he becomes more familiar with the terrain in his area of operation. To prepare a range card, the individual Cadet or BFV gunner must know the following information: Sectors of fire. A sector of fire is a piece of the battlefield for which a gunner is responsible. Target reference points. Leaders designate natural or man-made features as reference points. A Cadet uses these reference points for target acquisition and range determination. Dead space. Dead space is an area that cannot be observed or covered by directfire systems within the sector of fire. Maximum engagement line. The maximum engagement line is the depth of the area and is normally limited to the maximum effective engagement range of the weapons systems. Weapons reference point. The weapons reference point is an easily recognizable terrain feature on the map used to assist leaders in plotting the vehicle, squad, or weapon position. The individual Cadet or gunner prepares two copies of the range card. If alternate and supplementary firing positions are assigned, two copies are required for these as well. A copy is kept with the vehicle or weapons position, and the other given to the section leader for his sketch. The Cadet or gunner prepares the range card according to TC MAXIMUM ENGAGEMENT LINE Although the maximum engagement line is typically limited to the maximum effective engagement range of the weapons systems, it can be less if objects prevent the Cadet from engaging targets at maximum effective ranges of his assigned weapon. DATA SECTION The gunner completes the position identification, date, weapon, and circle value according to TC The table information is as follows: Number. Start with left and right limits, then list TRPs and reference points in numerical order. Direction and Deflection. The direction is in degrees and taken from a lensatic compass. The most accurate technique is to have the gunner aim at the terrain feature, and to have the driver dismount and 62
69 align himself with the gun barrel and the terrain feature to measure the azimuth. To achieve correct deflection and elevation readings of the terrain feature, select TOW. Show the deflection reading taken from the BFV s azimuth indicator in the deflection block next to the magnetic azimuth. Elevation. Show the gun elevation reading in tens or hundreds of mils. The smallest increment of measure on the elevation scale is tens of mils. Any number other than 0 is preceded by a plus or minus symbol to show whether the gun needs to be elevated or depressed. Ammunition and range must be indexed to have an accurate elevation reading. Range. This is the distance, in meters, from vehicle position to L and R limits and TRPs and reference points. Ammunition. List types of ammunition used. Description. List the name of the object. Remarks. Enter the weapons reference point data. As a minimum, weapons reference point data include a description of what the weapons reference point is, a six-digit or eight-digit grid coordinate of the weapons reference point, the magnetic azimuth and the distance from the weapons reference point to the vehicle position. 63


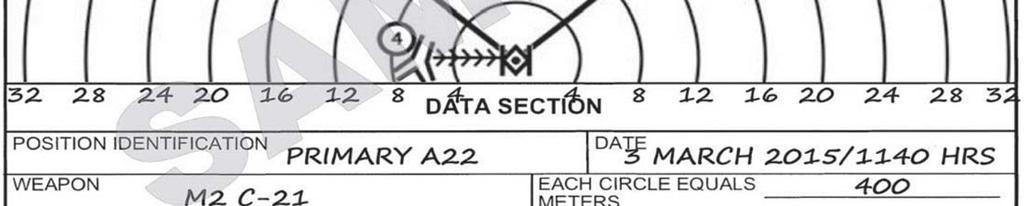
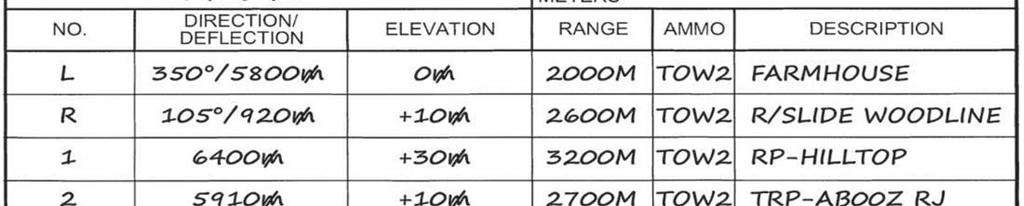
70 Example of a Completed Range Card 64
71 Sector Sketches Individual Cadets in squads and BFV gunners prepare range cards. Squad and platoon leaders prepare sector sketches. Section leaders may have to prepare sector sketches if they are assigned separate positions. The platoon leader reviews his squad s, and if applicable section s, sector sketches and ensures the sketches are accurate and meet his requirements. If he finds gaps or other flaws, the platoon leader adjusts weapons locations within the area of operation. Once the platoon leader approves the squad and section sector sketches, he prepares a consolidated report for the company team commander and incorporates this into a consolidated platoon sector sketch. The platoon leader or platoon sergeant physically prepares the platoon sector sketch. The sector sketch can be on acetate taped to a map or it can be a hand drawn sketch. Accurate and detailed sketches aid in direct fire planning, and in direct fire control and distribution. Squad Sector Sketches The squad leaders and section leaders make two copies of their sector sketches; one copy goes to the platoon leader, the other remains at the position. The squad leaders and section leaders draw sector sketches as close to scale as possible, showing Main terrain features in the area of operation and the range to each. Each primary position. Engagement area or primary and secondary sectors of fire covering each position. M240B machine gun final protective line or principle direction of fire. M249 SAW final protective lines or principle direction of fires. Type of weapon in each position. Reference points and TRPs in the area of operation. Observation post locations. Dead space. Obstacles. Maximum engagement lines for all BFV weapon systems. Maximum engagement lines for Javelin (if applicable) and AT4s. Indirect fire targets. 65

72 Example of a Completed Squad Sector Sketch 66
73 A pint of sweat will save a gallon of blood. Chapter 10 First Aid General George S. Patton Jr PERFORM FIRST AID for BLEEDING (TC JAN 16) Task: Conditions: You have a casualty who has a bleeding wound of the arm or leg. The casualty is breathing. You will need the casualty s emergency bandage, chitosan dressing, or field dressing, materials to improvise a pressure dressing (wadding and cravat or strip of cloth), materials to elevate the extremity (blanket, shelter half, poncho, log, or any available material), and combat application tourniquet (C-A-T) or materials to improvise a tourniquet rigid object (stick, tent peg, or similar object) and a strip of cloth. Standards: Control bleeding from the wound following the correct sequence. Place a dressing over the wound with the sides of the dressing sealed so it does not slip. Ensure that the dressings do not have a tourniquet-like effect. Apply a tourniquet to stop profuse bleeding not stopped by the dressings, for severed arms and legs, or to control life-threatening bleeding when under fire. Performance Steps Note: If the wound is a partial or complete amputation of the arm or leg, you will need to apply a tourniquet on the injured extremity. Also, if you are under fire and need to control bleeding quickly, apply a tourniquet first. When the tactical situation allows, you can loosen the tourniquet after applying other measures to control the bleeding such as a pressure dressing or chitosan dressing. Go to step Uncover the wound unless clothing is stuck to the wound or you are in a chemical environment. CAUTION: Clothing or anything stuck to the wound should be left alone to avoid injury. Do NOT attempt to clean the wound. CAUTION: Do NOT remove protective clothing in a chemical environment. Apply dressings over the protective clothing. 2. Apply the casualty s dressing. a. Emergency bandage. Note: The emergency bandage is a new item that can be used on any bleeding wound. It can be used both as a field dressing and as a pressure dressing. (1) Place the pad on the wound, white side down, and wrap the elastic bandage around the limb. CAUTION: Do NOT touch the white (sterile) side of the dressing. Do NOT allow it to come into contact with any surface other than the wound. (2) Insert the elastic bandage into the pressure bar. (3) Tighten the elastic bandage. (4) Pull back, forcing the pressure bar down onto the pad. (5) Wrap the elastic bandage tightly over the pressure bar and wrap it over all edges of the pad. (6) Secure the hooking ends of the closure bar into the elastic bandage. 67
74 Performance Steps WARNING: Emergency bandages, field dressings, and pressure dressings should NOT have a tourniquet-like effect. The dressing must be loosened if the skin beyond the injury becomes cool, blue, or numb. b. Chitosan dressing. Note: The chitosan dressing is used to control serious arterial bleeding. It is not used for wounds with minimal to moderate bleeding. The chitosan dressing can be used in conjunction with a tourniquet to control severe arterial bleeding. (1) Hold the foil over-pouch so that the instructions can be read and the unsealed edges are at the top. (2) Grasp the unsealed edges. (3) Peel open the over-pouch by pulling the unsealed edges apart. (4) Use your hand and thumb to trap the dressing between the bottom foil and the green/black polyester backing. (5) Hold the dressing by the nonabsorbent green/black backing and discard the foil over-pouch. Note: Do not let moisture from your hand come into contact with the dressing before you apply the bandage. The moisture could cause the sponge to become sticky. (6) Apply the light-colored sponge portion directly over the wound and apply pressure to the green/black backing with your fingers. Note: Do not let the bandage come into contact with the casualty s eyes. (7) Apply manual pressure and maintain the pressure until the dressing adheres and the bleeding stops (usually 2 to 4 minutes). Do not try to reposition the bandage once it is applied. Note: If the bleeding does not stop within 4 minutes, remove the chitosan dressing, apply another chitosan dressing, and apply manual pressure again. Do not apply a new chitosan dressing over an old one. The old chitosan dressing must be removed so that the sponge portion of the new chitosan dressing can come into contact with the blood and fluids from the wound. (8) Apply a field dressing or a cravat to secure the chitosan dressing and to prevent contamination. Note: For smaller wounds, you may want to cut the chitosan dressing before applying it to the wound. In this way, you will have a second dressing to apply if the first dressing is not sufficient to stop the bleeding or to use on another wound (entrance and exit wound, for example). c. Field dressing. (1) Apply the dressing, white side down, directly over the wound. CAUTION: Do NOT touch the white (sterile) side of the dressing. Do NOT allow it to come into contact with any surface other than the wound. (2) Wrap each tail, one at a time, in opposite directions around the wound so the dressing is covered and both sides are sealed. (3) Tie the tails into a nonslip knot over the outer edge of the dressing NOT over the wound. (4) Check the dressing to make sure that it is tied firmly enough to prevent slipping without causing a tourniquet-like effect. 3. Apply manual pressure and elevate the arm or leg to reduce bleeding, if necessary. a. Apply firm manual pressure over the dressing for 5 to 10 minutes, when practical. b. Elevate the injured part above the level of the heart, unless a fracture is suspected and has not been splinted. 4. If a field dressing was applied and bleeding continues, apply a pressure dressing. a. Keep the arm or leg elevated. 68
75 Performance Steps b.place a wad of padding directly over the wound. c. Place an improvised dressing over the wad of padding and wrap it tightly around the limb. d. Tie the ends in a nonslip knot directly over the wound. e. Check the dressing to make sure that it does not have a tourniquet-like effect. Note: If the bleeding stops, watch the casualty closely, and check for other injuries. Note: If the bleeding continues despite proper application of a field dressing and a pressure dressing, an emergency bandage, or a chitosan dressing; or if the wound is a partial or complete amputation of the arm or leg, apply a tourniquet on the injured extremity. If only part of a hand or foot has been severed, the bleeding should be stopped using a pressure dressing. 5. Apply a tourniquet. a. Combat application tourniquet (C-A-T). (1) Remove the C-A-T from the pouch. (2) Slide the wounded extremity through the loop of the self-adhering band. Note: The C-A-T is packaged in its one-handed configuration. (3) Position the C-A-T. (a) If the wound is above the knee or elbow, position the C-A-T 2 inches above a bleeding site. CAUTION: Never place a tourniquet directly over a wound, fracture, or joint. (b) If the wound is below the knee or elbow, initially position the tourniquet band 2 inches above the wound. If a tourniquet applied below the knee or elbow is not successful at stopping the bleeding, apply a second tourniquet 2 inches above the joint (knee or elbow). Do not remove the first tourniquet until the second tourniquet has been applied. (4) Pull the free running end of the self-adhering band tight and securely fasten it back on itself. Do NOT adhere the band past the windlass clip. Note: The friction adaptor buckle is not necessary for proper C-A-T application to an arm. However, use it as added protection when using two hands to apply the C-A-T to a leg. To use it, route the self-adhering band through the fiction adaptor buckle. This also prevents the strap from loosening during transport. (5) Twist the windlass rod until the bleeding has stopped. (6) Lock the windlass rod in place with the windlass clip. Note: For added security (and always before moving a casualty), secure the windlass rod with the windlass strap. For small extremities, also secure the self-adhering band under the windlass strap. (7) For small extremities, wind the self-adhering band around the extremity and over the windlass rod. (8) Grasp the windlass strap, pull it tight, and adhere it to the opposite hook on the windlass clip. b. Improvised tourniquet. (1) Make a tourniquet at least 2 inches wide. (2) Position the tourniquet. (a) Place the tourniquet over the smoothed sleeve or trouser leg if possible. 69
76 Performance Steps (b) If the wound is above the knee or elbow, place the tourniquet around the limb 2 to 4 inches above the wound between the wound and the heart but not on a joint or directly over a wound or a fracture. (c) If the wound is below the knee or elbow, initially position the tourniquet band 2 inches above the wound. If a tourniquet applied below the knee or elbow is not successful at stopping the bleeding, apply a second tourniquet 2 to 4 inches above the joint (knee or elbow). Do not remove the first tourniquet until the second tourniquet has been applied. (3) Put on the tourniquet. (a) Tie a half knot. (b) Place a stick (or similar object) on top of the half knot. (c) Tie a full knot over the stick. (d) Twist the stick until the tourniquet is tight around the limb and bright red bleeding has stopped. Note: In the case of an amputation, dark oozing blood may continue for a short time. (4) Secure the tourniquet. The tourniquet can be secured using the ends of the tourniquet band or with another piece of cloth, as long as the stick does not unwind. Note: If a limb is completely amputated, the stump should be padded and bandaged (do not cover the tourniquet). If the casualty has suffered an incomplete amputation, splint the limb. Note: If a tourniquet was applied to quickly control bleeding under fire, once the tactical situation allows, you can loosen the tourniquet after other measures have been applied to control the bleeding if it has been in place for less than 6 hours. However, do NOT remove it. Use direct pressure, a pressure dressing, or a chitosan dressing to control the bleeding prior to loosening the tourniquet. If unable to control bleeding by these methods, retighten the tourniquet until the bleeding stops. 6. If a tourniquet was applied, mark the casualty s forehead with a letter T and the time using a pen, mud, the casualty s blood, or whatever is available. 7. If applicable and the situation allows, save severed limbs or body parts and transport them with, but out of sight of, the casualty. Note: Body parts should be wrapped in dry, sterile dressing and placed in a dry, plastic bag and, in turn, placed in a cool container (do not soak in water or saline or allow to freeze). If your location in the field/combat does not allow for the correct preserving of parts; do what you can. 8. Watch the casualty closely for life-threatening conditions, check for other injuries (if necessary), and treat for shock. Seek medical aid. Evaluation Preparation: Setup: Use the same dressing repeatedly. If a chitosan dressing is being tested, you will need to use a simulated dressing and have a field dressing or cravat available to secure it. If a field dressing is being used, have materials available for a pressure dressing (wadding and cravat or a strip of cloth). Have one Cadet play the part of the casualty and another apply the dressing(s). Use a moulage or mark a place on the casualty s arm or leg to simulate a wound. For applying a tourniquet, use a mannequin or simulated arm or leg (padded length of 2-inch by 4-inch wood with a glove or boot on one end) with a dressing appropriately placed on the arm or leg. Under no circumstances will a live simulated casualty be used to evaluate the application of a tourniquet. Place the tourniquet materials nearby. Brief Cadet: Tell the Cadet to do, in order, the first aid steps required to apply a dressing and, if necessary, a 70
77 pressure dressing on the casualty s wound. When testing step 1, you can vary the test by telling the Cadet that clothing is stuck to the wound or that a chemical environment exists. After steps 2 and 3, tell the Cadet that the bleeding has not stopped. After step 4, tell the Cadet the bleeding is continuing and ask the Cadet to describe and perform the first aid on the simulated arm or leg provided. After step 5, ask the Cadet what should be done to indicate that a tourniquet has been applied and what should be done with a severed limb, if applicable. Do not evaluate step 9 in the simulated mode. Performance Measures GO NO- GO 1. Uncovered the wound, unless clothing was stuck to the wound or in a chemical environment. 2. Applied the casualty s dressing. a. Applied the dressing/pad directly over the wound. b. Covered the edges of dressing/pad. c. Properly secured the bandage. d. Did not create a tourniquet-like effect with the dressing. 3. Applied manual pressure and elevated the arm or leg, if necessary. 4. If a field dressing was applied and bleeding continued, applied a pressure dressing. a. Placed the wad of padding directly over the wound. b. Tightly wrapped the cloth around the limb. c. Tied a nonslip knot directly over the wound. d. Did not create a tourniquet-like effect with the dressing. 5. Applied a tourniquet, if necessary. a. Improvised tourniquet, if used, was at least 2 inches wide. b. Tourniquet was placed at least 2 inches above the wound between the wound and the heart but not on a joint or directly over a wound or a fracture. c. Tourniquet was properly applied and secured. 6. Performed steps 1 through 5, as necessary, in sequence. 7. If a tourniquet was applied, marked the casualty s forehead with a letter T and the time. 8. If applicable and the situation allowed, saved severed limbs or body parts and transported them with the casualty. 9. Watched the casualty closely for life-threatening conditions, checked for other injuries (if necessary), and treated for shock. Sought medical aid. Evaluation Guidance: Score the Cadet GO if all performance measures are passed. Score the Cadet NO GO if any performance measure is failed. If the Cadet scores NO GO on any performance measure, show or tell the Cadet what was done wrong and how to do it correctly. 71
78 10-2. EVALUATE a CASUALTY (TACTICAL COMBAT CASUALTY CARE) ((TC JAN 16) Task: Conditions: You have a casualty who has signs/symptoms of an injury. Your unit may be under fire. Standards: Evaluate the casualty following the correct sequence. Identify all life-threatening conditions and other serious wounds. Performance Steps Note: Tactical combat casualty care (TCCC) can be divided into three phases. The first is care under fire; the second is tactical field care; the third is combat casualty evacuation care. In the first, you are under hostile fire and are very limited as to the care you can provide. In the second, you and the casualty are relatively safe and no longer under effective hostile fire, and you are free to provide casualty care to the best of your ability. In the third, the care is rendered during casualty evacuation (CASEVAC). WARNING: If a broken neck or back is suspected, do not move the casualty unless to save his/her life. 1. Perform care under fire. a. Return fire as directed or required before providing medical treatment. b. Determine if the casualty is alive or dead. Note: In combat, the most likely threat to the casualty s life is from bleeding. Attempts to check for airway and breathing will expose the rescuer to enemy fire. Do not attempt to provide first aid if your own life is in imminent danger. Note: In a combat situation, if you find a casualty with no signs of life no pulse, no breathing do NOT attempt to restore the airway. Do NOT continue first aid measures. c. Provide tactical care to the live casualty. Note: Reducing or eliminating enemy fire may be more important to the casualty s survival than the treatment you can provide. (1) Suppress enemy fire. (2) Use cover or concealment (smoke). (3) Direct the casualty to return fire, move to cover, and administer self-aid (stop bleeding), if possible. If the casualty is unable to move and you are unable to move the casualty to cover and the casualty is still under direct enemy fire, have the casualty play dead. (4) If the casualty is unresponsive, move the casualty, his/her weapon, and missionessential equipment to cover, as the tactical situation permits. (5) Keep the casualty from sustaining additional wounds. (6) Reassure the casualty. d. Administer life-saving hemorrhage control. (1) Determine the relative threat of the tactical situation versus the risk of the casualty s bleeding to death. 72
79 Performance Steps (2) If the casualty has severe bleeding from a limb or has suffered amputation of a limb, administer life-saving hemorrhage control by applying a tourniquet before moving the casualty. (See task ) e. Transport the casualty, his/her weapon, and mission-essential equipment when the tactical situation permits. f. Recheck bleeding control measures as the tactical situation permits. 2. Perform tactical field care when no longer under direct enemy fire. Note: Tactical field care is rendered by the individual when no longer under hostile fire. Tactical field care also applies to situations in which an injury has occurred during the mission but there has been no hostile fire. Available medical equipment is limited to that carried into the field by the individual Cadet. WARNING: If there are any signs of nerve agent poisoning, stop the evaluation, take the necessary protective measures, and begin first aid. (See task ) Note: In the following situations communicate the medical situation to the unit leader and ensure that the tactical situation allows for time to perform these steps before initiating any medical procedure. Note: When evaluating and/or treating a casualty, seek medical aid as soon as possible. Do NOT stop treatment. If the situation allows, send another person to find medical aid. a. Form a general impression of the casualty as you approach (extent of injuries, chance of survival). Note: If a casualty is being burned, take steps to remove the casualty from the source of the burns before continuing evaluation and treatment. (See task ) b. Check for responsiveness. (1) Ask in a loud, but calm, voice: Are you okay? Gently shake or tap the casualty on the shoulder. (2) Determine the level of consciousness by using AVPU: A = Alert; V = responds to Voice; P = responds to Pain; U = Unresponsive. Note: To check a casualty s response to pain, rub the breastbone briskly with a knuckle or squeeze the first or second toe over the toenail. (3) If the casualty is conscious, ask where his/her body feels different than usual, or where it hurts. Skip steps 2c and 2d. Go to step 2e. Note: If the casualty is conscious but is choking and cannot talk, stop the evaluation and begin treatment. (See task ) (4) If the casualty is unconscious, continue with step 2c. c. Position the casualty and open the airway. (See task ) d. Assess for breathing and chest injuries. (1) Look, listen, and feel for respiration. (See task ) Note: If the casualty is breathing, insert a nasopharyngeal airway (see task ) and place the casualty in the recovery position. Note: On the battlefield the cost of attempting cardiopulmonary resuscitation (CPR) on casualties with what are inevitably fatal injuries may result in additional lives lost as care is diverted from casualties with less severe injuries. Only in the case of nontraumatic disorders 73
80 Performance Steps such as hypothermia, near drowning, or electrocution should CPR be considered prior to the CASEVAC phase. (2) Expose the chest and check for equal rise and fall and for any wounds. (See task ) (a) If the casualty has a penetrating chest wound and is breathing or making an effort to breathe, stop the evaluation to apply a dressing. (b) Monitor for increasing respiratory distress. If this occurs, decompress the chest on the same side as the injury. (See task ) (c) Position or transport with the affected side down, if possible. e. Identify and control bleeding. (1) Check for bleeding. (a) Remove only the minimum amount of clothing to expose and treat injuries. Protect the casualty from the environment (heat and cold). (b) Look for blood-soaked clothes. (c) Look for entry and exit wounds. (d) Place your hands behind the casualty s neck and pass them upward toward the top of the head. Note whether there is blood or brain tissue on your hands from the casualty s wounds. (e) Place your hands behind the casualty s shoulders and pass them downward behind the back, the thighs, and the legs. Note whether there is blood on your hands from the casualty s wounds. (2) If life-threatening bleeding is present, stop the evaluation and control the bleeding. Apply a tourniquet, chitosan dressing, emergency bandage, or field dressing, as appropriate. (See tasks , , , and ) Treat for shock and establish a saline lock/intravenous infusion, as appropriate. (See tasks , , and ) Note: If a tourniquet was previously applied, consider converting it to a pressure dressing. (See task ) Converting the tourniquet to a pressure dressing may save the casualty s limb if the tourniquet has not been in place for 6 hours. (3) Dress all wounds, including exit wounds. f. Check for fractures. (1) Check for open fractures by looking for bleeding or a bone sticking through the skin. (2) Check for closed fractures by looking for swelling, discoloration, deformity, or unusual body position. (3) If a suspected fracture is present, stop the evaluation and apply a splint. (See task ) g. Check for burns. (1) Look carefully for reddened, blistered, or charred skin. Also check for singed clothes. (2) If burns are found, stop the evaluation and begin treatment. (See task ) h. Administer pain medications and antibiotics (the casualty s combat pill pack) to any Cadet wounded in combat. Note: Each Cadet will be issued a combat pill pack before deploying on tactical missions. i. Document the casualty s injuries and the treatment given on the field medical card (FMC), if applicable. 74
81 Performance Steps Note: The FMC is usually initiated by the combat medic. However, a certified combat lifesaver can initiate the FMC if a combat medic is not available or if the combat medic directs the combat lifesaver to initiate the card. A pad of FMCs is part of the combat lifesaver medical equipment set. j. Transport the casualty to the site where evacuation is anticipated. (See task ) 3. Monitor an unconscious casualty during CASEVAC. Note: CASEVAC refers to the movement of casualties aboard nonmedical vehicles or aircraft. Care is rendered while the casualty is awaiting pickup or is being transported. A Cadet accompanying an unconscious casualty should monitor the casualty s airway, breathing, and bleeding. Evaluation Preparation: Setup: Prepare a casualty for the Cadet to evaluate in step 2 by simulating one or more wounds or conditions. Simulate the wounds using a war wounds moulage set, casualty simulation kit, or other available materials. You can coach a conscious casualty on how to respond to the Cadet s questions about location of pain or other symptoms of injury. However, you will have to cue the Cadet during evaluation of an unconscious casualty as to whether the casualty is breathing and describe the signs or conditions, as the Cadet is making the checks. Brief Cadet: To test step 1, tell the Cadet that his/her unit is under fire and ask him/her what he/she should do to provide aid to casualties. For step 2, tell the Cadet that the tactical situation permits full evaluation of the casualty. Tell him/her to do, in order, all necessary steps to evaluate the casualty and identify all wounds and/or conditions. Tell the Cadet that he/she will not perform first aid but will tell you what first aid action (give mouth-to-mouth resuscitation, bandage the wound, and so forth) he/she would take. After he/she has completed the checks (step 2f), ask him/her what else he/she should do. To test step 3, ask him/her what he/she should do while evacuating an unconscious casualty. Performance Measures GO NO-GO 1. Performed care under fire. a. Suppressed enemy fire to keep the casualty from sustaining additional wounds. b. Encouraged responsive casualties to protect themselves and perform self-aid, if able. c. Administered life-saving hemorrhage control. d. Transported the casualties, weapons, and mission-essential equipment, when the tactical situation permitted. 2. Performed tactical field care. a. Checked for responsiveness. b. Positioned the casualty and opened the airway. c. Assessed for breathing and chest injuries. d. Identified and controlled bleeding. e. Checked for fractures. f. Checked for burns. g. Administered pain medications and antibiotics, if appropriate. h. Documented the casualty s injuries and treatment given on the field medical card, if applicable. i. Transported the casualty to the site where evacuation is anticipated. 75
82 Performance Measures GO NO-GO 3. Monitored an unconscious casualty s airway, breathing, and bleeding during casualty evacuation. 4. Performed all necessary steps in sequence. 5. Identified all wounds and/or conditions. Evaluation Guidance: Score the Cadet GO if all performance measures are passed. Score the Cadet NO GO if any performance measure is failed. If the Cadet scores NO GO on any performance measure, show or tell the Cadet what was done wrong and how to do it correctly PERFORM FIRST AID for an OPEN CHEST (TC JAN 16) Task: Conditions: You see a casualty who has an open chest wound. The casualty is breathing. You will need the casualty s emergency bandage or field dressing, tape, a large bore (14-gauge, 3-inch long) needle and catheter unit, and material to improvise a dressing (clothing or blankets). Standards: Apply a dressing to the wound following the correct sequence, without causing further injury to the casualty. Ensure that the wound is properly sealed and the dressing is firmly secured without interfering with breathing. Perform needle chest decompression, if necessary. Performance Steps Note: Always check for both entry and exit wounds. If there are two wounds (entry and exit), treat the wound that appears more serious first (for example, the heavier bleeding, larger wound, and so forth). It may be necessary to improvise dressings for the second wound by using strips of cloth, a T-shirt, or the cleanest material available. 1. Uncover the wound unless clothing is stuck to the wound or you are in a chemical environment. CAUTION: Removing stuck clothing or uncovering the wound in a chemical environment could cause additional harm. WARNING: Do not attempt to clean the wound. 2. Apply airtight material over the wound. a. Fully open the outer wrapper of the casualty s dressing or other airtight material. b. Place the inner surface of the outer wrapper or other airtight material directly over the wound after the casualty exhales completely. Edges of the airtight material should extend 2 inches beyond the edges of the wound. Note: When applying the airtight material, do not touch the inner surface. c. Hold the material in place by taping on three sides and then monitor the casualty for development of a tension pneumothorax. Note: If the casualty has an open chest wound on his/her front and another open wound on his/her back on the same side, apply airtight material over each wound, taping down three sides of the material for the wound on the front and all four sides of the material for the wound on the back. 3. Apply the casualty s dressing. a. Apply the dressing/pad, white side down, directly over the airtight material. b. Have the casualty breathe normally. 76
83 Performance Steps c. Maintain pressure on the dressing while you wrap the tails (or elastic bandage) around the body and back to the starting point. d. For a field dressing, tie the tails into a nonslip knot over the center of the dressing after the casualty has exhaled completely. For an emergency bandage, pass the tail through the plastic pressure device, reverse the tail while applying pressure, continue to wrap the tail around the body, and secure the plastic fastening clip to the last turn of the wrap. e. Ensure that the dressing is secured without interfering with breathing. Note: When practical, apply direct manual pressure over the dressing for 5 to 10 minutes to help control the bleeding. 4. Position the casualty on the injured side or in a sitting position, whichever makes breathing easier. WARNING: If the casualty s respiratory condition becomes worse (progressively more difficult for the casualty to breathe) after placing the dressing on the wound, assume that a tension pneumothorax has developed, and perform needle chest decompression. 5. Perform needle chest decompression, if necessary. a. Locate the insertion site. Locate the second intercostal space (between the second and third ribs about two finger widths below the collarbone) at the midclavicular line (approximately in line with the nipple) on the same side of the casualty s chest as the penetrating wound. b. Insert a large bore (14-gauge, 3-inch long) needle and catheter unit. (1) Firmly insert the needle into the skin over the top of the third rib into the second intercostal space, until the chest cavity has been penetrated, as evidenced by feeling a pop as the needle enters the chest cavity. A hiss of escaping air under pressure will usually be heard. WARNING: The needle must be positioned properly to avoid puncturing blood vessels and/or nerves. Blood vessels and nerves run along the bottom of each rib. (2) Withdraw the needle while holding the catheter in place. Secure the catheter to the chest wall with tape. 6. Watch the casualty closely for life-threatening conditions, check for other injuries (if necessary), and treat for shock. Seek medical aid. Evaluation Preparation: Setup: Use the same dressing repeatedly. Prepare the dressing outer wrapper or provide a piece of airtight material (plastic, cellophane, foil). Have another Cadet act as the casualty. Use a moulage or otherwise simulate the chest wound. If a mannequin that is capable of testing needle chest decompression is available, use it to test step 6. Have an 18-gauge needle available. Brief Cadet: Tell the Cadet to do, in order, all necessary first aid steps to treat the casualty s wound. When testing step 1, you can vary the test by telling the Cadet that clothing is stuck to the wound or that a chemical environment exists. For step 6, tell the Cadet that the casualty s condition is becoming worse, and have him/her show you (on a mannequin) or tell you what he/she would do to decompress the chest. Do not evaluate step 8 in the simulated mode. 77
84 Performance Measures GO NO- GO 1. Uncovered the wound unless clothing was stuck to the wound or a chemical environment existed. 2. Applied airtight material over the wound without touching the inner surface of the airtight material. a. Fully opened the outer wrapper of the casualty s dressing or other airtight material. b. Applied the inner surface of the outer wrapper or other airtight material directly over the wound after the casualty exhaled completely. c. Held the material in place by taping on three sides and then monitored the casualty for development of a tension pneumothorax. 3. Applied the casualty s dressing. a. Applied the dressing/pad, white side down, directly over the airtight material. b. Had the casualty breathe normally. c. Maintained pressure on the dressing while wrapping the tails (or elastic bandage) around the body and back to the starting point. d. For a field dressing, tied the tails into a nonslip knot over the center of the dressing after the casualty exhaled completely. For an emergency bandage, passed the tail through the plastic pressure device, reversed the tail while applying pressure, continued to wrap the tail around the body, and secured the plastic fastening clip to the last turn of the wrap. e. Ensured that the dressing was secured without interfering with breathing. 4. When practical, applied direct manual pressure over the dressing for 5 to 10 minutes to help control the bleeding. 5. Positioned the casualty on the injured side or in a sitting position, whichever made breathing easier. 6. Performed needle chest decompression, if necessary. a. Located the correct insertion site. b. Inserted the needle until the chest cavity was penetrated. c. Withdrew the needle while holding the catheter in place, and secured the catheter to the chest wall with tape. 7. Performed steps 1 through 6 in the correct sequence. 8. Watched the casualty closely for life-threatening conditions, checked for other injuries (if necessary), and treated for shock. Sought medical aid. Evaluation Guidance: Score the Cadet GO if all performance measures are passed. Score the Cadet NO GO if any performance measure is failed. If the Cadet scores NO GO on any performance measure, show or tell the Cadet what was done wrong and how to do it correctly. 78
85 10-4. PERFORM FIRST AID to RESTORE BREATHING and/or PULSE (TC JAN 16) Task: Conditions: You see an adult casualty who is unconscious and does not appear to be breathing. You are not in a combat situation or chemical environment. You will need a nasopharyngeal airway (NPA). Standards: Take appropriate action, in the correct sequence, to restore breathing and, if necessary, restore the pulse. Continue until the casualty s breathing/pulse returns, a qualified person relieves you, a physician stops you, or you are too tired to continue. Performance Steps 1. Roll the casualty onto his/her back, if necessary, and place him/her on a hard, flat surface. WARNING: The casualty should be carefully rolled as a whole, so the body does not twist. a. Kneel beside the casualty. b. Raise the near arm and straighten it out above the head. c. Adjust the legs so they are together and straight or nearly straight. d. Place one hand on the back of the casualty s head and neck. e. Grasp the casualty under the arm with the free hand. f. Pull steadily and evenly toward yourself, keeping the head and neck in line with the torso. g. Roll the casualty as a single unit. h. Place the casualty s arms at his/her sides. 2. Open the airway. Note: If foreign material or vomit is in the mouth, remove it as quickly as possible. a. Head-tilt/chin-lift method. CAUTION: Do NOT use this method if a spinal or neck injury is suspected. (1) Kneel at the level of the casualty s shoulders. (2) Place one hand on the casualty s forehead and apply firm, backward pressure with the palm to tilt the head back. (3) Place the fingertips of the other hand under the bony part of the lower jaw and lift, bringing the chin forward. Note: Do NOT use the thumb to lift. CAUTION: Do NOT press deeply into the soft tissue under the chin with the fingers. b. Jaw-thrust method. CAUTION: Use this method if a spinal or neck injury is suspected. Note: If you are unable to maintain an airway after the second attempt, use the head-tilt/chin-lift method. (1) Kneel above the casualty s head (looking toward the casualty s feet). (2) Rest your elbows on the ground or floor. (3) Place one hand on each side of the casualty s lower jaw at the angle of the jaw, below the ears. (4) Stabilize the casualty s head with your forearms. (5) Use the index fingers to push the angles of the casualty s lower jaw forward. Note: If the casualty s lips are still closed after the jaw has been moved forward, use your thumbs to retract the lower lip and allow air to enter the casualty s mouth. 79
86 Performance Steps CAUTION: Do not tilt or rotate the casualty s head. 3. Check for breathing. a. While maintaining the open airway position, place an ear over the casualty s mouth and nose, looking toward the chest and stomach. b. Look for the chest to rise and fall. c. Listen for air escaping during exhalation. d. Feel for the flow of air on the side of your face. e. Count the number of respirations for 15 seconds. f. Take appropriate action. (1)If the casualty is unconscious, if respiratory rate is less than 2 in 15 seconds, and/or if the casualty is making snoring or gurgling sounds, insert an NPA. CAUTION: Do NOT use the NPA if there is clear fluid (cerebrospinal fluid-csf) coming from the ears or nose. This may indicate a skull fracture. (a) Keep the casualty in a face-up position. (b) Lubricate the tube of the NPA with water. (c) Push the tip of the casualty s nose upward gently. (d) Position the tube of the NPA so that the bevel (pointed end) of the NPA faces toward the septum (the partition inside the nose that separates the nostrils). Note: Most NPAs are designed to be placed in the right nostril. (e) Insert the NPA into the nostril and advance it until the flange rests against the nostril. CAUTION: Never force the NPA into the casualty s nostril. If resistance is met, pull the tube out and attempt to insert it in the other nostril. If neither nostril will accommodate the NPA, place the casualty in the recovery position. (f) Place the casualty in the recovery position by rolling him/her as a single unit onto his/her side, placing the hand of his/her upper arm under his/her chin, and flexing his/her upper leg. (g) Watch the casualty closely for life-threatening conditions and check for other injuries, if necessary. Seek medical aid. (2) If the casualty is not breathing, continue with step 4 if the tactical situation permits. Note: If the casualty resumes breathing at any time during this procedure, the airway should be kept open and the casualty should be monitored. If the casualty continues to breathe, he/she should be transported to medical aid. Otherwise, the procedure should be continued. 4. Give breaths to ensure an open airway. Note: When mouth-to-mouth resuscitation breathing cannot be performed because the casualty has jaw injuries or spasms, the mouth-to-nose method may be more effective. Perform the mouth-to-nose method as follows: * Blow into the nose while holding the lips closed. * Let air escape by removing your mouth and, in some cases, separating the casualty s lips. a. Insert a face shield, if available, into the casualty s mouth, with the short airway portion over the top of the tongue, and flatten the plastic sheet around the mouth. b. Maintain the airway and gently pinch the nose closed, using the hand on the casualty s forehead. c. Take a normal breath and place your mouth, in an airtight seal, around the casualty s mouth. d. Give two breaths (1 second each), taking a breath between them, while watching for the chest to rise and fall and listening and/or feeling for air to escape during exhalation. 80
87 Performance Steps Note: If the chest rises, go to step 7. Note: If the chest does not rise after the first breath, continue with step Reposition the casualty s head slightly farther backward and repeat the breaths. Note: If the chest rises, go to step 7. Note: If the chest does not rise, continue with step Perform chest compressions to clear the airway. a. Perform chest compressions. (1) Kneel close to the side of the casualty s body. (2) Locate the nipple line placing the heel of one hand on the lower half of the sternum (breastbone). (3) Place the heel of the other hand on top of the first hand on the lower half of the breastbone, extending or interlacing the fingers. (4) Straighten and lock the elbows with the shoulders directly above the hands. (5) Without bending the elbows, rocking, or allowing the shoulders to sag, apply enough pressure to depress the breastbone 1½ to 2 inches. Note: Give compressions at a rate of 100 per minute (hard and fast at a ratio of 30 compressions to 2 breaths) with the intent of relieving the obstruction. b. Look in the mouth for the object between compressions and breaths and if you can see it, remove it. WARNING: Only attempt to remove the object if you can see it. Do NOT force the object deeper into the airway. c. Reopen the airway and repeat the breaths. Note: If the chest rises, go to step 7. Note: If the chest does not rise, repeat step 6 until the airway is clear. 7. Check for a pulse for 5 to 10 seconds. Note: Use the first two fingers in the groove in the casualty s throat beside the Adam s apple on the side closest to you. Do NOT use the thumb. a. If a pulse is found but the casualty is not breathing, continue mouth-to-mouth resuscitation. (1) Give breaths at the rate of one every 5 to 6 seconds (10 to 12 breaths per minute). (2) Recheck for pulse and breathing every 2 minutes. If the pulse stops, go to step 8. (3) Continue until the casualty s breathing returns, a qualified person relieves you, a physician stops you, or you are too tired to continue. If the breathing returns, go to step 9. b. If no pulse is found, you must perform cardiopulmonary resuscitation (CPR). Continue with step Perform CPR. a. Position your hands and body for chest compressions as in step 6a. b. Give 30 compressions. (1) Press straight down to depress the breastbone 1 ½ to 2 inches. (2) Come straight up and completely release the pressure on the breastbone to allow the chest to return to its normal position. The time allowed for release should equal the time required for compression. (3) Give 30 compressions in about 23 seconds (at a rate of 100 per minute). 81
88 Performance Steps Note: Do NOT remove the heel of your hand from the casualty s chest or reposition your hand between compressions. However, all pressure must be released from the chest cavity to allow for full chest wall expansion. c. Give two breaths. (1) Open the casualty s airway. (2) Give two breaths (1 second each). d. Repeat steps 8b through 8c for five cycles or 2 minutes. e. Reassess the casualty. (1) Check for the return of the pulse for 3 to 5 seconds. (a) If the pulse is present, continue with step 8e(2). (b) If the pulse is absent, continue with step 8f. (2) Check breathing for 3 to 5 seconds. (a) If the casualty is breathing, continue with step 9. (b) If the casualty is not breathing, continue mouth-to-mouth resuscitation f. Resume CPR with compressions (step 8b). g. Recheck for pulse every 2 minutes. h. Continue CPR until the casualty s pulse returns, you are relieved by a qualified person, stopped by a physician, or you are too tired to continue. 9. Once the casualty is breathing and has a pulse, place the casualty in the recovery position until help arrives. Watch the casualty closely for life-threatening conditions, maintain an open airway, and check for other injuries, if necessary. Evaluation Preparation: Setup: For training and testing, you must use a resuscitation training mannequin (DVC 08-15). Have a bottle of alcohol and swabs or cotton available. Place the mannequin on the floor and alcohol and cotton balls on the table. Clean the mannequin s nose and mouth before each Cadet is evaluated. If a mannequin that is capable of testing insertion of an NPA is available, use it to test step 3b. Brief Cadet: Tell the Cadet to do, in order, all necessary steps to restore breathing and pulse. For step 3b, tell the Cadet that the casualty s breathing rate is slow, and have him/her show you (on a mannequin) or tell you what he/she would do to insert an NPA. After step 3, tell the Cadet that the casualty is not breathing. When testing steps 4 and 5, you can vary the test by indicating whether the chest rises or not. If steps 6 and 7 are tested, tell the Cadet that the chest rises after he/she removes the foreign object. When testing step 8, tell the Cadet that a pulse is not found. You can stop the evaluation when the Cadet rechecks for the pulse in step 10. Do not evaluate step 12 in the simulated mode. Note: Reference made to the mouth-to-nose method within the task presents information on an alternate procedure that must be used under some circumstances. This method will not be evaluated. Performance Measures GO NO- GO 1. Positioned the casualty. 2. Opened the airway using the head-tilt/chin-lift method. 3. Checked for breathing. a. Looked, listened, and felt for signs of respiration. b. Inserted an NPA, if necessary. 82
89 4. Gave breaths to ensure an open airway. 5. Repositioned the casualty s head and repeated breaths, if necessary. 6. Performed chest compressions to clear the airway, if necessary. 7. Looked for a foreign object in the casualty s mouth and removed it, if necessary. (Did NOT perform a blind finger sweep.) 8. Checked for a pulse. 9. Continued mouth-to-mouth or mouth-to-nose resuscitation or CPR, as required. 10. Rechecked for pulse and breathing, as required. 12. Once the casualty was breathing and had a pulse, placed him/her in the recovery position. Watched the casualty closely for life-threatening conditions, maintained an open airway, and checked for other injuries, if nessary. Evaluation Guidance: Score the Cadet GO if all performance measures are passed. Score the Cadet NO GO if any performance measure is failed. If the Cadet scores NO GO on any performance measure, show or tell the Cadet what was done wrong and how to do it correctly FIRST AID FOR HEAT ILLNESS (TC , 21JAN16) HEAT ILLNESS 1. Exertional heat illness refers to a spectrum of disorders (for example cramps, heat exhaustion, heat injury, heat stroke) resulting from total body heat stress. 2. While there is a range of adverse effects that can result from the body overheating, the two major kinds of heat illnesses that are referred to as heat casualties are Heat exhaustion (can be mild or more severe). Heat stroke (most severe form of heat illness and possibly fatal). HEAT EXHAUSTION 3. Heat exhaustion is often preceded by heat cramps, muscle cramps of the arms, legs, or abdomen. Heat cramps and heat exhaustion often act as canaries in the coal mine. These conditions need to be identified and treated before they get to a more extreme case of heat stroke. Catch these conditions early as casualty needs rest, water, shade, evaluation, and possible medical care. 4. Signs and symptoms of heat exhaustion include SIGNS AND SYMPTOMS OF HEAT EXHAUSTION Dizziness. Headache. Loss of appetite. 83
90 Nausea. Weakness. Clumsy/unsteady walk. Profuse sweating and pale (or gray), moist cool skin. Normal to slightly elevated body temperature. Muscle cramps. Heat cramps. FIRST AID FOR HEAT EXHAUSTION 5. First aid measures for heat exhaustion include Rest Cadet in shade. Loosen uniform and remove head gear. Have Cadet drink 2 quarts of water over 1 hour. Seek medical aid. Evacuate if no improvement in 30 minutes, or if Cadet s condition worsens. 6. First aid for heat cramps is the same for heat exhaustion; the goal is to prevent the heat cramps from progressing into heat exhaustion with further complications. HEAT STROKE 7. Heat stroke is a medical emergency and can be fatal if not immediately addressed. The casualty must be evacuated to the nearest medical treatment facility as soon as possible. 8. Signs and symptoms for heat stroke include SIGNS AND SYMPTOMS HEAT STROKE Hot dry skin. Headache. Note. In the early progression of heat stroke, the skin may be moist or wet Convulsions and chills. Dizziness. Nausea. Weakness. Pulse and respirations are weak and rapid Vomiting. Confusion, mumbling (do mental check questions to see if brain is working correctly). Combative. Passing out (unconscious). FIRST AID FOR HEAT STROKE 84
91 9. Immediately begin cooling the Cadet off (the faster the body is cooled, the less damage to the brain and organs) as follows: Cool the casualty with any means available, even before removing clothes. Strip (if possible, ensure a same gender helper is present). Rapidly cool by immersing the casualty in cold water. Rapidly cool with ice sheets as follows: Cover all but face with iced sheets. Ensure the iced sheet is soaked prior to applying to the casualty. Place ice packs, if available, in groin, axillae (armpits) and around the neck. Fan the entire body. Stop cooling if casualty starts shivering. Seek medical aid. Evacuate immediately, and continue cooling during transport. Give nothing by mouth. Note. The same person should observe the Cadet during cooling and evacuation in order to spot symptom changes. HYPONATREMIA (WATER INTOXICATION) 10. Hyponatremia is a medical emergency which can be mistaken for heat stroke, though treatment is very different. Note. This condition most often occurs during initial entry training; however, it may occur anytime overhydration is encountered. 11. Signs and symptoms for hyponatremia include SIGNS AND SYMPTOMS OF HYPONATREMIA Mental status changes. Vomiting. History of consumption of large volume of water. Poor food intake. Abdomen distended/bloated. Large amounts of clear urine. 12. First aid measures for hyponatremia include FIRST AID FOR HYPONATREMIA Do not give more water or intravenous fluids. If awake, allow Cadet to consume salty foods or snacks. Seek medical aid. Evacuate immediately. 85
92 COLD WEATHER INJURIES FIRST AID FOR COLD INJURY (TC , 21JAN16) 1. Cold weather-related injuries include injuries due to decreased temperature (hypothermia, frostbite, and nonfreezing cold injury); injuries due to heaters; carbon monoxide poisoning; and accidents due to impaired physical and/or mental function resulting from cold stress. Cold weather injuries can also occur in warmer ambient temperatures when an individual is wet due to rain or water immersion. For more information, see the United States Army Public Health Command (Cold Weather Casualties and Injuries) Web site. More information concerning cold weather injuries can also be found in ATP and TC HYPOTHERMIA 2. Hypothermia is defined as a body core temperature below 95 Fahrenheit (F). Hypothermia is usually characterized as mild, moderate, or severe, based on body core temperature. In order to properly diagnose hypothermia, core temperature must be measured rectally with a thermometer with an extended low range scale. Oral and tympanic temperatures will not yield accurate results in a cold environment, even when care is taken to use the best technique. CAUTION Hypothermia is a medical emergency, appropriate first aid and evacuation to the nearest medical treatment facility must be initiated as soon as possible. With generalized hypothermia, the entire body has cooled with the core temperature below 95 F. 3. Hypothermia occurs when heat loss is greater than heat production. This can occur suddenly, such as during partial or total immersion in cold water, or over hours or days, such as during extended operations or survival situations. 4. Hypothermia may occur at temperatures above freezing, especially when a person s skin or clothing is wet. SIGNS AND SYMPTOMS OF HYPOTHERMIA 5. Signs and symptoms of hypothermia include Vigorous shivering is typically present. Shivering may decrease or cease as core temperature continues to fall. Conscious, but usually apathetic or lethargic. Confusion. Sleepiness. Slurred speech. Shallow breathing. Very slow respirations. Weak pulse. Low or unattainable blood pressure. Change in behavior with or without poor control over body movements with or without slow reactions. With severe hypothermia, the casualty may be unconscious or stuporous. 86
93 FIRST AID FOR HYPOTHERMIA 6. The goals for field management of hypothermia are to rescue, examine, insulate, and rapidly transport. If untreated, hypothermia is a true medical emergency and requires evacuation. CAUTION Do not allow the casualty to use tobacco, or consume alcohol or caffeinated drinks. 7. Rewarming techniques include Remove the casualty from the cold environment. Replace wet clothing with dry clothing. Cover the casualty with insulating material or blanket. Wrap the casualty from head to toe. Avoid unnecessary movement from the casualty. If casualty is conscious, slowly give high caloric sweet warm fluids. Seek medical aid. Evacuate as soon as possible with the casualty lying down. IMMERSION FOOT (TRENCH FOOT) 8. Like chilblain, immersion syndrome of the feet is a nonfreezing cold-weather injury that can occur in damp, wet conditions. The most commonly affected area is the feet and occasionally involves the hands. If left untreated, or allowed to fester (to become septic), loss of tissue to include loss of limbs and gangrene can result. Permanent disability may result from severe immersion syndrome of the feet or hands. Signs and Symptoms of Immersion Foot 9. Signs and symptoms of immersion foot include Cold, numb feet that may progress to hot with shooting pains. Slight sensory change for 2 to 3 days. Swelling, redness, and bleeding may become pale and blue. Accompanied by aches, increased pain sensitivity and infection. Loss of sensation. Severe edema and gangrene. Loss of tissue. First Aid for Immersion Foot 10. First aid measures for immersion foot include Remove wet or constrictive clothing, gently wash and dry affected extremities. Elevate affected limbs and cover with layers of loose, warm, dry clothing. Do not pop blisters, apply lotions or creams, massage, expose to extreme heat or permit Cadets to walk, which can increase tissue damage and worsen the injury. Seek medical attention. Evacuate for medical treatment. 87
94 10-7. TRANSPORT A CASUALTY (TC , 21JAN16) 1. Transporting a casualty away from danger or to an evacuation vehicle is a key component of first aid. Care must be exercised in order not to further injure the casualty REMOVING A CASUALTY FROM A VEHICLE WARNING If the casualty was involved in a vehicle crash you should always consider that he may have a spinal injury. Unless there is an immediate life-threatening situation (such as fire, explosion), DO NOT move the casualty with a suspected back or neck injury. Seek medical personnel for guidance on how to transport the casualty. 2. To remove a casualty from a vehicle if necessary, laterally With the assistance of another Cadet, grasp the casualty s arms and legs. While stabilizing the casualty s head and neck as much as possible, lift the casualty free of the vehicle and move him to a safe place on the ground. Note. If medical personnel are available, they may stabilize the casualty s head, neck, and upper body with a special board or splint. 3. To remove a casualty from a vehicle if necessary, upward Note. You may have to remove a casualty upward from a vehicle; for example, from the passenger compartment of a wheeled vehicle lying on its side, or from the hatch of an armored vehicle sitting upright. You may place a pistol belt or similar material around the casualty s chest to help pull him from the vehicle. With the assistance of another Cadet inside the vehicle, draw the casualty upward using the pistol belt or similar material or by grasping his arms. While stabilizing the casualty s head and neck as much as possible, lift the casualty free of the vehicle and place him on the topmost side of the vehicle. Note. If medical personnel are available, they may stabilize the casualty s head, neck, and upper body with a special board or splint. Depending on the situation, move the casualty from the topmost side of the vehicle to a safe place on the ground. WARNING DO NOT use manual carries to move a casualty with a neck or spine injury, unless a lifethreatening hazard is in the immediate area. Seek medical guidance on how to move and transport the casualty. 88
95 TYPES OF MANUAL CARRIES 4. Manual carries are used to move a casualty a short distance to a safer location (cover), a greater level of care, or to a medical evacuation vehicle or a CASEVAC transport. 5. Select an appropriate method to transport the casualty as follows: Note. The fireman s carry is the typical one-man carry practiced in training. However, in reality, with a fully equipped casualty, it is nearly impossible to lift a Cadet over your shoulder and move to cover quickly. Fireman s carry use for an unconscious or severely injured casualty. CAUTION DO NOT use the neck drag if the casualty has a broken arm or a suspected neck injury. Neck drag use in combat for short distances. Cradle-drop drag use to move a casualty who cannot walk when being moved up or downstairs. Use litters if materials are available, if the casualty must be moved a long distance, or if manual carries will cause further injury. EVACUATE THE CASUALTY USING THE APPROPRIATE TYPE OF CARRY 6. Once the appropriate type of carry is selected, evacuate the casualty. 7. Conduct a Fireman s carry by using the following procedures: Kneel at the casualty s uninjured side. Place the casualty s arms above his head. Cross the ankle on the uninjured side over the opposite ankle. Place one of your hands on the shoulder farther from you and your other hand on his hip or thigh. Roll the casualty toward you onto his abdomen. Straddle the casualty. Note. Care must be taken to keep the casualty s head from falling backward, resulting in a neck injury. Place your hands under the casualty s chest and lock them together. Lift the casualty to his knees as you move backward. Continue to move backwards, thus straightening the casualty s legs and locking the knees. Walk forward, bringing the casualty to a standing position but tilted slightly backward to prevent the knees from buckling. Maintain constant support of the casualty with one arm. Free your other arm, quickly grasp his wrist, and raise the arm high. Quickly pass your head under the casualty s raised arm, releasing it as you pass under it. Move swiftly to face the casualty. Secure your arms around his waist. Immediately place your foot between his feet and spread them (approximately 6 to 8 inches apart). Again, grasp the casualty s wrist and raise the arm high above your head. Bend down and pull the casualty s arm over and down your shoulder bringing his body across your shoulders. At the same time pass your arm between the legs. 89
96 Grasp the casualty s wrist with one hand while placing your other hand on your knee for support. Rise with the casualty correctly positioned. Note. Your other hand is free to use as needed. WARNING DO NOT use the neck drag if the casualty has a fractured arm or a suspected neck injury. If the casualty is unconscious, protect his head from the ground. 8. Conduct a neck drag by using the following procedures: Place the casualty on his back, if not already there, otherwise, use the following steps: Kneel at the casualty s uninjured side. Place the casualty s arm above his head. Cross the ankle on the injured side over the opposite ankle. Place one of your hands on the shoulder farther from you and your other hand on his hip or thigh. Roll the casualty toward you onto his abdomen. Once the casualty is on his back, tie the casualty s hands at the wrists. (If conscious, the casualty may clasp his hands together around your neck.) Straddle the casualty in a kneeling face-to-face position. Loop the casualty s tied hands over and around your neck. Crawl forward, looking ahead, dragging the casualty with you. 9. Conduct a cradle drop drag by using the following procedures: With the casualty lying on his back, kneel at the head. Slide your hands, palms up, under the casualty s shoulders. Get a firm hold under his armpits. Partially rise, supporting the casualty s head on one of your forearms. Note. You may bring your elbows together and let the casualty s head rest on both of your forearms. With the casualty in a semi-sitting position, rise and drag the casualty backwards. Back down the steps (or up if appropriate), supporting the casualty s head and body and letting the hips and legs drop from step to step. LITTERS 10. When possible, a casualty should be transported on a litter rather than using a manual carry. A litter has many advantages. 90

97 POLYMER FLEXIBLE LITTER 11. Evacuate the casualty using a commercial polymer flexible litter (referred further in the text as a flexible litter, or litter). First prepare the flexible litter for transport by Removing the flexible litter from the pack and placing it on the ground. Unfastening the retainer strap. Stepping on the foot end of the flexible litter and unrolling the flexible litter completely. Bending the flexible litter in half and back roll. Repeating with the opposite end of the litter so that the flexible litter lays flat. Pointing out the handholds, straps for the casualty, and dragline at the head of the litter. 12. Place and secure a casualty onto to a flexible litter by conducting the following: Place the flexible litter next to the casualty so that the head end of the litter is next to the casualty s head. Place the cross straps under the flexible litter. Log roll the casualty onto his side in a steady and even manner. Slide the flexible litter as far under the casualty as possible. Gently roll the casualty until he is again lying on his back with the litter beneath him. Slide the casualty to the middle of the flexible litter, keeping his spinal column as straight as possible. Pull out the strap from under the flexible litter. Bring the straps across the casualty. Lift the sides of the flexible litter and fasten the four cross straps to the buckles directly opposite the straps. Lift the foot portion of the flexible litter. Feed the foot straps over the casualty s lower extremities and through the unused grommets at the foot end of the flexible litter. 13. Lift the casualty by Note. For a flexible litter, lift the sides of the flexible litter and fasten the four cross straps to the buckles directly opposite the straps. Lift the foot portion of the flexible litter and feed the foot straps through the unused grommets at the foot end of the flexible litter and fasten the buckles. Using for Cadets (two on each side), all facing the casualty s feet. Have each Cadet grab handle with their inside hand. In one fluid motion on the preparatory command of prepare to lift and then command of execution of lift, raise as a unit holding the casualty parallel and even. 91
98 MULTIHINGED FOLDING LITTER 14. A multihinged folding litter (referred further in the text as a multihinged litter, or litter), is often used in tactical situations where compact size is valued. When unfolded, the litter approximates the dimensions of a standard litter. 15. Evacuate a casualty by preparing a multihinged litter for use by Removing the litter from the bag. Standing the litter upright and releasing buckles from the litter. Placing the litter on the ground and completely extending it with the fabric side facing up. Keeping the multihinged litter as straight as possible, grab the handles and rotate them inwards until all the hinges rotate and lock. Note. This action is done best by using two individuals on each end of the litter executing this step simultaneously. While maintaining the hinges in the locked position, apply firm, steady pressure on the spreader bar with your foot. Increase pressure with your foot until the spreader bar locks into place. 16. Place the casualty on the litter as follows: Place the litter next to the casualty. Ensure that the head end of the litter is beside the head of the casualty. Log roll the casualty and slide the litter as far under him as possible. Gently roll the casualty down onto the litter. Slide the casualty to the center of the litter. Be sure to keep the spinal column as straight as possible. Secure the casualty to the litter using litter straps or other available materials. IMPROVISED LITTERS 17. There are times when a casualty may have to be moved and a standard litter is not available. Evacuate a casualty by using an improvised litter. 92
99 Poncho Improvised Litter 18. Use a poncho with two poles or limbs as follows: Open the poncho and lay the two poles lengthwise across the center forming three equal sections. Reach in, pull the hood up toward you, and lay it flat on the poncho. Fold on section of the poncho over the first pole. Fold the remaining section of the poncho over the second pole to the first pole. Jacket Improvised Litter 19. Use shirts or jackets and two poles or limbs by using the following procedure: Zipper closed two uniform jackets and turn them inside out, leaving the sleeves inside. Lay the jackets on the ground and pass through the sleeves, leaving one at the top and one at the bottom of the poles to support the casualty s whole body. 20. Place the casualty on the improvised litter by using the following procedure: Lift the litter. Place the litter next to the casualty. Ensure the head end of the litter is adjacent to the head of the casualty. Slide the casualty to the center of the litter. Be sure to keep the spinal column as straight as possible. Secure the casualty to the litter using litter straps or other available materials. 93
100 LOAD CASUALTIES ONTO A MILITARY VEHICLE 21. Information concerning ground ambulances, air ambulances, and CASEVAC is found in ATP and STP 8-68W13-SM-TG. Ground Ambulance Note. Ground ambulances have combat medics to take care of the casualties during evacuation. Follow any special instructions they give for loading, securing, or unloading casualties. 22. When loading a ground ambulance, use the following procedures: Make sure each litter casualty is secured to his litter. Use the litter straps when available. Load the most serious casualty last. Load the casualty head first (head in the direction of travel) rather than feet first. Make sure each litter is secured to the vehicle. Note. Unload casualties in reverse order, most seriously injured casualty first. Air Ambulance Note. Air ambulances have combat medics (flight medics) to take care of the casualties during evacuation. Follow any special instructions that they give for loading, securing, or unloading casualties. 23. When loading air ambulances, use the following procedures and precautions: WARNING Never go around the rear of the UH-60 or UH-1 aircraft. Remain 50 yards from the helicopter until the litter squad is signaled to approach the aircraft. Approach the aircraft in full view of the aircraft crew, maintaining visual confirmation that the crew is aware of the approach of the litter party. Ensure that the aircrew can continue to visually distinguish friendly from enemy personnel at all times. Maintain a low silhouette when approaching the aircraft. Approach UH-60 and UH-1 aircraft from the sides. Do not approach from front or rear. If you must move to the opposite side of the aircraft, approach from the side the exterior of the aircraft. Then hug the skin of the aircraft, and move around the front of the aircraft to the other side. Approach CH-47 aircraft from the rear. Approach MH-53 aircraft from the sides to the rear ramp, avoiding the tail rotor. Approach nonstandard aircraft in full view of the crew, avoiding tail rotors, main rotors, propellers, and jet intakes. Approach performance aircraft (M/C-130, C-17, and C-5B) from the rear, under the guidance of the aircraft loadmaster or the ground control party. Load the most seriously injured casualty last. Load the casualty who will occupy the upper berth first, and then load the next litter casualty immediately under the first casualty. 94
101 Note. This is done to keep the casualty from accidentally falling on another casualty if his litter is dropped before it is secured. When casualties are placed lengthwise, position them with their heads toward the direction of travel. Make sure each litter casualty is secured to the litter. Make sure each litter is secured to the aircraft. Note. Unload casualties in reverse order, most seriously injured first. Ground Military Vehicles 24. Ground military vehicles used to transport casualties are referred to as CASEVAC. When nonmedical military vehicles are used, medical equipment and oftentimes medical personnel are not present.. Note 1. Nonmedical military vehicles may be used to evacuate casualties when no medical evacuation vehicles are available. Note 2. If medical personnel are present, follow their instructions for loading, securing, and unloading casualties. 25. The following are guidelines for loading casualties into a ground evacuation vehicle: When loading casualties into the vehicle, load the most seriously injured last. When the casualty is loaded lengthwise, load the casualty with his head pointing forward, toward the direction of travel. Ensure each casualty is secured to the litter. Use litter straps if available. Secure each litter to the vehicle as it is loaded into place. Make sure each litter is secured. Note. Unload casualties in reverse order, most seriously injured casualty first. 95
102 10-8. REQUEST MEDICAL EVACUATION (ATP ) 1. Collect all applicable information needed for the MEDEVAC request. 1. Determine the grid coordinates for the pickup site. 2. Obtain radio frequency, call sign, and suffix. 3. Obtain the number of patients and precedence. 4. Determine the type of special equipment required. 5. Determine the number and type (litter or ambulatory) of patients. 6. Determine the security of the pickup site. 7. Determine how the pickup site will be marked. 8. Determine patient nationality and status 9. Obtain pickup site nuclear, biological, and chemical (NBC) contamination information, normally obtained from the senior person or medic. Note: NBC line 9 information is only included when contamination exists. 1. Record the gathered MEDEVAC information using the authorized brevity codes. Note: Unless the MEDEVAC information is transmitted over secure communication systems, it must be encrypted, except as noted in step 3b(1). 1. Location of the pickup site (line 1). 2. Radio frequency, call sign, and suffix (line 2). 3. Numbers of patients by precedence (line 3). 4. Special equipment required (line 4). 5. Number of patients by type (line 5). 6. Security of the pickup site (line 6). 7. Method of marking the pickup site (line 7). 8. Patient nationality and status (line 8). 9. CBRN contamination (line 9). 2. Transmit the MEDEVAC request. 1. Contact the unit that controls the evacuation assets. (1) Make proper contact with the intended receiver. (2) Use effective call sign and frequency assignments from the SOI. (3) Give the following in the clear I HAVE A MEDEVAC REQUEST; wait one to three seconds for a response. If no response, repeat the statement. 2. Transmit the MEDEVAC information in the proper sequence. (1) State all line item numbers in clear text. The call sign and suffix (if needed) in line 2 may be transmitted in the clear. 96
103 Note: Line numbers 1 through 5 must always be transmitted during the initial contact with the evacuation unit. Lines 6 through 9 may be transmitted while the aircraft or vehicle is en route. (2) Follow the procedure provided in the explanation column of the MEDEVAC request format to transmit other required information. (3) Pronounce letters and numbers according to appropriate radio/telephone procedures. (4) Take no longer than 25 seconds to transmit. (5) End the transmission by stating Over. (6) Keep the radio on and listen for additional instructions or contact from the evacuation unit. 97

104 Nine-Line medical evacuation request 98


105 Nine-Line medical evacuation request (continued) 99


106 MEDEVAC REQUEST CARD FRONT 100

107 MEDEVAC REQUEST CARD BACK 101
108 Chapter 11 Communications Say what you mean and mean what you say. General George S. Patton Jr. (FM ; FM Pg 4-51 JUL06; FM Pg 2-12 MAR07; FM SEP87) 11-1 PROCEDURE WORDS (PROWORDS) 1. PROWORDS a. Speed up communications b. Add a degree of security c. Help with mission command d. Pro-words are established during tactical operations to describe objectives, phase lines, check points and link ups and to keep voice transmission as short and clear as possible; radio operators use them to take the place of long sentences. 2. Signals Signals can be used in many forms during an operation. Signals are usually either audio or visual. The key to the use of signals is ensuring everyone is aware of the signal and its meaning. PROWORD ALL AFTER ALL BEFORE AUTHENTICATE AUTHENTICATION IS BREAK CALL SIGN CORRECT CORRECTION Explanation The portion of the message to which I have reference is all that which follows. The portion of the message to which I have reference is all that which precedes. The station called is to reply to the challenge which follows The transmission authentication of this message is. I hereby indicate the separation of the text from other portions of the message. The group that follows is a call sign. You are correct, or what you have transmitted is correct. An error has been made in this transmission. Transmission will continue with the last word correctly transmitted. An error has been made in this transmission (or message indicated). The correct version is. That which follows is a corrected version in answer to your request for verification. 102
109 PROWORD DISREGARD THIS TRANSMISSION OUT Explanation This transmission is in error. Disregard it. This PROWORD shall not be used to cancel any message that has been completely transmitted and for which receipt or acknowledgement has been received. DO NOT ANSWER EXECUTE EXECUTE TO FOLLOW FLASH FROM I AUTHENTICATE Stations called are not to answer this call, receipt for this message, or otherwise to transmit in connection with this transmission. When this PROWORD is employed, the transmission shall be ended with the PROWORD OUT. Carry out the purpose of the message or signal to which this applies. To be used only with the executive mode. Action on the message or signal which follows is to be carried out upon receipt of the PROWORD EXECUTE. To be used only with the delayed executive method. Precedence FLASH The originator of this message is indicated by the address designator immediately following. The group that follows is the reply to your challenge to authenticate. IMMEDIATE IMMEDIATE EXECUTE I READ BACK I SAY AGAIN I SPELL I VERIFY MORE TO FOLLOW OUT OVER PRIORITY READ BACK ROGER (Use instead of copy ) ROUTINE SAY AGAIN SILENCE(Repeated three or more times) SILENCE LIFTED Precedence IMMEDIATE. Action on the message or signal following is to be carried out on receipt of the word EXECUTE. To be sued only with the Immediate Executive Method. The following is my response to your instructions to read back. I am repeating transmission or portion indicated. I shall spell the next word phonetically That which follows has been verified at your request and is repeated. To be used only as a reply to VERIFY. Transmitting station has additional traffic for the receiving station. This is the end of my transmission to you and no answer is required or expected. This is the end of my transmission to you and a response is necessary. Go ahead, transmit Precedence PRIORITY Repeat this entire transmission back to me exactly as received. I have received your last transmission satisfactorily. Precedence ROUTINE Repeat all of your last transmission. Followed by identification data means Repeat (portion indicated). Cease transmission on this net immediately. Silence will be maintained until lifted. (When an authentication system is in force, the transmission imposing silence is to be authenticated). Silence is lifted. (When an authentication system is in force, the transmission lifting silence is to be authenticated). 103
110 PROWORD SPEAK SLOWER Explanation Your transmission is at too fast a speed. Reduce speed of transmission. STOP REBROADCASTING THIS IS TIME UNKNOWN STATION VERIFY WAIT WAIT OUT WILCO Cut the automatic link between the two nets that are being rebroadcast and revert to normal working. This transmission is from the station whose designator immediately follows. That which immediately follows is the time or date time-time group of the message. The identity of the station with whom I am attempting to establish communication is unknown. Verify entire message (or portion indicated) with the originator and send the correct version. To be used only at the discretion of or by the addresses to which the questioned message was directed. I must pause for a few seconds I must pause longer than a few seconds. I have received your signal, understand it, and will comply. To be used only by the addressee. Since the meaning of ROGER is included in that of WILCO, the two PROWORDS are never used together. WORD AFTER WORD BEFORE The word of the message to which I have reference is that which follows. The word of the message to which I have reference is that precedes. The following are not PRO-WORDS and should NEVER be used: BE ADVISED COPY THAT GOOD COPY 104
111 Phonetic Alphabet A ALFA AL FAH B BRAVO BRAH VOH C CHARLIE CHAR LEE or SHAR LEE D DELTA DELL TAH E ECHO ECK OH F FOXTROT FOKS TROT G GOLF GOLF H HOTEL HOH TELL I INDIA IN DEE AH J JULIETT JEW LEE ETT K KILO KEY LOH L LIMA LEE MAH M MIKE MIKE N NOVEMBER NO VEM BER O OSCAR OSS CAH P PAPA PAH Q QUEBEC KEH BECK R ROMEO ROW ME OH S SIERRA SEE AIR RAH T TANGO TANG GO U UNIFORM YOU NEE FORM or OO NEE FORM V VICTOR VIK TAH W WHISKEY WISS KEY X XRAY ECKS RAY Y YANKEE YANG KEY Z ZULU ZOO LOO Numeral Spoken As Numeral Spoken As 0 ZE RO 5 FIFE 1 WUN 6 SIX 2 TOO 7 SEV EN 3 TREE 8 AIT 4 FOW ER 9 NIN ER Number Pronunciation Guide 11-2 RADIO CALL PROCEDURES A preliminary call will be transmitted when the sending station wishes to know if the receiving station is ready to receive a message. When communications reception is good and contact has been continuous, a preliminary call is optional. The following is an example of a preliminary call 105
112 A1D THIS IS B6T, OVER. B6T THIS IS A1D, OVER. A1D THIS IS B6T (sends message), OVER. B6T THIS IS A1D, ROGER OUT. 1. JULIAN DATE The SINCGARS uses a special two-digit form of the Julian date as part of the sync time. The two digit Julian date begins with 01 on 1 January and continues through 00, repeating as necessary to cover the entire year. 2. SYNC TIME To maintain proper sync time, the SINCGARS uses seven internal clocks: a base clock, plus one for each of the six FH channels. Manual and cue settings will display the base clock time. 3. Very High Frequency Radio Systems SINCGARS provide interoperable communications between C2 assets and have the capability to transmit and receive secure voice and data. SINCGARS is secured with electronic attack (EA) security features (such as frequency hopping [FH]) that enable the United States (US) Army, United States Navy (USN), United States Air Force (USAF), and United States Marine Corps (USMC) communications interoperability. This interoperability ensures successful communications for joint and single component combat operations. 4. Single-Channel Ground Radio System Characteristics and Capabilities a. The SINCGARS family is designed on a modular basis to achieve maximum commonality among various ground and airborne configurations. A common RT is used in the man pack and all vehicle configurations. These individual components are totally interchangeable from one configuration to the next. Additionally, the modular design reduces the burden on the logistics system to provide repair parts. b. SINCGARS operates in either the SC or FH mode. It is compatible with all current US and multinational VHF radios in the SC non-secure mode. SINCGARS is compatible with other USAF, USMC, and USN SINCGARS in the FH mode. SINCGARS stores eight SC frequencies, including the cue and manual frequencies and six separate hopsets. c. SINCGARS accepts either digital or analog input and imposes the signal onto a SC or FH output signal. In FH, the input changes frequency about 100 times per second over portions of the tactical VHF range. This hinders threat intercept and jamming units from locating or disrupting friendly communications. GROUND VERSION RECEIVER/TRANSMITTER Either the RT-1523/A/B/C/D or the RT-1523E comprise the core component of all ground-based radio sets. The RT-1523 series has internal COMSEC circuits (source of the ICOM designation). The ground versions are equipped with a whisper mode for noise restriction during patrolling or while in defensive positions. The RTO whispers into the handset and is heard at the receiver in a normal voice. 106


113 Front Panel ICOM Radio TR-1523/A/B/C/D K Keypad Display K Fill Port Antenna Port Function Switch Front Panel ICOM Radio RT-1523E ADVANCED SYSTEM IMPROVEMENT PROGRAM The SINCGARS ASIP increases the performance of the SINCGARS SIP (RT-1523 C/D models). It also increases its operational capability in support of the tactical Internet, specifically improved data capability, manpower and personnel integration requirement compliance, and flexibility in terms of interfaces with other systems. Figure 6-3 is an example of the SINCGARS ASIP radio. 107
 batteries, such as BA-5590, contain a toxic, pressurized, and liquefied gas.")

114 SINCGARS ASIP Radio 11-3 BATTERIES AND LOADING FREQUENCY (TM ) Batteries WARNING 1. LITHIUM NON-RECHARGEABLE BATTERIES a. Lithium Non-Rechargeable Batteries contain a great deal of energy. They must never be charged or abused. Attempting to do so could result in leakage, fire or even an explosion. b. Lithium-Sulfur Dioxide (Li-SO2) batteries, such as BA-5590, contain a toxic, pressurized, and liquefied gas. It has a strong pungent odor. Lithium-Manganese Dioxide (Li-MnO2) batteries such as BA-5372 (HUB or Hold-Up battery) and BA-5390 contain a flammable electrolyte. Both types of batteries contain pure Lithium which reacts violently with water. DO NOT heat, incinerate short circuit, puncture, mutilate or attempt to disassemble any battery. DO NOT USE any battery which shows signs of damage, such as bulging, swelling, disfigurement, leaking or staining inside the plastic packaging. Keep all batteries in their original packaging until ready for use. DO NOT test Lithium batteries for capacity with a test set. No external test set exists that provides a reliable result. DO NOT store batteries in unused equipment for more than 30 days. c. If a battery compartment becomes hot to the touch, if it hisses or makes a burping sound, or if you smell irritating pungent Sulfur Dioxide gas: Turn off the equipment immediately and clear the area. Let the equipment cool for at least an hour. After the equipment is cool and the odor has cleared, remove the battery or batteries. Install new battery or batteries and resume operation. d. If the equipment again becomes hot to the touch, go through the above steps but do not install new batteries. Turn in the equipment for maintenance. 108
115 DO NOT place Lithium batteries in ordinary trash; turn them in for disposal in accordance with local regulations. DO NOT store Lithium batteries with other hazardous materials and keep them away from open flame or heat. DO NOT use water to fight a Lithium battery fire. This is an extremely intense fire frequently characterized by a bright red flame. Carbon Dioxide or dry chemical fire extinguishers are effective in fighting fires of other combustibles and in keeping the batteries cool when exposed to fires in the vicinity. Sprinklers are recommended for storage areas to douse fires of other combustible materials and to keep batteries cool. e. NEVER use a Halon type fire extinguisher on a Lithium battery fire. This will only increase the intensity of the fire. f. In the event of a Lithium fire, immediately EVACUATE THE AREA and contact the appropriate emergency authorities. Class D fire extinguishers are to be used only by professional fire fighters. 2. RECHARGEABLE BATTERIES a. This includes BB-390/U Nickel-Metal Hydride (Ni-MH) and BB-2590/U Lithium-Ion (Li-Ion) batteries. DO NOT leave batteries in equipment for long term storage (more than 30 days). b. Charge batteries in long term storage at least annually, and charge them before inserting in equipment. c. Before opening original packaging always examine the package for signs of leakage, staining or other indications of battery damage. DO NOT use a damaged battery. a. Always charge a rechargeable battery on the appropriate charger according to the dictates of the manufacturer. NEVER disassemble, heat, burn, or incinerate these or any batteries. b. CO2 or Dry Chemical fire extinguishers are suggested for fires involving these batteries. 2. Turn in batteries for disposal. Dispose of them in accordance with local regulations. WARNING 3. NON-RECHARGEABLE ZINC-AIR BATTERIES a. This includes BA-8180/U and BA-8140/U Zinc-Air (Zn-Air) batteries. DO NOT leave batteries in equipment for long term storage (more than 30 days). b. Before opening original packaging always examine the package for signs of leakage, staining or other indications of battery damage. DO NOT use a damaged battery. c. Zn-Air batteries contain gelled Potassium Hydroxide (KOH) as an electrolyte. This is corrosive and will burn the skin. If it comes in contact with the skin, wash thoroughly with soap and water. If it comes in contact with the eyes, flush with copious amounts of water and seek immediate medical attention. NEVER disassemble, heat, burn, or incinerate these or any batteries. d. CO2 or Dry Chemical fire extinguishers are suggested for fires involving these batteries. e. Turn in batteries for disposal. Dispose of them in accordance with local regulations. 109
116 LOADING FREQUENCIES 1. SINCGARS is a single channel radio in that it can transmit or receive on only one channel at a time. Single channel or the SC mode of operation, refers to the fact that only one frequency is being used for communications. 2. FREQUENCIES. The SINCGARS radio will operate on 2320 different frequencies in the range of to MHz, with a 25 KHz separation between frequencies. 3. CHANNELS Eight single channel frequencies can be loaded into a SINCGARS RT: one in each numbered channel 1-6, plus one each in the CUE and MAN channels. 4. LOADING SC frequencies are loaded via the RT keypad. Although a matter of command policy, operators are normally required to load only those SC frequencies they are expected to need during mission operations. 5. Load SC frequencies, use the procedure shown in Table 4-2, below. (Also, see Primary Operator Task 1, Load Single Channel Frequencies into SINCGARS RT. ) How to Load SC Frequencies (1) Set FCTN switch to LD; MODE to SC. (2) Select CHAN 1-6, CUE, or MAN. (3) Press FREQ, then CLR. (4) Enter 5-digit frequency. (5) Press STO. (6) Repeat for each channel to be loaded. Primary Task 1 Load Single Channel Freq. in SINCGARS RT SUBTASKS ACTION RESULTS a. Prepare to (1) Obtain proper freqs from (Load CUE freq only if directed) perform task ANCD* (2) Set RT controls COMSEC to PT MODE to SC FCTN to ZFH, TST, and then to LD CHAN to MAN, CUE, or 1-6 RT display shown [GOOD] (or see unit maintainer) b. Load SC Freq (1) Press: FREQ CLR XXXXX (Freq) STO Display shows [00000] or [30000] Display shows [ _ ] Display shows SC freq entered Display blinks (data is stored) (2) Repeat Step b-1 for each freq (As directed by NCS or unit needed SOP) (3) Set Loading of SC freq is complete FCTN to SQ ON *In units using secure, FH nets, operators normally load on a routine basis only a MANSC frequency. CUE and CHAN 1-6 SC frequencies are loaded only as needed or directed **Only NCS and Alt NCS routinely load a CUE frequency ***RT settings for RT-1523E are set via MENU 110
117 Chapter 12- Weapons Overview M4 Rifle and Carbine The Army standard service rifle is either the M16-series rifle or M4-series carbine. These weapons are described as a lightweight, 5.56-mm, magazine-fed, gas operated, air-cooled, shoulder-fired rifle or carbine. They fire in semiautomatic (single shot), three-round burst, or in automatic mode using a selector lever, depending on the variant. The weapon system has a standardized mounting surface for various optics, pointers, illuminators, and equipment, to secure those items with common mounting and adjustment hardware. Clearing Procedures for the M4 Series Weapon The first step in maintenance is to clear the weapon. This applies in all situations, not just after firing. This paragraph explains the techniques and procedures for clearing the M16-/M4-series weapon. Additional mechanical training is available in TM to include disassembly, maintenance, assembly, loading, and sight manipulation. WARNING: To be considered SAFE before disassembly, cleaning, inspecting, transporting, or storing, the weapon must be cleared. 1. Point the muzzle in a designated SAFE DIRECTION. Attempt to place selector lever on SAFE. If weapon is not cocked, lever cannot be placed on SAFE. 2. Remove the magazine by depressing the magazine catch button and pulling the magazine down. 3. To lock bolt open, pull charging handle rearward. Press bottom of bolt catch and allow bolt to move forward until it engages bolt catch. Return charging handle to full forward position. If you have not done so before, place the selector lever on SAFE. 4. Visually (not physically) inspect the receiver and chamber to ensure these areas contain no ammo. 5. With the selector lever pointing toward SAFE, allow the bolt to go forward by pressing the upper portion of the bolt catch. 6. Place the selector lever on SEMI and squeeze the trigger. 7. Pull the charging handle fully rearward and release it, allowing the bolt to return to the full forward position. 8. Place the selector lever on SAFE. 9. Close the ejection port cover. 111
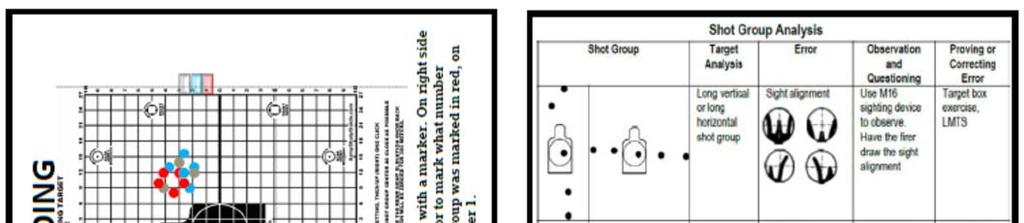
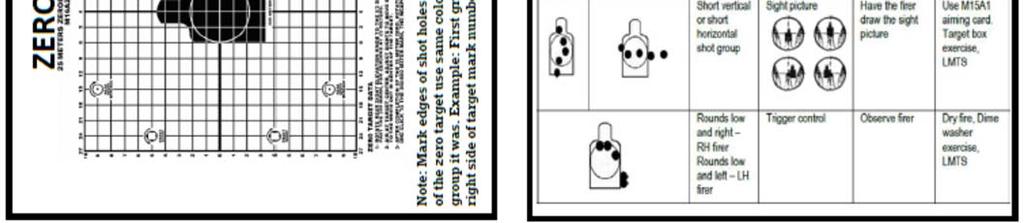
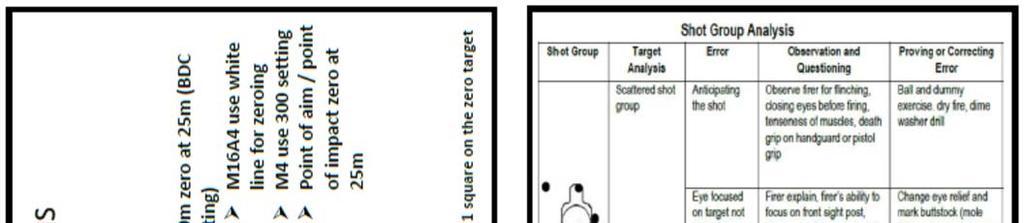
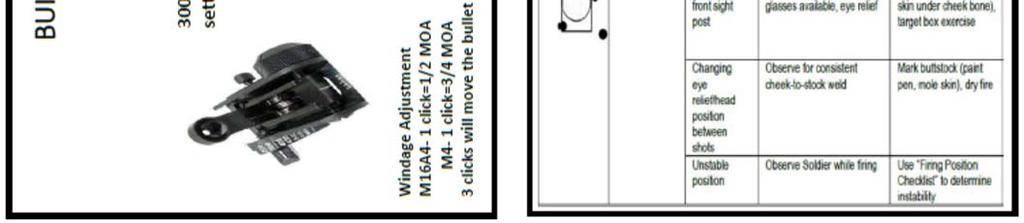
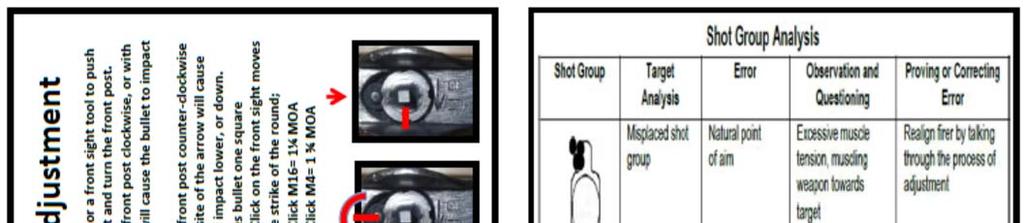
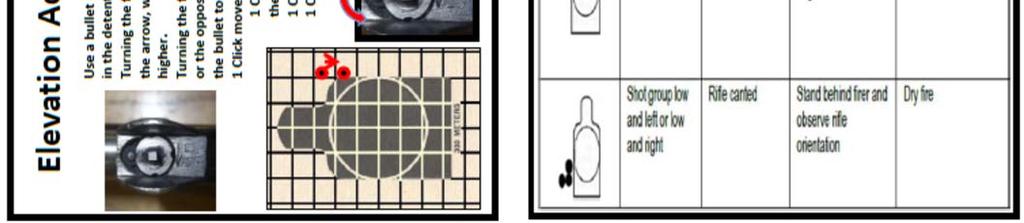
118 112


119 113
120 12-2. M249 Machine Gun The 5.56-mm M249 machine gun supports the Soldier in both the offense and defense. The M249 provides a medium volume of close and continuous fire. The Soldier needs this to accomplish the mission. The M249 lets units engage the enemy with controlled and accurate fire from individual weapons. The medium-range, close defensive, and final protective fires delivered by the M249 MG form an integral part of a unit s defensive fires. This chapter also describes the weapon and the types of ammunition in detail and provides a table of general data. Although this chapter discusses employment of the M249 in the machine gun role, Soldiers also use this weapon in the automatic rifle role. DESCRIPTION AND DATA The M249 machine gun is a gas-operated, air-cooled, belt- or magazine-fed, automatic weapon that fires from the open-bolt position (Figure 1-1). Its maximum rate of fire is 850 rounds per minute. Ammunition feeds into the weapon from a 200-round ammunition box containing a disintegrating, metallic, splitlink belt. Only in emergencies do M249 gunners use a 20- or 30-round M16 rifle magazine, in part because this increases the chance of stoppages. The gunner can fire the versatile M249 machine gun from the shoulder, hip, or underarm; with a bipod; or with a tripod. CLEARING PROCEDURES The first step in maintenance is to clear the weapon (Figure 1-8). This applies in all situations, not just after firing. The gunner must always assume the M249 machine gun is loaded. To clear the M249, the gunner performs the following procedures: Moves the safety to the fire F position by pushing it to the left until the red ring is visible. With his right hand, palm up, pulls the cocking handle to the rear, locking the bolt in place. 114
 Returns and locks the cocking handle to the forward position.")
 Checks the feed tray assembly. 3) Lifts the feed tray assembly and inspects the chamber. 4) Checks the space between the bolt assembly and the chamber.")
121 While holding the resistance on the cocking handle, moves the safety to the safe position by pushing it to the right until the red ring is not visible. (The gunner can only place the weapon on safe with the bolt locked to the rear.) Returns and locks the cocking handle to the forward position. Raises the cover and feed mechanism assembly, and conducts the five-point safety check for brass, links, or ammunition. 1) Checks the feed pawl assembly under the feed cover. 2) Checks the feed tray assembly. 3) Lifts the feed tray assembly and inspects the chamber. 4) Checks the space between the bolt assembly and the chamber. 5) Inserts two fingers of left hand into magazine well to extract ammunition or brass. Closes the cover and feed mechanism assembly, and moves the safety to the F position. With his right hand, palm up, returns the cocking handle to the rear position. Presses the trigger and at the same time eases the bolt forward by manually riding the cocking handle forward. 115
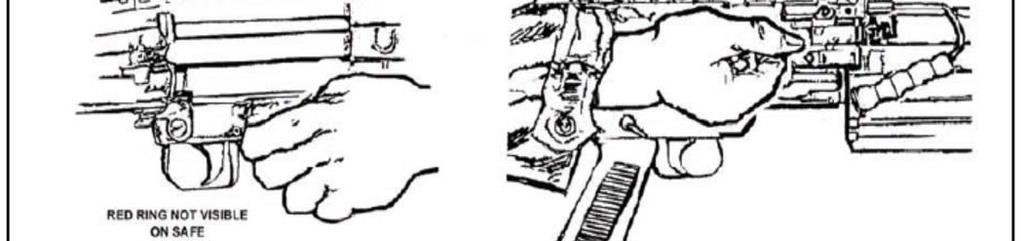
122 116

123 117
 BELT When loading belted ammunition always can t the weapon to the right.")

124 LOADING PROCEDURES To load the M249, the gunner must first clear it as described. (With the feed cover raised, the gunner makes sure his face is not exposed to the open chamber area while loading.) BELT When loading belted ammunition always can t the weapon to the right. Make sure the open side of the links is facing down, and place the lead link tab or first round of the belt in the tray groove against the cartridge stop. Place the rounds flat across the feed tray. With your left hand, count five to six rounds down to hold ammunition in place on the feed tray, while at the same time closing the feed cover with your right hand. When closing the feed cover, always place your hand in front of the rear sight to prevent accidentally changing the sight adjustment. UNLOADING PROCEDURES To unload the weapon-- Grasp the cocking handle with the right hand, palm facing upwards. Pull the cocking handle to lock the bolt to the rear. Hold the cocking handle with your right hand, and place the weapon on safe. With your left hand, push the cocking handle to the forward locked position. Depending on whether you are using belt-fed or magazine-fed ammunition, do the following: Raise the feed cover and remove any ammunition or links from the feed tray. Perform the five-point safety check. 118
125 Push the magazine release tab down and pull the magazine from the magazine well. Raise the feed cover and perform the five-point safety check M240B Machine Gun The M240B machine gunner supports the rifleman in both offensive and defensive operations. The 7.62-mm M240B provides a heavy volume of close and continuous fire. The M240B engages targets those rifles can engage, and does so with controlled and accurate fire. The long-range, close defensive, and final protective fires delivered by the M240B form an integral part of a unit s defensive fires. This chapter describes the weapon, its components, and its ammunition in detail; and it includes a table of general data. The M240B is a general-purpose machine gun. It mounts on a bipod, tripod, aircraft, or vehicle. It is belt fed, air cooled, gas operated, and fully automatic. It fires from an open bolt. Ammunition feeds from a 100-round bandoleer with disintegrating links. The gas from firing one round provides the energy to fire the next one. Thus, the gun fires automatically as long as it has ammunition and the gunner holds the trigger is held to the rear. As the gun fires, the links separate and eject from the side. Empty cases eject from the bottom. Each M240B is issued with a spare barrel. The gunner can change barrels quickly, because the weapon has a fixed head space. The bore of the barrel is chromium plated, reducing barrel wear to a minimum. However, gunners should never switch barrels between weapons. This could prove fatal. CLEARING PROCEDURES The first step in maintenance of the M240B is to clear it. This applies in all situations, not just after firing. The gunner must always assume the M240B is loaded. To clear the M240B, he must-- Move the safety to the fire F position. 119

126 With his right hand, (palm up) pull the cocking handle to the rear, ensuring that the bolt locks to the rear (bipod mode). Return the cocking handle to its forward position. Place the safety on S. Raise the cover assembly and conduct the four-point safety check for brass, links, or ammunition. Check the feed pawl assembly under the cover. Check the feed tray. Lift the feed tray and inspect the chamber. Check the space between the face of the bolt and chamber as well as the space under the bolt and operating rod assembly. Close the feed tray and cover assembly. Place the safety on F. Pull the cocking handle to the rear, and pull the trigger while manually riding the bolt forward. Close the ejection port cover. 120

127 FUNCTION CHECK The gunner must perform a function check to ensure that the M240B is correctly assembled by performing the following steps in order: Place the safety on F. Pull the cocking handle to the rear, locking the bolt to the rear of the receiver. Return the cocking handle to the forward position. Place the safety on S and close the cover. Pull the trigger. (Bolt should not go forward). Place the safety on F. Pull the cocking handle to the rear, pull the trigger, and ride the bolt forward. Close the ejection port cover. LOADING PROCEDURES The gunner makes sure the weapon is clear. He places the safety on F. With his palm facing up, he pulls the cocking handle to the rear. This puts the bolt assembly in the rear position. While the sear holds the bolt to the rear, the gunner manually returns the cocking handle to the forward position and places the safety on S. He raises the cover assembly and ensures the feed tray, receiver assembly, and chamber are clear. He lowers the feed tray, places the safety on F, and pulls the cocking handle to the rear. While maintaining rearward pressure on the cocking handle, he pulls the trigger and eases the bolt assembly forward. He places the first round of the belt in the feed tray groove with the double link leading, and with the open side of links face down. While closing the 121
128 cover assembly, he holds the belt about six rounds from the loading end. Ensure that the round remains in the feed tray groove, and close the cover assembly. UNLOADING PROCEDURES The gunner unloads the M240B by pulling and locking the bolt to the rear position, if it is not already there. He manually returns the cocking handle to its forward position. He places the safety on S. He raises the cover assembly and removes any ammunition or links from the feed tray. He performs the four-point safety check 122
129 Chapter 13-Land Navigation TC NOV 13 COMPASS HANDLING Compasses are delicate instruments and should be cared for accordingly. A detailed inspection is required when first obtaining and using a compass. One of the most important parts to check is the floating dial, which contains the magnetic needle. The user also makes sure the sighting wire is straight, the glass and crystal parts are not broken, the numbers on the dial are readable, and that the dial does not stick. Metal objects and electrical sources can affect the performance of a compass. However, nonmagnetic metals and alloys do not affect compass readings. The following separation distances are suggested to ensure proper functioning of a compass: High-tension power lines...55 m. Field gun, truck, or tank...18 m. Telegraph or telephone wires and barbed wire...10 m. A compass in good working condition is very accurate. However, a compass has to be checked periodically on a known line of direction, such as a surveyed azimuth, using a declination station. Compasses with more than 3 degrees variation should not be used. If traveling with the compass unfolded, make sure the rear sight is fully folded down onto the bezel ring. This locks the floating dial, prevents vibration, and protects the crystal and rear sight from damage. USING A COMPASS Magnetic azimuths are determined using magnetic instruments such as lensatic and M2 compasses. Employ the following techniques when using the lensatic compass: centerhold technique and compass-to-cheek technique. CENTERHOLD TECHNIQUE First, open the compass to its fullest so that the cover forms a straightedge with the base. Move the lens (rear sight) to the rearmost position, allowing the dial to float freely. Next, place your thumb through the thumb loop, form a steady base with your third and fourth fingers, and extend your index finger along the side of the compass. Place the thumb of the other hand between the lens (rear sight) and the bezel ring; extend the index finger along the remaining side of the compass, and the remaining fingers around the fingers of the other hand. Pull your elbows firmly into your sides; this places the compass between your chin and your belt. To measure an azimuth, simply turn your entire body toward the object, pointing the compass cover directly at the object. Once you are pointing at the object, look down and read the azimuth from beneath the fixed black index line. (See Figure 8-2.) This preferred method offers the following advantages over the sighting technique: It is faster and easier to use. It can be used under all conditions of visibility. It can be used when navigating over all types of terrain. It can be used without putting down the rifle. However, the rifle is slung well back over either shoulder. It can be used without removing eyeglasses. 123
130 COMPASS-TO-CHEEK TECHNIQUE Fold the cover of the compass containing the sighting wire to a vertical position; then fold the rear sight slightly forward. Look through the rear-sight slot and align the front-sight hairline with the desired object in the distance. Glance down at the dial through the eye lens to read the azimuth. Note. The compass-to-cheek technique is used almost exclusively for sighting. It is the best technique for this purpose. COLORS USED ON A MILITARY MAP By the fifteenth century, most European maps were carefully colored. Profile drawings of mountains and hills were shown in brown, rivers and lakes in blue, vegetation in green, roads in yellow, and special information in red. A look at the legend of a modern map confirms that the use of colors has not changed much over the past several hundred years. To facilitate the identification of features on a map, the topographical and cultural information is usually printed in different colors. These colors may vary from map to map. On a standard largescale topographic map, the colors used and the features each represent are: 124
131 a. Black. Indicates cultural (man-made) features such as buildings and roads, surveyed spot elevations, and all labels. b. Red-Brown. The colors red and brown are combined to identify cultural features, all relief features, nonsurveyed spot elevations, and elevation, such as contour lines on red-light readable maps. c. Blue. Identifies hydrography or water features such as lakes, swamps, rivers, and drainage. d. Green. Identifies vegetation with military significance, such as woods, orchards, and vineyards. e. Brown. Identifies all relief features and elevation, such as contours on older edition maps, and cultivated land on red-light readable maps. f. Red. Classifies cultural features, such as populated areas, main roads, and boundaries, on older maps. g. Other. Occasionally other colors may be used to show special information. These are indicated in the marginal information as a rule. BASE LINES In order to measure something, there must always be a starting point or zero measurement. To express direction as a unit of angular measure, there must be a starting point or zero measure and a point of reference these two points designate the base or reference line. There are three base lines true north, magnetic north, and grid north. The most commonly used are magnetic and grid. a. True North. A line from any point on the earth's surface to the North Pole. All lines of longitude are true north lines. True north is usually represented by a star. b. Magnetic North. The direction to the north magnetic pole, as indicated by the north-seeking needle of a magnetic instrument. The magnetic north is usually symbolized by a line ending with half of an arrowhead Magnetic readings are obtained with magnetic instruments, such as lensatic and M2 compasses. c. Grid North. The north that is established by using the vertical grid lines on the map. Grid north may be symbolized by the letters GN or the letter "y". 125

132 DECLINATION DIAGRAM Declination is the angular difference between any two norths. If you have a map and a compass, the one of most interest to you will be between magnetic and grid north. The declination diagram shows the angular relationship, represented by prongs, among grid, magnetic, and true norths. While the relative positions of the prongs are correct, they are seldom plotted to scale. Do not use the diagram to measure a numerical value. This value will be written in the map margin (in both degrees and mils) beside the diagram. a. Location. A declination diagram is a part of the information in the lower margin on larger maps. On mediumscale maps, the declination information is shown by a note in the map margin. b. Grid-Magnetic Angle. The G-M angle value is the angular size that exists between grid north and magnetic north. It is an arc, indicated by a dashed line that connects the grid-north and magnetic-north prongs. This value is expressed to the nearest 1/2 degree, with mil equivalents shown to the nearest 10 mils. The G-M angle is important to the map reader/land navigator because azimuths translated between map and ground will be in error by the size of the declination angle if not adjusted for it. c. Grid Convergence. An arc indicated by a dashed line connects the prongs for true north and grid north. The value of the angle for the center of the sheet is given to the nearest full minute with its equivalent to the nearest mil. These data are shown in the form of a grid-convergence note. d. Conversion. There is an angular difference between the grid north and the magnetic north. Since the location of magnetic north does not correspond exactly with the grid-north lines on the maps, a conversion from magnetic to grid or vice versa is needed. 126


133 Major Terrain Features. (1) Hill. A hill is an area of high ground. From a hilltop, the ground slopes down in all directions. A hill is shown on a map by contour lines forming concentric circles. The inside of the smallest closed circle is the hilltop. Saddle. A saddle is a dip or low point between two areas of higher ground. A saddle is not necessarily the lower ground between two hilltops; it may be simply a dip or break along a level ridge crest. If you are in a saddle, there is high ground in two opposite directions and lower ground in the other two directions. A saddle is normally represented as an hourglass. Valley. A valley is a stretched-out groove in the land, usually formed by streams or rivers. A valley begins with high ground on three sides, and usually has a course of running water through it. If standing in a valley, three directions offer high ground, while the fourth direction offers low ground. Depending on its size and where a person is standing, it may not be obvious that there is high ground in the third direction, but water flows from higher to lower ground. Contour lines forming a valley are either U-shaped or V-shaped. To determine the direction water is flowing, look at the contour lines. The closed end of the contour line (U or V) always points upstream or toward high ground


134 Ridge. A ridge is a sloping line of high ground. If you are standing on the centerline of a ridge, you will normally have low ground in three directions and high ground in one direction with varying degrees of slope. If you cross a ridge at right angles, you will climb steeply to the crest and then descend steeply to the base. When you move along the path of the ridge, depending on the geographic location, there may be either an almost unnoticeable slope or a very obvious incline. Contour lines forming a ridge tend to be U-shaped or V-shaped. The closed end of the contour line points away from high ground. Depression. A depression is a low point in the ground or a sinkhole. It could be described as an area of low ground surrounded by higher ground in all directions, or simply a hole in the ground. Usually only depressions that are equal to or greater than the contour interval will be shown. On maps, depressions are represented by closed contour lines that have tick marks pointing toward low ground. 128


135 Minor Terrain Features. Draw. A draw is a less developed stream course than a valley. In a draw, there is essentially no level ground and, therefore, little or no maneuver room within its confines. If you are standing in a draw, the ground slopes upward in three directions and downward in the other direction. A draw could be considered as the initial formation of a valley. The contour lines depicting a draw are U-shaped or V-shaped, pointing toward high ground Spur. A spur is a short, continuous sloping line of higher ground, normally jutting out from the side of a ridge. A spur is often formed by two rough parallel streams, which cut draws down the side of a ridge. The ground sloped down in three directions and up in one direction. Contour lines on a map depict a spur with the U or V pointing away from high ground 129


136 Cliff. A cliff is a vertical or near vertical feature; it is an abrupt change of the land. When a slope is so steep that the contour lines converge into one "carrying" contour of contours, this last contour line has tick marks pointing toward low ground. Cliffs are also shown by contour lines very close together and, in some instances, touching each other Supplementary Terrain Features. (1) Cut. A cut is a man-made feature resulting from cutting through raised ground, usually to form a level bed for a road or railroad track. Cuts are shown on a map when they are at least 10 feet high, and they are drawn with a contour line along the cut line. This contour line extends the length of the cut and has tick marks that extend from the cut line to the roadbed, if the map scale permits this level of detail Fill. A fill is a man-made feature resulting from filling a low area, usually to form a level bed for a road or railroad track. Fills are shown on a map when they are at least 10 feet high, and they are drawn with a contour line along the fill line. This contour line extends the length of the filled area and has tick marks that point toward lower ground. If the map scale permits, the length of the fill tick marks are drawn to scale and extend from the base line of the fill symbol 130
137 Chapter 14- Perform Individual Camouflage Conditions: Given grass, bushes, trees, shadows, Battle Dress Uniforms (BDU), pieces of Lightweight Camouflage Screen System (LCSS), skin paint, charcoal, and/or mud for camouflage, load carrying equipment (LCE), Kevlar helmet with camouflage cover, an individual weapon, and an individual fighting position placed on a reverse slope. Standards: Camouflage yourself, your individual equipment, and your individual fighting position to prevent detection by visual, near infrared, infrared, ultraviolet, radar, acoustic and radio sensors. There are no changes to the standards if performed in Mission-Oriented Protective Posture (MOPP) 4. Performance Steps 1. Identify critical camouflage considerations, incorporating an analysis of the following considerations: a. Movement. Note: Movement draws attention. The naked eye and infrared/radar sensors can detect movement. (1) Minimize movement, remembering that darkness does not prevent observation. (2) Move, slow and smoothly when movement is necessary. b. Shape. (1) Use artificial materials to break up shapes, outlines and equipment. (2) Move, staying in shadows. (3) Disguise or distort the shape of your helmet and body with artificial materials when conducting operations close to the enemy. Note: Gloss or shine caused by light reflecting from smooth or polished surfaces will attract attention. Remember moonlight and starlight can be reflected as easily as sunlight. c. Cover or remove the following items eliminating light reflection. (1) Mess kits. (2) Mirrors. (3) Eye glasses. (4) Watch crystals. (5) Plastic map cases. (6) Starched uniforms. (7) Clear plastic garbage bags. (8) Dust goggles worn on the top of helmets. (9) Cigarettes and pipes. (10) Red filtered flashlights. Note: Flashlights - replace all red filters with blue-green filters. d. Color. Blend individual camouflage with the surroundings; or at a minimum, objects must not contrast with the background. Note: When moving from one area to another, change camouflage as required. What works well in one location may draw fire in another. 2. Camouflage your skin. Note: Exposed skin reflects light. a. Cover your skin oils, even if you have very dark skin, using paint sticks. Paint sticks cover these oils and provide blending with the background. Note: Do not use oils or insect repellant to soften paint sticks. This defeats the purpose of paint sticks by making the skin shiny. Soldiers applying paint should work in pairs because self-application may leave gaps, such as behind the ears. b. Use the following table when applying paint on the face. 131
138 c. Paint exposed skin on the back of the neck, arms, and hands with an irregular pattern. MUD CONTAINS BACTERIA, SOME OF WHICH IS HARMFUL AND MAY CAUSE DISEASE OR INFECTION. MUD SHOULD BE CONSIDERED LAST AS A FIELD EXPEDIENT PAINT. 3. Camouflage your Uniform. a. Roll your sleeves down and button all buttons. b. Attach leaves, grass, small branches, or pieces of LCSS to your uniform and helmet. These items will distort shapes and blend colors with the natural background. c. DO NOT starch uniforms; this counters the infrared properties of the dyes. d. Replace excessively faded and worn uniform because camouflage effectiveness is lost. 4. Camouflage your personal equipment. a. Cover or remove shiny items. b. Secure items that rattle or make noise when moved or worn. 5. Camouflage your individual fighting position. a. Place your position, considering camouflage as the most important factor. b. Place your position out of the direct view of threat forces when possible. c. Place your position at night or under other conditions of limited visibility. d. Collect spoil in carrying devices for careful disposal. Note: Spoil may be used to fill sandbags and as a parapet for protection. e. Avoid disturbing the natural look of the surroundings. f. Use LCSS and natural vegetation to distort the outline of the position. Note: Use decoy positions to draw enemy attention away from actual fighting positions. g. Conduct the camouflage process. (1) Camouflage your position as it is built. (2) DO NOT leave shiny or light-colored objects exposed. (3) DO NOT remove shirts while in the open. (4) DO NOT use fires. (5) DO NOT leave tracks or other signs of movement. (6) DO NOT look up when aircraft fly overhead. The most obvious features on aerial photographs is the upturned faces of soldiers. h. Inspect the following. (1) Inspect your position from the enemy viewpoint. (2) Inspect the camouflage continuously to see that it stays natural looking and conceals the position. (3) Change or improve materials when they become ineffective. 132
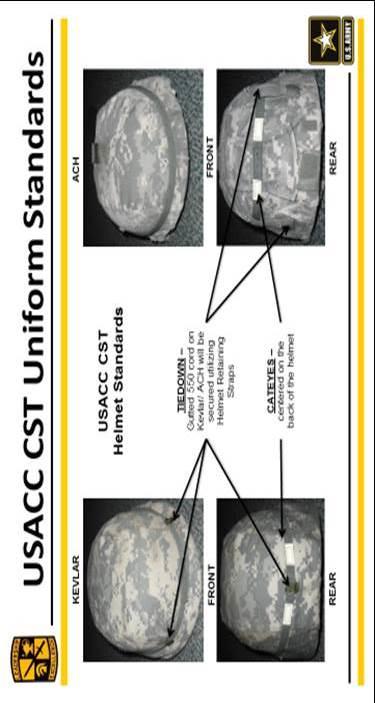
139 133


140 134


141 135
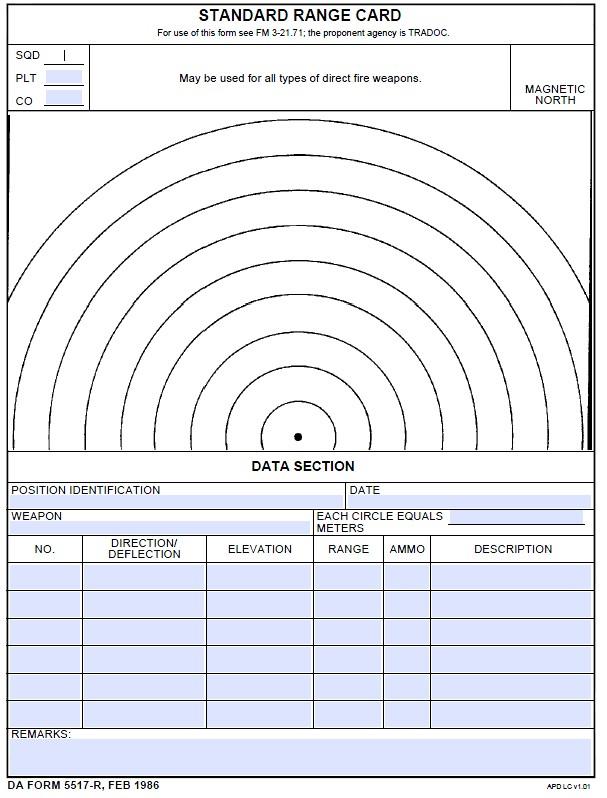
142 136
Cadets are expected to maintain high standards of appearance and conduct on and off campus.
 Cadets are expected to maintain high standards of appearance and conduct on and off campus. GROOMING AND PERSONAL APPEARANCE STANDARDS Personal appearance and wearing the uniform is a significant part
Private First Class (PFC) Private E-2. Staff Sergeant (SSG) Sergeant First Class (SFC) Sergeant (SGT)
 Private E-2. Staff Sergeant (SSG) Sergeant First Class (SFC) Sergeant (SGT)") US Army Enlisted Ranks Service members in pay grades E-1 through E-3 are usually either in some kind of training status or on their initial assignment. The training includes the basic training phase where
US Army Enlisted Ranks Service members in pay grades E-1 through E-3 are usually either in some kind of training status or on their initial assignment. The training includes the basic training phase where
HCC EMS Code of Conduct
 HCC EMS Code of Conduct Attendance and Tardiness Attendance at all classroom, skill sessions, and hands on training is mandatory. Tardiness will not be tolerated. This will include when reporting to any
Standards. The Military Uniform and Appearance Standards. A. Define, Describe, or Identify: B. List or Describe:
 1 Lesson 2 The Military Uniform and Appearance Standards The Military Uniform and Appearance Standards A. Define, Describe, or Identify: 1. Uniform A distinctive mode of dress. The English word uniform
HCC EMS Program Code of Conduct Policy
 HCC EMS Program Code of Conduct Policy 6.2013 Attendance and Tardiness Attendance at all classroom, skill sessions, and hands on training is mandatory. Tardiness will not be tolerated. This will include
Senior Aerospace Science Instructor ( SASI). Uniforms
. Uniforms") BY ORDER OF 20051 OH 20051I 01 Senior Aerospace Science Instructor Cadet Personnel ( SASI). Uniforms PERSONNEL COMPLIANCE WITH THIS PUBLICATION IS MANDATORY ACCESSIBILITY: ONLINE AT UNIT WEBSITE, 1 PER
BY ORDER OF 20051 OH 20051I 01 Senior Aerospace Science Instructor Cadet Personnel ( SASI). Uniforms PERSONNEL COMPLIANCE WITH THIS PUBLICATION IS MANDATORY ACCESSIBILITY: ONLINE AT UNIT WEBSITE, 1 PER
8.3 Scope The guidelines herein govern all firefighters who will take part in the stipend.
 Fire Fighter Stipend: Section 8 8.0 Purpose To Provide a dependable service to the community El Paso County Emergency Services Dist No. 1 serves. The Horizon Fire Department will initiate a program for
RECRUIT SUSTAINMENT PROGRAM SOLDIER TRAINING READINESS MODULES Military Customs, Courtesies and Traditions 17 June 2011
 RECRUIT SUSTAINMENT PROGRAM SOLDIER TRAINING READINESS MODULES Military Customs, Courtesies and Traditions 17 June 2011 SECTION I. Lesson Plan Series Task(s) Taught Academic Hours References Student Study
Abington Township Police Department Policy and Procedure Manual
 Abington Township Police Department Policy and Procedure Manual Chapter: Patrol General Order: 41.3.4 Section: Equipment Original Date: 050104 Title: Authorized Personal Equipment and Apparel Re-Issue
General Order 44 KIRKWOOD POLICE DEPARTMENT. Issuing Authority. Jack R. Plummer, Chief of Police. Issue Date October 6, 2009
 Issue Date October 6, 2009 General Order 44 Effective Date Immediately Subject Review Date December Rescinds/Amends GO 44; ISSUED FEBRUARY 17, 1995 PURPOSE The purpose of this general order is to describe
LE-I/II Northridge HS
 LE-I/II Northridge HS Purpose This lesson provides an overview of the various Marine Corps uniforms and today s MCJROTC uniforms. After the lesson, Cadets will: Be able to describe the different Marine
V. Procedures. A. Uniformed Assignments
 Page: 2 of 7 V. Procedures A. Uniformed Assignments 1. Police uniforms, as prescribed by the Chief of Police, will be worn by all officers within the Patrol Division. 2. A sufficient change of uniforms
HONORABLE SERVICE / STEWARDSHIP OF THE ARMY PROFESSION
 LESSON AUTHOR: CENTER FOR THE ARMY PROFESSION AND ETHIC (CAPE) DATE PREPARED: 11 DECEMBER 2013 1. OVERVIEW. This lesson plan helps you assemble and conduct a professional development session on honorable
California Department of State Hospitals Policy Manual
 Policy 1024 Uniform Regulations PURPOSE AND SCOPE The uniform policy of the (DSH) is established to ensure that uniformed officers will be readily identifiable to the public through the proper use and
Wear and Appearance of Army Uniforms and Insignia
 Army Regulation 670 1 Uniform and Insignia Wear and Appearance of Army Uniforms and Insignia UNCLASSIFIED Headquarters Department of the Army Washington, DC 25 May 2017 SUMMARY of CHANGE AR 670 1 Wear
Effective Date: 08/30/2012. Revised Date: To ensure that all members of VCES are in proper uniform and appearance.
 Scope: All Career Members of Valencia County Emergency Services. Purpose To ensure that all members of VCES are in proper uniform and appearance. 1. General Requirements: a. All Personnel. i. Members shall
CHAPTER SEVEN CIVILIAN CLOTHING SECTION 2: GENERAL REGULATIONS PERTAINING TO THE WEARING OF CIVILIAN CLOTHES BY NAVAL PERSONNEL
 CHAPTER SEVEN CIVILIAN CLOTHING SECTION 1: GENERAL INFORMATION SECTION 2: GENERAL REGULATIONS PERTAINING TO THE WEARING OF CIVILIAN CLOTHES BY NAVAL PERSONNEL CHAPTER SEVEN CIVILIAN CLOTHING SECTION 1:
STANDARD ADMINISTRATIVE POLICY
 STANDARD ADMINISTRATIVE POLICY Subject: Personnel Apparel & Appearance Reference Number: SAP-DEP-003 Effective Date: 1 January 2004 Last Revision Date: 12 March 2018 Signature of Approval: J. Dan Eggleston,
INFORMATION PAPER SUBJECT:
 INFORMATION PAPER SUBJECT: America s Army Our Profession Education and Training program, 2 nd Quarter Calendar Year 2013 Theme: Army Customs, Courtesies, and Traditions 1. Purpose. To provide information
NCOs Must Lead In This Period of Uncertainty By SMA Raymond F. Chandler III Sergeant Major of the Army
 NCOs Must Lead In This Period of Uncertainty By SMA Raymond F. Chandler III Sergeant Major of the Army Our Army is at a crossroads. We are less than 15 months from our departure from Afghanistan. Even
LESSON 8: AMERICAN MILITARY TRADITIONS, CUSTOMS, AND COURTESIES
 LESSON 8: AMERICAN MILITARY TRADITIONS, CUSTOMS, AND COURTESIES Learning Objectives Describe the types of personal salutes and when they are executed Match Army ranks and their proper titles Identify situations
THURMONT POLICE DEPARTMENT
 Subject: Uniforms and Appearance Page No. 1 THURMONT POLICE DEPARTMENT GENERAL ORDER Authority: Chief of Police Subject: Uniforms and Appearance CALEA Standard: 41 Related Documents: Date Issued: January
ARMY CUSTOMS, COURTESIES AND TRADITIONS
 LESSON AUTHOR: CENTER FOR THE ARMY PROFESSION AND ETHIC (CAPE) DATE PREPARED: 12 DECEMBER 2012 1. OVERVIEW. This lesson plan provides resources and guidance to help you assemble and conduct a professional
Internship Program Information
 Internship Program Information The St. Louis County Police Department, Office of Emergency Management (SLCPD/OEM) Internship Program provides students with a unique opportunity to apply classroom skills
Customs, Courtesies & Ceremonies
 Lesson Objective: Demonstrate the unique customs and courtesies used by members of CAP and the USAF, plan relevant ceremonies which require the use of the those skills and demonstrate the correct selection
MARINE CORPS JROTC INFO-BOOK
 MARINE CORPS JROTC INFO-BOOK Hello OBHS Student. If you are reading this, then you ve taken the first step into an exciting adventure! The Purpose of this info-book is to provide some background information
Moving Up in Army JROTC (Rank and Structure) Key Terms. battalion. company enlisted platoons specialists squads subordinate succession team
 Key Terms. battalion. company enlisted platoons specialists squads subordinate succession team") Lesson 3 Moving Up in Army JROTC (Rank and Structure) Key Terms battalion company enlisted platoons specialists squads subordinate succession team What You Will Learn to Do Illustrate the rank and structure
Lesson 3 Moving Up in Army JROTC (Rank and Structure) Key Terms battalion company enlisted platoons specialists squads subordinate succession team What You Will Learn to Do Illustrate the rank and structure
Webelos Scout Uniform Inspection Sheet
 Webelos Scout Uniform Inspection Sheet 20 pts General Appearance. Allow 4 points for each: n Good posture n Clean face and hands n Combed hair n Neatly dressed n Clean fingernails 1 Headgear. Webelos cap.
Student Workbook. Basic Cadet School. Cadet Programs Section, California Wing United States Air Force Auxiliary Civil Air Patrol.
 Basic Cadet School Student Workbook February 2015 Cadet Programs Section, California Wing United States Air Force Auxiliary Civil Air Patrol Basic Cadet School Program Workbook 1 This workbook is to be
RECRUIT SUSTAINMENT PROGRAM SOLDIER TRAINING READINESS MODULES Leadership Overview 9 July 2012
 RECRUIT SUSTAINMENT PROGRAM SOLDIER TRAINING READINESS MODULES Leadership Overview 9 July 2012 SECTION I. Lesson Plan Series Task(s) Taught Academic Hours References Student Study Assignments Instructor
Occupational HealthCare Overview
 Occupational HealthCare Overview Occupational Programs at the heart of healthcare Mission Statement Vance-Granville Community College educates, inspires, and supports a diverse community of learners to
TEXARKANA, TEXAS POLICE DEPARTMENT GENERAL ORDERS MANUAL. TPCA Best Practices Recognition Program Reference
 Effective Date February 1, 2008 Amended Date Reference Distribution All Personnel City Manager City Attorney TPCA Best Practices Recognition Program Reference Review Date January 1, 2009 Pages 1 This Operations
HQ AFOATS AIR FORCE JUNIOR RESERVE OFFICER TRAINING CORPS (AFJROTC)
") HQ AFOATS AIR FORCE JUNIOR RESERVE OFFICER TRAINING CORPS (AFJROTC) (Prepared 2002) J R O T C INTERSERVICE CROSS-INDEX DRILL MANUAL TABLE OF CONTENTS FOREWORD..............................................
HQ AFOATS AIR FORCE JUNIOR RESERVE OFFICER TRAINING CORPS (AFJROTC) (Prepared 2002) J R O T C INTERSERVICE CROSS-INDEX DRILL MANUAL TABLE OF CONTENTS FOREWORD..............................................
As our Army enters this period of transition underscored by an
 America s Army Our Profession Major General Gordon B. Skip Davis, Jr., U.S. Army, and Colonel Jeffrey D. Peterson, U.S. Army Over the past 237 years, the United States Army has proudly served the nation
Natalia ISD STUDENT CONDUCT. Purpose
 Purpose General Guidelines The District s dress code is established to teach grooming and hygiene, instill discipline, prevent disruption, avoid safety hazards, and teach respect for authority. Students
BOY SCOUT/VARSITY SCOUT UNIFORM INSPECTION SHEET OFFICIAL PLACEMENT OF INSIGNIA
 BOY SCOUT/VARSITY SCOUT UNIFORM INSPECTION SHEET OFFICIAL PLACEMENT OF INSIGNIA SHOULDER SEAM RIGHT SLEEVE RIGHT POCKET SHOULDER EPAULETS AND LOOPS LEFT SLEEVE 4" LEFT POCKET Conduct uniform inspection
UNITED STATES MARINE CORPS Marine Corps Junior Reserve Officers Training Corps McKinney High School 1400 Wilson Creek Parkway McKinney, Texas 75069
 UNITED STATES MARINE CORPS Marine Corps Junior Reserve Officers Training Corps McKinney High School 1400 Wilson Creek Parkway McKinney, Texas 75069 1 Aug 2014 MCJROTC CADET CODE OF CONDUCT - SY 14/15 PURPOSE:
OFFICE OF THE SHERIFF ST. MARY'S COUNTY, MD
 EFFECTIVE DATE: October 11, 2016 SUBJECT: AFFECTS: OFFICE OF THE SHERIFF ST. MARY'S COUNTY, MD PERSONAL APPEARANCE AND EQUIPMENT All Employees Policy No. 3.03 Section Code: Rescinds: Amends: 1/22/2016
Drill and Ceremony. What are the three marching steps used in drill? 1. 15in step 2. 30in step 3. 30in step, DOUBLE TIME 180 steps per minute
 What are the three marching steps used in drill? 1. 15in step 2. 30in step 3. 30in step, DOUBLE TIME 180 steps per minute Drill and Ceremony (the 18in step is used when formally stacking arms, it is executed
MCWP Leading Marines. U.S. Marine Corps PCN
 MCWP 6-11 Leading Marines U.S. Marine Corps PCN 139 000001 00 MCCDC (C 42) 27 Nov 2002 E R R A T U M to MCWP 6-11 LEADING MARINES 1. For administrative purposes, FMFM 1-0 is reidentified as MCWP 6-11.
Cadet and NCO of the Month Study Guide Lake City Panther Battalion PO Drawer 1569 Lake City, SC 29560
 [Type the document title] 1 Cadet and NCO of the Month Study Guide Lake City Panther Battalion PO Drawer 1569 Lake City, SC 29560 [Type the document title] 2 Mission To motivation young people to be better
Professional and Unprofessional Relationships
 Professional and Unprofessional Relationships Cognitive Lesson Objective: Comprehend that the negative impact of unprofessional relationships (UPRs) requires officers to inherently accept the responsibility
INFORMATION PAPER. SUBJECT: FY America s Army Our Profession theme, Living the Army Ethic
 15 DEC 2015 INFORMATION PAPER SUBJECT: FY 15-16 America s Army Our Profession theme, Living the Army Ethic 1. Purpose. To provide background and context supporting the continuation of the FY15-16 America
Webelos I Requirements October 12, 2005
 Webelos I Requirements October 12, 2005 To be done in the Den Meeting To be done at Home 1. Have an adult member of your family read the Webelos Scout Parent Guide that come with this book (Webelos Handbook,
Attachment 7-1 AUTHORIZED AIR FORCE JROTC BADGES AND INSIGNIA
 Attachment 7-1 AUTHORIZED AIR FORCE JROTC BADGES AND INSIGNIA Optional Enlisted/Officer Service Cap Insignia AEF BADGE (NEW) Marksmanship Shield Choose one only. Follow APT placement criteria. May NOT
MASON COUNTY FIRE DISTRICT #4 CHAPTER: 2000 NUMBER: 2360 APPROVED:
 TITLE: UNIFORM STANDARDS CHAPTER: 2000 NUMBER: 2360 APPROVED: 10-07-2008 APPROVED: Signature on file Bob Burbridge, Chief 1. PURPOSE: To provide District personnel with a clothing standard in order to
Cadet Name: 3. The civilian leader to whom all members of the Department of Defense are responsible is
 Cadet Name: Date: 1. What is the Mission of JROTC? 2. What is the key to success in JROTC? 3. The civilian leader to whom all members of the Department of Defense are responsible is 4. The Secretary of
Navy Service Uniform Collar Device Placement E-
 Navy Service Uniform Collar Device Placement E-6 DESCRIPTION OF MATERNITY UNIFORM COMPONENTS For E2-E6 personnel, anodized (highly polished) miniature rank/collar devices (article 4227) shall. Various
Note: We ARE NOT Military Recruiters and there is NO military commitment.
 Note: We ARE NOT Military Recruiters and there is NO military commitment. Stebbins High School Air Force Junior ROTC (AFJROTC) 1900 Harshman Rd, Riverside, OH 45432 Aerospace 100 Course Syllabus Congratulations
DRILL AND CEREMONIES MANUAL
 MI-VDF BATTALION 352.00 352-1 Standard Operating Procedure DRILL AND CEREMONIES MANUAL AUGUST 26, 2013. THE SHADED SECTIONS (SHOWN BELOW) INDICATE THE PARTS OF THE MANUAL *(FM 22-5) THAT HAVE BEEN REMOVED
Staff Dress Code Local Procedure
 Staff Dress Code Local Procedure Written: September 2017 Next Review: September 2019 Person Responsible: Principal This local procedure should be read in conjunction with the NAS Dress Code for Staff Policy
CADET TRAINING RECORD INFORMATION SHEET
 CADET TRAINING RECORD INFORMATION SHEET LAST NAME FIRST NAME MIDDLE NAME ADDRESS CITY STATE ZIP CODE HOME PHONE NUMBER PLACE OF BIRTH (City/State) MIDDLE SCHOOL ATTENDED DATE OF BIRTH (mm/dd/yyyy) CITIZENSHIP
UNITED STATES MARINE CORPS Marine Corps University User's Guide to Marine Corps Values LEADER AND FOLLOWER
 UNITED STATES MARINE CORPS Marine Corps University User's Guide to Marine Corps Values LEADER AND FOLLOWER 1. Introduction. To be a good leader, Marines of all ranks need to know their responsibilities
PURPOSE: To ensure that all LifeBridge Health employees project a professional image to patients, visitors and guests.
 Policy Title: Facility: Dress Code - LifeBridge LifeBridge Health Effective Date: 7/1/2017 SUMMARY: All LifeBridge Health staff, including residents, staff physicians, volunteers, temporary/agency employees
Culture / Climate. 2-4 Mission command fosters a culture of trust,
 Culture / Climate Document Title Proponent Page Comment ADP 1 The Army TRADOC 2-8 Unit and organizational esprit de corps is built on an open command climate of candor, trust, and respect, with leaders
AIR FORCE ROTC DETACHMENT 505 HOME OF THE PISTOLEROS
 1 AIR FORCE ROTC DETACHMENT 505 HOME OF THE PISTOLEROS New Cadet Welcome Packet Fall 2018 WELCOME TO DETACHMENT 505 2 Congratulations on your acceptance to New Mexico State University (NMSU) or University
Bowie High School NavalJiiiiior Reserve Offlcer'sTralnlng Annapolis Road.--, Bowie, Maryland (301) II
 II") I< '.. Bowie High School NavalJiiiiior Reserve Offlcer'sTralnlng 15200 Annapolis Road.--, Bowie, Maryland 20715 (301) 805-2629 II bowie.njrotc@pgcps.org Corps Unit CADET AGREEMENT From: To: Senior Naval
I< '.. Bowie High School NavalJiiiiior Reserve Offlcer'sTralnlng 15200 Annapolis Road.--, Bowie, Maryland 20715 (301) 805-2629 II bowie.njrotc@pgcps.org Corps Unit CADET AGREEMENT From: To: Senior Naval
MONROE COUNTY SHERIFF S OFFICE. General Order
 MONROE COUNTY SHERIFF S OFFICE General Order CHAPTER: 019 EFFECTIVE DATE: March 30, 2010 REFERENCE: CALEA 41.3.5, 41.3.6 CFA 14.10 NO. PAGES: 9 TITLE: Issued Equipment/Uniforms/Grooming REVIEWED/REVISED:
THIS MESSAGE HAS BEEN SENT BY THE PENTAGON TELECOMMUNICATIONS CENTER ON BEHALF OF DA WASHINGTON DC//DAPE HRI//
 Original Message From: DAADMINISTRATOR@PTSC.PENTAGON.MIL [mailto:daadministrator@ptsc.pentagon.mil] On Behalf Of PTC WASHINGTON DC//ALARACT// Sent: Wednesday, August 20, 2008 8:02 AM To: DCS G1 Agency
P-12 Dress Code Policy
 P-12 Dress Code Policy DRESS CODE STATEMENT The following Student Dress Code Policy clearly explains and documents standards of acceptable dress within Woodcrest State College. The policy has been developed
*MAMC Regulation DEPARTMENT OF THE ARMY MADIGAN ARMY MEDICAL CENTER Tacoma, Washington MAMC Regulation Number October 2007
 *MAMC Regulation 690-1 DEPARTMENT OF THE ARMY MADIGAN ARMY MEDICAL CENTER Tacoma, Washington 98431-1100 MAMC Regulation Number 690-1 23 October 2007 Civilian Personnel STANDARDS OF DRESS AND APPEARANCE
The Ohio County HS Junior Reserve Officer Training Course (JROTC) is a congressionally mandated and funded course
 is a congressionally mandated and funded course") 1. COURSE NAME: Ohio County High School JROTC 2. INSTRUCTOR(S) NAMES AND RESPONSIBILITIES: Lieutenant Colonel (Retired) Mark V. Lathem, Senior Army Instructor Sergeant First Class (Retired) James C. Warnock,
1. COURSE NAME: Ohio County High School JROTC 2. INSTRUCTOR(S) NAMES AND RESPONSIBILITIES: Lieutenant Colonel (Retired) Mark V. Lathem, Senior Army Instructor Sergeant First Class (Retired) James C. Warnock,
Roles and Relationships
 Appendix A Roles and Relationships A-1. When the Army speaks of soldiers, it refers to commissioned officers, warrant officers, noncommissioned officers (NCOs), and enlisted personnel both men and women.
Step up to the challenge.
 DEPARTMENT OF THE ARMY St. James High School Junior Army Reserve Officers Training Corps (JROTC) 5181 Wildcat Drive St. James, Louisiana 70086 August 6, 2012 Instructors: LTC (Ret.) Linda M. Colar, Senior
Standards of Professional Attire and Classroom Behavior*
 Standards of Professional Attire and Classroom Behavior* Upon acceptance and entry into the University of Missouri-Kansas City (UMKC) School of Pharmacy (SOP) or Nursing and Health Sciences (SONHS), students
ANNEX A (General Instructions / Packing List) to Army National Guard (ARNG) AAC Student Memorandum of Instruction (MOI)
 to Army National Guard (ARNG) AAC Student Memorandum of Instruction (MOI)") 1. General a. Billeting - Billeting is available throughout the course. All nonresident Soldiers will utilize arranged billeting throughout the course. b. Dining - Meals are provided and per diem will
1. General a. Billeting - Billeting is available throughout the course. All nonresident Soldiers will utilize arranged billeting throughout the course. b. Dining - Meals are provided and per diem will
New Mexico State University The PRIDE of New Mexico Marching Band Handbook 2015
 New Mexico State University The PRIDE of New Mexico Marching Band Handbook 2015 Mission Statement: The PRIDE of New Mexico Marching Bandʼs primary goal is to provide an outstanding musical experience for
BASIC TRAINING SURVIVAL GUIDE WHAT TO EXPECT, WHAT YOU LL LEARN AND WHAT IT TAKES
 BASIC TRAINING SURVIVAL GUIDE WHAT TO EXPECT, WHAT YOU LL LEARN AND WHAT IT TAKES BASIC TRAINING SURVIVAL GUIDE TABLE OF CONTENTS 10 WEEKS THAT WILL CHANGE YOUR LIFE... 1 FIRST STOP: RECEPTION BATTALION...2
Customs, Courtesies, Traditions
 Customs, Courtesies, Traditions Basic Introduction Course (BIC) Lesson 8 Core Values at the core of our service Honor Integrity is our standard. We demonstrate uncompromising ethical conduct and moral
DEPARTMENT OF THE ARMY HEADQUARTERS, U.S. ARMY SIGNAL CENTER AND FORT GORDON Fort Gordon, Georgia
 *USASC&FG Reg 600-2 DEPARTMENT OF THE ARMY HEADQUARTERS, U.S. ARMY SIGNAL CENTER AND FORT GORDON Fort Gordon, Georgia 30905-5000 USASC&FG Regulation 23 April 2001 No. 600-2 Personnel General DRESS STANDARDS
HOLMES HIGH SCHOOL MARINE CORPS JROTC
 HOLMES HIGH SCHOOL MARINE CORPS JROTC Contract for Participation ATTENTION: THIS CONTRACT MUST ME READ THOROUGHLY AND ALL FORMS (except sports physical) MUST BE FILLED OUT AND SIGNED BY A PARENT/GUARDIAN
DEPARTMENT OF THE NAVY HEADQUARTERS UNITED STATES MARINE CORPS MARINE CORPS PENTAGON WASHINGTON, DC
 DEPARTMENT OF THE NAVY HEADQUARTERS UNITED STATES MARINE CORPS 3 000 MARINE CORPS PENTAGON WASHINGTON, DC 20350-3000 MCO 1700.28A MPO MARINE CORPS ORDER 170 0.28A From: To: Subj: Commandant of the Marine
UNIFORMS AND IDENTIFYING INSIGNIA POLICY
 Virginia Beach Department of Emergency Medical Services CAAS # 103.01.01 Index # Administration UNIFORMS AND IDENTIFYING INSIGNIA POLICY PURPOSE: The purpose of this policy is to establish a consistent,
Southlake Regional Health Centre - Dress Code
 Page 1 of 6 Home > Policies & Procedures > Administrative Documents > Administration Manual > Dress Code Disclaimer: the information contained in this document is for educational purposes only. Any PRINTED
Cadet Basic Training Week Two
 Escondido Cadet Squadron 714 Cadet Basic Training Week Two Followership (Ref. Leadership: 2000 and Beyond) Followership is reaching a specific goal while exercising respect for authority, a positive attitude,
Social misconduct violates Army values, NCOs at Town Hall 4 say
 NCOJOURNAL AUTHOR: Koester SECTION: Feature RUN DATE: April 2017 Social misconduct violates Army values, NCOs at Town Hall 4 say By MARTHA C. KOESTER NCO Journal Harassment, bullying, hazing, stalking,
DRAFT. Dental Aid/Assisting Handbook Table of Contents
 DRAFT Dental Aid/Assisting Handbook Table of Contents Introduction Page Vision..2 Mission Statement...2 M-DCPS Dental Aide/Assisting curriculum training program...2 Program standards...3 Health Occupations
NMMI Army ROTC Early Commissioning Program. ROTC Handbook. Part 3 Military Science IV (Sophomore Year at NMMI)
") NMMI Army ROTC Early Commissioning Program ROTC Handbook Part 3 Military Science IV (Sophomore Year at NMMI) Military Science and Leadership IV 1 New Cadet Cadre 2 Administrative Requirements Prior to
NMMI Army ROTC Early Commissioning Program ROTC Handbook Part 3 Military Science IV (Sophomore Year at NMMI) Military Science and Leadership IV 1 New Cadet Cadre 2 Administrative Requirements Prior to
MUKWONAGO FIRE DEPARTMENT OPERATING PROCEDURES
 MUKWONAGO FIRE DEPARTMENT OPERATING PROCEDURES Cadet Program Approved by: Chief Jeffrey R. Stien POL #25 Draft Date: 4/23/15 Revision Date: 12/22/16, 02/16/17 Effective Date: 4/23/15, 12/22/16, 02/16/17
Staff Dress Code. Date of approval 13 th July 2017 Review date January 2020
 Staff Dress Code Date of approval 13 th July 2017 Review date January 2020 Contents 1. Rationale 2. Scope 3. Introduction 4. Implementation of the Dress Code Policy 5. Responsibilities a. Employees b.
POLICY STATEMENT. Policy Statement 1007 Policy Area: Effective Date: Approved: Paul A. Quander, Jr., Director. Dress Code Policy
 Court Services and Offender Supervision Agency for the District of Columbia POLICY STATEMENT Policy Area: Effective Date: Approved: Paul A. Quander, Jr., Director Dress Code Policy I. COVERAGE The provisions
Criminal Justice Training Center. 167th Basic Peace Officer Academy
 167th Basic Peace Officer Academy 1 Roadmap for today Introductions Overview of program Rules Schedule Q & A Tour Introductions Tell us about you: Your name Your agency Your background A fun fact about
CIVIL DEFENCE CIRCULAR CD 02/2012 THE WEARING OF CIVIL DEFENCE VOLUNTEER UNIFORM
 CIVIL DEFENCE CIRCULAR CD 02/2012 THE WEARING OF CIVIL DEFENCE VOLUNTEER UNIFORM RECORD OF AMENDMENTS NOTE: All amendments take effect from the date shown, except where otherwise stated. AMENDMENTS Para
WEST VIRGINIA UNIVERSITY SCHOOL OF DENTISTRY POLICY ON PROFESSIONAL APPEARANCE AND ATTIRE
 WEST VIRGINIA UNIVERSITY SCHOOL OF DENTISTRY POLICY ON PROFESSIONAL APPEARANCE AND ATTIRE Revised August 2009 Revised December 2011 Revised January 2013 Revised August 2015 Revised September 2016 WVU SCHOOL
SECTION: OPERATIONS OPR-271 UNIFORMS AND EQUIPMENT
 SECTION: OPERATIONS OPR-271 CHAPTER: DIRECTIVE: UNIFORMS AND EQUIPMENT INDEX 01 SUMMARY 02 GENERAL APPEARANCE A. GROOMING B. UNIFORMS C. JEWELRY D. HAIR E. PLAIN CLOTHES PERSONNEL F. COURT APPEARANCES
Attachment 7-1 AUTHORIZED AIR FORCE JROTC BADGES/INSIGNIA/PINS
 Attachment 7-1 AUTHORIZED AIR FORCE JROTC BADGES/INSIGNIA/PINS AEF BADGE (OLD) AEF BADGE (NEW) Marksmanship Shield Cyber Patriot Badge (Choose one only. Follow APT placement criteria. May NOT wear Marksmanship
HOT TOPICS BLACK BERET. Symbol of Transformation THE. Your New Headgear: The Facts. Step-by-step Guide to a Proper Fit SPRING 2001
 HOT TOPICS CURRENT ISSUES FOR ARMY LEADERS SPRING 2001 THE BLACK BERET Symbol of Transformation Your New Headgear: The Facts Step-by-step Guide to a Proper Fit Message from the Sergeant Major of the Army
AMERICA S ARMY OUR PROFESSION LESSON PLANS. (845)
") AMERICA S ARMY OUR PROFESSION LESSON PLANS http://cape.army.mil (845) 938-0467 Table of Contents THE ARMY PROFESSION OVERVIEW....1 STANDARDS AND DISCIPLINE....10 ARMY CUSTOMS, COURTESIES, AND TRADITIONS...
AMERICA S ARMY OUR PROFESSION LESSON PLANS http://cape.army.mil (845) 938-0467 Table of Contents THE ARMY PROFESSION OVERVIEW....1 STANDARDS AND DISCIPLINE....10 ARMY CUSTOMS, COURTESIES, AND TRADITIONS...
425 POLICY Dress and Personal Appearance
 425 POLICY Dress and Personal Appearance 425.1 Statement of Policy Redlands Community College s Faculty and Staff have constant contact with employees, students, parents, visitors, and other contracted
Grand Forks AFB Base Honor Guard Welcome Package
 Grand Forks AFB Base Honor Guard Welcome Package Base Honor Guard Charge Handpicked to serve as a member of the Grand Forks Air Force base Honor Guard, my standards of conduct and level of professionalism
Officer Candidate Schools and Basic and Advanced Non-Commissioned Officer Courses
 Cadet Regulation 3-2 Officer Candidate Schools and Basic and Advanced Non-Commissioned Officer Courses State of California-Military Department Joint Force Headquarters Sacramento, California 1 August 2014
WEST VIRGINIA UNIVERSITY SCHOOL OF DENTISTRY POLICY ON PROFESSIONAL APPEARANCE AND ATTIRE
 WEST VIRGINIA UNIVERSITY SCHOOL OF DENTISTRY POLICY ON PROFESSIONAL APPEARANCE AND ATTIRE Revised August 2009 Revised December 2011 Revised January 2013 Revised August 2015 Revised September 2016 Revised
COMPLIANCE WITH THIS PUBLICATION IS MANDATORY
 BY ORDER OF THE COMMANDER MISAWA AIR BASE AIR FORCE INSTRUCTION 36-2903 18 JULY 2011 MISAWA AIR BASE Supplement 24 SEPTEMBER 2013 Personnel DRESS AND PERSONAL APPEARANCE OF AIR FORCE PERSONNEL COMPLIANCE
Title: Standards of Appearance
 Title: Standards of Appearance POLICY Owner: Human Resources Keywords: Standards of Appearance, Dress Code, Uniform # HR.21 Issued: 6/01 I. Statement of Purpose The Standards of Appearance Policy provides
USAREC Regulation Personnel General. U.S. Army Recruiting. for Junior Reserve. Training Corps UNCLASSIFIED
 USAREC Regulation 600-31 Personnel General U.S. Army Recruiting Command Award for Junior Reserve Officers Training Corps UNCLASSIFIED Headquarters United States Army Recruiting Command 1307 3rd Avenue
UNIT 3 MILITARY CUSTOMS, COURTESIES, ETIQUETTE AND CEREMONIES
 UNIT 3 MILITARY CUSTOMS, COURTESIES, ETIQUETTE AND CEREMONIES Customs, Courtesies, Etiquette, and Ceremonies Customs and courtesies are the way by which nations and individuals pay respect to distinguished
LESSON 2: THE U.S. ARMY PART 1 - THE ACTIVE ARMY
 LESSON 2: THE U.S. ARMY PART 1 - THE ACTIVE ARMY INTRODUCTION The U.S. Army dates back to June 1775. On June 14, 1775, the Continental Congress adopted the Continental Army when it appointed a committee
TSG Title: Identify Duties, Responsibilities, and Authority of Commissioned Officers, Warrant Officers, and Noncommissioned Officers.
 TSG 158-1183 Title: Identify Duties, Responsibilities, and Authority of Commissioned Officers, Warrant Officers, and Noncommissioned Officers. Course Number: 158-1183 Task Number 158-100-1183 Effective
From: Commanding Officer, Navy Recruiting District New Orleans. Subj: EQUAL OPPORTUNITY PROGRAM AND COMMANDING OFFICER S POLICY STATEMENTS
 NAVCRUITDIST NEW ORLEANS INSTRUCTION 5354.1N 00 From: Commanding Officer, Navy Recruiting District New Orleans Subj: EQUAL OPPORTUNITY PROGRAM AND COMMANDING OFFICER S POLICY STATEMENTS Ref: (a) SECNAVINST
NJROTC SYLLABUS AND PROGRAM OVERVIEW
 NJROTC SYLLABUS AND PROGRAM OVERVIEW For new cadets, this will be a completely new experience. For returning cadets, this will be a review of what you already know and a notice that some elements will