Thank you for purchasing the Actuator Systems NextBolt fingerprint deadbolt.
|
|
|
- Marjory Barber
- 5 years ago
- Views:
Transcription
1 PREFACE Thank you for purchasing the Actuator Systems NextBolt fingerprint deadbolt. Please read the documentation carefully before installation & use. The manual details all installation procedures and operation steps. Manufacturer and/or Distributors of the Actuator Systems NextBolt will not be responsible for any damages caused by incorrect installation or mishandling of the lock. Any such damages will void manufacturer s warranty. 1
2 Table of Contents Preface 1 Installation Manual 1. Parts Required Tools Pre-installation Mark and bore holes on the door Deadbolt Latch Selection Installation Installation of Deadbolt Installing Strike and Strike Lining Box (on the door jamb) Sizing Tail Piece (to the right length) Installation of the Outdoor Unit Installation of the Indoor Unit Trouble Shooting Operation Manual Section I - Enrolling Administrators: Section II - Enrolling Fingerprint Users 2 thru 99: Section III Deleting Individual Fingerprint Users: Section IV Deleting ALL Fingerprint Users: Section V Unlocking the Actuator Systems NextBolt from outside: Section VI Locking the Actuator Systems NextBolt from Outside: Section VII Locking and Unlocking the Actuator Systems Nextbolt from Inside: APPENDIX A..44 USER ENROLLMENT TABLE: Special THANKS from Actuator Systems


3 1. Parts Please familiarize yourself with all the parts in the packaging box of the Actuator Systems NextBolt. If any part is missing or damaged, contact our service center or your local dealer. Outdoor Unit Indoor Unit Strike Lining Box Indoor and Outdoor Rubber Gaskets Strike Plate Keys 3
")
 Screws (90")
")


4 Deadbolt Latch 2 ¾ backset (70mm) Deadbolt Latch 2 3/8 backset (60mm) Screws (90 mm) Screws (2 x 18 mm & 1 x 29mm) Wooden & Metal Screws Alkaline Batteries (1) Fixing Plate 4
5 2. Required Tools With the EZ Mount Kit Installation is quick and easy. If your door has an existing deadbolt you only need the following tools. 1 Philips & flat head screw drivers 3. Pre-installation 3.1 Mark and bore holes on the door 3.11 Mark holes on door For doors with existing deadbolt lock with 2 1/8 diameter hole: 1) Remove existing cylindrical deadbolt. 5


6 2) Please be sure to use the included clear installation template when installing the Actuator Systems NextBolt on a door with an existing deadbolt. 3) Rest the installation template on the front of the door, on top of the existing 2 1/8 hole, making sure that it is aligned properly for the door s existing 2 3/8 or 2 ¾ backset. 6
7 For doors that do not have a cylindrical deadbolt lock or a hole for the cylindrical deadbolt lock: A. Start approximately 46 from floor. Select the appropriate installation template according to the length of the backset. Fold and apply the template to the edge of the door bevel. Mark the center point of the cylinder hole on the door face, and then mark the center point of the deadbolt hole on door edge, as indicated on the template. B. For installation of combination set (door handle and deadbolt), it is recommended that the distance is 5 ½ between the two center points. C. Mark the center points of the two small holes on the door face for the two upper fixing posts mounted on the top plate of the outdoor unit, as indicated on the installation template. 7
8 3.12 Bore holes A. Bore a 2 1/8 diameter hole in the center of door face for chassis. (It is recommended to bore this hole from both sides of the door to avoid splintering.) B. Bore a 1 diameter hole in the center of door edge for deadbolt. 3.2 Deadbolt Latch Selection There are two deadbolt latches in each box, one with a 2 3/8 (60mm) backset and the other with a 2 ¾ (70mm) backset. Make sure which length you will need and select the right one before installation. 8
9 4. Installation Installation of Deadbolt A. Insert the deadbolt latch into the hole in the edge of the door (follow the UP sign), keeping it parallel to the face of the door. Mark the outline of the face plate and remove the deadbolt. B. Then chisel 1/8 deep rectangular shape, per your marking (or until the faceplate is flush with the door edge). C. Insert the deadbolt latch; make sure the deadbolt UP sign is facing upwards. Then fasten the screws. 9
10 4.2 Installing Strike and Strike Lining Box (on the door jamb) A. (1) Close the door until the deadbolt touches the door jamb along the face plate to mark the horizontal center lines. (2) Measure one half of the door thickness from one side of the door jamb, and then mark the vertical center lines. (3) Extend the vertical center line and the horizontal line to mark the drill center point for the strike. B. Bore a 1 diameter and 1 deep hole in the door jamb at the center point for strike. To ensure the proper deadbolt function, this hole must be drilled at least 1 deep. C. Chisel the door jamb at 1/16 deep for the strike plate which must fit flush with the door jamb. D. Insert the strike lining box and then fasten screws to the plate. 10

11 4.3 Sizing Tail Piece (to the right length) The Actuator Systems NextBolt is designed to fit door thicknesses of 1 3/8 to 2. Four pre-sized tailpieces are included with the Actuator Systems NextBolt for 1 3/8, 1 ½, 1 ¾ and 2 thick doors. Your door thickness and length of the tailpiece being used must match exactly. EX: If your door is 1 ¾ thick, then you must use the 1 ¾ long tailpiece. The Actuator Systems NextBolt comes with the 1 ¾ tailpiece preinstalled. If your door is not 1 ¾ thick, but the thickness matches one of the other pre-cut tailpieces included with the lock, then you must swap out the tailpiece. 11
12 IF YOUR DOOR THICKNESS DOES NOT EXACTLY MATCH ANY OF THE PRE-CUT TAILPIECES LENGTHS, THEN YOU MUST TRIM THE PRE-INSTALLED TAIL PIECE TO MATCH YOUR EXACT DOOR THICKNESS. If you need to trim the tailpiece, be sure to measure the exact thickness of your door, mark the tailpiece (with a marker) where it needs to be cut and trim the tail piece accordingly per the exact thickness of your door, with a hacksaw or metal cutters. Notes: The motor could be dislodged if the tailpiece is not cut properly and is too long, due to excessive pressure. Warranty will be voided if this occurs. 12


13 4.4 Installation of the Outdoor Unit 1) Attach the rubber gasket to the back of the outdoor unit. 2) Make sure the deadbolt is engaged. 13


14 3) Make sure the tail piece is vertical. 4) Insert tail piece through the cross slot of the latch. 14


15 5) Insert the connector and wire through the cylinder hole below the deadbolt latch. 6) On the INSIDE side of the door screw the fixing plate to the outside door lock using the two 90mm screws. You can break off the screws to the needed length depending on your required thickness. Insure these have a snug fit. 15
 Select the proper door opening orientation on the back plate of the Indoor Unit.")
16 4.5 Installation of the Indoor Unit The outdoor unit should now be firmly fastened to the outside of the door. This will make it much easier and simpler to attach the inside portion of the lock. 1) Select the proper door opening orientation on the back plate of the Indoor Unit. If the door is left handed, please push the orientation selector switch to L position; if it s right handed, switch the selector to R position. 16


17 2) Plug wire set into circuit board, making sure all prongs are firmly seated. Make sure the black dots on the cable and connector align. 3) Turn the manual turn knob to the vertical position, facing downward. 17
 Gently finish joining the outdoor and indoor units together.. 18")
18 4) Insert the tail piece into the vertical retaining slot of the indoor unit. 5) Gently finish joining the outdoor and indoor units together.. 18

19 6) Fasten the two shorter (15mm) screws through the fixing plate on the upper section of the inside unit. 19
 Move the manual turn knob back and forth to ensure that deadbolt opens and closes")
20 7) Fasten the two long screws through the bottom fixing post holes on the inside unit. 8) Move the manual turn knob back and forth to ensure that deadbolt opens and closes mechanically. 20

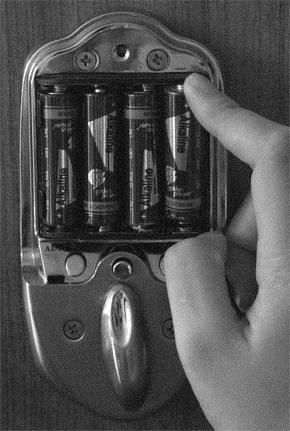
21 9) Insert 4 high-quality AA batteries 21
22 10) Press the electronic open/close button to ensure that the deadbolt opens and closes electronically. 4.6 Final inspection/adjustment prior to enrollment Note: After installation and prior to using the unit, make sure you read and follow the steps below: 1 Turn the inside knob to the horizontal position; next turn it to the vertical position (locked position). It should turn freely. If and when the inside and outside locks are attached securely and the inside knob doesn t turn freely, see the trouble shooting table below for possible solution. If the knob turns freely, continue with the next step. 2 Try to lock and unlock from outside by fully opening and closing the sliding cover. 3 Try to lock and unlock from inside by pressing the Open/Close button to ensure it works well electronically. IMPORTANT SECURITY NOTE: WITHOUT ANY FINGERPRINTS ENROLLED, THE NextBolt WILL LOCK AND UNLOCK BY FULLY OPENING AND FULLY 22
23 CLOSING THE SLIDING COVER Trouble Shooting PROBLEMS Indoor turn knob does not turn or turns very sluggishly POSSIBLE REASONS 1. Incorrect installation 2. Incorrect tailpiece length SOLUTIONS 1. Make sure the tail piece was inserted vertically through the cross slot of the deadbolt and slot of the indoor unit while the turn knob was vertical (facing down). 2. Measure the door thickness and swap or trim the tail piece per section 4.3 of the installation manual 23
24 Indoor turn knob turns but nothing happens. The sliding cover is fully lifted to power on without any fingerprint enrolled inside, the deadbolt does not disengage or four alert beeps are heard. 1. The tail piece did not go through the cross slot of the deadbolt; 2. Tail piece was trimmed too short and does not penetrate the slot of the indoor unit; 1. Right & left hand door configurations is set incorrectly; 2. The tail piece was not set properly 1. Remove and reinstall the outdoor unit. Then insert the tail piece through the cross slot of the deadbolt and slot of the indoor unit while the turn knob is in vertical position (facing down). 2. Contact the Actuator Systems NextBolt dealer that you purchased to lock from OR Contact us at: com 1. Correctly configure the unit for left or right hand door swing per section Uninstall the outdoor unit and keep the UP sign side of the tail piece up and insert the tail vertically through the cross slot of the deadbolt while the turn knob is in vertical position. 24
25 When the sliding cover is fully lifted and immediately put down to engage the deadbolt, but the deadbolt does not fully engage, or four alert beeps are heard. When the sliding cover is lifted up during daily use, nothing happens (fingerprint scanner does not blink) Six beeps are heard when any function is performed. 1. Improper positioning of the strike and strike lining box. It may be deflecting the deadbolt. 1. Batteries not inserted correctly; 2. Wires not connected properly Low Voltage 1. Check the position of the strike and the strike lining box. 1. Remove & reinsert the batteries following + and signs in the battery house. 2. Check the connections and make sure wires are fully plugged in. Change the batteries Operation Manual Operation Manual Helpful Hints Please be sure to physically leave your door open until you have successfully enrolled the first user (ADMINISTRATOR) into the Actuator Systems NextBolt and have successfully verified the new user s fingerprint to unlock the door. 25
26 With no fingerprints enrolled in the Actuator Systems NextBolt, the deadbolt will engage/disengage when the sliding cover is fully opened and immediately closed. Definitions of Indication Beeps: Single, Short Beep Indicates that any operations sequence has begun OR that the door has been successfully locked or unlocked OR that the sliding cover has been left open for more than ten seconds. Single, Long Beep Indicates that programming operation was successful Short, Double Beep Indicates that individual fingerprint user deletion sequence has begun. Long Double Beep Indicates that Delete All programming was successful Four Beeps Indicates unsuccessful enrollment/unsuccessful verification attempt OR Actuator Systems NextBolt was improperly installed (see Installation Guide). Five Beeps - Indicates the selected user was unsuccessfully deleted. Six, Short Beeps Low battery alert, change batteries Common definitions of terms used when using the Actuator Systems NextBolt: Fingerprint Enrollment: Process of adding fingerprints to the Actuator Systems NextBolt. Enrolled Fingerprints: Fingerprints that have been successfully added into the Actuator Systems NextBolt. 26
27 27 Verifying Fingerprints: Process of authentication by scanning enrolled fingerprints to: A) Unlock the door B) Authenticate Administrators enrolled fingerprints to program the Actuator Systems NextBolt. Before enrolling and verifying fingerprints, make sure to read the following helpful hints for Fingerprint Enrollment and Verification: Generally, the center of the vortex (swirl) of the fingerprint pattern is the key data point; ideally, it is placed in the center of the small glass window in a consistent way. Your finger should be flat, motionless and held with light pressure in the same way each time. See the picture below for some guiding drawings. Light pressure when placing the finger on the scanner gives the best image, but the finger must not move during scanning. Moist fingers provide better images than dry ones. If on cold, dry days you have difficulty, for example, try moistening your finger with your breath or a little lotion. Very dry, dirty or scarred fingers are obviously not recommended, since they will obscure the fingerprint. The pointer finger is, by far, the best fingerprint to enroll. The thumb is the second best digit. If the pointer finger is difficult to enroll or verify, try enrolling the same NON ADMIN fingerprint 2 or 3 times at slightly different angles. EX: Enroll same pointer finger as users 3, 4 and 5. In the event you still have trouble enrolling fingerprints we have included 2 fingerprint pads in your box. Moisten your fingers with one of these pads prior to enrollment. These dramatically increase the quality of the enrollment. Once enrolled these pads may be discarded.

28 Always wait until the fingerprint scanner turns on to place your finger on the scanning window. This is true for both fingerprint enrollment AND verification. When trying to enroll or verify fingerprints in direct sunlight, be sure to shade the sensor with your shadow, so sunlight will not reflect off of the mirror in the sensor. Important Programming Notes: When Adding or Deleting Fingerprints, the closed sliding cover must be fully lifted within 8 seconds after pressing the ADD or DEL button, or the NextBolt will power off. If this occurs, simply close the sliding cover, press the ADD or DEL button again and fully lift the sliding cover immediately to restart the programming sequence. 28
29 The first two fingerprint users enrolled will automatically be programmed as ADMINISTRATORS (Users 1 and 2). ADMINISTRATORS can apply all programming functions as well as verify their fingerprints to unlock the door. The 3rd thru 99th fingerprint users enrolled (Users 3 thru 99) are automatically programmed at the USER level. USER level fingerprints can only be used to unlock the door, not to program the lock. Section I - Enrolling Administrators (First Fingerprint User): Sliding cover must be closed before any programming sequence can begin. As noted in the Helpful Hints section, the first two users that enroll their fingerprints into the Actuator Systems NextBolt will automatically be programmed as ADMINISTRATORS (Users 1 and 2). ADMINISTRATORS can apply all programming functions as well as verify their fingerprints to unlock the door. Please use the following steps to enroll the first fingerprint user (ADMINISTRATOR1/USER 1): Remove the battery cover from the indoor unit Press the ADD button located on the indoor unit Single beep will be heard 29
30 Fully open the sliding cover located on the outdoor unit immediately Sensor will flicker for less than one second 30 A single short beep will be heard and the fingerprint sensor will power on After the fingerprint sensor powers on, rest your pointer finger on the sensor window during the first of three scans Keep your pointer finger on the scanning window thru all three scans. After the scanning is completed you will hear one of the following: o Single, long beep indicating that the operation was successful OR o Four beeps indicating that your fingerprint was not successfully enrolled. If you hear four beeps, please start the enrollment process over from the beginning
31 Close the sliding cover (USER 2 through USER 99): Section II - Enrolling Fingerprint Users 2 thru 99: Sliding cover must be closed before any programming sequence can begin. As noted in the Helpful Hints section, the third thru ninety-ninth fingerprint users enrolled (Users 3 thru 99) are automatically programmed at the USER level. USER level fingerprints can only be used to unlock the door, not to program the lock. Please use the following steps to enroll additional fingerprint users (Users 3 thru 99): 31
32 Remove the battery cover from the indoor unit Press the ADD button located on the indoor unit Single beep will be heard 32
33 Fully open the sliding cover located on the outdoor unit immediately Sensor will flicker for less than one second A single short beep will be heard and the fingerprint sensor will power on After the fingerprint sensor powers on, rest an ADMINISTRATOR S finger on the sensor window to verify that they are an Administrator When the first Administrator s fingerprint is successfully verified, the sensor will briefly turn off (for less than one second) Immediately remove the ADMINSTRATOR S finger and enter the KEPRESS SEQUENCE for the user number you wish to enroll described in APPENDIX A 33
34 A single short beep will be heard and the fingerprint sensor will power on Rest the new user s pointer finger on the sensor window during the first of three scans Keep your pointer finger on the scanning window until you hear a single long beep or four beeps. After the scanning is completed you will hear one of the following: o Single, long beep indicating that the operation was successful OR o Four beeps indicating that your fingerprint was not successfully enrolled. If you hear four beeps, please start the enrollment process over from the beginning Once enrollment begins users can be enrolled consecutively without the need to verify the administrator again. After you hear the long beep simply enter in the next KEYPRESS SEQUENCE from the APPENDIX A for the next user. Close the sliding cover to end the enrollment procedure. 34

35 Section III Deleting Individual Fingerprint Users: Sliding cover must be closed before any programming sequence can begin. The Individual Fingerprint User Deletion programming function deletes the individual user you select from your enrolled users. Please use the following steps to delete individual fingerprint users: With the battery cover removed, press the DEL button located on the indoor unit Short, Double Beep will be heard 35
.")
36 Fully open the sliding cover located on the outdoor unit immediately Sensor will flicker for less than one second A single short beep will be heard and the fingerprint sensor will power on Rest an Administrator s fingerprint on the scanning window When the LED light goes out enter the keypress sequence. (The chart is in Appendix A of this manual). o If you hear four beeps this indicates that the Administrator was not recognized. If you hear five beeps this indicates the user deletion was not successful. Begin again from the first step of Section III. When one long beep is hear the user has been deleted successfully. Once the deletion is successful you are not required to verify the administrator to remove additional users. Simply enter the next user 36
37 id sequence and wait for the long beep for each user you wish to remove. Close the sliding cover to end the deletion procedure. Close the sliding cover Repeat steps from the beginning of Section III to delete the next most recently enrolled fingerprint user. Section IV Deleting ALL Fingerprint Users: Sliding cover must be closed before any programming sequence can begin. Deleting ALL enrolled fingerprint users will reset the lock and all users (including Administrators fingerprints) will be deleted. With no fingerprints enrolled in the Actuator Systems NextBolt, the deadbolt will engage/disengage when the sliding cover is fully opened and immediately closed. 37
38 Please use the following steps to delete ALL fingerprint users: 1. Press and hold the DEL button. 2. While holding down the DEL button add the other two buttons (ADD & OPEN/CLOSE). Now all three buttons on the lock will be held down. 3. When one long beep is heard, pull the outside cover up and place the Admin finger on the sensor for verification when the sensor light turns on. 4. Once one long beep is heard, the lock is reset successfully. Close the sliding cover IMPORTANT SECURITY NOTE: WITHOUT ANY FINGERPRINTS ENROLLED, THE NEXTBOLT WILL LOCK AND UNLOCK BY FULLY OPENING AND FULLY CLOSING THE SLIDING COVER. 38
39 Section V Unlocking the Actuator Systems NextBolt from outside: In case of emergency, override keys can be used to disengage the deadbolt. Please use the following steps to unlock the Actuator Systems NextBolt from outside, with your enrolled fingerprint: Fully lift the sliding cover located on the outdoor unit. 39
40 A single short beep will be heard and the fingerprint sensor will power on After the fingerprint sensor powers on, rest any enrolled fingerprint on the sensor window to verify. If fingerprint verification is successful, the deadbolt will disengage and a single, short beep will be heard; If verification of enrolled fingerprint was not successful, then 4 short beeps will be heard. If this happens, the fingerprint scanner will still turn on two additional times enabling users to try more. If all the two additional verification attempts still fail, please start the unlocking process over again, from the beginning of this section. 40
41 Close the sliding cover Section VI Locking the Actuator Systems NextBolt from Outside: In case of emergency, override keys can be used to engage the deadbolt. Please use the following steps to lock the Actuator Systems NextBolt from outside (when leaving): 41
42 Make sure your door is closed Open and immediately close the sliding cover Deadbolt will engage and a single, short beep will be heard Section VII Locking and Unlocking the Actuator Systems NextBolt from Inside: In case of emergency, manual turn knob can be used to disengage the deadbolt. Please use the following steps to lock and unlock the Actuator Systems NextBolt from inside: 42
43 Press the OPEN/CLOSE button (located between the ADD and DEL buttons) Deadbolt will engage/disengage and single, short beep will be heard. Support: Contact the Actuator Systems NextBolt dealer that you purchased the lock from OR Contact us at: for additional support. 43
44 APPENDIX A FINGERPRINT ENROLLMENT CODES Real User ID Code Keypress Sequence (plus Open/Close) 1 ADD 2 ADD/DEL 3 ADD/ADD 4 ADD/DEL/DEL 5 ADD/DEL/ADD 6 ADD/ADD/DEL 7 ADD/ADD/ADD 8 ADD/DEL/DEL/DEL 9 ADD/DEL/DEL/ADD 10 ADD/DEL/ADD/DEL 11 ADD/DEL/ADD/ADD 12 ADD/ADD/DEL/DEL 13 ADD/ADD/DEL/ADD 14 ADD/ADD/ADD/DEL 15 ADD/ADD/ADD/ADD 16 ADD/DEL/DEL/DEL/DEL 17 ADD/DEL/DEL/DEL/ADD 18 ADD/DEL/DEL/ADD/DEL 19 ADD/DEL/DEL/ADD/ADD 20 ADD/DEL/ADD/DEL/DEL 21 ADD/DEL/ADD/DEL/ADD 22 ADD/DEL/ADD/ADD/DEL 23 ADD/DEL/ADD/ADD/ADD 24 ADD/ADD/DEL/DEL/DEL 25 ADD/ADD/DEL/DEL/ADD 44
45 ADD/ADD/DEL/ADD/DEL 27 ADD/ADD/DEL/ADD/ADD 28 ADD/ADD/ADD/DEL/DEL 29 ADD/ADD/ADD/DEL/ADD 30 ADD/ADD/ADD/ADD/DEL 31 ADD/ADD/ADD/ADD/ADD 32 ADD/DEL/DEL/DEL/DEL/DEL 33 ADD/DEL/DEL/DEL/DEL/ADD 34 ADD/DEL/DEL/DEL/ADD/DEL 35 ADD/DEL/DEL/DEL/ADD/ADD 36 ADD/DEL/DEL/ADD/DEL/DEL 37 ADD/DEL/DEL/ADD/DEL/ADD 38 ADD/DEL/DEL/ADD/ADD/DEL 39 ADD/DEL/DEL/ADD/ADD/ADD 40 ADD/DEL/ADD/DEL/DEL/DEL 41 ADD/DEL/ADD/DEL/DEL/ADD 42 ADD/DEL/ADD/DEL/ADD/DEL 43 ADD/DEL/ADD/DEL/ADD/ADD 44 ADD/DEL/ADD/ADD/DEL/DEL 45 ADD/DEL/ADD/ADD/DEL/ADD 46 ADD/DEL/ADD/ADD/ADD/DEL 47 ADD/DEL/ADD/ADD/ADD/ADD 48 ADD/ADD/DEL/DEL/DEL/DEL 49 ADD/ADD/DEL/DEL/DEL/ADD 50 ADD/ADD/DEL/DEL/ADD/DEL 51 ADD/ADD/DEL/DEL/ADD/ADD 52 ADD/ADD/DEL/ADD/DEL/DEL 53 ADD/ADD/DEL/ADD/DEL/ADD 54 ADD/ADD/DEL/ADD/ADD/DEL 55 ADD/ADD/DEL/ADD/ADD/ADD 56 ADD/ADD/ADD/DEL/DEL/DEL
46 ADD/ADD/ADD/DEL/DEL/ADD 58 ADD/ADD/ADD/DEL/ADD/DEL 59 ADD/ADD/ADD/DEL/ADD/ADD 60 ADD/ADD/ADD/ADD/DEL/DEL 61 ADD/ADD/ADD/ADD/DEL/ADD 62 ADD/ADD/ADD/ADD/ADD/DEL 63 ADD/ADD/ADD/ADD/ADD/ADD 64 ADD/DEL/DEL/DEL/DEL/DEL/DEL 65 ADD/DEL/DEL/DEL/DEL/DEL/ADD 66 ADD/DEL/DEL/DEL/DEL/ADD/DEL 67 ADD/DEL/DEL/DEL/DEL/ADD/ADD 68 ADD/DEL/DEL/DEL/ADD/DEL/DEL 69 ADD/DEL/DEL/DEL/ADD/DEL/ADD 70 ADD/DEL/DEL/DEL/ADD/ADD/DEL 71 ADD/DEL/DEL/DEL/ADD/ADD/ADD 72 ADD/DEL/DEL/ADD/DEL/DEL/DEL 73 ADD/DEL/DEL/ADD/DEL/DEL/ADD 74 ADD/DEL/DEL/ADD/DEL/ADD/DEL 75 ADD/DEL/DEL/ADD/DEL/ADD/ADD 76 ADD/DEL/DEL/ADD/ADD/DEL/DEL 77 ADD/DEL/DEL/ADD/ADD/DEL/ADD 78 ADD/DEL/DEL/ADD/ADD/ADD/DEL 79 ADD/DEL/DEL/ADD/ADD/ADD/ADD 80 ADD/DEL/ADD/DEL/DEL/DEL/DEL 81 ADD/DEL/ADD/DEL/DEL/DEL/ADD 82 ADD/DEL/ADD/DEL/DEL/ADD/DEL 83 ADD/DEL/ADD/DEL/DEL/ADD/ADD 84 ADD/DEL/ADD/DEL/ADD/DEL/DEL 85 ADD/DEL/ADD/DEL/ADD/DEL/ADD 86 ADD/DEL/ADD/DEL/ADD/ADD/DEL 87 ADD/DEL/ADD/DEL/ADD/ADD/ADD
47 88 ADD/DEL/ADD/ADD/DEL/DEL/DEL 89 ADD/DEL/ADD/ADD/DEL/DEL/ADD 90 ADD/DEL/ADD/ADD/DEL/ADD/DEL 91 ADD/DEL/ADD/ADD/DEL/ADD/ADD 92 ADD/DEL/ADD/ADD/ADD/DEL/DEL 93 ADD/DEL/ADD/ADD/ADD/DEL/ADD 94 ADD/DEL/ADD/ADD/ADD/ADD/DEL 95 ADD/DEL/ADD/ADD/ADD/ADD/ADD 96 ADD/ADD/DEL/DEL/DEL/DEL/DEL 97 ADD/ADD/DEL/DEL/DEL/DEL/ADD 98 ADD/ADD/DEL/DEL/DEL/ADD/DEL 99 ADD/ADD/DEL/DEL/DEL/ADD/ADD 47
48 USER ENROLLMENT TABLE Number Name Finger Used (L/R) Date
49
50
51
52 We would like to personally thank you for your purchase of our exciting NextBolt Series biometric deadbolt lock from Actuator Systems. We hope you enjoy using it as much as we enjoy developing this technology for you. For more helpful information about your NextBolt please visit or our knowledgebase at For all Tech Support Questions: Call: Ext 102 or To reach the main office: Frequently Asked Questions (FAQ) Here are a few answers to common installation questions. (These account for 90% of the inquiries we receive to our technical support department). 1) When you mate the front and back of the lock together insure the bolt is in the *locked* (out) position and the knob is pointing directly down. This will cause the notch the tailpiece fits into to be in a vertical position. 2) Insure the wire that runs between the two lock pieces does not interfere with the rotation of the tailpiece. 3) Issues with fingerprint recognition are due to a poor enrollment 95% of the time. High quality enrollments are the key to fast and reliable operation of your new lock. Ensure when you place your finger on the pad for enrollment that as much of your finger as possible is in contact with the sensor. Do not move your finger while it is being scanned wait until you hear the long beep. Keep even pressure applied to the center of the fingerprint pad. You can enroll the same finger more than one time. It also can help enrollment if the finger you use is not overly dry. a. We have included in your pack 2 disposable fingerprint enhancement pads. These pads are only necessary in the event you had trouble enrolling. To use just wipe your finger with one of the pads 5 seconds before enrollment. These pads considerably enhance the quality of the ridges of the fingerprint. Thanks again from your friends at Actuator Systems! 52
INTERNAL FRENCHFOLD DOOR SYSTEM
 INTERNAL FRENCHFOLD DOOR SYSTEM 3 AND 4 Patterns to Head 3mm to Frame 3-4mm Slave Daily Access /Master to floor 17mm max IMPORTANT Please note: You can only assemble these door configurations by using
Ceremonial Bugle Operation Manual and Military Funeral Honors Guide
 S & D Consulting Int, Ltd. Ceremonial Bugle Operation Manual and Military Funeral Honors Guide Limited Warranty S & D Consulting Int, Ltd. guarantees the insert to be materially free from defects and to
TARGUS NOTEBOOK SECURITY DEFCON SCL SERIALIZED COMBINATION CABLE LOCK
 notebook security DEFCON SCL serialized combination cable lock USER GUIDE Visit our Website at www.targus.com Features and specifications subject to change without notice. 2006 Targus Group International,
Caution! triangles are used to warn of situations that demand extra care and attention.
 OctoStretch Instruction guide English 7EN160104-01 2009-07-07 Applies to the following models: OctoStretch Prod. No. 3156055 OctoStretch Balance Prod. No. 3156056 OctoStretch is intended for lifting and
INTRODUCTION. AUTHORIzATION A Word of Caution
 RxOnly TAbLE Of CONTENTS Product Terminology................. 2 Important Information Specifications.................... 2 Introduction...................... 3 Authorization..................... 3 Customer
Overview. Airespace AP a Radio Card Quick Installation
 Airespace AP 802.11a Radio Card Quick Installation Guide Airespace AP 802.11a Radio Card Quick Installation Guide Overview System Release 1.1 This guide is designed to provide professional installers with
MEDICAL ALERT SETUP GUIDE
 MEDICAL ALERT SETUP GUIDE GETTING STARTED STARTED You ve made a great decision to protect yourself with Medical Alert, be sure to wear your button everyday to stay protected all the time! Enclosed please
Instructions for Use and Disposal
 Instructions for Use and Disposal IONSYS fentanyl iontophoretic transdermal system, 40mcg/activation For single use only. Up to 24 hours or 80 doses, whichever comes first. Refer to the Prescribing Information
Giving Intravenous (IV) Nutrition Through a Central Line with a CADD Pump
 Nutrition Through a Central Line with a CADD Pump") Home Care Services Giving Intravenous (IV) Nutrition Through a Central Line with a CADD Pump Receiving medicine and supplies When you receive a shipment, make sure you have the correct medicine and supplies.
Home Care Services Giving Intravenous (IV) Nutrition Through a Central Line with a CADD Pump Receiving medicine and supplies When you receive a shipment, make sure you have the correct medicine and supplies.
Hill-Rom Advanta 2 Bed Tips Simply Intuitive FOR COMPLETE INSTRUCTIONS ON HOW TO OPERATE THE ADVANTA 2 BED, SEE USER S MANUAL.
 Hill-Rom Advanta 2 Bed Tips Simply Intuitive FOR COMPLETE INSTRUCTIONS ON HOW TO OPERATE THE ADVANTA 2 BED, SEE USER S MANUAL. 1 Three-Mode Bed Exit System (Patient Position Monitor) The Bed Exit Alarm
DEFCON Authenticator. with Dual USB Port Hub
 DEFCON Authenticator with Dual USB Port Hub DEFCON TM Authenticator 2 Introduction Thank you for purchasing the Targus DEFCON Authenticator fingerprint scanner with Dual USB Port Hub. The DEFCON Authenticator
FlexoStretch. Product Description. Instruction Guide
 FlexoStretch Instruction Guide English 7EN160176-02 2009-07-07 Applies to the following models: FlexoStretch Prod. No. 3156057 Product Description FlexoStretch is intended for lifting and transferring
VAN WERT COUNTY HOSPITAL. Policy/Procedure: Interdepartmental No.: N Issue Date: 6-90 By: Nursing No. of Pages: 9
 VAN WERT COUNTY HOSPITAL Policy/Procedure: Interdepartmental No.: N 7-14 Issue Date: 6-90 By: Nursing No. of Pages: 9 Reviewed: 6-14, 12-13, 5-11 Revised: 6-14 Distribution List: All Nursing Departments,
Personal Health Monitoring Services SM VITAL SIGNS TRANSMITTER MODEL: VST 3 TM. Instruction Manual
 Personal Health Monitoring Services SM VITAL SIGNS TRANSMITTER MODEL: VST 3 TM Instruction Manual TABLE OF CONTENTS Introduction...................................2 Get to Know Your Vital Signs Transmitter............4
66CF1005 Certificate lifting equipment with new delivery Pag. 64/03
 Estil Spur-Gear Chain Hoists Estil Link Chain Hand-Lever Hoists Estil Steel wire hoist and lashing devises. Estil Trolleys for manual and electrical hoists Estil Beam clamps for temporarty lifting points
HQ AFOATS AIR FORCE JUNIOR RESERVE OFFICER TRAINING CORPS (AFJROTC)
") HQ AFOATS AIR FORCE JUNIOR RESERVE OFFICER TRAINING CORPS (AFJROTC) (Prepared 2002) J R O T C INTERSERVICE CROSS-INDEX DRILL MANUAL TABLE OF CONTENTS FOREWORD..............................................
HQ AFOATS AIR FORCE JUNIOR RESERVE OFFICER TRAINING CORPS (AFJROTC) (Prepared 2002) J R O T C INTERSERVICE CROSS-INDEX DRILL MANUAL TABLE OF CONTENTS FOREWORD..............................................
Instructions for use. Unfold and lay flat. Read both sides for full instructions
 Instructions for use Trulicity 0.75 mg solution for injection in pre-filled pen dulaglutide BREAK SEAL BREAK SEAL Unfold and lay flat Read both sides for full instructions ABOUT TRULICITY PRE-FILLED PEN
CARRIER, PERSONNEL, FULL TRACKED, ARMORED, M113A CARRIER, COMMAND POST, LIGHT TRACKED, M577A
 OPERATOR S MANUAL CARRIER, PERSONNEL, FULL TRACKED, ARMORED, M113A2 2350-01-068-4077 CARRIER, COMMAND POST, LIGHT TRACKED, M577A2 2350-01-068-4089 CARRIER, MORTAR, 107-MM, M30; SELF-PROPELLED, M106A2 2350-01-069-6931
Policy and Procedure Manual
 Policy and Procedure Manual Employee Duties Adaptive Educational Services 2 Table of Contents OPENING OFFICE 3 CLOSING OFFICE 3 ANSWERING TELEPHONE 4 RELAY INDIANA 6 FORMAT-STUDENT FILES 7 PREPARING FILES
Medication Aide Skills Assessment Review Guide
 Medication Aide Skills Assessment Review Guide Provided by Clarkson College Office of Professional Development professionaldevelopment@clarksoncollege.edu Medication Aide Skills Assessment Study Guide
SMP 385MT. Solutions Start Here... Solutions Start Here USER & MAINTENANCE MANUAL
 Solutions Start Here... SMP 385MT Solutions Start Here www.smpcanada.com SMP Canada 10 Sims Crescent, Richmond Hill Ontario, L4B-1K9 Canada Tel: (905) 764-7767 Fax: 1-866-627-9798 support@smpcanada.com
1. Communicate to the UAP any special information needed prior to the administration of the medication.
 Objectives At the completion of this module, unlicensed assistive personnel (UAP) should be able to: 1. administer medications by intradermal injection. 2. document medication administration in the client
RISK EVALUATION AND MITIGATION STRATEGY (REMS)
") Initial REMS approval: XX/XXXX NDA 21338 IONSYS (fentanyl iontophoretic transdermal system) I. GOAL Fentanyl/Opioid The Medicines Company 8 Sylvan Way, Parsippany NJ 07054 Phone: 973-290-6050 RISK EVALUATION
Initial REMS approval: XX/XXXX NDA 21338 IONSYS (fentanyl iontophoretic transdermal system) I. GOAL Fentanyl/Opioid The Medicines Company 8 Sylvan Way, Parsippany NJ 07054 Phone: 973-290-6050 RISK EVALUATION
Safe & Sound Video and audio baby monitor User guide Models: BM3000/ BM3000 Twin
 Safe & Sound Video and audio baby monitor User guide Models: BM3000/ BM3000 Twin For product support please call: 1 300 369 193 Congratulations on purchasing your new VTech product. Before using this product,
ORTHODONTIC. Clinical Assistant Manual
 ORTHODONTIC Clinical Assistant Manual Note: The following policies and procedures comprise general information and guidelines only. The purpose of these policies is to assist you in performing your job.
Buck & Boost Transformer Installation Instructions
 Buck & Boost Installation Instructions 120 V x 240 V - 12/24 V Class 7414 Introduction This manual provides installation, operation, and maintenance instructions for the 2847 Buck & Boost transformer,
Mortara Holter. Patient Instruction Manual
 Mortara Holter Patient Instruction Manual Preventice Services, LLC and Preventice Technologies, Inc., are independent, wholly owned subsidiaries of Preventice Solutions, Inc. 1 Patient Financial Obligations
Lockset Catalog. Fastec Industrial. A Division of WESCO Distribution, Inc.
 Lockset Catalog Fastec Industrial A Division of WESCO Distribution, Inc. Interior Locks, Tulip and Ball Style C SeriesPassage 5902 Series Passage 607 Series Passage 7/8 Drive in Latch with 1/2 Moon Spindle
LF1090 BARIATRIc. USeR MANUAL. LF1090-INS-LAB-RevD GF Health Products, Inc.
 LF1090 BARIATRIc PATIeNT LIFT USeR MANUAL LF1090-INS-LAB-RevD12 2012 GF Health Products, Inc. Read this manual before operating your Patient Lift. Save this manual for future use. The most current version
Effective: Revised: April 15, 2016 SUCTIONING, MODIFIED STERILE TRACHEAL
 SUCTIONING, MODIFIED STERILE TRACHEAL Purpose: Tracheal suctioning is performed to remove secretions and maintain a patent airway. Additional Authority: Nevada Revised Statute, Nevada Nurse Practice Act,
2010 Innovative Uses and Tips for Safe Patient Moving Equipment: Safe Patient Moving: the Keys to the Kingdom: Learning Objectives
 2010 Innovative Uses and Tips for Safe Patient Moving Equipment: Better Care, Less Wear Safe Patient Moving: the Keys to the Kingdom: Learning Objectives A. Describe what Consistency Communication Collaboration
HomeMed Information. for the UMHS Cancer Center
 HomeMed Information for the UMHS Cancer Center 1 In this manual you will find the following information: Your Health Care Team... HomeMed... 3 When to notify your team or HomeMed... 4 Infusion Pump Guide
Pharmacy Technician Reference Guide. Written by Emily Moore
 Pharmacy Technician Reference Guide Written by Emily Moore Table of Contents iii Table of Contents Introduction... vii Chapter 1: Using Intercom Plus... 3 Understanding the Work Queue... 3 Using Quick-Keys...
2016 School District of Pittsburgh
 2016 School District of Pittsburgh Health Careers Skill Name: Accurately Measures, Records and Reports Client s Oral Temperature ROADMAP: 20 min (vitals, height and weight) EQUIPMENT NEEDED: facility/materials
Operating Manual for HEKA Incubators
 Operating Manual for HEKA Incubators Models without separate hatching chamber Models with separate hatching chamber HEKA-1 HEKA-2 HEKA-3 HEKA-4 HEKA-5 HEKA-6 HEKA-7 HEKA-8 HEKA-9 HEKA-11 HEKA-12 HEKA-10
TABLE OF CONTENTS FINAL ASSEMBLY (3 WIRE)... 1 FINAL ASSEMBLY (2 WIRE)... 2 DOOR ASSEMBLY (3 WIRE)... 4 DOOR ASSEMBLY (2 WIRE)...
... 1 FINAL ASSEMBLY (2 WIRE)... 2 DOOR ASSEMBLY (3 WIRE)... 4 DOOR ASSEMBLY (2 WIRE)...") FEB2008 4216770 B TABLE OF CONTENTS FINAL ASSEMBLY (3 WIRE)... 1 FINAL ASSEMBLY (2 WIRE)... 2 FINAL ASSEMBLY (3 WIRE & 2 WIRE) PARTS LIST... 3 DOOR ASSEMBLY (3 WIRE)... 4 DOOR ASSEMBLY (3 WIRE) PARTS LIST...
FEB2008 4216770 B TABLE OF CONTENTS FINAL ASSEMBLY (3 WIRE)... 1 FINAL ASSEMBLY (2 WIRE)... 2 FINAL ASSEMBLY (3 WIRE & 2 WIRE) PARTS LIST... 3 DOOR ASSEMBLY (3 WIRE)... 4 DOOR ASSEMBLY (3 WIRE) PARTS LIST...
Affinity Four Birthing bed Delivering Safety
 Affinity Four Birthing bed Delivering Safety The perfect combination of safety and ease-of-use In labour and delivery, every second counts. Caregivers must be able to respond quickly and easily, especially
Reference Guide for Applicants
 Grants Ontario System Reference Guide for Applicants Please inform us if you need a different format or other accommodation to access this information. Version Date: July 2017 Table of Contents Introduction...
medical and commercial f ields.
 NIM SYSTEM A simple communication system sa medical and commercial f ields. SYSTEM FEATURES All call and group call Call log Powerful sound 20406080 call capacity Large variety of sub stations Durability
Read thoroughly before getting started. Patient User Guide
 Read thoroughly before getting started Patient User Guide Stool collection Step-by-step instructions Packing and shipping Step-by-step instructions Please read booklet carefully Follow the Stool collection
UNCLASSIFIED. AUD-MERO Office of Audits March 2017
 AUD-MERO-17-28 Office of Audits March 2017 Management Assistance Report: Improvements Needed to the Security Certification Process To Ensure Compliance With Security Standards at Embassy Kabul, Afghanistan
GUIDELINES FOR PROVIDING PERSONAL CARE: TEACHING PLAN
 GUIDELINES FOR PROVIDING PERSONAL CARE: TEACHING PLAN Lesson overview Time: One hour This session covers the essential elements of providing or assisting with a resident s personal care. Facility policies
User Manual Lobby Camera Phone
 User Manual Lobby Camera Phone DRC-GUM/RF1 Thank you for purchasing COMMAX products. Please carefully read this User s Guide (in particular, precautions for safety) before using a product and follow instructions
CALIFORNIA STATE UNIVERSITY, OFFICE OF THE CHANCELLOR Telecommuting Policy and Guidelines For CSUEU Employees
 TELECOMMUTER S AGREEMENT For CSUEU Represented Employees This Telecommuter s Agreement is between the Chancellor s Office and (Employee). The employee s normal work location is, the employee s department
TESTING APPLICATION STANDARD (TAS) IMPACT TEST PROCEDURES
 IMPACT TEST PROCEDURES") TESTING APPLICATION STANDARD (TAS) 201-94 IMPACT TEST PROCEDURES 1. 2. Scope: 1.1 This protocol covers procedures for conducting the impact test of materials as required by Section 1626 of the Florida
TESTING APPLICATION STANDARD (TAS) 201-94 IMPACT TEST PROCEDURES 1. 2. Scope: 1.1 This protocol covers procedures for conducting the impact test of materials as required by Section 1626 of the Florida
LEARN TO LEAD DRILL & CEREMONIES TESTS CAP TEST 78-2 JULY Corrected Copy - Feb 2011 See inside front cover
 LEARN TO LEAD DRILL & CEREMONIES TESTS CAP TEST 78-2 JULY 2010 Corrected Copy - Feb 2011 See inside front cover NOTE: This test booklet applies only to those cadets who are studying the Learn to Lead textbook.
Caring for Your Jackson Pratt Drainage System
 Caring for Your Jackson Pratt Drainage System This booklet was originally written by Barbara Cree-Loveless, RN and Cynthia Knauer, RN, MS Introduction This booklet describes how to care for your Jackson
ACHIEVEMENT 1 Drill & Ceremonies Practical Test
 ACHIEVEMENT 1 Drill & Ceremonies Practical Test Topic: Basic Drill as an Element Member Conditions: Form cadets as a single element. Test no more than 5 cadets at a time. Passing Score: 73%. Must perform
Invivo Expression. MRI Patient Monitoring Systems
 Invivo Expression MRI Patient Monitoring Systems Safer. Smarter. Simpler. The only thing easier than using Expression is choosing one. Invivo MRI patient monitoring systems are completely upgradeable,
NOTES AND ACTIONS. Turn off power switch, wait a few seconds, turn back on. If paper jammed, remove and reinsert.
 POLICY All ADCs will be plugged into the C&W Emergency Power (RED) plugs. In the event that the main BC Hydro power is off, the cabinets should still run on the Emergency Power system (C&W back up generators).
RFP for 2015 E-Rate Funded Wireless Upgrade Project at Four Locations In Thomasville City Schools RFP Reference# 2015Wireless Cabling Contact Mike
 RFP for 2015 E-Rate Funded Wireless Upgrade Project at Four Locations In Thomasville City Schools RFP Reference# 2015Wireless Cabling Contact Mike Ingram Chief Information Officer Thomasville City Schools
Cadets are expected to maintain high standards of appearance and conduct on and off campus.
 Cadets are expected to maintain high standards of appearance and conduct on and off campus. GROOMING AND PERSONAL APPEARANCE STANDARDS Personal appearance and wearing the uniform is a significant part
Chapter 4. Disbursements
 Chapter 4 Disbursements This Page Left Blank Intentionally CTAS User Manual 4-1 Disbursements: Introduction The Claims Module in CTAS allows you to post approved claims into disbursements. If you use a
INDIAN ASSOCIATION FOR THE CULTIVATION OF SCIENCE 2A & 2B Raja S.C.Mullick Road Jadavpur, Kolkata
 INDIAN ASSOCIATION FOR THE CULTIVATION OF SCIENCE 2A & 2B Raja S.C.Mullick Road Jadavpur, Kolkata 700032 Tender Notice No.: IACS/PC/BBD/WELLCOME-DBT/14/38 dated: 4.09.2014 Sub: Specification for CO2 Incubator
LF1090 BARIATRIC PATIENT LIFT
 LF1090 BARIATRIC PATIENT LIFT USER MANUAL LF1090-INS-LAB-RevG15 2005 GF Health Products, Inc. Read this manual before operating your Patient Lift. Save this manual for future use. CONTENTS 1 INTRODUCTION...
GUIDELINES FOR PROVIDING PERSONAL CARE: TEACHING PLAN
 GUIDELINES FOR PROVIDING PERSONAL CARE: TEACHING PLAN Lesson overview Time: One hour This session covers the essential elements of providing or assisting with a resident s personal care. Facility policies
CONVENIENCE METAL FABRICATION ABRASIVES VENDING SOLUTIONS CORNER STORE RIGHT ON THE FLOOR
 METAL FABRICATION ABRASIVES VENDING SOLUTIONS CORNER STORE CONVENIENCE RIGHT ON THE FLOOR Pre-selected product assortment for optimal coverage of popular applications Industry s best selection of abrasive
Using Body Mechanics
 Promotion of Safety Using Body Mechanics Muscles work best when used correctly Correct use of muscles makes lifting, pulling, and pushing easier Prevents unnecessary fatigue and strain and saves energy
ECN KNOY Lab Consultant Manual
 ECN KNOY Lab Consultant Manual Last updated August 20, 2013 Welcome, KNOY Lab Consultants! Thanks for being part of the ECN (purdue.edu/ecn) team in the College of Technology. This document is to be used
Parts List. Commercial Series Refrigerated Kitchen Equipment
 Parts List Commercial Series Refrigerated Kitchen Equipment Models CR1S, CF1S CR2S, CF2S CR3S, CF3S Full Glass (FGE/FGY), Full Solid (FS), Half Solid (HS) hoshizakiamerica.com Number: 7132 Issued: 12-28-201
1510 Self-Contained Biological Indicator Incubator OPERATION MANUAL
 1510 Self-Contained Biological Indicator Incubator OPERATION MANUAL Bozeman Manufacturing Facility Bozeman, MT USA (303) 987-8000 FAX: (406) 585-9219 www.mesalabs.com Omaha Manufacturing Facility Omaha,
Easylink to Square D Module
 Document o. 587-326 Easylink to Square D Module Product Description The Easylink Module mounts in an enclosure (P/ 587-300, 115 Vac or P/ 587-295, 230 Vac). Once installed, the Easylink Module is positioned
KANOPY INTRODUCTION PRODUCT SPECIFICATION
 INTRODUCTION Lighting petrol station forecourts can be extremely costly especially when operating a 24 hour premises when the filling area must be lit throughout the night but customer visits may be infrequent
CONVENIENCE CORNER STORE RIGHT ON THE FLOOR
 Metal Fabrication Abrasives Vending Solutions CORNER STORE CONVENIENCE RIGHT ON THE FLOOR Pre-selected product assortment for optimal coverage of popular applications Industry s best selection of abrasive
SPONGE ACCOUNTing SYSTEM AUDIT TOOL
 Verna C. Gibbs M.D. NoThing Left Behind SPONGE ACCOUNTing SYSTEM Nurses use a standardized process to put sponges in hanging plastic holders and document the counts on a wall-mounted dry-erase board in
Uniform Data System for Medical Rehabilitation
 Uniform Data System for Medical Rehabilitation 270 Northpointe Parkway, Suite 300, Amherst, New York 14228 tel: 716-817-7800 fax: 716-568-0037 The Functional Assessment Specialists UDSMR Credentialing
einteract einteract Setup Guide July 07, 2017
 einteract einteract Setup Guide July 07, 2017 This document covers the setup of the einteract features in PointClickCare. Table of Contents einteract... 3 Overview of einteract... 3 Security for einteract...
SAMPLE AED PROCEDURE
 Public Access Defibrillation Policies and Procedures Company Information Effective Date: PUBLIC ACCESS DEFIBRILLATION POLICIES AND PROCEDURES Table of Contents Signature Page AED Overview Section 1.0 Definitions
AIRCRAFT WEAPONS SYSTEMS TEST EQUIPMENT
 CHAPTER 16 AIRCRAFT WEAPONS SYSTEMS TEST EQUIPMENT Aviation ordnancemen use test equipment in all phases of electrical testing of weapons systems. The testing procedures you use are required at specific
Security Risk Analysis
 Security Risk Analysis Risk analysis and risk management may be performed by reviewing and answering the following questions and keeping this review (with date and signature) for evidence of this analysis.
Eleganza 3XC. Designed for ICU
 Eleganza 3XC Designed for ICU Benefits of Eleganza 3XC 2 LINET Eleganza 3XC Everything needed to save lives Prevention of pulmonary and cardiac complications Falls protection and pressure ulcer prevention
WLDG 1428 Introduction to Shielded Metal Arc Welding
 SYLLABUS WLDG 1428 Introduction to Shielded Metal Arc Welding WELDING BRAZOSPORT COLLEGE LAKE JACKSON TEXAS PREPARED BY: Jay Barr DATE: August 25, 2016 INSTRUCTOR RECOMMENDED BY: DATE: DIVISION CHAIRMAN
Early discharge with Exudrain wound drains NURSING INFORMATION ON THE CARE OF BREAST SURGERY PATIENTS AT HOME
 Early discharge with Exudrain wound drains NURSING INFORMATION ON THE CARE OF BREAST SURGERY PATIENTS AT HOME Home sweet home For the first few days after surgery many patients have two wound drains and
EMAR Medication Pass
 EMAR Medication Pass This manual includes recording of resident medication passes on a computer. To begin your Medication Pass, click on the EMAR icon, then select a Med Provider. The listing of Med Providers
Health and Safety Policy
 Health and Safety Policy STATEMENT OF INTENT This pre-school believes that the health and safety of children is of paramount importance. We make our pre-school a safe and healthy place for children, parents,
Lift Repositioning and Turning Accessory Operating Instructions
 The EZ Way line of Repositioning and Turning Accessories was designed to aid caregivers in effectively turning patients, repositioning patients, elevating patients over a bed to change bed linen, and weighing
Clinical Skills Validation: Alaris Pump System
 Clinical Skills Validation: Alaris Pump System These documents are intended for use by CW Nurse Clinical Leadership Team. The method used to implement the validation of the Alaris Pump System is unit specific.
User Guide (0108) Barton Ceiling Track Lift
 Barton Ceiling Track Lift") User Guide (0108) Barton Ceiling Track Lift 1 Lift Features 1. Lift capabilities and design features; 2. Lift operation; Ceiling Track Lifts are designed to withstand the rigors of daily institutional
User Guide (0108) Barton Ceiling Track Lift 1 Lift Features 1. Lift capabilities and design features; 2. Lift operation; Ceiling Track Lifts are designed to withstand the rigors of daily institutional
Go! Guide: Medication Administration
 Go! Guide: Medication Administration Introduction Medication administration is one of the most important aspects of safe patient care. The EHR assists health care professionals with safety by providing
Online Application Help
 Online Application Help The Search for Grants website is noted throughout this document, however we also manage many other foundations that are not hosted on the website, but do utilize our online applications.
Patient Education Guide
 Patient Education Guide Online Video Tutorials For helpful video instruction, select the patient tab at our website www.cardionet.com Share Your Thoughts Please share with us how we are doing by filling
API Qualification of Ultrasonic Examiners for Sizing Examination Program (QUSE) Candidate Orientation
 Candidate Orientation") API Qualification of Ultrasonic Examiners for Sizing Examination Program (QUSE) Candidate Orientation July 2015 1 PURPOSE The information in this handout is intended to provide an outline for the API Qualification
API Qualification of Ultrasonic Examiners for Sizing Examination Program (QUSE) Candidate Orientation July 2015 1 PURPOSE The information in this handout is intended to provide an outline for the API Qualification
University of Miami Clinical Enterprise Technologies
 Provider Manual 1 Our Mission: To design and deliver ongoing support for a network of Business and Clinical Information Management Systems which enhance the academic and research vision while implementing
Check List Putting On (Donning) PPE Removing (Doffing) PPE. Sources: Victorian Ebola Virus Disease Plan Version 2: 12 November 2014.
 PPE Removing (Doffing) PPE. Sources: Victorian Ebola Virus Disease Plan Version 2: 12 November 2014.") Guidance on Personal Protective Equipment (PPE) To Be Used by Healthcare Workers During the Management of Patients with Ebola Virus Disease in Grampians Region Hospitals Check List Putting On (Donning)
Guidance on Personal Protective Equipment (PPE) To Be Used by Healthcare Workers During the Management of Patients with Ebola Virus Disease in Grampians Region Hospitals Check List Putting On (Donning)
EZTest Incubator OPERATION MANUAL. 10 Evergreen Drive Bozeman, MT USA (303) Model
 Model") EZTest Incubator OPERATION MANUAL 10 Evergreen Drive Bozeman, MT 59715 USA (303) 987-8000 www.mesalabs.com 16 1 This page intentionally blank. 2 15 This page intentionally blank. Table of Contents Introduction
EZTest Incubator OPERATION MANUAL 10 Evergreen Drive Bozeman, MT 59715 USA (303) 987-8000 www.mesalabs.com 16 1 This page intentionally blank. 2 15 This page intentionally blank. Table of Contents Introduction
YOU ARE INVITED EDUCATIONAL COURSES CREDITS OFFERED. IDN-H. Hoffman & ASSA ABLOY are proud to offer
 YOU ARE INVITED (ALOA, ESA & NJCEI) IDN-H. Hoffman & are proud to offer EDUCATIONAL COURSES covering Adams Rite, HES and Securitron product lines. 2 DATES OF CLASSES TUESDAY, MAY 1, 2018 8:00 a.m. - 5:00
2-DAYS OF EDUCATION TUESDAY, AUGUST 7, :00 AM - 5:00 PM TRADE SHOW WEDNESDAY, AUGUST 8, :00 AM - 2:00 PM YOU ARE CORDIALLY INVITED
 YOU ARE CORDIALLY INVITED to attend the IDN-Grand Rapids Trade Show TRADE SHOW 11:00 AM - 2:00 PM LIVE AT 2-DAYS OF EDUCATION TUESDAY, AUGUST 7, 2018 8:00 AM - 5:00 PM 8:00 AM - 11:00 AM LOOK INSIDE FOR
Patient Visit Tracking Toolkit
 Dramatic Performance Improvement Patient Visit Tracking Toolkit A Bird s Eye View of Patient Experience Summary Instructions for Tracking Patient Visits. In redesign, it s imperative to truly understand
TECHNICAL MANUAL OPERATOR'S, UNIT, DIRECT SUPPORT, AND GENERAL SUPPORT MAINTENANCE MANUAL
 TECHNICAL MANUAL OPERATOR'S, UNIT, DIRECT SUPPORT, AND GENERAL SUPPORT MAINTENANCE MANUAL AIR CONDITIONER, HORIZONTAL, COMPACT, 36,000 BTU/HR, MULTI-POWER INPUT 208V, 3 PHASE, 50/60/400 HZ MODEL MH-40-MP
www MK-Electronic de 5 Parts List 8. Xerographic PL 8.1 Xerographic (1 of 2) PL 8.2 Xerographic (2 of 2)
 PL 8.2 Xerographic (2 of 2)") Overview Introduction... 5-5 Subsystem Information... 5-6 Symbology... 5-7 s 1. IIT/CP PL 1.1 Platen/IIT Cover... 5-9 PL 1.2 Control Panel/Platen Glass... 5-10 PL 1.3 Control Panel (1 of 2)... 5-11 PL
Overview Introduction... 5-5 Subsystem Information... 5-6 Symbology... 5-7 s 1. IIT/CP PL 1.1 Platen/IIT Cover... 5-9 PL 1.2 Control Panel/Platen Glass... 5-10 PL 1.3 Control Panel (1 of 2)... 5-11 PL
Audio. Distribution. Network ADN C1/ADN D1. Quick guide
 Audio Distribution Network ADN C1/ADN D1 Quick guide Information on this quick guide Information on this quick guide Please make sure to read the Safety information supplement included separately with
CAP IP. ip intercom REFUGE CALL POINTS IP NETWORK SALES DEPARTMENT SECURITY DISPATCH SMARTPHONE SUPERVISION IP MAYLIS RANGE
 CAP IP ip intercom A GLOBAL FULL IP / SIP ACCESS INTERCOM AND AUDIO VIDEO INTERCOMMUNICATION SOLUTION PRINCIPAL VISITOR ACCESS ENTRANCE FLOORS VISITORS CAR PARK CAP IP AUDIO VIDEO KEYPAD SELECTABLE LIST
SKS, $100. 1" /22, TAPCO
 Sks stocks tapco The Borg System is 100 % Sks stocks tapco Choate Dragunov SKS Stocks (Black Cheek Rest) $15.00. SKS T6 Adjustable Stock with spike bayonet cut (Olive Drab) $89.00. ATI Folding SKS Stock
1.5 to 5 Tons INDOOR COILS C33. Upflow - Cased and Uncased PRODUCT SPECIFICATIONS C A - 2 F MODEL NUMBER IDENTIFICATION FEATURES
 INDOOR COILS C33 PRODUCT SPECIFICATIONS Upflow - Cased and Uncased Bulletin No. 20280 September 203 Supersedes June 202 MODEL NUMBER IDENTIFICATION FEATURES WARRANTY Unit Type C = Indoor Coil - Upflow
Welcome to the ACEND Accreditation Webinar for Program Directors.
 Welcome to the ACEND Accreditation Webinar for Program Directors. 1 This webinar is designed to provide some information about ACEND Accreditation and the 2017 Standards to new program directors. ACEND
Hyundai Motor America, Receipt of Petition for Decision of. AGENCY: National Highway Traffic Safety Administration (NHTSA),
,") This document is scheduled to be published in the Federal Register on 04/07/2017 and available online at https://federalregister.gov/d/2017-06954, and on FDsys.gov DEPARTMENT OF TRANSPORTATION National
This document is scheduled to be published in the Federal Register on 04/07/2017 and available online at https://federalregister.gov/d/2017-06954, and on FDsys.gov DEPARTMENT OF TRANSPORTATION National
St. Cloud Veterans Affairs Healthcare System UV Disinfection Study
 TRU-D SMARTUVC St. Cloud Veterans Affairs Healthcare System UV Disinfection Study St. Cloud VA Health Care System recently conducted a study on the effectiveness of Tru-D in operating rooms, endoscopy
N C MPASS. Clinical Self-Scheduling. Version 6.8
 N C MPASS Clinical Self-Scheduling Version 6.8 Ontario Telemedicine Network (OTN) All rights reserved. Last update: May 24, 2018 This document is the property of OTN. No part of this document may be reproduced
a. is used to administer an electric shock through the chest wall to the heart;
 Policy and Procedures for Use of Automatic External Defibrillators (AED) by CTHSS School Personnel and the Development of School AED Emergency Action Plans Overview: It has been well demonstrated that
1. General. 2. Background
 Port State Control guidance for examination of fixed CO2 firefighting systems and conducting fire drills onboard Cruise Ships during scheduled examinations. (CG-CVC-2 / July 2013) 1. General These guidelines