ADVANCED CAMP CADET HANDBOOK
|
|
|
- Bertram Lamb
- 5 years ago
- Views:
Transcription


1 U.S. ARMY CADET COMMAND ADVANCED CAMP CADET HANDBOOK DISTRIBUTION RESTRICTION: APPROVED FOR PUBLIC RELEASE; DISTRIBUTION IS UNLIMITED. USACC, G3, CST Planning Branch, 2018.
2 CADET CREED I am an Army Cadet. Soon I will take an oath and become an Army Officer committed to defending the values, which make this nation great. HONOR is my touchstone. I understand MISSION first and PEOPLE always. I am the PAST: the spirit of those WARRIORS who have made the final sacrifice. I am the PRESENT: the scholar and apprentice soldier enhancing my skills in the science of warfare and the art of leadership. But, above all, I am the FUTURE: the future WARRIOR LEADER of the United States Army. May God give me the compassion and judgment to lead and the gallantry to WIN. I WILL do my duty.
3 Table of Contents Chapter 1 The Army Leader 1-1 SECTION I LEADER DEVELOPMENT 1-1 SECTION II CREEDS AND OATHS Error! Bookmark not defined. SECTION III - DUTIES AND RESPONSIBILITIES 1-6 Chapter 2 Mission Command 2-11 SECTION I: MISSION COMMAND INTRODUCTION 2-11 SECTION II TROOP LEADING PROCEDURES 2-13 SECTION III ORDERS 2-17 Chapter 3 Operations 3-23 SECTION I REPORTS 3-23 SECTION II FIRE CONTROL AND DISTRIBUTION 3-24 SECTION III WEAPONS 3-25 SECTION IV RANGE CARDS AND SECTOR SKETCHES 3-26 Chapter 4 Communications 4-1 SECTION I PROCEDURE WORDS (PROWORDS) 4-1 SECTION II RADIO CALL PROCEDURES 4-5 SECTION III BATTERIES AND LOADING FREQUENCY 4-8 Chapter 5 First Aid 5-12 SECTION I PERFORM FIRST AID for BLEEDING 5-12 SECTION II EVALUATE A CASUALTY (TACTICAL COMBAT CASUALTY CARE) 5-20 SECTION III PREFORM FIRST AID FOR AN OPEN CHEST 5-27 SECTION IV PERFORM FIRST AID to RESTORE BREATHING AND/OR PULSE 5-31 SECTION VI FIRST AID FOR HEAT ILLNESS ( ) 5-39 SECTION VII FIRST AID FOR COLD INJURY ( ) 5-42 SECTION VIII TRANSPORT A CASUALTY (081-COM-1046) 5-44 SECTION IX REQUEST MEDICAL EVACUATION 5-53 Chapter 6 Tactics 6-59 SECTION I MOVEMENT OVERVIEW 6-59 SECTION II MOVEMENT FORMATIONS 6-64 SECTION IV PLATOON OPERATIONS 6-77 SECTION I OFFENSIVE 6-77 SECTION II DEFENSE 6-86
4 SECTION III PATROLS and PATROLLING 6-97 Chapter 7 Other Considerations in the Operating Environment 7-1 SECTION I CADET RULES 7-1 SECTION II ROE/DETAINEE OPERATIONS 7-1 SECTION III - RISK MANAGEMENT PROCESS 7-6 Chapter 8 Chemical, Biological, Radiological, and Nuclear (CBRN) 8-19 SECTION I DETECT CHEMICAL AGENTS USING M8 OR M9 DETECTOR PAPER 8-19 SECTION II MARK CBRN-CONTAMINATED AREAS 8-22 SECTION III PROTECT YOURSELF FROM CHEMICAL AND BIOLOGICAL (CB) CONTAMINATION USING YOUR ASSIGNED PROTECTIVE MASK 8-24 SECTION IV- MAINTAIN YOUR ASSIGNED PROTECTIVE MASK 8-32 SECTION V-PROTECT YOURSELF FROM CBRN INJURY/CONTAMINATION WITH THE JSLIST CHEMICAL-PROTECTIVE ENSEMBLE 8-32 SECTION VI- DECONTAMINATE YOURSELF AND INDIVIDUAL EQUIPMENT USING CHEMICAL DECONTAMINATING KITS 8-35 SECTION VII-REACT TO CHEMICAL OR BIOLOGICAL (CB) HAZARD/ATTACK 8-39 Chapter 9 Quick Reference and Graphic Training Aids (GTA) 9-42 SECTION I MEDEVAC 9-42 SECTION III CALL FOR FIRE 9-56 SECTION V- COMPREHENSIVE CADET & FAMILY FITNESS 9-58 SECTION VI- USACC CST UNIFORM STANDARDS Error! Bookmark not defined. SECTION VII: STANDARD RANGE CARD 9-60 SECTION VIII MEDEVAC REQUEST FORM 9-63 CHAPTER 10- LAND NAVIGATION 9-50 SECTION I- COMPASS HANDLING AND USE 9-50 SECTION II- MAP TERRAIN FEATURES, COLORS, AND BASE LINES 9-52 CHAPTER 11- WEAPONS OVERVIEW 9-60 SECTION I- M4 RIFLE AND CARBINE 9-60 SECTION II- M249 MACHINE GUN 9-62 SECTION III- M240B MACHINE GUN 9-68 CHAPTER 12- PREFORM INDIVIDUAL CAMOUFLAGE 9-88
5 Table of Figures Figure 2-1: The Exercise of Mission Command 2-12 Figure 3-1: Fire Control Measures 3-24 Figure 3-2- Range Card 3-29 Figure 4-1: PROWORDS 4-4 Figure 4-2: Phonetic Alphabet 4-5 Figure 4-3: Number Pronunciation Guide 4-5 Figure 4-4: Front Panel ICOM Radio TR-1523/A/B/C/D 4-6 Figure 4-5: Front Panel ICOM Radio RT-1523E 4-7 Figure 4-6: SINCGARS ASIP Radio 4-7 Figure Basics of Tactical Movement 6-60 Figure 6-2: Legend of Platoon Symbols 6-68 Figure 7-1: A Cyclical, Continuous Process for managing Risk 7-8 Figure 7-2: Assessment Steps and Management Steps 7-9 Index of Tables Table Infantry Platoon Weapons 3-25 Table 4-1: How to Load SC Frequencies 4-10 Table 4-2: Primary Task 1 - Load Single Channel Freq. in SINCGARS RT 4-10 Table 7-1: Risk Assessment Matrix 7-11 Table 7-2: Levels of Severity and Examples of Consequences 7-12 Table 7-3: Criteria for Effective Controls 7-15 Table 7-4: Examples of Hazards and Controls 7-16 Table 9-1: Categories of Evacuation Precedence 9-42 Send recommendations for change with a summary letter to: DEPARTMENT OF THE ARMY G3, TRAINING DIVISION (CST Planning Branch) BUILDING 5931, ALSACE STREET FORT KNOX, KENTUCKY 40121
6 SECTION I LEADER DEVELOPMENT (Excerpt from FM 6-22 Leader Development) Introduction 1. The Army depends upon itself to develop adaptable leaders able to achieve mission accomplishment in dynamic, unstable, and complex environments. A robust, holistic leader development program is essential. Through a mix of education, training, and experience, Army leader development processes produce and sustain agile, adaptive, and innovative leaders who act with boldness and initiative in dynamic, complex situations to execute missions according to doctrine, orders, and training. Furthermore, it also produces leaders that possess the integrity and willingness to act in the absence of orders, when existing orders, doctrine or their own experience no longer fit the situation, or when unforeseen opportunities or threats arise. Properly designed leader development programs develop trusted leaders of character, competence, and commitment. The goal is to develop Army leaders who clearly provide purpose, direction, motivation, and vision to their teams and subordinates while executing missions to support their commander s intent. Leaders at all levels need to be prepared to understand the strategic context for execution and success of any mission. 2. Leader development is fundamental to our Army leader development is the deliberate, continuous, sequential, and progressive process founded in Army values that grows Cadets and Army Civilians into competent and confident leaders capable of decisive action. Leader development is achieved through the lifelong synthesis of the knowledge, skills, and experiences gained through the training and education opportunities in the institutional, operational, and selfdevelopment domains (AR 350-1). A key component of leader development is remaining focused on the professionalism of our leaders and those they lead. By developing and promoting a professional force, the Army develops trust on several levels: between Cadets; between Cadets and leaders; between Cadets and Army Civilians; between the Cadets, their families and the Army; and between the Army and the American people. This is why the Army is committed to providing quality institutions of education and training along with challenging experiences throughout a career. TENETS OF ARMY LEADER DEVELOPMENT 1. The tenets of Army leader development provide the essential principles that have made the Army successful at developing its leaders. The tenets also provide a backdrop for the Army principles of unit training (see ADRP 7-0). The overarching tenets of Army leader development are Strong commitment by the Army, superiors, and individuals to leader development. 1-1
7 Clear purpose for what, when, and how to develop leadership. Supportive relationships and culture of learning. Three mutually supportive domains (institutional, operational, and self-development) that enable education, training, and experience. Providing, accepting, and acting upon candid assessment and feedback. 2. Development of people is an Army priority. Commitment represents intention and engagement from the individual, from supportive leaders, and from the Army. Beyond their directed responsibility to develop subordinates, leaders want to serve in an organization that values camaraderie and teamwork and improves the capabilities of others. Leaders have a directed responsibility to develop their subordinates; accountability for implementation follows responsibility. Leaders must be committed to the development of others and themselves. Teams change and organizations change when individuals choose to engage and improve. 3. Development depends on having clear purpose for what, when and how to develop. Good leader development is purposeful and goal-oriented. A clearly established purpose enables leaders to guide, assess, and accomplish development. The principles of leader development describe goals for what leaders need to be developed to do: leading by example, developing subordinates, creating a positive environment for learning, exercising the art and science of mission command, adaptive performance, critical and creative thinking, and knowing subordinates and their families. The core leader competencies and attributes identified need to be able to do. 4. Supportive relationships and a culture of learning recognize that for development to occur a willingness to engage with others must exist. This tenet relates to two of the principles of leader development: creating a learning environment and knowing subordinates and their families (see ADRP 7-0). Leaders, organizations, and the entire Army must set the conditions for development to occur. Leader development is a mindset incorporated into all organizational requirements and mission accomplishment. Leaders must balance leader development against organizational requirements and mission performance. In operational units and other organizations, development can occur concurrently with training and mission performance, especially when leaders create an environment that places real value and accountability on leader development activities and the Cadets and civilians to be developed. 5. Development occurs through both formal systems and informal practices. Reception and integration, newcomer training, developmental tasks and assignments, individual and collective training, educational events, transition or succession planning, and broadening are all activities where development occurs and should be encouraged. Development involves experiential learning that is consistent with the principle of train as you fight. The performance of duties is always an opportunity for learning while doing. Any experience that shapes and improves performance enhances development. 6. Feedback is necessary to guide and gauge development. Formal and informal feedback based on observation and assessment provide information to confirm or increase self-awareness about developmental progress. The Army established performance monitoring, evaluation reports,
8 coaching, mentoring, and growth counseling processes to engage leaders and individuals. Each is essential for development. THE CHALLENGE FOR LEADER DEVELOPMENT 1. The Army must develop leaders who are comfortable making decisions with available information and prepared to underwrite the honest mistakes subordinates make when learning. These same leaders must also be capable of developing others to be adaptive, creative, professional, and disciplined to execute any mission. Leaders should place emphasis on holistic programs that range across grades from enlisted through senior officers and the Army Civilian Corps. 2. Developing leaders involves a holistic, comprehensive, and purposeful group of activities. More than any set of activities, success stems from a culture where leaders with a mindset and passion for developing others use daily opportunities to learn and teach. Leader development occurs at home station, in offices, laboratories, depots, maintenance bays, during exercises, and while deployed. Limited day-to-day interaction with their units and subordinates challenges Reserve Component leaders. At the same time, they benefit from the civilian skills of their subordinates. Reserve Component leaders should use the experience and leadership acquired by their Cadets from their civilian careers and develop strategies that can be executed on-duty and off, keeping in mind the balance that must be achieved between their subordinate s Army duties, civilian position, and family life. For all cohorts, the Army must sustain the continuous development of future leaders. 3. Successful leaders recognize that they must continually develop their subordinates by maximizing opportunities in the institutional, operational, and self-development domains. It is critical to the long-term sustainment of the Army. Leaders are responsible for ensuring their organizations develop subordinates, perform missions, apply doctrinally sound principles in training, and exercise stewardship of resources. Along with responsibility comes accountability. Accountability speaks to two levels: leaders held accountable for how well they have developed their subordinates and individuals held accountable for their own professional development. 4. The ALDS lays out the Army's vision, mission, and framework for leader development. The strategic vision emphasizes competence, commitment, character, skills, and attributes needed by Army leaders to prevail in unified land operations and leading the Army enterprise. The Army's leader development mission relies on training, education, and experience components to contribute to the development of leaders. The ALDS also identifies the ends, ways and means for the leader development process. Will and time applied to development are the essential means for success, and this is why a professional culture and individual mindsets committed to development are important. The ALDS starts with leaders at all levels understanding their responsibility for developing other leaders and themselves and creating conditions that provide the opportunities for teaching, training, and providing developmental experiences. The ALDS integrates leader development domains with the training, education, and experience lines of effort to show how leaders can be prepared through diverse, aligned activities. The desired ends

9 are leaders developing and improving to meet the expectations identified in the Army leadership requirements model. LEADERSHIP REQUIREMENTS 1. An Army leader, by virtue of assumed role or assigned responsibility, inspires and influences people to accomplish organizational goals. Army leaders motivate people both inside and outside the chain of command to pursue actions, focus thinking, and shape decisions for the greater good of the organization (ADP 6-22). These occur through leadership the process of influencing people by providing purpose, direction, and motivation to accomplish the mission and improve the organization (ADP 6-22). The nation and the Army has articulated the expectations of leaders in the Army. The Army leadership requirements model illustrates expectations of every leader, whether military or civilian, officer or enlisted, active or reserve. This model aligns the desired outcome of leader development activities and personnel practices to a common set of characteristics valued throughout the Army. It covers the core requirements and expectations of leaders at all levels of leadership. Attributes are the desired internal characteristics of a leader what the Army wants leaders to be and know. Competencies are skills and learnable behaviors the Army expects leaders to acquire, demonstrate, and continue to enhance what the Army wants leaders to do. 2. The competency of getting results requires special mention to counter beliefs that only the end result matters. While the other elements in the model address enablers, conditions, and processes; the achieves category is where leadership is most direct and most challenging. The actions for gets results integrate all other components in a way that brings people, values, purpose, motivation, processes, and task demands together to make the difference in outcomes related to the mission. The integrating actions of this competency also affect all other attributes and competencies. Getting results must simultaneously address improvements to the organization, Cadet and civilian well-being and motivation, adjustments due to situational changes, ethical mission accomplishment, and so on. All the competencies and attributes together lead to trust between the leader and the led, trust that lays the foundation for mission command and effective teamwork. 3. The leadership requirements and principles of mission command are mutually supportive. Understanding and practicing the principles of mission command are imperative for all leaders: officers, warrant officers, noncommissioned officers (NCOs), and Army Civilians. Mission command is the exercise of authority and direction by the commander using mission orders to

10 enable disciplined initiative within the commander s intent to empower agile and adaptive leaders in the conduct of unified land operations (ADP 6-0). While commanders exercise mission command, the actions of subordinates influence effectiveness. 4. Through practices in all domains of leader development, the philosophy of mission command becomes ingrained in the Army s ethos and culture. Army leaders, Cadets, and Civilians at every echelon throughout the operating force and the institutional Army apply mission command principles in the conduct of routine functions and daily activities. 5. To best prepare leaders for the uncertainty associated with Army operations, leaders must develop and create opportunities to understand and become proficient in employing the mission command principles. This development requires continual assessment and refinement throughout the individual s service. Leaders who fail to assess or develop their people or teams will not have prepared them to take disciplined initiative. Additionally, the leaders will not understand what individuals and teams are capable of doing and will not be in a position to capitalize on using mission orders. 6. Army leaders exercise mission command. The table above shows the linkage between the principles of mission command and the competencies and attributes of Army leaders in the leadership requirements model. Leader development activities must maintain the vision of developing leaders to execute mission command.
11 SECTION II - DUTIES AND RESPONSIBILITIES (ATP APR 16) 1. COMMANDING OFFICER (CO) - leads by personal example and responsible for everything the company does or fails to do. Principle duties include the key areas of tactical employment, training, administration, personnel management, maintenance, force protection, and sustainment of the company. Given the asymmetrical, noncontiguous environment, the military information support operation (MISO) commander must now integrate and synchronize a greater mix of forces for limited land operations, including other combined arms and combat support elements, civil affairs (CA), interpreters, media, unmanned aerial system (UAS) and robotics teams. Among other things, the commander: Mission Command through subordinate leaders. Employs the company to accomplish its mission according to battalion commander's intent and concept. Selects the best location to maneuver the platoons and other elements. Conducts mission analysis and troop-leading procedures (TLP) and issues operation orders for company tactical operations. Maintains and expresses situation awareness and understanding. Resources the platoons and other elements and requests battalion support when needed. Ensures the company command post (CP) effectively battle tracks the situation and status. Provides timely and accurate tactical picture to battalion commander and subordinate units. Implements measures for force protection, security, and accountability of forces and systems. Develops the leadership and tactical skill of platoon leaders. 2. EXECUTIVE OFFICER (XO) - Second in command. Primary role is to assist the commander in mission planning and accomplishment. Assumes command of the company as required and ensures that tactical reports from platoons are forwarded to battalion tactical operations center (TOC). Locate where to maintain communications with the company commander and battalion. Along with the 1SG, plans and supervises the company's sustainment operations; ensures that pre-combat inspections are complete. Plans and coordinates logistical support with agencies external to the company while the 1SG does the same internally. Prepares, or aids in preparing, paragraph four of the company operation order (OPORD). Assist the company commander in planning the mission. Coordinate with higher headquarters, adjacent and supporting units. May aid in control of critical events of the battle such as a passage of lines, bridging a gap, breaching an obstacle or may assume control of a platoon attached to the company during movement. Might lead a quartering party, an element consisting of representatives of various company elements whose purpose is to precede the company and reconnoiter, secure, and mark an assembly area. The XO might lead a detachment with other tactical tasks, including shaping or sustaining force leader in a company raid, attack, control company machine guns, or mortar section. May also Lead the reserve. Lead the detachment left in contact during a withdrawal.
12 Control attachments to the company. Serve as movement control officer. 3. FIRST SERGEANT (1SG) leads by personal example and is responsible for everything the company does or fails to do. The senior noncommissioned officer (NCO) and normally the most experienced Cadet in the company. 1SG is the commander's primary tactical advisor and expert on individual and NCO skills. Helps the commander plan, coordinate, and supervise all activities that support the unit mission. Operates where the commander directs or where can best influence a critical point or what is viewed as the unit's decisive point. In addition: Supervises routine operations, including enforcing tactical standing operating procedures; planning and coordinating both training and full spectrum operations; and administering replacement operations, logistics, maintenance, communications, field hygiene, and casualty evacuation operations. Supervises, inspects, and influences matters designated by the commander as well as areas that depend on expertise such as Cadet care, force protection, security, and accountability. Assists the XO and keeps self-prepared to assume the XO's duties, if needed. Leads task-organized elements or subunits for the company's shaping effort or designated missions. 4. PLATOON LEADER The platoon leader leads his Cadets by personal example and is responsible for all the platoon does or fails to do, having complete authority over his subordinates. This centralized authority enables him to maintain unit discipline, unity, and to act decisively. He must be prepared to exercise initiative within his company commander s intent and without specific guidance for every situation. The platoon leader knows his Cadets, how to employ the platoon, its weapons, and its systems. Relying on the expertise of the platoon sergeant, the platoon leader regularly consults with him on all platoon matters. During operations, the platoon leader Leads the platoon in supporting the higher headquarters missions. He bases his actions on his assigned mission and intent and concept of his higher commanders. Conducts troop leading procedures. Maneuvers squads and fighting elements. Synchronizes the efforts of squads. Looks ahead to the next move of the platoon. Requests, controls, and synchronizes supporting assets. Employs mission command systems available to the squads and platoon Checks with squad leaders ensuring 360-degree, three-dimensional security is maintained. Checks with weapons squad leader controlling the emplacement of key weapon systems. Issues accurate and timely reports. Places himself where he is most needed to accomplish the mission. Assigns clear tasks and purposes to the squads. Understands the mission and commander s intent two levels up (company and battalion).
13 Receives on-hand status reports from the platoon sergeant and squad leaders during planning. Coordinates and assists in the development of the obstacle plan. Oversees and is responsible for property management. The platoon leader works to develop and maintain situational understanding. This is a product of four elements. First, the platoon leader attempts to know what is happening in present terms of friendly, enemy, neutral, and terrain situations. Second, he knows the end state representing mission accomplishment. Third, he determines the critical actions and events occurring to move his unit from the present to the end state. Finally, he assesses the risk throughout. 5. PLATOON SERGEANT The platoon sergeant is the platoon's most experienced NCO and second-in-charge, accountable to the platoon leader for leadership, discipline, training, and welfare of the platoon's Cadets. He sets the example in everything. He assists the platoon leader by upholding standards and platoon discipline. His expertise includes tactical maneuver, employment of weapons and systems, sustainment, administration, security, accountability, protection warfighting functions, and Cadet care. As the second-in charge, the platoon sergeant assumes no formal duties except those prescribed by the platoon leader. However, the platoon sergeant traditionally Ensures the platoon is prepared to accomplish its mission, which includes supervising pre-combat checks and inspections. Updates platoon leader on appropriate reports and forwards reports needed by higher headquarters. Prepares to assume the role and responsibilities of the platoon leader. Takes charge of task-organized elements in the platoon during tactical operations, which may include but is not limited to, quartering parties, support elements in raids or attacks, and security patrols. Monitors the morale, discipline, and health of the platoon. Positions where best needed to help the engagement (either in the base of fire or with the assault element). Receives squad leaders administrative, logistical, and maintenance reports, and requests rations, water, fuel, and ammunition. Requests logistical support from the higher headquarters, and usually coordinates with the company s first sergeant or executive officer. Ensures Cadets maintain all equipment. Ensures ammunition and supplies are properly and evenly distributed after the platoon consolidates on the objective and while the platoon reorganizes. Manages the unit s combat load prior to operations, and monitors logistical status during operations. Establishes and operates the unit s casualty collection point (CCP). This includes directing the platoon medic and aid/litter teams in moving casualties, maintains platoon strength level information, consolidates and forwards the platoon s casualty reports, and receives and orients replacements. Employs the available digital mission command systems to the squads and platoon. Ensures Cadets distribute supplies according to the platoon leader s guidance and direction. Accounts for Cadets, equipment, and supplies.
14 Coaches, counsels, and mentors Cadets. Upholds standards and platoon discipline. Understands the mission and commander s intent two levels up (company and battalion). 6. SQUAD LEADER The squad leader directs team leaders and leads by personal example. He has authority over his subordinates and overall responsibility of those subordinates actions. Centralized authority enables him to act decisively while maintaining troop discipline and unity. Under the fluid conditions of close combat, the squad leader accomplishes assigned missions without constant guidance from higher headquarters. The squad leader is the senior Infantry Cadet in the squad and is responsible for everything the squad does or fails to do. He is responsible for the care of the squad s Cadets, weapons, and equipment, and leads the squad through two team leaders. During operations, the squad leader Is the subject matter expert on all battle and individual drills. Is the subject matter expert for the squad s organic weapons employment, and employment of supporting assets. Knows weapon effects, surface danger zones, and risk estimate distances for all munitions. Uses control measures for direct fire, indirect fire, and tactical movement effectively. Controls the movement of the squad and its rate and distribution of fire (including call for and adjust fire). Fights the close fight by fire and movement with two fire teams and available supporting weapons. Selects the fire team s general location and temporary sector of fires in the defense. Communicates timely and accurate situation reports (SITREPs) and status reports including Size, activity, location, unit, time, and equipment (SALUTE) spot reports (SPOTREPs). Status to the platoon leader (including squad location and progress, enemy situation, enemy killed in action [KIA], and security posture). Status of ammunition, casualties, and equipment to the platoon sergeant. Employs digital mission command systems available to the squad and platoon. Operates in all environments to include the urban environment. Conducts troop leading procedures. Assumes duties as the platoon sergeant or platoon leader as required. Understands the mission and commander s intent two levels up (platoon and company). 7. TEAM LEADER - The team leader leads his team members by personal example and has authority over his subordinates and overall responsibility of their actions. Centralized authority enables him to maintain troop discipline and unity and to act decisively. Under the fluid conditions of close combat, he accomplishes assigned missions using initiative without needing constant guidance from higher headquarters. The team leader s position on the battlefield requires immediacy and accuracy in all of his actions and is a fighting leader who leads by example. He is responsible for all his team does or fails to do, and is responsible for caring of the team s Cadets, weapons, and equipment. During operations, the team leader Is the subject matter expert for all the team s weapons and duty positions and all squad battle drills.
15 Leads his team in fire and movement. Controls the movement of his team and its rate and distribution of fire. Employs digital mission command systems available to the squad and platoon. Ensures security of the team s area of operations. Assists the squad leader as required. Is prepared to assume the duties of squad leader and platoon sergeant. Enforces field discipline and preventive medicine measures. Determines his team s combat load and manages its available classes of supply as required. Understands the mission two levels up (squad and platoon). When maneuvering the team, the team fights using one of three techniques. This includes: Individual movement techniques. This is the lowest level of movement. Buddy team fire and movement. Fire team fire and movement (maneuver).
16 SECTION I: MISSION COMMAND INTRODUCTION 1. Mission Command is the exercise of authority and direction by the commander using mission orders to enable disciplined initiative within the commander s intent to empower agile and adaptive leaders in the conduct of unified land operations. a. Mission Command is exercised by Army commanders; it blends the art of command and the science of control while integrating the war fighting functions to conduct the tasks of decisive action. Mission command has six fundamental principles: Build cohesive teams through mutual trust. Create shared understanding. Provide a clear commander s intent. Exercise disciplined initiative. Use mission orders. Accept prudent risk. b. The exercise of mission command is based on mutual trust, shared understanding, and purpose. Commanders understand that some decisions must be made quickly at the point of action. Therefore, they concentrate on the objectives of an operation, not how to achieve it. Commanders provide subordinates with their intent, the purpose of the operation, the key tasks, the desired end state, and resources. Subordinates then exercise disciplined initiative to respond to unanticipated problems. Every Cadet must be prepared to assume responsibility, maintain unity of effort, take prudent action, and act resourcefully within the commander s intent. Mutual trust is shared confidence among commanders, subordinates, and partners. c. Effective commanders build cohesive teams in an environment of mutual trust. There are few shortcuts to gaining the trust of others. Trust takes time and must be earned. Commanders earn trust by upholding the Army values and exercising leadership, consistent with the Army s leadership principles. 2. Unified Land Operations is the Army s operational concept. This concept is based on the central idea that Army units seize, retain, and exploit the initiative to gain a position of relative advantage over the enemy. This is accomplished through decisive action the simultaneous combination of offensive, defensive, and stability operations (or defense support of civil authorities) that set the conditions for favorable conflict resolution.


17 Figure 2-1: The Exercise of Mission Command
18 SECTION II TROOP LEADING PROCEDURES (ATP APR 16) Troop leading procedures provide small-unit leaders with a framework for planning and preparing for operations. Leaders of company and smaller units use troop leading procedures to develop plans and orders. This chapter describes the eight steps of troop leading procedures and their relationship to the military decision making process (MDMP). While this chapter explains troop leading procedures from a ground-maneuver perspective, it applies to all types of small units. 1. Receive the Mission In Step 1 of TLP, leaders determine their units missions and assess the time available to accomplish them. They can conduct an initial (light) analysis of the order using METT-TC. They conduct detailed METT-TC analyses only after they issue the first TROOP LEADING PROCEDURES 1. Receive the mission 2. Issue a warning order 3. Make a tentative plan 4. Initiate Movement 5. Conduct reconnaissance 6. Complete the plan 7. Issue the operations order 8. Supervise and refine the plan issues the third WARNORDs or the OPORDs themselves. However, in the course of parallel planning, small-unit leaders already will have deduced their tentative missions. Leaders can receive their missions in several ways. They can get them in the form of WARNORDs or, if higher chooses to wait for more information, an actual OPORD. Sometimes higher chooses not to send WARNORDs, opting instead to wait and send a full OPORD. Worst case, leaders receive new missions due to situational changes occurring during the execution of a prior mission. In addition to receiving (or deducing) their missions during this step, the leaders must also Assess the time available to prepare for and execute the mission. Prepare an initial timeline for planning and executing the mission. Conduct an initial planning-time analysis. Determine the total amount of time to plan and prepare. As planning continues, use the initial planning-time analysis to conduct a detailed time analysis. Analyze the time his unit has available. Prepare an initial timeline. The most important element of the leader's WARNORD is the initial timeline for planning. They also may convey other instructions or information they think will help their subordinates prepare for the upcoming mission. 2. Issue a Warning Order A WARNORD is a preliminary notice of an order or action to follow. (Refer to ADRP 1-02 for more information.) Though less detailed than a complete OPORD, a WARNORD aids in parallel planning. After the leaders receive new missions and assess the time available for planning, preparing, and executing the mission, they immediately issue WARNORDs to their subordinates. By issuing the initial WARNORDs as quickly as possible, they enable subordinates to begin their own planning and preparation (parallel planning) while they begin to develop the OPORDs.
19 When they obtain more information, they issue updated WARNORDs, giving subordinates as much as they know. Leaders can issue WARNORDs to their subordinates right after they receive higher command s initial WARNORDs. In their own initial WARNORDs, they include the same elements given in their higher headquarters initial WARNORDs. If practical, leaders brief their subordinate leaders face-to-face, on the ground. Otherwise, they use a terrain model, sketch, or map. The WARNORD follows the five-paragraph OPORD format and includes the following items, at a minimum: Type of operation. General location of operation. Initial operational timeline. Reconnaissance to initiate. Movement to initiate. Planning and preparation instructions (to include planning timeline). Information requirements. Commander s critical information requirements. 3. Make a Tentative Plan: In a time-constrained environment, a platoon leader typically develops only one COA. However, as time permits, he can develop as many COA, for comparison purposes, as time allows. He begins TLP Step 3 after he issues his own WARNORD, and after he has received company s third WARNORD, or until he has enough information to proceed. He need not wait for a complete OPORD before starting to develop his own tentative plan. The platoon leader begins mission analysis when receiving the mission. During mission analysis, the platoon leader Restates the mission. Conducts an initial risk assessment. Identifies a tentative decisive point. Defines his own intent. He conducts mission analysis to help him start developing his vision, and to confirm what he must do to accomplish his mission. At the lower levels, leaders conduct their mission analyses by evaluating METT-TC. He makes significant deductions about the terrain, enemy, and own forces affecting operations. These significant deductions drive the planning process and execution of operations. A leader must convey to his subordinates the importance of these deductions, and effect they will have on the units operations. In the end, the usefulness of mission analysis lies in recognizing and capitalizing on opportunities. The answers to the following questions become inputs into developing a COA. Mission analysis has no time standard. A leader may take as much time as needed, while still adhering to the one-third/two-thirds rule. Mission analysis answers the four questions of the leader's visualization: What is my mission? What is the current situation? How do we accomplish the mission?
20 What are the risks? METT-TC Analyzing METT-TC is a continuous process. Leaders constantly receive information, from the time they begin planning through execution. During execution, their continuous analyses enable them to issue well-developed FRAGORDs. They must assess if the new information affects their missions and plans. If so, then they must decide how to adjust their plans to meet these new situations. They need not analyze METT-TC in a particular order. How and when they do so depends on when they receive information as well as on their experience and preferences. One technique is to parallel the TLP based on the products received from higher. Using this technique, they would, but need not, analyze mission first; followed by terrain and weather; enemy; troops and support available; time available; and finally civil considerations. 4. Initiate Movement Leaders initiate movements necessary to continue mission preparation or to posture the unit for starting the mission. This step can be executed anytime throughout the sequence of the TLP. It can include movement to an AA, battle position, or new area of operation, or the movement of guides or quartering parties. 5. Conduct Reconnaissance To exploit the principles of speed and surprise, leaders should weigh the advantages of reconnoitering personally against the combat multiplier in the form of supplied information from battalion information systems. They realistically consider the dangers of reconnoitering personally, and time required to conduct them. Leaders might be able to plan their operations using the unprecedented amount of combat information provided by the higher echelon information collection assets. However, if time permits, leaders should verify higher headquarters intelligence by reconnoitering visually. They should seek to confirm the PIR supporting their tentative plans. These PIR usually consists of assumptions or critical facts about the enemy. This can include strength and location, especially at templated positions. It also can include information about the terrain. For example, verification of a tentative support-by-fire position can suppress the enemy, or an avenue of approach is useable. If possible, leaders should include their subordinate leaders in their reconnaissance efforts. This allows the subordinates to see as much of the terrain and enemy as possible. The reconnaissance also helps subordinate leaders gain insight into the leaders' visions of the operation. The leaders' recons might include moving to or beyond the LD, reconnaissance of an area of operation, or walking from the forward edge of the battle area back to and through the platoon area of operation or battle position along likely enemy avenues of approach. If possible, leaders should select vantage points with the best possible view of the decisive point. In addition to the leaders' reconnaissance efforts, units can conduct additional reconnaissance operations. Examples include surveillance of an area by subordinate elements, patrols to determine enemy locations, and establishment of observation posts to gain additional information. Leaders also can incorporate Javelin CLUs as surveillance tools (day or night), based on an analysis of METT-TC. The nature of the reconnaissance, including what it covers and how long it lasts, depends on the tactical situation and time available. The leader should use the results of the COA development process to identify information and security requirements of the unit's reconnaissance operations.
21 The leader must include disseminating results and conclusions arrived from reconnaissance into his time analysis. He also must consider how to communicate changes in the COA to his subordinates and how these changes affect his plans, actions of the subordinates, and other supporting elements. 6. Complete the Plan During this step, leaders expand their selected (or refined) COA into complete OPORD. They prepare overlays, refine the indirect fire list, complete sustainment and mission command requirements and, of course, update the tentative plan based on the latest reconnaissance or information. They prepare briefing sites and other briefing materials they might need to present the OPORD directly to their subordinates. Using the five-paragraph OPORD format helps them to explain all aspects of the operation: terrain, enemy, higher and adjacent friendly units, unit mission, execution, support, and mission command. The format also serves as a checklist to ensure they cover all relevant details of the operation. It also gives subordinates a smooth flow of information from beginning to end. 7. Issue the Operation Order The OPORD precisely and concisely explains both the leader's intent and concept of how he envisions the unit accomplishing the mission. The order does not contain unnecessary information. The OPORD is delivered quickly and in a manner allowing subordinates to concentrate on understanding the leader's vision and not just copying what he says verbatim. The leader must prepare adequately and deliver the OPORD confidently and quickly to build and sustain confidence in his subordinates. When issuing the OPORD, the leader must ensure his subordinates understand and share his vision of what must be done and when and how it must be done. They must understand how all the platoon elements work together to accomplish the mission. They also must understand how the platoon mission supports the intentions of the immediate higher commander. When the leader has finished issuing the order, subordinate leaders should leave with a clear understanding of what the leader expects their elements to do. The leader is responsible for ensuring his subordinates understand. In many respects more importantly, the leader must issue the order in a manner instilling subordinates with confidence in the plan and a commitment to do their best to achieve the plan. Whenever possible, he must issue the order in person. He looks into the eyes of his subordinate leaders to ensure each one understands the mission and what the element must achieve. Complete the order with a confirmation brief. At a minimum, each subordinate leader should be able to back brief the unit mission and intent, the immediate higher commander's intent, his own tasks and purpose, and time he will issue his unit's OPORD. Each subordinate should confirm he understands the commander s vision and how the mission is accomplished with respect to the decisive point. This confirmation brief provides an opportunity to highlight issues or concerns. The five-paragraph OPORD format helps the leader paint a picture of all aspects of the operation, from the terrain to the enemy, and finally to the unit's own actions from higher to lower. The format helps him decide what relevant details he must include and in providing subordinates with a smooth flow of information from beginning to end. At the same time, the leader must ensure the order is not only clear and complete but also as brief as possible. If he has already addressed an item adequately in a previous WARNORD, he can simply state "No
22 change," or provide necessary updates. The leader is free to brief the OPORD in the most effective manner to convey information to his subordinates 8. Supervise and Refine This final step of the TLP is crucial. After issuing the OPORD, the leader and his subordinate leaders must ensure the required activities and tasks are completed in a timely manner prior to mission execution. Supervision is the primary responsibility of all leadership. Both officers and NCOs must check everything important for mission accomplishment. This includes, but is not limited to Conducting numerous back briefs on all aspects of the platoon and subordinate unit operations. Ensuring the second in command in each element is prepared to execute in his leaders absence. Listening to subordinates OPORD. Observing rehearsals of subordinate units. Checking load plans to ensure they are carrying only what is necessary for the mission or what the OPORD specified. Checking the status and serviceability of weapons. Checking on maintenance activities of subordinate units Ensuring local security is maintained SECTION III ORDERS (ATP APR 16) Commanders direct operations and communicate their vision, commander s intent, and decisions through plans and orders. Effective plans and orders clearly describe how the commander intends to combine offensive, defensive, and stability or civil support operations throughout the conduct of operations. They synchronize subordinate activities in time, space, and purpose to achieve objectives and accomplish missions. Plans and orders not only direct subordinate units but provide information to facilitate coordination among organizations outside the command. Effective plans and orders account for those joint, interagency, intergovernmental, multinational, and host-nation organizations involved in the operation. Effective plans and orders encourage subordinate s initiative by providing the what and why of tasks to subordinate units, and leave the how to perform the tasks to subordinates. To maintain clarity and simplicity, the base plan or order is kept as short and concise as possible. Detailed information and instructions are addressed in annexes as required.
23 1. ORDERS GROUP a. Platoon Orders at a minimum, the following individuals will attend platoon orders: (1) Platoon leader (2) Platoon sergeant (3) Squad leaders (4) Platoon Forward Observer (FO) (5) PLT Medic (6) Attachment leaders OPERATIONS ORDER 1. Situation 2. Mission 3. Execution 4. Sustainment 5. Command and Signal b. Squad Orders at a minimum, the following individuals will attend squad orders: (1) Squad leader (2) Team leaders 2. ORDERS FORMATS a. Warning Order (WARNORD) (1) Contains as much detail as possible. (2) Follows the 5-para OPORD format. (3) Initial WARNORD normally includes: mission; time and place for issuing OPORD; elements participating in the operation; specific tasks not addressed in SOPs; timeline. b. Fragmentary Order (FRAGORD) - Include all five OPORD paragraph headings and differ from OPORDs only in the degree of detail provided. c. Operation Orders (OPORD) The following are adjusted OPORD formats to accommodate the CST training environment. 1. SITUATION a. Weather and light data. (1) Light conditions: (a) Begin morning nautical twilight (BMNT). (b) Sunrise. (c) Sunset. (d) End evening nautical twilight (EENT). (e) Moonrise. (f) Moonset (g) Percent of illumination. (2) Weather forecast for the operation. (3) Effects of the weather and light conditions on the operation. (a) Trafficability. (b) Visibility. (c) Effect on the lasers and the thermals. b. TERRAIN. (4) Obstacles, hills, valleys, road types and conditions, streams, rivers, bridges, and builtup areas. (5) Avenues of approach. (a) Size of unit that can be supported.
24 (b) Start and end point. (c) Objective. (6) Key terrain (discuss how friendly and / or threat forces may attempt to use it to their advantage). (7) Observation and fields of fire. (8) Cover and concealment. (9) Engagement areas (EA). (10) Overall effect of terrain on the operation d. Enemy forces. (1) Disposition (2) Composition (3) Capabilities (4) Strengths and Weaknesses (5) Most Probable Course of Action (6) Most Dangerous Course of Action Note: In this subparagraph, it should be noted that there will be groups or individuals in the area of operations (AO) that present a threat or may be hostile to friendly forces, but are not included as the enemy. Criminal gangs, religious factions, desperate refugees, or those inhabitants upset with the local situation, present circumstances that will complicate operations, but do not warrant the same response as enemy combatants. (1) Identification. (2) Activity. (3) Location. (4) Disposition. (5) Strength. (6) Composition, to include type and capabilities of equipment. (7) Other threat information critical to the upcoming operation, to include: (a) Chemical, nuclear, field artillery, and obstacle capabilities. (b) Air defense artillery (ADA). (c) Aviation, including helicopters. (d) Electronic warfare. (8) Most probable threat courses of action (COA). (9) Most dangerous threat COA. c. Friendly forces (10) Mission of higher headquarters (company team / troop) including commander s intent and scheme of maneuver. (11) Combat Identification (CID) equipment or procedures / mission of adjacent units (left, right, front, rear) (12) ID - mission of reserves in higher headquarters. (13) ID - mission of supporting units with a direct support (DS) / reinforcing (R) role to higher headquarters (field artillery, engineer, ADA). (14) Which higher headquarters element has priority of fires.
25 (15) Close air support (CAS) allocated to higher headquarters, including number of sorties available. (16) Attachments and detachments to the platoon and higher 2. MISSION Note: This is the WHO, WHAT, WHEN, WHERE, and WHY which states essential task(s) to be accomplished by the entire unit, to include on-order missions, and clearly defines the platoon s objective. 3. EXECUTION a. Commander s intent b. Concept of the operation; the sequence of subparagraphs is: Note: The concept statement further explains and expands on your (and / or the commander's) intent, particularly his vision of HOW he will conduct the operation and WHO he will assign to execute it. (1) Scheme of maneuver. (2) Fires, as follows: (a) Purpose for field artillery and mortar fires or aviation fires (how fires will be used to support the maneuver). (b) Priority of fires within the unit. (c) Allocation of final protective fires (FPF). (d) Preparation starting time and duration of fires. (e) Triggers (trigger line / point or event). (f) Description of threat fires in the AO. (g) Special fire allocation / use (smoke, illumination, and CAS. (h) Restrictions. (3) Engineer support (obstacles, mines, and fortifications), as follows: (a) Priority of engineer effort (mobility, counter-mobility, survivability). (b) Priority of engineer support. (c) Obstacle overlay and obstacle list. (d) Logistical constraints. (e) On-order missions. c. Specific instructions. d. Coordinating instructions, as follows: (1) Time schedule for critical events, including: (a) Rehearsals confirmation briefing (back briefs). (b) Pre-combat inspection. (c) First movement. (d) Arrival of any attachments / detachments. (e) Bore sighting. (2) Movement instructions. (3) Passage of lines, including:
26 (a) Contact points. (b) Passage points. (c) Lanes, to include identification / markings. (4) Actions at danger areas. (5) Actions on expected contact. (6) Rally points. (7) Rules of engagement (ROE) / rules of interaction (ROI). (8) Intelligence requirements, to include priority intelligence requirements (PIR). (9) Air defense warning and weapons control status. (10) Mission-oriented protective posture (MOPP) level and operational exposure guidance (OEG) data. (11) Be-prepared tasks or other general information not provided in concept of the operation or specific instructions. 4. SUSTAINMENT. a. Location and movement plan of the company / troop trains (initial and subsequent grids). b. Material and services. (1) Supply. (a) Priorities of supply. (b) Resupply points and pre-stock sites. (c) Ration cycle. (d) Location of task force trains. (2) Transportation. (a) Supply routes. (b) Logistics release points (LRP). (c) Priorities established on the main supply route (MSR). (3) Services: handling of killed in action (KIA). (4) Maintenance. (a) Maintenance procedures. (b) Vehicle evacuation. (c) Task force unit maintenance collection point (UMCP) location. c. Medical evacuation and treatment. (1) Location of company / troop medics. (2) Location of battalion / squadron aid station. (3) Procedures for treatment and evacuation of wounded. (4) Aero medical evacuation information. (5) Location of the ambulance exchange points. (6) Handling of contaminated wounded. d. Personnel. (1) Handling and disposition instructions for enemy prisoners of war (EPW). (2) EPW guard instructions. (3) Location of EPW collection point.
27 (4) Instructions for ROI. (5) Number of expected replacements. (6) Cross-leveling procedures. e. Miscellaneous. 5. COMMAND AND SIGNAL. a. Command. (1) Location of: (a) Phase line (PL) during the operation. (b) Commander. (c) Executive officer (XO). (d) Tactical operations center (TOC). (e) Tactical command post (TAC CP). b. Succession of command. c. Control - Command Posts Describe the employment of command posts (CPs), including the location of each CP and its time of opening and closing, as appropriate. State the primary controlling CP for specific tasks or phases of the operation (for example, The division tactical command post will control the air assault ) d. Signal. (2) Signal operating instructions (SOI) index and edition in effect. (a) Key frequencies. (b) Key call signs. (c) Current item number identifier. (3) Appropriate fills, time, and change over data. (4) Listening silence instructions. (5) Challenge and password. (6) Special signals, to include use of pyrotechnics. (7) Code words.
28 SECTION I REPORTS (ATP APR 16) 1. SALUTE - a. Size b. Activity c. Location d. Unit/Uniform e. Time f. Equipment 2. SITREP - (situation report) given IAW OPORD 3. Spot Reports (FM 6-99 AUG13) - normally, team leaders gives an Ammunition, Casualty, Equipment (ACE) report (a common spot report) to the squad leader and the squad leaders give them to the platoon sergeant after contact with the enemy. a. Ammunition (GREEN %, AMBER 79-70%, RED 69-50% BLACK 50-0%) b. Casualty (UP or # OF CASUALTIES) c. Equipment (UP or NAME OF MISSING EQUIPMENT) 4. Logistics - team leaders and squad leaders report twice daily up the chain of command. 5. Sensitive item - status reported by team leaders and squad leaders up the chain of command twice daily. 6. Personnel status - team leaders and squad leaders report twice daily. Normally, reports are given at stand-to and before nightfall.
29 SECTION II FIRE CONTROL AND DISTRIBUTION 1. Fire control measures. Fire control measures are the means by which the company commander or subordinate leaders control direct fires. Helps the unit acquires the enemy, focus fires, distribute the effects, and prevent fratricide. Figure 3-1: Fire Control Measures 2. Engagement Techniques Effects-oriented direct-fire distribution measures. a. Point Fire b. Area Fire c. Volley Fire d. Alternating Fire e. Sequential Fire f. Observed Fire g. Time of Suppression h. Reconnaissance by Fire 3. Fire Commands Oral orders issued by leader to focus and distribute fires as required in order to achieve desired effects. The elements of a Fire Command include: a. Alert. The leader gives description, Direction, Range, Method of Fire, Command of Open Fire (Ex: 1 st Platoon, Direct Front, 75 Meters, 3 Rounds, Fire, Cease Fire. b. Weapon or Ammunition (Optional). Identifies weapon or ammunition to be employed. May designate type or number of rounds to limit ammo expenditure. (Ex: JAVELIN, MACHINE GUN) c. Target Description. The leader identifies the target. For multiple targets, he also tells which target to engage first. (Ex: TROOPS IN TRENCH, BUNKER, PCs) d. Orientation. Identifies location or vicinity of target.(ex: Target Reference Point (TRP)13, ONE O CLOCK, LEFT FRONT, ON MY TRACER) e. Range (Optional). Distance to target. f. Control (Optional). Used to direct desired target effects, distribution methods, or engagement techniques. (Ex: JAVELIN ENGAGE VEHICLE, MACHINE GUNS ENGAGE TROOPS) g. Execution (Time). Specifies when direct fires should be initiated. (Ex: FIRE, AT MY COMMAND, AT YOUR COMMAND, AT PHASE LINE ORANGE)

30 SECTION III WEAPONS 1. Basic Safety: a. Weapons on safe until target is identified and acquired b. Muzzle Awareness c. Finger outside of trigger well until sights are on the target d. Every weapon is ALWAYS treated as loaded 2. Weapons Readiness a. WEAPONS HOLD: Engage only if engaged or ordered to engage. b. WEAPONS TIGHT: Engage only targets positively identified as enemy c. WEAPONS FREE. Engage targets not positively identified as friendly. 3. Clearing Procedures for the M16/A1, M16/A2, or M4 Rifle - a. Point the weapon in a safe direction. Place the selector lever on safe. b. Remove the magazine c. Lock the bolt to the rear d. Inspect the chamber and receiver areas for ammunition e. With the selector switch on safe, allow the bolt to go forward. INFANTRY PLATOON WEAPONS GUIDE (ATP , APR 16) (FM ) 1. TYPES OF INFANTRY PLATOON WEAPONS There are five types: small arms; machine guns; grenade launchers; shoulder-launched munitions (SLM) i.e. AT4 / Close Combat Missile System (CCMS) i.e. Javelin; and mortars. Table Infantry Platoon Weapons 2. FIRE TEAM WEAPONS The rate of fire is the number of rounds fired in a minute by a particular weapon system. The leader dictates the rate of fire for each weapon system under his
31 control. There are two factors that contribute to leader decisions about rates of fire: achieving fire superiority; and ammunition constraints. a. RIFLE - Rifleman and Infantry leaders are currently armed with the M4 rifle. The M4 rifle is a direct fire weapon that fires ball and tracer 5.56-mm ammunition. The rifleman s primary role is to kill the enemy with precision fire. In this capacity, the rate of fire for the M4 rifle is not based on how fast the Cadet can pull the trigger. Rather, it is based on how fast the Cadet can accurately acquire and engage the enemy. The second role of the rifleman is to engage likely or suspected enemy targets with suppressive fire. b. M249 MACHINE GUN - The automatic rifleman is currently armed with an M249 machine gun. The M249 is a direct-fire, low trajectory weapon that is primarily used to fire ball tracer 5.56-mm ammunition linked at area targets. The M249 also has the ability to fire unlinked 5.56-mm ammunition in 30-round magazines, but reliability is greatly reduced. Firing with a magazine should be limited to emergency situations. c. M240B MACHINE GUN - Two medium machine guns and crews are found in the Infantry platoon s weapons squad. Machine gunners are a self-contained support by fire element or with a rifle squad to provide long range, accurate, sustained fires against enemy Infantry and apertures in fortifications, buildings, and lightly-armored vehicles. Machine gunners also provide a high volume of short-range fire in self-defense against aircraft. The M240B fires 7.62-mm ammunition. d. SHOULDER-LAUNCHED MUNITIONS - Shoulder-launched munitions (SLM) are lightweight, self-contained, single-shot, disposable weapons that consist of unguided free flight, fin-stabilized, rocket-type cartridges packed in launchers. SLM provide the Cadet a direct fire capability to defeat enemy personnel within field fortifications, bunkers, caves, masonry structures, and lightly armored vehicles. Cadets use SLM to engage enemy combatants at very close ranges across the street or from one building to another. Likewise, SLM may be fired at long distances to suppress the enemy or kill him. Cadets may employ the SLM as a member of a support-by fire element to incapacitate enemy forces that threaten the friendly assault element. When the assault element clears a building, the leader may reposition the SLM gunner inside to engage a potential counterattack force. SECTION IV RANGE CARDS AND SECTOR SKETCHES (ATP APR 16) Range cards are used to record firing data for individual or crew-served weapons and sector sketches are used to record a unit s positioning of its weapons and direct fire control measures. 1. Range Cards a. A range card (DA Form 5517, Standard Range Card) is a sketch of the assigned area for a direct fire weapon system on a given sector of fire. (Refer to TC for more information.) A range card aids in planning and controlling fires and aids the crews and squad gunners in acquiring targets during limited visibility. Range cards show possible target areas and terrain features plotted with a firing position. The process of walking and sketching the terrain to create a range card allows the individual Cadet or gunner to become more familiar with his area of operation. He should continually assess the area and, if necessary, update his range card. The range card is an aid for replacement personnel or platoons or squads to move into the position and orient on their area of operation. The individual Cadet or BFV gunner should make the range
32 card so that he becomes more familiar with the terrain in his area of operation. To prepare a range card, the individual Cadet or BFV gunner must know the following information: b. Sectors of fire. A sector of fire is a piece of the battlefield for which a gunner is responsible. c. Target reference points. Leaders designate natural or man-made features as reference points. A Cadet uses these reference points for target acquisition and range determination. d. Dead space. Dead space is an area that cannot be observed or covered by direct fire systems within the sector of fire. e. Maximum engagement line. The maximum engagement line is the depth of the area and is normally limited to the maximum effective engagement range of the weapons systems. f. Weapons reference point. The weapons reference point is an easily recognizable terrain feature on the map used to assist leaders in plotting the vehicle, squad, or weapon position. The individual Cadet or gunner prepares two copies of the range card. If alternate and supplementary firing positions are assigned, two copies are required for these as well. A copy is kept with the vehicle or weapons position, and the other given to the section leader for his sketch. The Cadet or gunner prepares the range card according to TC MAXIMUM ENGAGEMENT LINE g. Although the maximum engagement line is typically limited to the maximum effective engagement range of the weapons systems, it can be less if objects prevent the Cadet from engaging targets at maximum effective ranges of his assigned weapon. DATA SECTION The gunner completes the position identification, date, weapon, and circle value according to TC The table information is as follows: Number. Start with left and right limits, then list TRPs and reference points in numerical order. Direction and Deflection. The direction is in degrees and taken from a lensatic compass. The most accurate technique is to have the gunner aim at the terrain feature, and to have the driver dismount and align himself with the gun barrel and the terrain feature to measure the azimuth. To achieve correct deflection and elevation readings of the terrain feature, select TOW. Show the deflection reading taken from the BFV s azimuth indicator in the deflection block next to the magnetic azimuth. Elevation. Show the gun elevation reading in tens or hundreds of mils. The smallest increment of measure on the elevation scale is tens of mils. Any number other than 0 is preceded by a plus or minus symbol to show whether the gun needs to be elevated or depressed. Ammunition and range must be indexed to have an accurate elevation reading. Range. This is the distance, in meters, from vehicle position to L and R limits and TRPs and reference points.
33 Ammunition. List types of ammunition used. Description. List the name of the object. Remarks. Enter the weapons reference point data. As a minimum, weapons reference point data include a description of what the weapons reference point is, a six-digit or eight-digit grid coordinate of the weapons reference point, the magnetic azimuth and the distance from the weapons reference point to the vehicle position.


34 Example of a Completed Range Card Figure 3-2- Range Card 2. Sector Sketches
35 Individual Cadets in squads and BFV gunners prepare range cards. Squad and platoon leaders prepare sector sketches. Section leaders may have to prepare sector sketches if they are assigned separate positions. The platoon leader reviews his squad s, and if applicable section s, sector sketches and ensures the sketches are accurate and meet his requirements. If he finds gaps or other flaws, the platoon leader adjusts weapons locations within the area of operation. Once the platoon leader approves the squad and section sector sketches, he prepares a consolidated report for the company team commander and incorporates this into a consolidated platoon sector sketch. The platoon leader or platoon sergeant physically prepares the platoon sector sketch. The sector sketch can be on acetate taped to a map or it can be a hand drawn sketch. Accurate and detailed sketches aid in direct fire planning, and in direct fire control and distribution. 3. Squad Sector Sketches The squad leaders and section leaders make two copies of their sector sketches; one copy goes to the platoon leader, the other remains at the position. The squad leaders and section leaders draw sector sketches as close to scale as possible, showing Main terrain features in the area of operation and the range to each. Each primary position. Engagement area or primary and secondary sectors of fire covering each position. M240B machine gun final protective line or principle direction of fire. M249 SAW final protective lines or principle direction of fires. Type of weapon in each position. Reference points and TRPs in the area of operation. Observation post locations. Dead space. Obstacles. Maximum engagement lines for all BFV weapon systems. Maximum engagement lines for Javelin (if applicable) and AT4s. Indirect fire targets. Example of a Completed Squad Sector Sketch

36
37 (FM ; FM Pg 4-51 JUL06; FM Pg 2-12 MAR07; FM SEP87) SECTION I PROCEDURE WORDS (PROWORDS) 1. PROWORDS a. Speed up communications b. Add a degree of security c. Help with mission command d. Pro-words are established during tactical operations to describe objectives, phase lines, check points and link ups and to keep voice transmission as short and clear as possible; radio operators use them to take the place of long sentences. 2. Signals - Signals can be used in many forms during an operation. Signals are usually either audio or visual. The key to the use of signals is ensuring everyone is aware of the signal and its meaning. PROWORD ALL AFTER ALL BEFORE AUTHENTICATE Explanation The portion of the message to which I have reference is all that which follows. The portion of the message to which I have reference is all that which precedes. The station called is to reply to the challenge which follows AUTHENTICATION IS The transmission authentication of this message is. BREAK CALL SIGN CORRECT CORRECTION I hereby indicate the separation of the text from other portions of the message. The group that follows is a call sign. You are correct, or what you have transmitted is correct. An error has been made in this transmission. Transmission will continue with the last word correctly transmitted. An error has been made in this transmission (or message indicated). The correct version is. That which follows is a corrected version in answer to your request for verification. 4-1
38 PROWORD DISREGARD THIS TRANSMISSION -- OUT DO NOT ANSWER EXECUTE EXECUTE TO FOLLOW FLASH FROM I AUTHENTICATE IMMEDIATE IMMEDIATE EXECUTE I READ BACK I SAY AGAIN I SPELL I VERIFY MORE TO FOLLOW Explanation This transmission is in error. Disregard it. This PROWORD shall not be used to cancel any message that has been completely transmitted and for which receipt or acknowledgement has been received. Stations called are not to answer this call, receipt for this message, or otherwise to transmit in connection with this transmission. When this PROWORD is employed, the transmission shall be ended with the PROWORD "OUT". Carry out the purpose of the message or signal to which this applies. To be used only with the executive mode. Action on the message or signal which follows is to be carried out upon receipt of the PROWORD "EXECUTE". To be used only with the delayed executive method. Precedence FLASH The originator of this message is indicated by the address designator immediately following. The group that follows is the reply to your challenge to authenticate. Precedence IMMEDIATE. Action on the message or signal following is to be carried out on receipt of the word EXECUTE. To be sued only with the Immediate Executive Method. The following is my response to your instructions to read back. I am repeating transmission or portion indicated. I shall spell the next word phonetically That which follows has been verified at your request and is repeated. To be used only as a reply to VERIFY. Transmitting station has additional traffic for the receiving station. 4-2
39 PROWORD OUT OVER PRIORITY READ BACK ROGER (Use instead of copy ) ROUTINE SAY AGAIN SILENCE(Repeated three or more times) SILENCE LIFTED SPEAK SLOWER STOP REBROADCASTING THIS IS TIME UNKNOWN STATION VERIFY WAIT Explanation This is the end of my transmission to you and no answer is required or expected. This is the end of my transmission to you and a response is necessary. Go ahead, transmit Precedence PRIORITY Repeat this entire transmission back to me exactly as received. I have received your last transmission satisfactorily. Precedence ROUTINE Repeat all of your last transmission. Followed by identification data means "Repeat (portion indicated)". Cease transmission on this net immediately. Silence will be maintained until lifted. (When an authentication system is in force, the transmission imposing silence is to be authenticated). Silence is lifted. (When an authentication system is in force, the transmission lifting silence is to be authenticated). Your transmission is at too fast a speed. Reduce speed of transmission. Cut the automatic link between the two nets that are being rebroadcast and revert to normal working. This transmission is from the station whose designator immediately follows. That which immediately follows is the time or date time-time group of the message. The identity of the station with whom I am attempting to establish communication is unknown. Verify entire message (or portion indicated) with the originator and send the correct version. To be used only at the discretion of or by the addresses to which the questioned message was directed. I must pause for a few seconds 4-3
40 PROWORD WAIT -- OUT WILCO WORD AFTER WORD BEFORE Explanation I must pause longer than a few seconds. I have received your signal, understand it, and will comply. To be used only by the addressee. Since the meaning of ROGER is included in that of WILCO, the two PROWORDS are never used together. The word of the message to which I have reference is that which follows. The word of the message to which I have reference is that precedes. Figure 4-1: PROWORDS The following are not PRO-WORDS and should NEVER be used: BE ADVISED COPY COPY THAT GOOD COPY PHONETIC ALPHABET A ALFA AL FAH B BRAVO BRAH VOH C CHARLIE CHAR LEE or SHAR LEE D DELTA DELL TAH E ECHO ECK OH F FOXTROT FOKS TROT G GOLF GOLF H HOTEL HOH TELL I INDIA IN DEE AH J JULIETT JEW LEE ETT K KILO KEY LOH L LIMA LEE MAH M MIKE MIKE N NOVEMBER NO VEM BER O OSCAR OSS CAH P PAPA PAH Q QUEBEC KEH BECK R ROMEO ROW ME OH S SIERRA SEE AIR RAH T TANGO TANG GO U UNIFORM YOU NEE FORM or OO NEE FORM 4-4
41 V VICTOR VIK TAH W WHISKEY WISS KEY X XRAY ECKS RAY Y YANKEE YANG KEY Z ZULU ZOO LOO Figure 4-2: Phonetic Alphabet Number pronunciation guide Numeral Spoken As Numeral Spoken As 0 ZE RO 5 FIFE 1 WUN 6 SIX 2 TOO 7 SEV EN 3 TREE 8 AIT 4 FOW ER 9 NIN ER Figure 4-3: Number Pronunciation Guide SECTION II RADIO CALL PROCEDURES A preliminary call will be transmitted when the sending station wishes to know if the receiving station is ready to receive a message. When communications reception is good and contact has been continuous, a preliminary call is optional. The following is an example of a preliminary call A1D THIS IS B6T, OVER. B6T THIS IS A1D, OVER. A1D THIS IS B6T (sends message), OVER. B6T THIS IS A1D, ROGER OUT. 1. JULIAN DATE The SINCGARS uses a special two-digit form of the Julian date as part of the sync time. The two digit Julian date begins with 01 on 1 January and continues through 00, repeating as necessary to cover the entire year. 2. SYNC TIME To maintain proper sync time, the SINCGARS uses seven internal clocks: a base clock, plus one for each of the six FH channels. Manual and cue settings will display the base clock time. 3. Very High Frequency Radio Systems - SINCGARS provide interoperable communications between C2 assets and have the capability to transmit and receive secure voice and data. SINCGARS is secured with electronic attack (EA) security features (such as frequency hopping [FH]) that enable the United States (US) Army, United States Navy (USN), United States Air Force (USAF), and United States Marine Corps (USMC) communications interoperability. This interoperability ensures successful communications for joint and single component combat operations. 4. Single-Channel Ground Radio System Characteristics and Capabilities 4-5

42 a. The SINCGARS family is designed on a modular basis to achieve maximum commonality among various ground and airborne configurations. A common RT is used in the man pack and all vehicle configurations. These individual components are totally interchangeable from one configuration to the next. Additionally, the modular design reduces the burden on the logistics system to provide repair parts. b. SINCGARS operates in either the SC or FH mode. It is compatible with all current US and multinational VHF radios in the SC non-secure mode. SINCGARS is compatible with other USAF, USMC, and USN SINCGARS in the FH mode. SINCGARS stores eight SC frequencies, including the cue and manual frequencies and six separate hopsets. c. SINCGARS accepts either digital or analog input and imposes the signal onto a SC or FH output signal. In FH, the input changes frequency about 100 times per second over portions of the tactical VHF range. This hinders threat intercept and jamming units from locating or disrupting friendly communications. GROUND VERSION RECEIVER/TRANSMITTER Either the RT-1523/A/B/C/D or the RT-1523E comprise the core component of all ground-based radio sets. The RT-1523 series has internal COMSEC circuits (source of the ICOM designation). The ground versions are equipped with a whisper mode for noise restriction during patrolling or while in defensive positions. The RTO whispers into the handset and is heard at the receiver in a normal voice. Figure 4-4: Front Panel ICOM Radio TR-1523/A/B/C/D 4-6

.")


43 Antenna Port Keypad Display Function Switch K Fill Port Figure 4-5: Front Panel ICOM Radio RT-1523E ADVANCED SYSTEM IMPROVEMENT PROGRAM The SINCGARS ASIP increases the performance of the SINCGARS SIP (RT-1523 C/D models). It also increases its operational capability in support of the tactical Internet, specifically improved data capability, manpower and personnel integration requirement compliance, and flexibility in terms of interfaces with other systems. Figure 6-3 is an example of the SINCGARS ASIP radio. Figure 4-6: SINCGARS ASIP Radio 4-7
44 SECTION III BATTERIES AND LOADING FREQUENCY (TM ) Batteries WARNING 1. LITHIUM NON-RECHARGEABLE BATTERIES a. Lithium Non-Rechargeable Batteries contain a great deal of energy. They must never be charged or abused. Attempting to do so could result in leakage, fire or even an explosion. b. Lithium-Sulfur Dioxide (Li-SO2) batteries, such as BA-5590, contain a toxic, pressurized, and liquefied gas. It has a strong pungent odor. Lithium-Manganese Dioxide (Li- MnO2) batteries such as BA-5372 (HUB or Hold-Up battery) and BA-5390 contain a flammable electrolyte. Both types of batteries contain pure Lithium which reacts violently with water. DO NOT heat, incinerate short circuit, puncture, mutilate or attempt to disassemble any battery. DO NOT USE any battery which shows signs of damage, such as bulging, swelling, disfigurement, leaking or staining inside the plastic packaging. Keep all batteries in their original packaging until ready for use. DO NOT test Lithium batteries for capacity with a test set. No external test set exists that provides a reliable result. DO NOT store batteries in unused equipment for more than 30 days. c. If a battery compartment becomes hot to the touch, if it hisses or makes a burping sound, or if you smell irritating pungent Sulfur Dioxide gas: Turn off the equipment immediately and clear the area. Let the equipment cool for at least an hour. After the equipment is cool and the odor has cleared, remove the battery or batteries. Install new battery or batteries and resume operation. d. If the equipment again becomes hot to the touch, go through the above steps but do not install new batteries. Turn in the equipment for maintenance. DO NOT place Lithium batteries in ordinary trash; turn them in for disposal in accordance with local regulations. DO NOT store Lithium batteries with other hazardous materials and keep them away from open flame or heat. DO NOT use water to fight a Lithium battery fire. This is an extremely intense fire frequently characterized by a bright red flame. Carbon Dioxide or dry chemical fire extinguishers are effective in fighting fires of other combustibles and in keeping the batteries cool when exposed to fires in the vicinity. Sprinklers are recommended for storage areas to douse fires of other combustible materials and to keep batteries cool. 4-8
45 e. NEVER use a Halon type fire extinguisher on a Lithium battery fire. This will only increase the intensity of the fire. f. In the event of a Lithium fire, immediately EVACUATE THE AREA and contact the appropriate emergency authorities. Class D fire extinguishers are to be used only by professional fire fighters. WARNING 2. RECHARGEABLE BATTERIES a. This includes BB-390/U Nickel-Metal Hydride (Ni-MH) and BB-2590/U Lithium-Ion (Li-Ion) batteries. DO NOT leave batteries in equipment for long term storage (more than 30 days). b. Charge batteries in long term storage at least annually, and charge them before inserting in equipment. c. Before opening original packaging always examine the package for signs of leakage, staining or other indications of battery damage. DO NOT use a damaged battery. a. Always charge a rechargeable battery on the appropriate charger according to the dictates of the manufacturer. NEVER disassemble, heat, burn, or incinerate these or any batteries. b. CO2 or Dry Chemical fire extinguishers are suggested for fires involving these batteries. 2. Turn in batteries for disposal. Dispose of them in accordance with local regulations. WARNING 3. NON-RECHARGEABLE ZINC-AIR BATTERIES a. This includes BA-8180/U and BA-8140/U Zinc-Air (Zn-Air) batteries. DO NOT leave batteries in equipment for long term storage (more than 30 days). b. Before opening original packaging always examine the package for signs of leakage, staining or other indications of battery damage. DO NOT use a damaged battery. c. Zn-Air batteries contain gelled Potassium Hydroxide (KOH) as an electrolyte. This is corrosive and will burn the skin. If it comes in contact with the skin, wash thoroughly with soap 4-9
46 and water. If it comes in contact with the eyes, flush with copious amounts of water and seek immediate medical attention. NEVER disassemble, heat, burn, or incinerate these or any batteries. d. CO2 or Dry Chemical fire extinguishers are suggested for fires involving these batteries. e. Turn in batteries for disposal. Dispose of them in accordance with local regulations. LOADING FREQUENCIES 1. SINCGARS is a "single channel" radio in that it can transmit or receive on only one channel at a time. Single channel or the SC mode of operation, refers to the fact that only one frequency is being used for communications. 2. FREQUENCIES. The SINCGARS radio will operate on 2320 different frequencies in the range of to MHz, with a 25 KHz separation between frequencies. 3. CHANNELS Eight single channel frequencies can be loaded into a SINCGARS RT: one in each numbered channel 1-6, plus one each in the CUE and MAN channels. 4. LOADING SC frequencies are loaded via the RT keypad. Although a matter of command policy, operators are normally required to load only those SC frequencies they are expected to need during mission operations. To load SC frequencies, use the procedure shown in Table 4-2, below. (Also, see Primary Operator Task 1, "Load Single Channel Frequencies into SINCGARS RT.") Table 4-1: How to Load SC Frequencies (1) Set FCTN switch to LD; MODE to SC. (2) Select CHAN 1-6, CUE, or MAN. (3) Press FREQ, then CLR. (4) Enter 5-digit frequency. (5) Press STO. (6) Repeat for each channel to be loaded. Table 4-2: Primary Task 1 - Load Single Channel Freq. in SINCGARS RT SUBTASKS ACTION RESULTS 4-10
47 a. Prepare to perform task (1) Obtain proper freqs from ANCD* (2) Set RT controls COMSEC to PT MODE to SC FCTN to ZFH, TST, and then to LD CHAN to MAN, CUE, or 1-6 b. Load SC Freq (1) Press: FREQ CLR XXXXX (Freq) STO (Load CUE freq only if directed) RT display shown [GOOD] (or see unit maintainer) Display shows [00000] or [30000] Display shows [ _ ] Display shows SC freq entered Display blinks (data is stored) (As directed by NCS or unit SOP) Loading of SC freq is complete (2) Repeat Step b-1 for each freq needed (3) Set FCTN to SQ ON *In units using secure, FH nets, operators normally load on a routine basis only a MANSC frequency. CUE and CHAN 1-6 SC frequencies are loaded only as needed or directed **Only NCS and Alt NCS routinely load a CUE frequency ***RT settings for RT-1523E are set via MENU 4-11
48 SECTION I PERFORM FIRST AID for BLEEDING Perform First Aid for a Bleeding and/or Severed Extremity (TC JAN 16) Task: Conditions: You have a casualty who has a bleeding wound of the arm or leg. The casualty is breathing. You will need the casualty's emergency bandage, chitosan dressing, or field dressing, materials to improvise a pressure dressing (wadding and cravat or strip of cloth), materials to elevate the extremity (blanket, shelter half, poncho, log, or any available material), and combat application tourniquet (C-A-T) or materials to improvise a tourniquet--rigid object (stick, tent peg, or similar object) and a strip of cloth. Standards: Control bleeding from the wound following the correct sequence. Place a dressing over the wound with the sides of the dressing sealed so it does not slip. Ensure that the dressings do not have a tourniquet-like effect. Apply a tourniquet to stop profuse bleeding not stopped by the dressings, for severed arms and legs, or to control life-threatening bleeding when under fire. Performance Steps Note: If the wound is a partial or complete amputation of the arm or leg, you will need to apply a tourniquet on the injured extremity. Also, if you are under fire and need to control bleeding quickly, apply a tourniquet first. When the tactical situation allows, you can loosen the tourniquet after applying other measures to control the bleeding such as a pressure dressing or chitosan dressing. Go to step Uncover the wound unless clothing is stuck to the wound or you are in a chemical environment. CAUTION: Clothing or anything stuck to the wound should be left alone to avoid injury. Do NOT attempt to clean the wound. CAUTION: Do NOT remove protective clothing in a chemical environment. Apply dressings over the protective clothing. 2. Apply the casualty's dressing. a. Emergency bandage. 5-12
49 Performance Steps Note: The emergency bandage is a new item that can be used on any bleeding wound. It can be used both as a field dressing and as a pressure dressing. (1) Place the pad on the wound, white side down, and wrap the elastic bandage around the limb. CAUTION: Do NOT touch the white (sterile) side of the dressing. Do NOT allow it to come into contact with any surface other than the wound. (2) Insert the elastic bandage into the pressure bar. (3) Tighten the elastic bandage. (4) Pull back, forcing the pressure bar down onto the pad. (5) Wrap the elastic bandage tightly over the pressure bar and wrap it over all edges of the pad. (6) Secure the hooking ends of the closure bar into the elastic bandage. WARNING: Emergency bandages, field dressings, and pressure dressings should NOT have a tourniquet-like effect. The dressing must be loosened if the skin beyond the injury becomes cool, blue, or numb. b. Chitosan dressing. Note: The chitosan dressing is used to control serious arterial bleeding. It is not used for wounds with minimal to moderate bleeding. The chitosan dressing can be used in conjunction with a tourniquet to control severe arterial bleeding. (1) Hold the foil over-pouch so that the instructions can be read and the unsealed edges are at the top. (2) Grasp the unsealed edges. (3) Peel open the over-pouch by pulling the unsealed edges apart. (4) Use your hand and thumb to trap the dressing between the bottom foil and the green/black polyester backing. (5) Hold the dressing by the nonabsorbent green/black backing and discard the foil overpouch. 5-13
50 Performance Steps Note: Do not let moisture from your hand come into contact with the dressing before you apply the bandage. The moisture could cause the sponge to become sticky. (6) Apply the light-colored sponge portion directly over the wound and apply pressure to the green/black backing with your fingers. Note: Do not let the bandage come into contact with the casualty's eyes. (7) Apply manual pressure and maintain the pressure until the dressing adheres and the bleeding stops (usually 2 to 4 minutes). Do not try to reposition the bandage once it is applied. Note: If the bleeding does not stop within 4 minutes, remove the chitosan dressing, apply another chitosan dressing, and apply manual pressure again. Do not apply a new chitosan dressing over an old one. The old chitosan dressing must be removed so that the sponge portion of the new chitosan dressing can come into contact with the blood and fluids from the wound. (8) Apply a field dressing or a cravat to secure the chitosan dressing and to prevent contamination. Note: For smaller wounds, you may want to cut the chitosan dressing before applying it to the wound. In this way, you will have a second dressing to apply if the first dressing is not sufficient to stop the bleeding or to use on another wound (entrance and exit wound, for example). c. Field dressing. (1) Apply the dressing, white side down, directly over the wound. CAUTION: Do NOT touch the white (sterile) side of the dressing. Do NOT allow it to come into contact with any surface other than the wound. (2) Wrap each tail, one at a time, in opposite directions around the wound so the dressing is covered and both sides are sealed. (3) Tie the tails into a nonslip knot over the outer edge of the dressing--not over the wound. (4) Check the dressing to make sure that it is tied firmly enough to prevent slipping without causing a tourniquet-like effect. 3. Apply manual pressure and elevate the arm or leg to reduce bleeding, if necessary. 5-14
51 Performance Steps a. Apply firm manual pressure over the dressing for 5 to 10 minutes, when practical. b. Elevate the injured part above the level of the heart, unless a fracture is suspected and has not been splinted. 4. If a field dressing was applied and bleeding continues, apply a pressure dressing. a. Keep the arm or leg elevated. b. Place a wad of padding directly over the wound. c. Place an improvised dressing over the wad of padding and wrap it tightly around the limb. d. Tie the ends in a nonslip knot directly over the wound. e. Check the dressing to make sure that it does not have a tourniquet-like effect. Note: If the bleeding stops, watch the casualty closely, and check for other injuries. Note: If the bleeding continues despite proper application of a field dressing and a pressure dressing, an emergency bandage, or a chitosan dressing; or if the wound is a partial or complete amputation of the arm or leg, apply a tourniquet on the injured extremity. If only part of a hand or foot has been severed, the bleeding should be stopped using a pressure dressing. 5. Apply a tourniquet. a. Combat application tourniquet (C-A-T). (1) Remove the C-A-T from the pouch. (2) Slide the wounded extremity through the loop of the self-adhering band. Note: The C-A-T is packaged in its one-handed configuration. (3) Position the C-A-T. (a) If the wound is above the knee or elbow, position the C-A-T 2 inches above a bleeding site. CAUTION: Never place a tourniquet directly over a wound, fracture, or joint. 5-15
52 Performance Steps (b) If the wound is below the knee or elbow, initially position the tourniquet band 2 inches above the wound. If a tourniquet applied below the knee or elbow is not successful at stopping the bleeding, apply a second tourniquet 2 inches above the joint (knee or elbow). Do not remove the first tourniquet until the second tourniquet has been applied. (4) Pull the free running end of the self-adhering band tight and securely fasten it back on itself. Do NOT adhere the band past the windlass clip. Note: The friction adaptor buckle is not necessary for proper C-A-T application to an arm. However, use it as added protection when using two hands to apply the C-A-T to a leg. To use it, route the self-adhering band through the fiction adaptor buckle. This also prevents the strap from loosening during transport. (5) Twist the windlass rod until the bleeding has stopped. (6) Lock the windlass rod in place with the windlass clip. Note: For added security (and always before moving a casualty), secure the windlass rod with the windlass strap. For small extremities, also secure the self-adhering band under the windlass strap. (7) For small extremities, wind the self-adhering band around the extremity and over the windlass rod. (8) Grasp the windlass strap, pull it tight, and adhere it to the opposite hook on the windlass clip. b. Improvised tourniquet. (1) Make a tourniquet at least 2 inches wide. (2) Position the tourniquet. (a) Place the tourniquet over the smoothed sleeve or trouser leg if possible. (b) If the wound is above the knee or elbow, place the tourniquet around the limb 2 to 4 inches above the wound between the wound and the heart but not on a joint or directly over a wound or a fracture. (c) If the wound is below the knee or elbow, initially position the tourniquet band 2 inches above the wound. If a tourniquet applied below the knee or elbow is not successful at 5-16
53 Performance Steps stopping the bleeding, apply a second tourniquet 2 to 4 inches above the joint (knee or elbow). Do not remove the first tourniquet until the second tourniquet has been applied. (3) Put on the tourniquet. (a) Tie a half knot. (b) Place a stick (or similar object) on top of the half knot. (c) Tie a full knot over the stick. (d) Twist the stick until the tourniquet is tight around the limb and bright red bleeding has stopped. Note: In the case of an amputation, dark oozing blood may continue for a short time. (4) Secure the tourniquet. The tourniquet can be secured using the ends of the tourniquet band or with another piece of cloth, as long as the stick does not unwind. Note: If a limb is completely amputated, the stump should be padded and bandaged (do not cover the tourniquet). If the casualty has suffered an incomplete amputation, splint the limb. Note: If a tourniquet was applied to quickly control bleeding under fire, once the tactical situation allows, you can loosen the tourniquet after other measures have been applied to control the bleeding if it has been in place for less than 6 hours. However, do NOT remove it. Use direct pressure, a pressure dressing, or a chitosan dressing to control the bleeding prior to loosening the tourniquet. If unable to control bleeding by these methods, retighten the tourniquet until the bleeding stops. 6. If a tourniquet was applied, mark the casualty's forehead with a letter T and the time--using a pen, mud, the casualty's blood, or whatever is available. 7. If applicable and the situation allows, save severed limbs or body parts and transport them with, but out of sight of, the casualty. Note: Body parts should be wrapped in dry, sterile dressing and placed in a dry, plastic bag and, in turn, placed in a cool container (do not soak in water or saline or allow to freeze). If your location in the field/combat does not allow for the correct preserving of parts; do what you can. 5-17
54 Performance Steps 8. Watch the casualty closely for life-threatening conditions, check for other injuries (if necessary), and treat for shock. Seek medical aid. Evaluation Preparation: Setup: Use the same dressing repeatedly. If a chitosan dressing is being tested, you will need to use a simulated dressing and have a field dressing or cravat available to secure it. If a field dressing is being used, have materials available for a pressure dressing (wadding and cravat or a strip of cloth). Have one Cadet play the part of the casualty and another apply the dressing(s). Use a moulage or mark a place on the casualty's arm or leg to simulate a wound. For applying a tourniquet, use a mannequin or simulated arm or leg (padded length of 2-inch by 4-inch wood with a glove or boot on one end) with a dressing appropriately placed on the arm or leg. Under no circumstances will a live simulated casualty be used to evaluate the application of a tourniquet. Place the tourniquet materials nearby. Brief Cadet: Tell the Cadet to do, in order, the first aid steps required to apply a dressing and, if necessary, a pressure dressing on the casualty's wound. When testing step 1, you can vary the test by telling the Cadet that clothing is stuck to the wound or that a chemical environment exists. After steps 2 and 3, tell the Cadet that the bleeding has not stopped. After step 4, tell the Cadet the bleeding is continuing and ask the Cadet to describe and perform the first aid on the simulated arm or leg provided. After step 5, ask the Cadet what should be done to indicate that a tourniquet has been applied and what should be done with a severed limb, if applicable. Do not evaluate step 9 in the simulated mode. Performance Measures GO NO- GO 1. Uncovered the wound, unless clothing was stuck to the wound or in a chemical environment. 2. Applied the casualty's dressing. a. Applied the dressing/pad directly over the wound. b. Covered the edges of dressing/pad. c. Properly secured the bandage. 5-18
55 Performance Measures GO NO- GO d. Did not create a tourniquet-like effect with the dressing. 3. Applied manual pressure and elevated the arm or leg, if necessary. 4. If a field dressing was applied and bleeding continued, applied a pressure dressing. a. Placed the wad of padding directly over the wound. b. Tightly wrapped the cloth around the limb. c. Tied a nonslip knot directly over the wound. d. Did not create a tourniquet-like effect with the dressing. 5. Applied a tourniquet, if necessary. a. Improvised tourniquet, if used, was at least 2 inches wide. b. Tourniquet was placed at least 2 inches above the wound between the wound and the heart but not on a joint or directly over a wound or a fracture. c. Tourniquet was properly applied and secured. 6. Performed steps 1 through 5, as necessary, in sequence. 7. If a tourniquet was applied, marked the casualty's forehead with a letter T and the time. 8. If applicable and the situation allowed, saved severed limbs or body parts and transported them with the casualty. 9. Watched the casualty closely for life-threatening conditions, checked for other injuries (if necessary), and treated for shock. Sought medical aid. 5-19
56 Evaluation Guidance: Score the Cadet GO if all performance measures are passed. Score the Cadet NO GO if any performance measure is failed. If the Cadet scores NO GO on any performance measure, show or tell the Cadet what was done wrong and how to do it correctly. SECTION II EVALUATE A CASUALTY (TACTICAL COMBAT CASUALTY CARE) Evaluate a Casualty (Tactical Combat Casualty Care (TC JAN 16) Task: Conditions: You have a casualty who has signs/symptoms of an injury. Your unit may be under fire. Standards: Evaluate the casualty following the correct sequence. Identify all life-threatening conditions and other serious wounds. Performance Steps Note: Tactical combat casualty care (TCCC) can be divided into three phases. The first is care under fire; the second is tactical field care; the third is combat casualty evacuation care. In the first, you are under hostile fire and are very limited as to the care you can provide. In the second, you and the casualty are relatively safe and no longer under effective hostile fire, and you are free to provide casualty care to the best of your ability. In the third, the care is rendered during casualty evacuation (CASEVAC). WARNING: If a broken neck or back is suspected, do not move the casualty unless to save his/her life. 1. Perform care under fire. a. Return fire as directed or required before providing medical treatment. b. Determine if the casualty is alive or dead. Note: In combat, the most likely threat to the casualty's life is from bleeding. Attempts to check for airway and breathing will expose the rescuer to enemy fire. Do not attempt to provide first aid if your own life is in imminent danger. 5-20
57 Performance Steps Note: In a combat situation, if you find a casualty with no signs of life--no pulse, no breathing-- do NOT attempt to restore the airway. Do NOT continue first aid measures. c. Provide tactical care to the live casualty. Note: Reducing or eliminating enemy fire may be more important to the casualty's survival than the treatment you can provide. (1) Suppress enemy fire. (2) Use cover or concealment (smoke). (3) Direct the casualty to return fire, move to cover, and administer self-aid (stop bleeding), if possible. If the casualty is unable to move and you are unable to move the casualty to cover and the casualty is still under direct enemy fire, have the casualty "play dead." (4) If the casualty is unresponsive, move the casualty, his/her weapon, and mission-essential equipment to cover, as the tactical situation permits. (5) Keep the casualty from sustaining additional wounds. (6) Reassure the casualty. d. Administer life-saving hemorrhage control. (1) Determine the relative threat of the tactical situation versus the risk of the casualty's bleeding to death. (2) If the casualty has severe bleeding from a limb or has suffered amputation of a limb, administer life-saving hemorrhage control by applying a tourniquet before moving the casualty. (See task ) e. Transport the casualty, his/her weapon, and mission-essential equipment when the tactical situation permits. f. Recheck bleeding control measures as the tactical situation permits. 2. Perform tactical field care when no longer under direct enemy fire. Note: Tactical field care is rendered by the individual when no longer under hostile fire. Tactical field care also applies to situations in which an injury has occurred during the mission but there 5-21
58 Performance Steps has been no hostile fire. Available medical equipment is limited to that carried into the field by the individual Cadet. WARNING: If there are any signs of nerve agent poisoning, stop the evaluation, take the necessary protective measures, and begin first aid. (See task ) Note: In the following situations communicate the medical situation to the unit leader and ensure that the tactical situation allows for time to perform these steps before initiating any medical procedure. Note: When evaluating and/or treating a casualty, seek medical aid as soon as possible. Do NOT stop treatment. If the situation allows, send another person to find medical aid. a. Form a general impression of the casualty as you approach (extent of injuries, chance of survival). Note: If a casualty is being burned, take steps to remove the casualty from the source of the burns before continuing evaluation and treatment. (See task ) b. Check for responsiveness. (1) Ask in a loud, but calm, voice: "Are you okay?" Gently shake or tap the casualty on the shoulder. (2) Determine the level of consciousness by using AVPU: A = Alert; V = responds to Voice; P = responds to Pain; U = Unresponsive. Note: To check a casualty's response to pain, rub the breastbone briskly with a knuckle or squeeze the first or second toe over the toenail. (3) If the casualty is conscious, ask where his/her body feels different than usual, or where it hurts. Skip steps 2c and 2d. Go to step 2e. Note: If the casualty is conscious but is choking and cannot talk, stop the evaluation and begin treatment. (See task ) (4) If the casualty is unconscious, continue with step 2c. c. Position the casualty and open the airway. (See task ) d. Assess for breathing and chest injuries. 5-22
59 Performance Steps (1) Look, listen, and feel for respiration. (See task ) Note: If the casualty is breathing, insert a nasopharyngeal airway (see task ) and place the casualty in the recovery position. Note: On the battlefield the cost of attempting cardiopulmonary resuscitation (CPR) on casualties with what are inevitably fatal injuries may result in additional lives lost as care is diverted from casualties with less severe injuries. Only in the case of non-traumatic disorders such as hypothermia, near drowning, or electrocution should CPR be considered prior to the CASEVAC phase. (2) Expose the chest and check for equal rise and fall and for any wounds. (a) If the casualty has a penetrating chest wound and is breathing or making an effort to breathe, stop the evaluation to apply a dressing. (b) Monitor for increasing respiratory distress. If this occurs, decompress the chest on the same side as the injury. (c) Position or transport with the affected side down, if possible. e. Identify and control bleeding. (1) Check for bleeding. (a) Remove only the minimum amount of clothing to expose and treat injuries. Protect the casualty from the environment (heat and cold). (b) Look for blood-soaked clothes. (c) Look for entry and exit wounds. (d) Place your hands behind the casualty's neck and pass them upward toward the top of the head. Note whether there is blood or brain tissue on your hands from the casualty's wounds. (e) Place your hands behind the casualty's shoulders and pass them downward behind the back, the thighs, and the legs. Note whether there is blood on your hands from the casualty's wounds. (2) If life-threatening bleeding is present, stop the evaluation and control the bleeding. Apply a tourniquet, chitosan dressing, emergency bandage, or field dressing, as appropriate. 5-23
60 Performance Steps (See tasks , , , and ) Treat for shock and establish a saline lock/intravenous infusion, as appropriate. (See tasks , , and ) Note: If a tourniquet was previously applied, consider converting it to a pressure dressing. (See task ) Converting the tourniquet to a pressure dressing may save the casualty's limb if the tourniquet has not been in place for 6 hours. (3) Dress all wounds, including exit wounds. f. Check for fractures. (1) Check for open fractures by looking for bleeding or a bone sticking through the skin. (2) Check for closed fractures by looking for swelling, discoloration, deformity, or unusual body position. (3) If a suspected fracture is present, stop the evaluation and apply a splint. g. Check for burns. (1) Look carefully for reddened, blistered, or charred skin. Also check for singed clothes. (2) If burns are found, stop the evaluation and begin treatment. (See task ) h. Administer pain medications and antibiotics (the casualty's combat pill pack) to any Cadet wounded in combat. Note: Each Cadet will be issued a combat pill pack before deploying on tactical missions. i. Document the casualty's injuries and the treatment given on the field medical card (FMC), if applicable. Note: The FMC is usually initiated by the combat medic. However, a certified combat lifesaver can initiate the FMC if a combat medic is not available or if the combat medic directs the combat lifesaver to initiate the card. A pad of FMCs is part of the combat lifesaver medical equipment set. j. Transport the casualty to the site where evacuation is anticipated. (See task ) 3. Monitor an unconscious casualty during CASEVAC. 5-24
61 Performance Steps Note: CASEVAC refers to the movement of casualties aboard nonmedical vehicles or aircraft. Care is rendered while the casualty is awaiting pickup or is being transported. A Cadet accompanying an unconscious casualty should monitor the casualty's airway, breathing, and bleeding. Evaluation Preparation: Setup: Prepare a "casualty" for the Cadet to evaluate in step 2 by simulating one or more wounds or conditions. Simulate the wounds using a war wounds moulage set, casualty simulation kit, or other available materials. You can coach a "conscious casualty" on how to respond to the Cadet's questions about location of pain or other symptoms of injury. However, you will have to cue the Cadet during evaluation of an "unconscious casualty" as to whether the casualty is breathing and describe the signs or conditions, as the Cadet is making the checks. Brief Cadet: To test step 1, tell the Cadet that his/her unit is under fire and ask him/her what he/she should do to provide aid to casualties. For step 2, tell the Cadet that the tactical situation permits full evaluation of the casualty. Tell him/her to do, in order, all necessary steps to evaluate the casualty and identify all wounds and/or conditions. Tell the Cadet that he/she will not perform first aid but will tell you what first aid action (give mouth-to-mouth resuscitation, bandage the wound, and so forth) he/she would take. After he/she has completed the checks (step 2f), ask him/her what else he/she should do. To test step 3, ask him/her what he/she should do while evacuating an unconscious casualty. Performance Measures GO NO- GO 1. Performed care under fire. a. Suppressed enemy fire to keep the casualty from sustaining additional wounds. b. Encouraged responsive casualties to protect themselves and perform self-aid, if able. c. Administered life-saving hemorrhage control. d. Transported the casualties, weapons, and mission-essential equipment, when the tactical situation permitted. 5-25
62 Performance Measures GO NO- GO 2. Performed tactical field care. a. Checked for responsiveness. b. Positioned the casualty and opened the airway. c. Assessed for breathing and chest injuries. d. Identified and controlled bleeding. e. Checked for fractures. f. Checked for burns. g. Administered pain medications and antibiotics, if appropriate. h. Documented the casualty's injuries and treatment given on the field medical card, if applicable. i. Transported the casualty to the site where evacuation is anticipated. 3. Monitored an unconscious casualty's airway, breathing, and bleeding during casualty evacuation. 4. Performed all necessary steps in sequence. 5. Identified all wounds and/or conditions. Evaluation Guidance: Score the Cadet GO if all performance measures are passed. Score the Cadet NO GO if any performance measure is failed. If the Cadet scores NO GO on any performance measure, show or tell the Cadet what was done wrong and how to do it correctly. 5-26
63 SECTION III PREFORM FIRST AID FOR AN OPEN CHEST (TC JAN 16) Task: Conditions: You see a casualty who has an open chest wound. The casualty is breathing. You will need the casualty's emergency bandage or field dressing, tape, a large bore (14-gauge, 3-inch long) needle and catheter unit, and material to improvise a dressing (clothing or blankets). Standards: Apply a dressing to the wound following the correct sequence, without causing further injury to the casualty. Ensure that the wound is properly sealed and the dressing is firmly secured without interfering with breathing. Perform needle chest decompression, if necessary. Performance Steps Note: Always check for both entry and exit wounds. If there are two wounds (entry and exit), treat the wound that appears more serious first (for example, the heavier bleeding, larger wound, and so forth). It may be necessary to improvise dressings for the second wound by using strips of cloth, a T-shirt, or the cleanest material available. 1. Uncover the wound unless clothing is stuck to the wound or you are in a chemical environment. CAUTION: Removing stuck clothing or uncovering the wound in a chemical environment could cause additional harm. WARNING: Do not attempt to clean the wound. 2. Apply airtight material over the wound. a. Fully open the outer wrapper of the casualty's dressing or other airtight material. b. Place the inner surface of the outer wrapper or other airtight material directly over the wound after the casualty exhales completely. Edges of the airtight material should extend 2 inches beyond the edges of the wound. Note: When applying the airtight material, do not touch the inner surface. c. Hold the material in place by taping on three sides and then monitor the casualty for development of a tension pneumothorax. Note: If the casualty has an open chest wound on his/her front and another open wound on his/her back on the same side, apply airtight material over each wound, taping down three sides 5-27
64 Performance Steps of the material for the wound on the front and all four sides of the material for the wound on the back. 3. Apply the casualty's dressing. a. Apply the dressing/pad, white side down, directly over the airtight material. b. Have the casualty breathe normally. c. Maintain pressure on the dressing while you wrap the tails (or elastic bandage) around the body and back to the starting point. d. For a field dressing, tie the tails into a nonslip knot over the center of the dressing after the casualty has exhaled completely. For an emergency bandage, pass the tail through the plastic pressure device, reverse the tail while applying pressure, continue to wrap the tail around the body, and secure the plastic fastening clip to the last turn of the wrap. e. Ensure that the dressing is secured without interfering with breathing. Note: When practical, apply direct manual pressure over the dressing for 5 to 10 minutes to help control the bleeding. 4. Position the casualty on the injured side or in a sitting position, whichever makes breathing easier. WARNING: If the casualty's respiratory condition becomes worse (progressively more difficult for the casualty to breathe) after placing the dressing on the wound, assume that a tension pneumothorax has developed, and perform needle chest decompression. 5. Perform needle chest decompression, if necessary. a. Locate the insertion site. Locate the second intercostal space (between the second and third ribs about two finger widths below the collarbone) at the mid-clavicular line (approximately in line with the nipple) on the same side of the casualty's chest as the penetrating wound. b. Insert a large bore (14-gauge, 3-inch long) needle and catheter unit. (1) Firmly insert the needle into the skin over the top of the third rib into the second intercostal space, until the chest cavity has been penetrated, as evidenced by feeling a 5-28
65 Performance Steps "pop" as the needle enters the chest cavity. A hiss of escaping air under pressure will usually be heard. WARNING: The needle must be positioned properly to avoid puncturing blood vessels and/or nerves. Blood vessels and nerves run along the bottom of each rib. (2) Withdraw the needle while holding the catheter in place. Secure the catheter to the chest wall with tape. 6. Watch the casualty closely for life-threatening conditions, check for other injuries (if necessary), and treat for shock. Seek medical aid. Evaluation Preparation: Setup: Use the same dressing repeatedly. Prepare the dressing outer wrapper or provide a piece of airtight material (plastic, cellophane, foil). Have another Cadet act as the casualty. Use a moulage or otherwise simulate the chest wound. If a mannequin that is capable of testing needle chest decompression is available, use it to test step 6. Have an 18-gauge needle available. Brief Cadet: Tell the Cadet to do, in order, all necessary first aid steps to treat the casualty's wound. When testing step 1, you can vary the test by telling the Cadet that clothing is stuck to the wound or that a chemical environment exists. For step 6, tell the Cadet that the casualty's condition is becoming worse, and have him/her show you (on a mannequin) or tell you what he/she would do to decompress the chest. Do not evaluate step 8 in the simulated mode. Performance Measures GO NO- GO 1. Uncovered the wound unless clothing was stuck to the wound or a chemical environment existed. 2. Applied airtight material over the wound without touching the inner surface of the airtight material. a. Fully opened the outer wrapper of the casualty's dressing or other airtight material. b. Applied the inner surface of the outer wrapper or other airtight material directly over the wound after the casualty exhaled completely. 5-29
66 Performance Measures GO NO- GO c. Held the material in place by taping on three sides and then monitored the casualty for development of a tension pneumothorax. 3. Applied the casualty's dressing. a. Applied the dressing/pad, white side down, directly over the airtight material. b. Had the casualty breathe normally. c. Maintained pressure on the dressing while wrapping the tails (or elastic bandage) around the body and back to the starting point. d. For a field dressing, tied the tails into a nonslip knot over the center of the dressing after the casualty exhaled completely. For an emergency bandage, passed the tail through the plastic pressure device, reversed the tail while applying pressure, continued to wrap the tail around the body, and secured the plastic fastening clip to the last turn of the wrap. e. Ensured that the dressing was secured without interfering with breathing. 4. When practical, applied direct manual pressure over the dressing for 5 to 10 minutes to help control the bleeding. 5. Positioned the casualty on the injured side or in a sitting position, whichever made breathing easier. 6. Performed needle chest decompression, if necessary. a. Located the correct insertion site. b. Inserted the needle until the chest cavity was penetrated. c. Withdrew the needle while holding the catheter in place, and secured the catheter to the chest wall with tape. 7. Performed steps 1 through 6 in the correct sequence. 5-30
67 Performance Measures GO NO- GO 8. Watched the casualty closely for life-threatening conditions, checked for other injuries (if necessary), and treated for shock. Sought medical aid. Evaluation Guidance: Score the Cadet GO if all performance measures are passed. Score the Cadet NO GO if any performance measure is failed. If the Cadet scores NO GO on any performance measure, show or tell the Cadet what was done wrong and how to do it correctly. SECTION IV PERFORM FIRST AID to RESTORE BREATHING AND/OR PULSE Perform First Aid to Restore Breathing and/or Pulse (TC JAN 16) Task: Conditions: You see an adult casualty who is unconscious and does not appear to be breathing. You are not in a combat situation or chemical environment. You will need a nasopharyngeal airway (NPA). Standards: Take appropriate action, in the correct sequence, to restore breathing and, if necessary, restore the pulse. Continue until the casualty's breathing/pulse returns, a qualified person relieves you, a physician stops you, or you are too tired to continue. Performance Steps 1. Roll the casualty onto his/her back, if necessary, and place him/her on a hard, flat surface. WARNING: The casualty should be carefully rolled as a whole, so the body does not twist. a. Kneel beside the casualty. b. Raise the near arm and straighten it out above the head. c. Adjust the legs so they are together and straight or nearly straight. d. Place one hand on the back of the casualty's head and neck. 5-31
68 Performance Steps e. Grasp the casualty under the arm with the free hand. f. Pull steadily and evenly toward yourself, keeping the head and neck in line with the torso. g. Roll the casualty as a single unit. h. Place the casualty's arms at his/her sides. 2. Open the airway. Note: If foreign material or vomit is in the mouth, remove it as quickly as possible. a. Head-tilt/chin-lift method. CAUTION: Do NOT use this method if a spinal or neck injury is suspected. (1) Kneel at the level of the casualty's shoulders. (2) Place one hand on the casualty's forehead and apply firm, backward pressure with the palm to tilt the head back. (3) Place the fingertips of the other hand under the bony part of the lower jaw and lift, bringing the chin forward. Note: Do NOT use the thumb to lift. Note: Do NOT completely close the casualty's mouth. CAUTION: Do NOT press deeply into the soft tissue under the chin with the fingers. b. Jaw-thrust method. CAUTION: Use this method if a spinal or neck injury is suspected. Note: If you are unable to maintain an airway after the second attempt, use the head-tilt/chinlift method. (1) Kneel above the casualty's head (looking toward the casualty's feet). (2) Rest your elbows on the ground or floor. 5-32
69 Performance Steps (3) Place one hand on each side of the casualty's lower jaw at the angle of the jaw, below the ears. (4) Stabilize the casualty's head with your forearms. (5) Use the index fingers to push the angles of the casualty's lower jaw forward. Note: If the casualty's lips are still closed after the jaw has been moved forward, use your thumbs to retract the lower lip and allow air to enter the casualty's mouth. CAUTION: Do not tilt or rotate the casualty's head. 3. Check for breathing. a. While maintaining the open airway position, place an ear over the casualty's mouth and nose, looking toward the chest and stomach. b. Look for the chest to rise and fall. c. Listen for air escaping during exhalation. d. Feel for the flow of air on the side of your face. e. Count the number of respirations for 15 seconds. f. Take appropriate action. (1) If the casualty is unconscious, if respiratory rate is less than 2 in 15 seconds, and/or if the casualty is making snoring or gurgling sounds, insert an NPA. CAUTION: Do NOT use the NPA if there is clear fluid (cerebrospinal fluid-csf) coming from the ears or nose. This may indicate a skull fracture. (a) Keep the casualty in a face-up position. (b) Lubricate the tube of the NPA with water. (c) Push the tip of the casualty's nose upward gently. (d) Position the tube of the NPA so that the bevel (pointed end) of the NPA faces toward the septum (the partition inside the nose that separates the nostrils). 5-33
70 Performance Steps Note: Most NPAs are designed to be placed in the right nostril. (e) Insert the NPA into the nostril and advance it until the flange rests against the nostril. CAUTION: Never force the NPA into the casualty's nostril. If resistance is met, pull the tube out and attempt to insert it in the other nostril. If neither nostril will accommodate the NPA, place the casualty in the recovery position. (f) Place the casualty in the recovery position by rolling him/her as a single unit onto his/her side, placing the hand of his/her upper arm under his/her chin, and flexing his/her upper leg. (g) Watch the casualty closely for life-threatening conditions and check for other injuries, if necessary. Seek medical aid. (2) If the casualty is not breathing, continue with step 4 if the tactical situation permits. Note: If the casualty resumes breathing at any time during this procedure, the airway should be kept open and the casualty should be monitored. If the casualty continues to breathe, he/she should be transported to medical aid. Otherwise, the procedure should be continued. 4. Give breaths to ensure an open airway. Note: When mouth-to-mouth resuscitation breathing cannot be performed because the casualty has jaw injuries or spasms, the mouth-to-nose method may be more effective. Perform the mouth-to-nose method as follows: * Blow into the nose while holding the lips closed. * Let air escape by removing your mouth and, in some cases, separating the casualty's lips. a. Insert a face shield, if available, into the casualty's mouth, with the short airway portion over the top of the tongue, and flatten the plastic sheet around the mouth. b. Maintain the airway and gently pinch the nose closed, using the hand on the casualty's forehead. c. Take a normal breath and place your mouth, in an airtight seal, around the casualty's mouth. d. Give two breaths (1 second each), taking a breath between them, while watching for the chest to rise and fall and listening and/or feeling for air to escape during exhalation. 5-34
71 Performance Steps Note: If the chest rises, go to step 7. Note: If the chest does not rise after the first breath, continue with step Reposition the casualty's head slightly farther backward and repeat the breaths. Note: If the chest rises, go to step 7. Note: If the chest does not rise, continue with step Perform chest compressions to clear the airway. a. Perform chest compressions. (1) Kneel close to the side of the casualty's body. (2) Locate the nipple line placing the heel of one hand on the lower half of the sternum (breastbone). (3) Place the heel of the other hand on top of the first hand on the lower half of the breastbone, extending or interlacing the fingers. (4) Straighten and lock the elbows with the shoulders directly above the hands. (5) Without bending the elbows, rocking, or allowing the shoulders to sag, apply enough pressure to depress the breastbone 1½ to 2 inches. Note: Give compressions at a rate of 100 per minute (hard and fast at a ratio of 30 compressions to 2 breaths) with the intent of relieving the obstruction. b. Look in the mouth for the object between compressions and breaths and if you can see it, remove it. WARNING: Only attempt to remove the object if you can see it. Do NOT force the object deeper into the airway. c. Reopen the airway and repeat the breaths. Note: If the chest rises, go to step 7. Note: If the chest does not rise, repeat step 6 until the airway is clear. 5-35
72 Performance Steps 7. Check for a pulse for 5 to 10 seconds. Note: Use the first two fingers in the groove in the casualty's throat beside the Adam's apple on the side closest to you. Do NOT use the thumb. a. If a pulse is found but the casualty is not breathing, continue mouth-to-mouth resuscitation. (1) Give breaths at the rate of one every 5 to 6 seconds (10 to 12 breaths per minute). (2) Recheck for pulse and breathing every 2 minutes. If the pulse stops, go to step 8. (3) Continue until the casualty's breathing returns, a qualified person relieves you, a physician stops you, or you are too tired to continue. If the breathing returns, go to step 9. b. If no pulse is found, you must perform cardiopulmonary resuscitation (CPR). Continue with step Perform CPR. a. Position your hands and body for chest compressions as in step 6a. b. Give 30 compressions. (1) Press straight down to depress the breastbone 1 ½ to 2 inches. (2) Come straight up and completely release the pressure on the breastbone to allow the chest to return to its normal position. The time allowed for release should equal the time required for compression. (3) Give 30 compressions in about 23 seconds (at a rate of 100 per minute). Note: Do NOT remove the heel of your hand from the casualty's chest or reposition your hand between compressions. However, all pressure must be released from the chest cavity to allow for full chest wall expansion. c. Give two breaths. (1) Open the casualty's airway. 5-36
73 Performance Steps (2) Give two breaths (1 second each). d. Repeat steps 8b through 8c for five cycles or 2 minutes. e. Reassess the casualty. (1) Check for the return of the pulse for 3 to 5 seconds. (a) If the pulse is present, continue with step 8e(2). (b) If the pulse is absent, continue with step 8f. (2) Check breathing for 3 to 5 seconds. (a) If the casualty is breathing, continue with step 9. (b) If the casualty is not breathing, continue mouth-to-mouth resuscitation (step 7a). f. Resume CPR with compressions (step 8b). g. Recheck for pulse every 2 minutes. h. Continue CPR until the casualty's pulse returns, you are relieved by a qualified person, stopped by a physician, or you are too tired to continue. 9. Once the casualty is breathing and has a pulse, place the casualty in the recovery position until help arrives. Watch the casualty closely for life-threatening conditions, maintain an open airway, and check for other injuries, if necessary. Evaluation Preparation: Setup: For training and testing, you must use a resuscitation training mannequin (DVC 08-15). Have a bottle of alcohol and swabs or cotton available. Place the mannequin on the floor and alcohol and cotton balls on the table. Clean the mannequin's nose and mouth before each Cadet is evaluated. If a mannequin that is capable of testing insertion of an NPA is available, use it to test step 3b. Brief Cadet: Tell the Cadet to do, in order, all necessary steps to restore breathing and pulse. For step 3b, tell the Cadet that the casualty's breathing rate is slow, and have him/her show you (on a mannequin) or tell you what he/she would do to insert an NPA. After step 3, tell the Cadet that the casualty is not breathing. When testing steps 4 and 5, you can vary the test by indicating whether the chest rises or not. If steps 6 and 7 are tested, tell the Cadet that the chest rises after he/she removes the foreign object. When testing step 8, tell the Cadet that a pulse is not found. 5-37
74 You can stop the evaluation when the Cadet rechecks for the pulse in step 10. Do not evaluate step 12 in the simulated mode. Note: Reference made to the mouth-to-nose method within the task presents information on an alternate procedure that must be used under some circumstances. This method will not be evaluated. Performance Measures GO NO- GO 1. Positioned the casualty. 2. Opened the airway using the head-tilt/chin-lift method. 3. Checked for breathing. a. Looked, listened, and felt for signs of respiration. b. Inserted an NPA, if necessary. 4. Gave breaths to ensure an open airway. 5. Repositioned the casualty's head and repeated breaths, if necessary. 6. Performed chest compressions to clear the airway, if necessary. 7. Looked for a foreign object in the casualty's mouth and removed it, if necessary. (Did NOT perform a blind finger sweep.) 8. Checked for a pulse. 9. Continued mouth-to-mouth or mouth-to-nose resuscitation or CPR, as required. 10. Rechecked for pulse and breathing, as required. 11. Performed all necessary steps in the correct sequence. 5-38
75 Performance Measures GO NO- GO 12. Once the casualty was breathing and had a pulse, placed him/her in the recovery position. Watched the casualty closely for life-threatening conditions, maintained an open airway, and checked for other injuries, if necessary. Evaluation Guidance: Score the Cadet GO if all performance measures are passed. Score the Cadet NO GO if any performance measure is failed. If the Cadet scores NO GO on any performance measure, show or tell the Cadet what was done wrong and how to do it correctly. HEAT ILLNESS SECTION VI FIRST AID FOR HEAT ILLNESS ( ) (TC , 21JAN16) 1. Exertional heat illness refers to a spectrum of disorders (for example cramps, heat exhaustion, heat injury, heat stroke) resulting from total body heat stress. 2. While there is a range of adverse effects that can result from the body overheating, the two major kinds of heat illnesses that are referred to as heat casualties are Heat exhaustion (can be mild or more severe). Heat stroke (most severe form of heat illness and possibly fatal). HEAT EXHAUSTION 3. Heat exhaustion is often preceded by heat cramps, muscle cramps of the arms, legs, or abdomen. Heat cramps and heat exhaustion often act as canaries in the coal mine. These conditions need to be identified and treated before they get to a more extreme case of heat stroke. Catch these conditions early as casualty needs rest, water, shade, evaluation, and possible medical care. SIGNS AND SYMPTOMS OF HEAT EXHAUSTION 4. Signs and symptoms of heat exhaustion include Dizziness. Headache. Loss of appetite. Nausea. Weakness. 5-39
76 Clumsy/unsteady walk. Profuse sweating and pale (or gray), moist cool skin. Normal to slightly elevated body temperature. Muscle cramps. Heat cramps. FIRST AID FOR HEAT EXHAUSTION 5. First aid measures for heat exhaustion include Rest Cadet in shade. Loosen uniform and remove head gear. Have Cadet drink 2 quarts of water over 1 hour. Seek medical aid. Evacuate if no improvement in 30 minutes, or if Cadet's condition worsens. 6. First aid for heat cramps is the same for heat exhaustion; the goal is to prevent the heat cramps from progressing into heat exhaustion with further complications. HEAT STROKE 7. Heat stroke is a medical emergency and can be fatal if not immediately addressed. The casualty must be evacuated to the nearest medical treatment facility as soon as possible. SIGNS AND SYMPTOMS HEAT STROKE 8. Signs and symptoms for heat stroke include Hot dry skin. Headache. Note. In the early progression of heat stroke, the skin may be moist or wet Convulsions and chills. Dizziness. Nausea. Weakness. Pulse and respirations are weak and rapid Vomiting. Confusion, mumbling (do mental check questions to see if brain is working correctly). Combative. Passing out (unconscious). FIRST AID FOR HEAT STROKE 9. Immediately begin cooling the Cadet off (the faster the body is cooled, the less damage to the brain and organs) as follows: 5-40
77 Cool the casualty with any means available, even before removing clothes. Strip (if possible, ensure a same gender helper is present). Rapidly cool by immersing the casualty in cold water. Rapidly cool with ice sheets as follows: Cover all but face with iced sheets. Ensure the iced sheet is soaked prior to applying to the casualty. Place ice packs, if available, in groin, axillae (armpits) and around the neck. Fan the entire body. Stop cooling if casualty starts shivering. Seek medical aid. Evacuate immediately, and continue cooling during transport. Give nothing by mouth. Note. The same person should observe the Cadet during cooling and evacuation in order to spot symptom changes. HYPONATREMIA (WATER INTOXICATION) 10. Hyponatremia is a medical emergency which can be mistaken for heat stroke, though treatment is very different. Note. This condition most often occurs during initial entry training; however, it may occur anytime overhydration is encountered. SIGNS AND SYMPTOMS OF HYPONATREMIA 11. Signs and symptoms for hyponatremia include Mental status changes. Vomiting. History of consumption of large volume of water. Poor food intake. Abdomen distended/bloated. Large amounts of clear urine. FIRST AID FOR HYPONATREMIA 12. First aid measures for hyponatremia include Do not give more water or intravenous fluids. If awake, allow Cadet to consume salty foods or snacks. Seek medical aid. Evacuate immediately. 5-41
78 SECTION VII FIRST AID FOR COLD INJURY ( ) (TC , 21JAN16) COLD WEATHER INJURIES 1. Cold weather-related injuries include injuries due to decreased temperature (hypothermia, frostbite, and nonfreezing cold injury); injuries due to heaters; carbon monoxide poisoning; and accidents due to impaired physical and/or mental function resulting from cold stress. Cold weather injuries can also occur in warmer ambient temperatures when an individual is wet due to rain or water immersion. For more information, see the United States Army Public Health Command (Cold Weather Casualties and Injuries) Web site. More information concerning cold weather injuries can also be found in ATP and TC HYPOTHERMIA 2. Hypothermia is defined as a body core temperature below 95 Fahrenheit (F). Hypothermia is usually characterized as mild, moderate, or severe, based on body core temperature. In order to properly diagnose hypothermia, core temperature must be measured rectally with a thermometer with an extended low range scale. Oral and tympanic temperatures will not yield accurate results in a cold environment, even when care is taken to use the best technique. CAUTION Hypothermia is a medical emergency, appropriate first aid and evacuation to the nearest medical treatment facility must be initiated as soon as possible. With generalized hypothermia, the entire body has cooled with the core temperature below 95 F. 3. Hypothermia occurs when heat loss is greater than heat production. This can occur suddenly, such as during partial or total immersion in cold water, or over hours or days, such as during extended operations or survival situations. 4. Hypothermia may occur at temperatures above freezing, especially when a person s skin or clothing is wet. SIGNS AND SYMPTOMS OF HYPOTHERMIA 5. Signs and symptoms of hypothermia include Vigorous shivering is typically present. Shivering may decrease or cease as core temperature continues to fall. Conscious, but usually apathetic or lethargic. Confusion. Sleepiness. Slurred speech. 5-42
79 Shallow breathing. Very slow respirations. Weak pulse. Low or unattainable blood pressure. Change in behavior with or without poor control over body movements with or without slow reactions. With severe hypothermia, the casualty may be unconscious or stuporous. FIRST AID FOR HYPOTHERMIA 6. The goals for field management of hypothermia are to rescue, examine, insulate, and rapidly transport. If untreated, hypothermia is a true medical emergency and requires evacuation. CAUTION Do not allow the casualty to use tobacco, or consume alcohol or caffeinated drinks. 7. Rewarming techniques include Remove the casualty from the cold environment. Replace wet clothing with dry clothing. Cover the casualty with insulating material or blanket. Wrap the casualty from head to toe. Avoid unnecessary movement from the casualty. If casualty is conscious, slowly give high caloric sweet warm fluids. Seek medical aid. Evacuate as soon as possible with the casualty lying down. IMMERSION FOOT (TRENCH FOOT) 8. Like chilblain, immersion syndrome of the feet is a nonfreezing cold-weather injury that can occur in damp, wet conditions. The most commonly affected area is the feet and occasionally involves the hands. If left untreated, or allowed to fester (to become septic), loss of tissue to include loss of limbs and gangrene can result. Permanent disability may result from severe immersion syndrome of the feet or hands. Signs and Symptoms of Immersion Foot 9. Signs and symptoms of immersion foot include Cold, numb feet that may progress to hot with shooting pains. Slight sensory change for 2 to 3 days. Swelling, redness, and bleeding may become pale and blue. Accompanied by aches, increased pain sensitivity and infection. 5-43
80 Loss of sensation. Severe edema and gangrene. Loss of tissue. First Aid for Immersion Foot 10. First aid measures for immersion foot include Remove wet or constrictive clothing, gently wash and dry affected extremities. Elevate affected limbs and cover with layers of loose, warm, dry clothing. Do not pop blisters, apply lotions or creams, massage, expose to extreme heat or permit Cadets to walk, which can increase tissue damage and worsen the injury. Seek medical attention. Evacuate for medical treatment. SECTION VIII TRANSPORT A CASUALTY (081-COM-1046) (TC , JAN16) 1. Transporting a casualty away from danger or to an evacuation vehicle is a key component of first aid. Care must be exercised in order not to further injure the casualty REMOVING A CASUALTY FROM A VEHICLE WARNING If the casualty was involved in a vehicle crash you should always consider that he may have a spinal injury. Unless there is an immediate life-threatening situation (such as fire, explosion), DO NOT move the casualty with a suspected back or neck injury. Seek medical personnel for guidance on how to transport the casualty. 2. To remove a casualty from a vehicle if necessary, laterally With the assistance of another Cadet, grasp the casualty s arms and legs. While stabilizing the casualty s head and neck as much as possible, lift the casualty free of the vehicle and move him to a safe place on the ground. Note. If medical personnel are available, they may stabilize the casualty s head, neck, and upper body with a special board or splint. 3. To remove a casualty from a vehicle if necessary, upward Note. You may have to remove a casualty upward from a vehicle; for example, from the passenger compartment of a wheeled vehicle lying on its side, or from the hatch of an armored vehicle sitting upright. 5-44
81 You may place a pistol belt or similar material around the casualty s chest to help pull him from the vehicle. With the assistance of another Cadet inside the vehicle, draw the casualty upward using the pistol belt or similar material or by grasping his arms. While stabilizing the casualty s head and neck as much as possible, lift the casualty free of the vehicle and place him on the topmost side of the vehicle. Note. If medical personnel are available, they may stabilize the casualty s head, neck, and upper body with a special board or splint. Depending on the situation, move the casualty from the topmost side of the vehicle to a safe place on the ground. WARNING DO NOT use manual carries to move a casualty with a neck or spine injury, unless a lifethreatening hazard is in the immediate area. Seek medical guidance on how to move and transport the casualty. TYPES OF MANUAL CARRIES 4. Manual carries are used to move a casualty a short distance to a safer location (cover), a greater level of care, or to a medical evacuation vehicle or a CASEVAC transport. 5. Select an appropriate method to transport the casualty as follows: Note. The fireman s carry is the typical one-man carry practiced in training. However, in reality, with a fully equipped casualty, it is nearly impossible to lift a Cadet over your shoulder and move to cover quickly. Fireman s carry use for an unconscious or severely injured casualty. Neck drag use in combat for short distances. Cradle-drop drag use to move a casualty who cannot walk when being moved up or downstairs. Use litters if materials are available, if the casualty must be moved a long distance, or if manual carries will cause further injury. EVACUATE THE CASUALTY USING THE APPROPRIATE TYPE OF CARRY 6. Once the appropriate type of carry is selected, evacuate the casualty. 7. Conduct a Fireman s carry by using the following procedures: Kneel at the casualty s uninjured side. Place the casualty s arms above his head. Cross the ankle on the uninjured side over the opposite ankle. 5-45
82 Place one of your hands on the shoulder farther from you and your other hand on his hip or thigh. Roll the casualty toward you onto his abdomen. Straddle the casualty. Note. Care must be taken to keep the casualty s head from falling backward, resulting in a neck injury. Place your hands under the casualty s chest and lock them together. Lift the casualty to his knees as you move backward. Continue to move backwards, thus straightening the casualty s legs and locking the knees. Walk forward, bringing the casualty to a standing position but tilted slightly backward to prevent the knees from buckling. Maintain constant support of the casualty with one arm. Free your other arm, quickly grasp his wrist, and raise the arm high. Quickly pass your head under the casualty s raised arm, releasing it as you pass under it. Move swiftly to face the casualty. Secure your arms around his waist. Immediately place your foot between his feet and spread them (approximately 6 to 8 inches apart). Again, grasp the casualty s wrist and raise the arm high above your head. Bend down and pull the casualty s arm over and down your shoulder bringing his body across your shoulders. At the same time pass your arm between the legs. Grasp the casualty s wrist with one hand while placing your other hand on your knee for support. Rise with the casualty correctly positioned. Note. Your other hand is free to use as needed. WARNING DO NOT use the neck drag if the casualty has a fractured arm or a suspected neck injury. If the casualty is unconscious, protect his head from the ground. 8. Conduct a neck drag by using the following procedures: Place the casualty on his back, if not already there, otherwise, use the following steps: Kneel at the casualty s uninjured side. Place the casualty s arm above his head. Cross the ankle on the injured side over the opposite ankle. Place one of your hands on the shoulder farther from you and your other hand on his hip or thigh. Roll the casualty toward you onto his abdomen. Once the casualty is on his back, tie the casualty s hands at the wrists. (If conscious, the casualty may clasp his hands together around your neck.) 5-46

83 Straddle the casualty in a kneeling face-to-face position. Loop the casualty s tied hands over and around your neck. Crawl forward, looking ahead, dragging the casualty with you. 9. Conduct a cradle drop drag by using the following procedures: With the casualty lying on his back, kneel at the head. Slide your hands, palms up, under the casualty s shoulders. Get a firm hold under his armpits. Partially rise, supporting the casualty s head on one of your forearms. Note. You may bring your elbows together and let the casualty s head rest on both of your forearms. With the casualty in a semi-sitting position, rise and drag the casualty backwards. Back down the steps (or up if appropriate), supporting the casualty s head and body and letting the hips and legs drop from step to step. LITTERS 10. When possible, a casualty should be transported on a litter rather than using a manual carry. A litter has many advantages. POLYMER FLEXIBLE LITTER 11. Evacuate the casualty using a commercial polymer flexible litter (referred further in the text as a flexible litter, or litter). First prepare the flexible litter for transport by 5-47
84 Removing the flexible litter from the pack and placing it on the ground. Unfastening the retainer strap. Stepping on the foot end of the flexible litter and unrolling the flexible litter completely. Bending the flexible litter in half and back roll. Repeating with the opposite end of the litter so that the flexible litter lays flat. Pointing out the handholds, straps for the casualty, and dragline at the head of the litter. 12. Place and secure a casualty onto to a flexible litter by conducting the following: Place the flexible litter next to the casualty so that the head end of the litter is next to the casualty s head. Place the cross straps under the flexible litter. Log roll the casualty onto his side in a steady and even manner. Slide the flexible litter as far under the casualty as possible. Gently roll the casualty until he is again lying on his back with the litter beneath him. Slide the casualty to the middle of the flexible litter, keeping his spinal column as straight as possible. Pull out the strap from under the flexible litter. Bring the straps across the casualty. Lift the sides of the flexible litter and fasten the four cross straps to the buckles directly opposite the straps. Lift the foot portion of the flexible litter. Feed the foot straps over the casualty s lower extremities and through the unused grommets at the foot end of the flexible litter. 13. Lift the casualty by Note. For a flexible litter, lift the sides of the flexible litter and fasten the four cross straps to the buckles directly opposite the straps. Lift the foot portion of the flexible litter and feed the foot straps through the unused grommets at the foot end of the flexible litter and fasten the buckles. Using for Cadets (two on each side), all facing the casualty s feet. Have each Cadet grab handle with their inside hand. In one fluid motion on the preparatory command of prepare to lift and then command of execution of lift, raise as a unit holding the casualty parallel and even. 5-48
85 MULTI-HINGED FOLDING LITTER 14. A multi-hinged folding litter (referred further in the text as a multi-hinged litter, or litter), is often used in tactical situations where compact size is valued. When unfolded, the litter approximates the dimensions of a standard litter. 15. Evacuate a casualty by preparing a multi-hinged litter for use by Removing the litter from the bag. Standing the litter upright and releasing buckles from the litter. Placing the litter on the ground and completely extending it with the fabric side facing up. Keeping the multi-hinged litter as straight as possible, grab the handles and rotate them inwards until all the hinges rotate and lock. Note. This action is done best by using two individuals on each end of the litter executing this step simultaneously. While maintaining the hinges in the locked position, apply firm, steady pressure on the spreader bar with your foot. Increase pressure with your foot until the spreader bar locks into place. 16. Place the casualty on the litter as follows: Place the litter next to the casualty. Ensure that the head end of the litter is beside the head of the casualty. Log roll the casualty and slide the litter as far under him as possible. Gently roll the casualty down onto the litter. Slide the casualty to the center of the litter. Be sure to keep the spinal column as straight as possible. Secure the casualty to the litter using litter straps or other available materials. 5-49
86 IMPROVISED LITTERS 17. There are times when a casualty may have to be moved and a standard litter is not available. Evacuate a casualty by using an improvised litter. Poncho Improvised Litter 18. Use a poncho with two poles or limbs as follows: Open the poncho and lay the two poles lengthwise across the center forming three equal sections. Reach in, pull the hood up toward you, and lay it flat on the poncho. Fold on section of the poncho over the first pole. Fold the remaining section of the poncho over the second pole to the first pole. Jacket Improvised Litter 5-50
87 19. Use shirts or jackets and two poles or limbs by using the following procedure: Zipper closed two uniform jackets and turn them inside out, leaving the sleeves inside. Lay the jackets on the ground and pass through the sleeves, leaving one at the top and one at the bottom of the poles to support the casualty s whole body. 20. Place the casualty on the improvised litter by using the following procedure: Lift the litter. Place the litter next to the casualty. Ensure the head end of the litter is adjacent to the head of the casualty. Slide the casualty to the center of the litter. Be sure to keep the spinal column as straight as possible. Secure the casualty to the litter using litter straps or other available materials. LOAD CASUALTIES ONTO A MILITARY VEHICLE 21. Information concerning ground ambulances, air ambulances, and CASEVAC is found in ATP and STP 8-68W13-SM-TG. Ground Ambulance Note. Ground ambulances have combat medics to take care of the casualties during evacuation. Follow any special instructions they give for loading, securing, or unloading casualties. 22. When loading a ground ambulance, use the following procedures: Make sure each litter casualty is secured to his litter. Use the litter straps when available. Load the most serious casualty last. Load the casualty head first (head in the direction of travel) rather than feet first. Make sure each litter is secured to the vehicle. Note. Unload casualties in reverse order, most seriously injured casualty first. Air Ambulance 5-51
88 Note. Air ambulances have combat medics (flight medics) to take care of the casualties during evacuation. Follow any special instructions that they give for loading, securing, or unloading casualties. 23. When loading air ambulances, use the following procedures and precautions: Remain 50 yards from the helicopter until the litter squad is signaled to approach the aircraft. WARNING Never go around the rear of the UH-60 or UH-1 aircraft. Approach the aircraft in full view of the aircraft crew, maintaining visual confirmation that the crew is aware of the approach of the litter party. Ensure that the aircrew can continue to visually distinguish friendly from enemy personnel at all times. Maintain a low silhouette when approaching the aircraft. Approach UH-60 and UH-1 aircraft from the sides. Do not approach from front or rear. If you must move to the opposite side of the aircraft, approach from the side the exterior of the aircraft. Then hug the skin of the aircraft, and move around the front of the aircraft to the other side. Approach CH-47 aircraft from the rear. Approach MH-53 aircraft from the sides to the rear ramp, avoiding the tail rotor. Approach nonstandard aircraft in full view of the crew, avoiding tail rotors, main rotors, propellers, and jet intakes. Approach performance aircraft (M/C-130, C-17, and C-5B) from the rear, under the guidance of the aircraft loadmaster or the ground control party. Load the most seriously injured casualty last. Load the casualty who will occupy the upper berth first, and then load the next litter casualty immediately under the first casualty. Note. This is done to keep the casualty from accidentally falling on another casualty if his litter is dropped before it is secured. When casualties are placed lengthwise, position them with their heads toward the direction of travel. Make sure each litter casualty is secured to the litter. Make sure each litter is secured to the aircraft. Note. Unload casualties in reverse order, most seriously injured first. Ground Military Vehicles 5-52
89 24. Ground military vehicles used to transport casualties are referred to as CASEVAC. When nonmedical military vehicles are used, medical equipment and oftentimes medical personnel are not present. Note 1. Nonmedical military vehicles may be used to evacuate casualties when no medical evacuation vehicles are available. Note 2. If medical personnel are present, follow their instructions for loading, securing, and unloading casualties. 25. The following are guidelines for loading casualties into a ground evacuation vehicle: When loading casualties into the vehicle, load the most seriously injured last. When the casualty is loaded lengthwise, load the casualty with his head pointing forward, toward the direction of travel. Ensure each casualty is secured to the litter. Use litter straps if available. Secure each litter to the vehicle as it is loaded into place. Make sure each litter is secured. Note. Unload casualties in reverse order, most seriously injured casualty first. SECTION IX REQUEST MEDICAL EVACUATION (ATP ) a) Collect all applicable information needed for the MEDEVAC request. 1. Determine the grid coordinates for the pickup site. 2. Obtain radio frequency, call sign, and suffix. 3. Obtain the number of patients and precedence. 4. Determine the type of special equipment required. 5. Determine the number and type (litter or ambulatory) of patients. 6. Determine the security of the pickup site. 7. Determine how the pickup site will be marked. 8. Determine patient nationality and status 9. Obtain pickup site nuclear, biological, and chemical (CBRN) contamination information, normally obtained from the senior person or medic. Note: CBRN line 9 information is only included when contamination exists. b) Record the gathered MEDEVAC information using the authorized brevity codes. Note: Unless the MEDEVAC information is transmitted over secure communication systems, it must be encrypted, except as noted in step 3b(1). 5-53
90 1. Location of the pickup site (line 1). 2. Radio frequency, call sign, and suffix (line 2). 3. Numbers of patients by precedence (line 3). 4. Special equipment required (line 4). 5. Number of patients by type (line 5). 6. Security of the pickup site (line 6). 7. Method of marking the pickup site (line 7). 8. Patient nationality and status (line 8). 9. CBRN contamination (line 9). c) Transmit the MEDEVAC request. 1. Contact the unit that controls the evacuation assets. (1) Make proper contact with the intended receiver. (2) Use effective call sign and frequency assignments from the SOI. (3) Give the following in the clear "I HAVE A MEDEVAC REQUEST;" wait one to three seconds for a response. If no response, repeat the statement. 2. Transmit the MEDEVAC information in the proper sequence. (1) State all line item numbers in clear text. The call sign and suffix (if needed) in line 2 may be transmitted in the clear. Note: Line numbers 1 through 5 must always be transmitted during the initial contact with the evacuation unit. Lines 6 through 9 may be transmitted while the aircraft or vehicle is en route. (2) Follow the procedure provided in the explanation column of the MEDEVAC request format to transmit other required information. (3) Pronounce letters and numbers according to appropriate radio/telephone procedures. (4) Take no longer than 25 seconds to transmit. (5) End the transmission by stating "Over." (6) Keep the radio on and listen for additional instructions or contact from the evacuation unit. 5-54

91 Nine-Line medical evacuation request 5-55

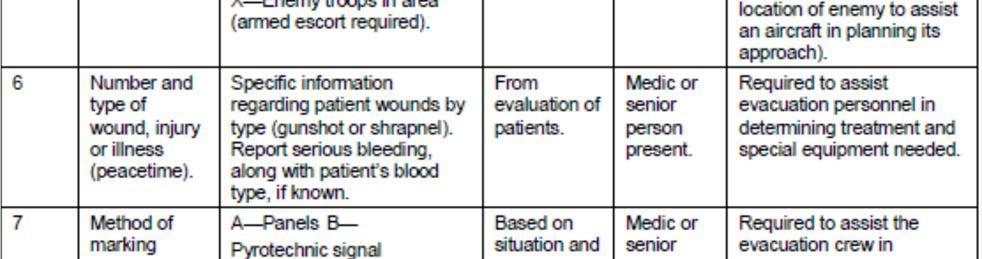
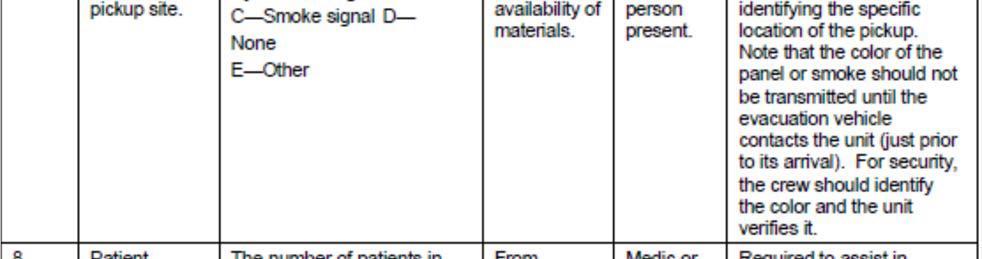

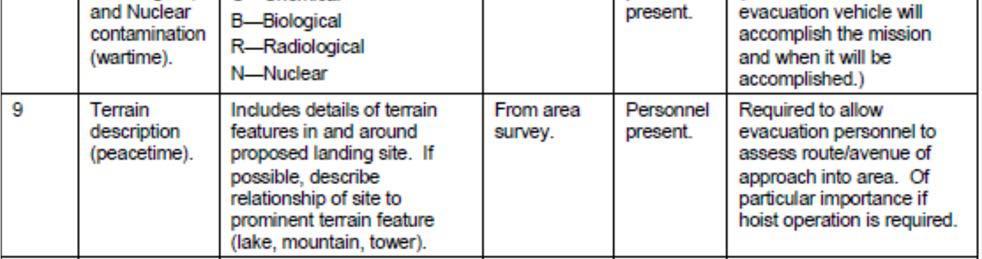
92 Nine-Line medical evacuation request (continued) 5-56


93 MEDEVAC REQUEST CARD FRONT 5-57

94 MEDEVAC REQUEST CARD BACK 5-58
95 (ATP APR 16) SECTION I MOVEMENT OVERVIEW Tactical movement is the movement of a unit assigned a tactical mission under combat conditions when not in direct ground contact with the enemy. Tactical movement is based on the anticipation of early ground contact with the enemy, either en route or shortly after arrival at the destination. Movement ends when ground contact is made or the unit reaches its destination. Movement is not maneuver. Maneuver happens once a unit has made contact with the enemy. Because tactical movement shares many of the characteristics of an offensive action, the battlefield is organized in a manner similar to other offensive actions. This chapter discusses the basics and formations of tactical movement. 1. Movement refers to the shifting of forces on the battlefield. The key to moving successfully involves selecting the best combination of movement formations and movement techniques for each situation. Leaders consider the factors of METT-TC in selecting the best route and the appropriate formation and movement technique. The leader's selection must allow the moving platoon to Maintain cohesion. Maintain communication. Maintain momentum. Provide maximum protection. Make enemy contact in a manner that allows them to transition smoothly to offensive or defensive action. a. Careless movement usually results in contact with the enemy at a time and place of the enemy s choosing. To avoid this, leaders must understand the constantly-changing interrelationship between unit movement, terrain, and weapon systems within their area of operations. This understanding is the basis for employing movement formations, movement techniques, route selection and navigation, crossing danger areas, and security (Figure 6-1). 6-59


96 Figure Basics of Tactical Movement b. Leaders executing tactical movement have three primary goals: Avoid surprise by the enemy. When necessary, transition quickly to maneuver while minimizing enemy effects. Get to the right place, at the right time, ready to fight. c. Units moving behind enemy lines seek to avoid enemy contact. They choose the movement that allows them to retain security and control. To avoid loss of surprise and initiative, casualties, and mission failure, platoons normally Avoid chance enemy contact, if possible. Move on covered and concealed routes. Avoid likely ambush sites and other danger areas. Practice camouflage, noise, and light discipline. Maintain 360-degree security. Make contact with the smallest element if enemy contact is unavoidable. Retain the initiative to attack at the time and place of the unit's choice. Take active countermeasures such as using smoke and direct and indirect fire to suppress or obscure suspected enemy positions. d. Infantry platoons primarily move on foot. However, there are circumstances when they will move, and even fight, mounted. Because their units may operate with vehicle support, leaders must be comfortable employing tactical movement with a variety of vehicle platforms. f. In selecting formations and movement techniques, leaders must consider other requirements such as speed and control as well as security. When conducting tactical movement, leaders must be prepared to quickly transition to maneuver and fight while minimizing the 6-60
97 effects of the enemy. This requirement calls for the leader to determine which formation or combination of formations best suits the situation. 2. MOVEMENT FORMATIONS - Movement formations are the ordered arrangement of forces that describes the general configuration of a unit on the ground. They determine the distance between Cadets, sectors of fire, and responsibilities for 360-degree security. Movement formations are used in combination with movement techniques (and other security measures), immediate action drills, and enabling tasks. Movement techniques define the level of security one subordinate provides another within a formation. Immediate action drills are those combat actions that enable the unit to quickly transition to maneuver during unexpected enemy contact. Enabling tasks facilitate transitions between other combat tasks. See Section II of this chapter for more on movement formations. a. Movement techniques describe the position of squads and fire teams in relation to each other during movement. Platoons and squads use three movement techniques: traveling, traveling over-watch, and bounding over-watch. b. Like formations, movement techniques provide varying degrees of control, security, and flexibility. Movement techniques differ from formations in two ways: Formations are relatively fixed; movement techniques are not. The distance between moving units or the distance that a squad bounds away from an over-watching squad varies based on factors of METT-TC. Formations allow the platoon to weight its maximum firepower in a desired direction; movement techniques allow squads to make contact with the enemy with the smallest element possible. This allows leaders to establish a base of fire, initiate suppressive fires, and attempt to maneuver without first having to disengage or be reinforced. 3. Leaders base their selection of a particular movement technique on the likelihood of enemy contact and the requirement for speed. See Section III of this chapter for more on movement techniques. 3. ROUTE AND NAVIGATION Planning and selecting a route is a critical leader skill. One of the keys to successful tactical movement is the ability to develop routes that increase the unit s security, decrease the Cadet s effort, and get the unit to the objective on time in a manner prepared to fight. Good route selection begins with a thorough terrain analysis and ends with superior navigation. Planning and preparation are worthless if a unit cannot find its way to the objective, or worse, stumbles onto it because of poor navigation. See Section IV of this chapter for more on route and navigation. 4. DANGER AREAS When analyzing the terrain (in the METT-TC analysis) during the troop-leading procedures (TLP), the platoon leader may identify danger areas. The term danger area refers to any area on the route where the terrain would expose the platoon to enemy 6-61
98 observation, fire, or both. If possible, the platoon leader should plan to avoid danger areas. However, there are times when he cannot. When the unit must cross a danger area, it should do so as quickly and as carefully as possible. See Section V of this chapter for more information on danger areas. 5. SECURITY Security during movement includes the actions that units take to secure themselves and the tasks given to units to provide security for a larger force. Platoons and squads enhance their own security during movement through the use of covered and concealed terrain; the use of the appropriate movement formation and technique; the actions taken to secure danger areas during crossing; the enforcement of noise, light, and radiotelephone discipline; and the use of proper individual camouflage techniques. See Section VII of this chapter for more on security. a. Formations and movement techniques provide security by: 1. Positioning each Cadet so he can observe and fire into a specific sector that overlaps with other sectors. 2. Placing a small element forward to allow the platoon to make contact with only the lead element and give the remainder of the platoon freedom to maneuver. Providing over-watch for a portion of the platoon. b. In planning tactical movement, leaders should also consider the requirements for Terrain. Planning. Direct fires. Fire support. Control. 6. TERRAIN The formations and techniques shown in the illustrations in this chapter are examples only. They are generally depicted without terrain considerations (which are usually a critical concern in the selection and execution of a formation). Therefore, in both planning and executing tactical movement, leaders understand that combat formations and movement techniques require modification in execution. Spacing requirements and speed result from a continuous assessment of terrain. Leaders must stay ready to adjust the distance of individuals, fire teams, squads, and individual vehicles and vehicle sections based on terrain, visibility, and other mission requirements. a. While moving, individual Cadets and vehicles use the terrain to protect themselves during times when enemy contact is possible or expected. They use natural cover and concealment to avoid enemy fires. b. The following guidelines apply to Cadets and vehicle crews using terrain for protection: Do not silhouette yourself against the skyline. Avoid possible kill zones because it is easier to cross difficult terrain than fight the enemy on unfavorable terms. 6-62
99 Cross open areas quickly. Avoid large, open areas, especially when they are dominated by high ground or by terrain that can cover and conceal the enemy. Do not move directly forward from a concealed firing position. 7. PLANNING One of the leader s primary duties is to develop a plan that links together route selection and navigation, combat formations, and appropriate security measures with enabling tasks that moves the unit from its current location to its destination. This plan must take into account the enemy situation and control during movement. 8.DIRECT FIRES While moving or when stationary, each Cadet (or vehicle) has a sector to observe and engage enemy Cadets in accordance with the unit s engagement criteria (see Chapter 2). Individual and small unit sectors are the foundation of the unit s area of influence. Pre-assigned sectors are inherent in combat formations. When formations are modified, leaders must reconfirm their subordinates sectors. Leaders have the added responsibility of ensuring their subordinates sectors are mutually supporting and employing other security measures that identify the enemy early and allow the leader to shape the fight. 9. FIRE SUPPORT Planning should always include arranging for fire support (mortars, artillery, CAS, attack helicopters, naval gunfire), even if the leader thinks it unnecessary. A fire plan can be a tool to help navigate and gives the leader the following options: Suppressing enemy observation posts or sensors. Creating a distraction. Achieving immediate suppression. Covering withdrawal off of an objective. Breaking contact. 10. CONTROL Controlling tactical movement is challenging. The leader must be able to start, stop, shift left or right, and control the unit s direction and speed of movement while navigating, assessing the terrain, and preparing for enemy contact. Determining the proper movement formations and techniques during planning is important, but the leader must be able to assess his decision during execution and modify or change his actions based on the actual situation. a. Without adequate procedural and positive control, it is difficult for the leader to make decisions and give orders, lead an effective response to enemy contact, or accurately navigate. Leaders exercise procedural control by unit training and rehearsals in the basics of tactical movement. The better trained and rehearsed subordinates are, the more freedom leaders have to concentrate on the situation, particularly the enemy and the terrain. Leaders exercise positive control by communicating to subordinates. They do so using hand-and-arm signals as a method of communication. They also use the other means of communication (messenger, visual, audio, radio, and digital) when appropriate. 6-63
100 b. All available communication is used (consistent with OPSEC and movement security) to assist in maintaining control during movement. March objectives, checkpoints, and phase lines may be used to aid in control. The number of reports is reduced as normally only exception reports are needed. The leader should be well forward in the formation but may move throughout as the situation demands. Communications with security elements are mandatory. Operations security often prevents the use of radios, so connecting files, runners, and visual signals can be used. Detailed planning, briefing, rehearsals, and control are valuable if there is enemy contact. Alternate plans are made to cover all possible situations. a. DUTIES AND RESPONSIBILITIES SECTION II MOVEMENT FORMATIONS This section describes the duties and responsibilities of personnel and habitual attachments in the Infantry rifle platoon and squad. Note. The duties and responsibilities of leadership and platoon members must be executed even in the absence of a particular leader to ensure mission accomplishment in accordance with the commander s intent. 1. PLATOON LEADER a. The platoon leader leads his Cadets by personal example and is responsible for all the platoon does or fails to do, having complete authority over his subordinates. This centralized authority enables him to maintain unit discipline, unity, and to act decisively. He must be prepared to exercise initiative within his company commander s intent and without specific guidance for every situation. The platoon leader knows his Cadets, how to employ the platoon, its weapons, and its systems. Relying on the expertise of the platoon sergeant, the platoon leader regularly consults with him on all platoon matters. b. During operations, the platoon leader Leads the platoon in supporting the higher headquarters missions. He bases his actions on his assigned mission and intent and concept of his higher commanders. Conducts troop leading procedures. Maneuvers squads and fighting elements. Synchronizes the efforts of squads. Looks ahead to the next move of the platoon. Requests, controls, and synchronizes supporting assets. Employs mission command systems available to the squads and platoon Checks with squad leaders ensuring 360-degree, three-dimensional security is maintained. Checks with weapons squad leader controlling the emplacement of key weapon systems. Issues accurate and timely reports. 6-64
101 Places himself where he is most needed to accomplish the mission. Assigns clear tasks and purposes to the squads. Understands the mission and commander s intent two levels up (company and battalion). Receives on-hand status reports from the platoon sergeant and squad leaders during planning. Coordinates and assists in the development of the obstacle plan. Oversees and is responsible for property management. c. The platoon leader works to develop and maintain situational understanding. This is a product of four elements. First, the platoon leader attempts to know what is happening in present terms of friendly, enemy, neutral, and terrain situations. Second, he knows the end state representing mission accomplishment. Third, he determines the critical actions and events occurring to move his unit from the present to the end state. Finally, he assesses the risk throughout. 2. PLATOON SERGEANT a. The platoon sergeant is the platoon's most experienced NCO and second-in-charge, accountable to the platoon leader for leadership, discipline, training, and welfare of the platoon's Cadets. He sets the example in everything. He assists the platoon leader by upholding standards and platoon discipline. His expertise includes tactical maneuver, employment of weapons and systems, sustainment, administration, security, accountability, protection warfighting functions, and Cadet care. As the second-in charge, the platoon sergeant assumes no formal duties except those prescribed by the platoon leader. b. However, the platoon sergeant traditionally Ensures the platoon is prepared to accomplish its mission, which includes supervising pre-combat checks and inspections. Updates platoon leader on appropriate reports and forwards reports needed by higher headquarters. Prepares to assume the role and responsibilities of the platoon leader. Takes charge of task-organized elements in the platoon during tactical operations, which may include but is not limited to, quartering parties, support elements in raids or attacks, and security patrols. Monitors the morale, discipline, and health of the platoon. Positions where best needed to help the engagement (either in the base of fire or with the assault element). Receives squad leaders administrative, logistical, and maintenance reports, and requests rations, water, fuel, and ammunition. Requests logistical support from the higher headquarters, and usually coordinates with the company s first sergeant or executive officer. Ensures Cadets maintain all equipment. 6-65
102 Ensures ammunition and supplies are properly and evenly distributed after the platoon consolidates on the objective and while the platoon reorganizes. Manages the unit s combat load prior to operations, and monitors logistical status during operations. Establishes and operates the unit s casualty collection point (CCP). This includes directing the platoon medic and aid/litter teams in moving casualties, maintains platoon strength level information, consolidates and forwards the platoon s casualty reports, and receives and orients replacements. Employs the available digital mission command systems to the squads and platoon. Ensures Cadets distribute supplies according to the platoon leader s guidance and direction. Accounts for Cadets, equipment, and supplies. Coaches, counsels, and mentors Cadets. Upholds standards and platoon discipline. Understands the mission and commander s intent two levels up (company and battalion). 3. SQUAD LEADER a. The squad leader directs team leaders and leads by personal example. He has authority over his subordinates and overall responsibility of those subordinates actions. Centralized authority enables him to act decisively while maintaining troop discipline and unity. Under the fluid conditions of close combat, the squad leader accomplishes assigned missions without constant guidance from higher headquarters. The squad leader is the senior Infantry Cadet in the squad and is responsible for everything the squad does or fails to do. He is responsible for the care of the squad s Cadets, weapons, and equipment, and leads the squad through two team leaders. b. During operations, the squad leader Is the subject matter expert on all battle and individual drills. Is the subject matter expert for the squad s organic weapons employment, and employment of supporting assets. Knows weapon effects, surface danger zones, and risk estimate distances for all munitions. Uses control measures for direct fire, indirect fire, and tactical movement effectively. Controls the movement of the squad and its rate and distribution of fire (including call for and adjust fire). Fights the close fight by fire and movement with two fire teams and available supporting weapons. Selects the fire team s general location and temporary sector of fires in the defense. Communicates timely and accurate situation reports (SITREPs) and status reports including Size, activity, location, unit, time, and equipment (SALUTE) spot reports (SPOTREPs). 6-66
103 Status to the platoon leader (including squad location and progress, enemy situation, enemy killed in action [KIA], and security posture). Status of ammunition, casualties, and equipment to the platoon sergeant. Employs digital mission command systems available to the squad and platoon. Operates in all environments to include the urban environment. Conducts troop leading procedures. Assumes duties as the platoon sergeant or platoon leader as required. Understands the mission and commander s intent two levels up (platoon and company). 4. TEAM LEADER a. The team leader leads his team members by personal example and has authority over his subordinates and overall responsibility of their actions. Centralized authority enables him to maintain troop discipline and unity and to act decisively. Under the fluid conditions of close combat, he accomplishes assigned missions using initiative without needing constant guidance from higher headquarters. The team leader s position on the battlefield requires immediacy and accuracy in all of his actions and is a fighting leader who leads by example. He is responsible for all his team does or fails to do, and is responsible for caring of the team s Cadets, weapons, and equipment. b. During operations, the team leader Is the subject matter expert for all the team s weapons and duty positions and all squad battle drills. Leads his team in fire and movement. Controls the movement of his team and its rate and distribution of fire. Employs digital mission command systems available to the squad and platoon. Ensures security of the team s area of operations. Assists the squad leader as required. Is prepared to assume the duties of squad leader and platoon sergeant. Enforces field discipline and preventive medicine measures. Determines his team s combat load and manages its available classes of supply as required. Understands the mission two levels up (squad and platoon). When maneuvering the team, the team fights using one of three techniques. This includes: Individual movement techniques. This is the lowest level of movement. Buddy team fire and movement. Fire team fire and movement (maneuver). c. Determining a suitable technique is based on the effectiveness of the enemy s fire and available cover and concealment. The more effective the enemy s fire, the lower the level of movement. Because the team leader leads his team, he is able to make this assessment firsthand. Other leaders must be sensitive to his decision on movement. 6-67
104 Figure 6-2: Legend of Platoon Symbols NOTE: The formations shown in the illustrations are examples only. They generally are depicted without METT-TC considerations, which are always the most crucial element in the selection and execution of a formation. Leaders must be prepared to adapt their choice of formation to the specific situation. 6-68

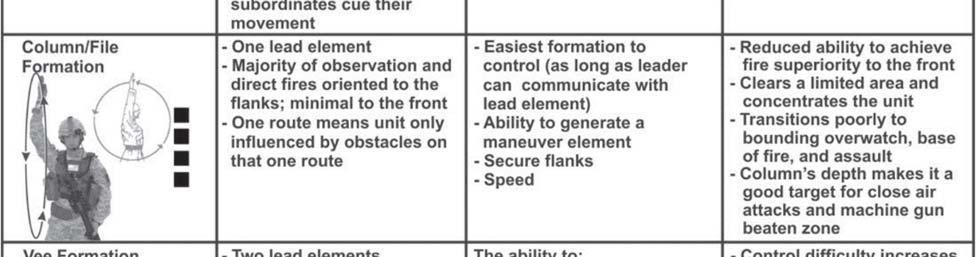
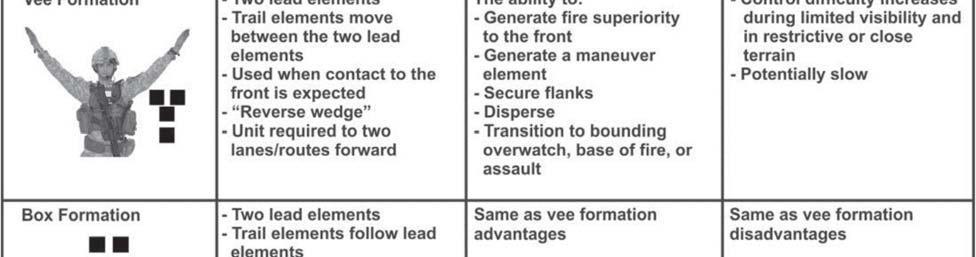
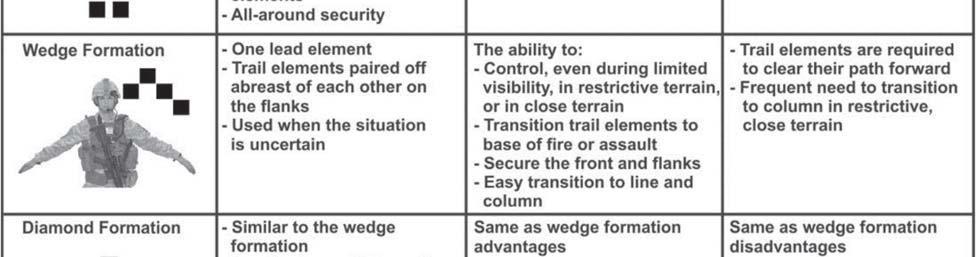
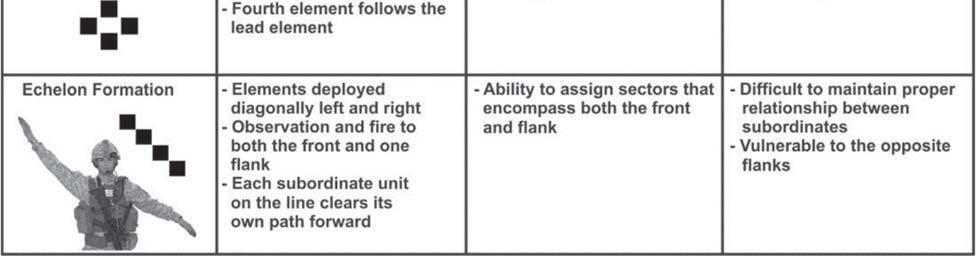
105 b. PRIMARY FORMATIONS 6-69


106 c. Infantry Platoon The actual number of useful combinations of squad and fire team combat formations within the platoon combat formations is numerous, creating a significant training requirement for the unit. Add to the requirement to modify formations with movement techniques, immediate action drills, and other techniques, and it is readily apparent what the platoon leader needs a few simple methods. These methods should be detailed in the unit SOP. 1. Platoon Formations Platoon formations include the column, the line (squads on line or in column), the vee, the wedge, and the file. The leader should weigh these carefully to select the best formation based on his mission and on METT-TC analysis. Comparisons of the different formations are in table below. 6-70
107 2. Platoon Column In the platoon column formation, the lead squad is the base squad. It normally is used for traveling only. 6-71
108 3. Platoon Line, Squads on Line In the platoon line, squads on line formation, or when two or more platoons are attacking, the company commander chooses one of them as the base platoon. The base platoon s center squad is its base squad. When the platoon is not acting as the base platoon, its base squad is its flank squad nearest the base platoon. The weapons squad may move with the platoon or it can provide the support-by-fire position. This is the basic platoon assault formation. The platoon line with squads on line is the most difficult formation from which to make the transition to other formations. It may be used in the assault to maximize the firepower and shock effect of the platoon. This normally is done when there is no intervening terrain between the unit and the enemy when antitank systems is suppressed, or when the unit is exposed to artillery fire and must move rapidly. 6-72
109 4. Platoon Line, Squads in Column When two or more platoons are moving, the company commander chooses one of them as the base platoon. The base platoon s center squad is its base squad. When the platoon is not the base platoon, its base squad is its flank squad nearest the base platoon. The platoon line with squads in column formation is difficult to transition to other formations. 6-73
110 5. Platoon Vee This formation has two squads up front to provide a heavy volume of fire on contact. It also has one squad in the rear either overwatching or trailing the other squads. The platoon leader designates one of the front squads as the platoon s base squad. 6-74
111 6. Platoon Wedge This formation has two squads in the rear overwatching or trailing the lead squad. The lead squad is the base squad. The wedge formation Can be used with the traveling and traveling overwatch techniques. Allows rapid transition to bounding overwatch. 6-75
112 7. Platoon File This formation may be set up in several methods. One method is to have three-squad files follow one another using one of the movement techniques. Another method is to have a single platoon file with a front security element (point) and flank security elements. The distance between Cadets is less than normal to allow communication by passing messages up and down the file. The platoon file has the same characteristics as the fire team and squad files. It normally is used for traveling only. 6-76
113 SECTION IV PLATOON OPERATIONS (ATP APR 16; TC AUG13) SECTION I OFFENSIVE The Infantry platoon and squad gains, maintains the initiative and keeps constant pressure on the enemy throughout its area of operation. Success in the offense greatly depends upon the proper application of the characteristics of the offense discussed in the following paragraphs. The four offensive tasks are movement to contact, attack, exploitation, and pursuit. Each is explained below. MOVEMENT TO CONTACT Movement to contact is an offensive task designed to develop the situation and establish or regain contact. (Refer to FM for more information.) It creates favorable conditions for subsequent tactical actions. The leader conducts a movement to contact when the enemy situation is vague or not specific enough to conduct an attack. Forces executing this task seek to make contact with the smallest friendly force possible. A movement to contact may result in a meeting engagement, which is a combat action occurring when a moving force engages an enemy at an unexpected time and place. Once making contact with an enemy force, the leader has five options: attack, defend, bypass, delay, or withdraw. Two movement to contact techniques are search and attack, and cordon and search. ATTACK An attack destroys or defeats enemy forces, seizes and secures terrain, or both. (Refer to FM for more information.) Attacks incorporate coordinated movement supported by direct and indirect fires. They may be decisive or shaping operations and hasty or deliberate, depending upon the time available for assessing the situation, planning, and preparing. However, based on METT-TC, the leader may decide to conduct an attack using only fires. An attack differs from a movement to contact because enemy main body dispositions are at least partially known, allowing the leader to achieve greater synchronization. This enables the massing effects of attacking forces combat power more effective in an attack than in a movement to contact. EXPLOITATION Exploitation follows an attack and disorganizes the enemy in-depth (Refer to FM for more information.) Exploitations seek to disintegrate enemy forces to the point where they have no alternative but surrender or retreat. Exploitation take advantage of tactical opportunities, foreseen or unforeseen. Division and higher headquarters normally plan site exploitations as branches or sequels plans. However, the Infantry platoon and squad may participate as part of the fixing force or striking force. 6-77
114 PURSUIT A pursuit is an offensive task designed to catch or cut off a hostile force attempting to escape, with the aim of destroying them. (Refer to FM for more information.) A pursuit normally follows exploitation. Transition into a pursuit can occur if it is apparent enemy resistance has broken down entirely and the enemy is fleeing the area of operation. FORMS OF MANEUVER Leaders select the form of maneuver based on METT-TC. The leader then synchronizes the contributions of all warfighting functions to the selected form of maneuver. An operation may contain several forms of offensive maneuver, such as frontal attack to clear enemy security forces, followed by a penetration to create a gap in enemy defenses, which in turn is followed by an envelopment to destroy a counterattacking force. While Infantry platoons and squads do not have the combat power to conduct all forms of maneuver on its own, they will participate as part of a larger organization. The six forms of maneuver are Envelopment--BCT Turning movement--div Frontal attack. Penetration. Infiltration. Flank attack. 6-78
115 ENVELOPMENT Envelopment is a form of maneuver in which an attacking force seeks to avoid the principal enemy defenses by seizing objectives behind those defenses allowing the targeted enemy force to be destroyed in their current positions. BCTs and above normally plan and conduct envelopments. At the tactical level, envelopments focus on seizing terrain, destroying specific enemy forces, and interdicting enemy withdrawal routes. The leader s decisive operation focuses on attacking an assailable flank. It avoids the enemy s strength at the front where the effects of fires and obstacles are greatest. Generally, the leader prefers to conduct envelopment instead of a penetration or frontal attack because the attacking force tends to suffer fewer casualties while having the most opportunities to destroy the enemy. Envelopment also produces great psychological shock on the enemy. If no assailable flank is available, the attacking force creates one. The four varieties of envelopment are single envelope, double envelopment, encirclement, and vertical envelopment. 6-79
116 TURNING MOVEMENT A turning movement is a form of maneuver in which the attacking force seeks to avoid the enemy s principle defensive positions by seizing objectives behind the enemy s current position. This causes the enemy forces to move out of their current positions or divert major forces to meet the threat. The leader uses this form of offensive maneuver to seize vital areas in the enemy s support area before the main enemy force can withdraw or receive reinforcements. This form of offensive maneuver transitions from an attack into a site exploitation or pursuit. A turning movement seeks to make the enemy force displace from their current locations, whereas an enveloping force seeks to engage the enemy in their current locations from an unexpected direction. Divisions normally execute turning movements. 6-80
117 FRONTAL ATTACK A frontal attack is a form of maneuver where an attacking force seeks to destroy a weaker enemy force, or fix a larger enemy in place over a broad front. An attacking force can use a frontal attack to overrun a weak enemy force. The leader commonly uses a frontal attack as a shaping operation in conjunction with other forms of maneuver. PENETRATION A penetration is a form of maneuver where an attacking force seeks to rupture enemy defenses in a narrow front to disrupt the defensive system. Destroying the continuity of defense allows the enemy s subsequent isolation and defeat in detail by exploiting friendly forces. The penetration extends from the enemy s security area through main defensive positions into the enemy support area. The leader employs a penetration when there is no assailable flank, enemy defenses are 6-81
118 overextended and weak spots are detected in the enemy s positions, or time pressures do not permit envelopment 6-82
119 INFILTRATION An infiltration is a form of maneuver where an attacking force conducts undetected movement through or into an area controlled by enemy forces. The goal is to occupy a position of advantage behind enemy positions while exposing only small friendly elements to their defensive fires. Infiltration occurs by land, water, air, or a combination of means. Moving and assembling forces covertly through enemy positions takes a considerable amount of time. To infiltrate, the force avoids detection and engagement. Since this requirement limits the size and strength of the infiltrating force, and infiltrated forces alone rarely can defeat an enemy, infiltration normally is used in conjunction with and in support for other forms of maneuver. 6-83
120 FLANK ATTACK A flanking attack is a form of offensive maneuver directed at the flank of an enemy force as illustrated. A flank is the right or left side of a military formation and is not oriented toward the enemy. It is usually not as strong in terms of forces or fires as is the front of a military formation. A flank may be created by the attacker with fires or by a successful penetration. A flanking attack is similar to envelopment but generally conducted on a shallower axis. It is designed to defeat the enemy force while minimizing the effect of the enemy s frontally-oriented combat power. Flanking attacks normally are conducted with the main effort directed at the flank of the enemy. Usually, a supporting effort engages the enemy s front by fire and maneuver while the main effort maneuvers to attack the enemy s flank. This supporting effort diverts the enemy s attention from the threatened flank. Corps and divisions are the most likely echelons to conduct turning movements. It often is used for a hasty operation or meeting engagement where speed and simplicity are paramount to maintaining battle tempo and, ultimately, the initiative. 6-84
121 SEQUENCE OF THE OFFENSE Offensive tasks are typically executed in a five-step sequence. This sequence is for discussion purposes only and is not the only way of conducting offensive tasks. These sequences overlap during the conduct of the offense. Normally the first three steps are shaping operations, while the maneuver step is the decisive operation. Follow through is usually a sequel or branch to the plan based upon the situation. The five-step sequence of the offense during execution is Gain and maintain enemy contact. Disrupt the enemy. Fix the enemy. Maneuver. Follow through. DELIBERATE AND HASTY OPERATIONS The primary difference between a deliberate operation and hasty operation is the extent of planning and preparation the attacking force conducts. At one end of the continuum, an Infantry unit launches hasty operation as a continuation of an engagement that exploits a combat power advantage and preempts enemy actions. At the other end of the continuum, an Infantry unit conducts a deliberate operation from a reserve position or AA with detailed knowledge of the enemy, a task organization designed specifically for attacking, and a fully rehearsed plan. Most attacks fall somewhere between the two extremes. A deliberate operation normally is conducted when enemy positions are too strong to be overcome by a hasty operation. It is a fully synchronized operation employing every available asset against the enemy defense, and are characterized by a high volume of planned fires, use of major supporting attacks, forward positioning of the resources needed to maintain momentum, and operations throughout the depth of enemy positions. Deliberate operations follow a preparatory period that includes planning, reconnaissance, coordination, positioning of follow-on forces and reserves, preparation of troops and equipment, rehearsals, and operational refinement. A hasty operation is conducted during movement to contact, as part of a defense, or when the enemy is in a vulnerable position and can be defeated quickly with available resources. This type of operation may cause the attacking force to lose a degree of synchronization. To minimize this risk, the leader maximizes use of standard formations and well-rehearsed, thoroughly understood battle drills and SOPs. A hasty operation often is the preferred option during continuous operations, enabling the leader to maintain momentum while denying the enemy time for defense preparations. CONTROL MEASURES FOR AN ATTACK Units conducting offensive tasks operate within an assigned area of operation. Regardless of whether the attack takes place in a contiguous or noncontiguous environment, the commander of this area of operation normally designates control measures such as the Areas of operation for subordinate units of battalion size or larger. Phase line as the line of departure, which also may be the line of contact (LC). Time to initiate the operation. 6-85
122 Objective. Infantry leaders use all other control measures necessary to control the attack. Short of the LD or LC, the leader may designate AA and attack positions where the unit prepares for the offense or waits for the establishment of required conditions to initiate the attack. Beyond the LD or LC, leaders may designate checkpoints, phase lines, PLD, assault positions, and direct and indirect fire support coordination measures. Between the PLD and objective, a final coordination line, assault positions, support by fire and attack by fire positions, and time of assault to better control the final stage of attack can be used. Beyond the objective, the Infantry leader can impose a LOA if an exploitation or pursuit is not conducted. SECTION II DEFENSE a. A defensive task is a task conducted to defeat an enemy attack, gain time, economize forces, and develop conditions favorable for offensive or stability tasks. (Refer to ADRP 3-90 for more information.) Normally, the defense alone cannot achieve a decision. However, it can set conditions for a counteroffensive or counterattack that enables Army forces to regain the initiative. Other reasons for conducting defensive tasks include, retain decisive terrain or deny a vital area to the enemy, attrition or fix the enemy as a prelude to the offense, counter surprise action by the enemy, or to increase the enemy s vulnerability by forcing the enemy commander to concentrate subordinate forces. This section covers basics of the defense, common defensive planning considerations, forms of the defense engagement area development, and transitions. The Infantry platoon and squad uses the defense to occupy and prepare positions and mass the effects of direct fires on likely avenues of approach or mobility corridors. While the offense is the most decisive type of combat operation, the defense is the stronger type. The following paragraphs discuss the basics of the defense. Note. METT-TC considerations determine the characteristics, placement, movement and maneuver of defensive positions. b. CHARACTERISTICS OF THE DEFENSE The defense shares the following characteristics: preparation, security, disruption, mass and concentration, flexibility, maneuver, and operations in-depth. (Refer to ADRP 3-90 for more information.) 1. PREPARATION The defense has inherent strengths. The defender arrives in the area of operation before the attacker and uses the available time to prepare. These preparations multiply the defense s effectiveness. Preparations end only when the defenders retrograde or begin to fight. Until then, preparations are continuous. Preparations in-depth continues, even as the close fight begins. 2. SECURITY Security helps deceive the enemy as to friendly locations, strengths, and weaknesses. It also inhibits or defeat enemy reconnaissance. Security measures provide early warning and disrupt enemy attacks early and continuously. 6-86
123 3. DISRUPTION Defenders disrupt attackers tempo and synchronization with actions designed to prevent them from massing combat power. Disruptive actions attempt to unhinge the enemy s preparations and, ultimately, his attacks. Methods include defeating or misdirecting enemy reconnaissance forces, breaking up his formations, isolating his units, and attacking or disrupting his systems. 4. MASS AND CONCENTRATION Defenders seek to mass the effects of overwhelming combat power where they choose and shift it to support the decisive operation. To obtain an advantage at decisive points, defenders economize and accept risk in some areas; retain and, when necessary, reconstitute a reserve; and maneuver to gain local superiority at the point of decision. Unit leaders accept risk in some areas to mass effects elsewhere. Obstacles, security forces, and fires can assist in reducing risk. 5. FLEXIBILITY The defense requires flexible plans. Planning focuses on preparation in-depth, use of reserves, and ability to shift the main effort. Leaders add flexibility by designating supplementary positions, designing counterattack plans, and preparing to counterattack. 6. MANEUVER Maneuver allows the defender to take full advantage of area of operation and to mass and concentrate when desirable. Maneuver, through movement in combination with fire, allows the defender to achieve a position of advantage over the enemy to accomplish the mission. It also encompasses defensive actions such as security and support area operations. 7. OPERATION IN-DEPTH Simultaneous application of combat power throughout the area of operation improves the chances for success while minimizing friendly casualties. Quick, violent, and simultaneous action throughout the depth of the defender s area of operation can hurt, confuse, and even paralyze an enemy force just as it is most exposed and vulnerable. Such actions weaken the enemy s will and do not allow all early enemy successes to build the confidence of the enemy s Cadets and leaders. In-depth planning prevents the enemy from gaining momentum in the attack. Synchronization of decisive, shaping, and sustaining operations facilitates mission success. c. DEFENSIVE TASKS 1. There are three basic defensive tasks: area defense, and retrograde. Each contains elements of the others, and usually contains both static and dynamic aspects. Infantry platoons serve as the primary maneuver element, or terrain-controlling units for the Infantry company. They can defend area of operation, positions; serve as a security force or reserve as part of the Infantry company s coordinated defense. (Refer to FM for more information.) 2. As part of a defense, the Infantry platoon can defend, delay, withdraw, counterattack, and perform security tasks. The Infantry platoon usually defends, as part of the Infantry company s defense in the main battle area. It conducts the defense to achieve one or more of the following: Gain time. Retain essential terrain. Support other operations. Preoccupy the enemy in one area while friendly forces attack in another. Wear down enemy forces at a rapid rate while reinforcing friendly operations. 6-87
124 3. Forms of Defensive Maneuver Two forms of defensive maneuver within an area defense are defense in-depth and forward defense. The Infantry platoon is expected to be able to do both. While the Infantry company commander usually selects the type of area defense to use, the higher commander often defines the general defensive scheme for the Infantry company. The specific mission may impose constraints such as time, security, and retention of certain areas that are significant factors in determining how the Infantry company will defend. a. Defense In-Depth Defense in-depth reduces the risk of the attacking enemy quickly penetrating the defense. The enemy is unable to exploit a penetration because of additional defensive positions employed indepth. The in-depth defense provides more space and time to defeat the enemy attack. The Infantry platoon uses a defense in-depth when The mission allows the Infantry platoon to fight throughout the depth of the areas of operations. The terrain does not favor a defense well forward, and better defensible terrain is available deeper in the areas of operations. Sufficient depth is available in the areas operations. Cover and concealment forward in the areas of operations is limited. Weapons of mass destruction may be used. 6-88
125 b. Forward Defense The intent of a forward defense is to prevent enemy penetration of the defense. Due to lack of depth, a forward defense is least preferred. The Infantry platoon deploys the majority of its combat power into forward defensive positions near the forward edge of the battle area. While the Infantry company may lack depth, the platoon and squads must build depth into the defense at their levels. The leader fights to retain the forward position, and may conduct counterattacks against enemy penetrations, or to destroy enemy forces in forward engagement area. Often, counterattacks are planned forward of the forward edge of the battle area to defeat the enemy. 1. The Infantry platoon uses a forward defense when Terrain forward in the areas of operations favors the defense. Strong existing natural or man-made obstacles, such as river or a rail lines, are located forward in areas of operations. The assigned area of operations lacks depth due to location of the area or facility to be protected. Cover and concealment in rear portions of the areas of operations is limited. Directed by higher headquarters to retain or initially control forward terrain. 6-89
126 4. RETROGRADE Retrograde is a defensive task involving organized movement away from the enemy. The enemy may force a retrograde or the leader may execute it voluntarily. In either case, the higher commander of the force executing the operation must approve retrograding. Retrogrades are conducted to improve a tactical situation or preventing a worse situation from developing. Platoons usually conduct retrogrades as part of a larger force but may conduct independent retrogrades (withdrawal) as required. Retrograde operations can accomplish the following: Resist, exhaust, and defeat enemy forces. Draw the enemy into an unfavorable situation. Avoid contact in undesirable conditions. 5. Delay Gain time. Disengage a force from battle for use elsewhere for other missions. Reposition forces, shorten lines of communication, or conform to movements of other friendly units. Secure favorable terrain. 6-90
127 a. Delays allow units to trade space for time, avoiding decisive engagement and safeguard its forces. Ability of a force to trade space for time requires depth within the area of operation assigned to the delaying force. The amount of depth required depends on several factors, including the Amount of time to be gained. Relative combat power of friendly and enemy forces. Relative mobility of forces. Nature of terrain. Ability to shape areas of operations with obstacles and fires. Degree of acceptable risk. b.delays succeed by forcing the enemy to concentrate forces to fight through a series of defensive positions. Delays must offer a continued threat of serious opposition, forcing the enemy to repeatedly deploy and maneuver. Delaying forces displace to subsequent positions before the enemy is able to concentrate sufficient resources to decisively engage and defeat delaying forces in current positions. The length of time a force can remain in position without facing danger of becoming decisively engaged is primarily a function of relative combat power, METT-TC and weather. Delays gain time to Allow friendly forces to establish a defense. Cover withdrawing forces. Protect friendly force s flanks. Allow friendly forces to counterattack. c. Parameters of the Delay Parameters of the delay are specified in the order for a delay mission. First, leaders direct one of two alternatives: delay within the area of operation or delay forward of a specified line or terrain feature for a specified time. The second parameter in the order must specify acceptable risk. Acceptable risk ranges from accepting decisive engagement in an attempt to hold terrain for a given time maintaining integrity of the delaying force. The order must specify whether the delaying force may use the entire area of operation or must delay from specific battle positions. A delay using the entire area of operation is preferable, but a delay from specific positions may be required to coordinate two or more units. d. Alternate or Successive Positions Leaders normally assign subordinate units contiguous area of operation that are deeper than they are wide. Leaders use obstacles, fires, and movement throughout the depth of assigned area of operation. If the leader plans the delay to only last a short time or the area of operation s depth is limited, delaying units may be forced to fight from a single set of positions. If the leader expects the delay to last for longer periods, or sufficient depth is available, delaying units may delay from either alternate or successive positions. In both techniques, delaying forces normally reconnoiter subsequent positions before occupying them if possible, and post guides on one or two subsequent positions. Additionally, in executing both techniques, it is critical the delaying force maintains contact with the enemy between delay positions. Advantages and disadvantages of the two techniques are summarized in table below. 6-91


128 6. DEFENSE OF A LINEAR OBSTACLE A platoon leader may conduct either an area or mobile defense along or behind a linear obstacle. The Infantry leader normally prefers an area defense because it accepts less risk by not allowing the enemy to cross the obstacle. Linear obstacles such as mountain ranges or river lines generally favor a forward defense. It is extremely difficult to deploy in strength along the entire length of a linear obstacle. The defending leader must conduct economy of force measures in some areas. Within an area defense, the leader s use of a defense in-depth accepts the possibility the enemy may force a crossing at a given point. The depth of the defense should prevent the enemy from rapidly exploiting its success. It also defuses the enemy s combat power by forcing the enemy to contain bypassed friendly defensive positions in addition to continuing to attack positions in greater depth. This form of defense may be used when defensible terrain is available in the forward portion of the platoon's area of operation, or to take advantage of a major linear natural obstacle. It also is used when the enemy is mainly Infantry; the platoon conducts a security mission such as counter infiltration, or as directed by company. This technique allows interlocking and overlapping observation and fields of fire across the platoon's front. The bulk of the platoon's combat power is well forward. Sufficient resources must be available to provide adequate combat power to detect and stop an attack. The platoon relies on fighting from well-prepared mutually supporting positions. It uses a high volume of direct and indirect fires to stop the attacks. The main concern when fighting this form of defense is the lack of flexibility and the difficulty of both seizing the initiative and seeking out enemy weaknesses. Obstacles, indirect fires, and contingency plans are vital to this maneuver. The platoon depends upon surprise, well-prepared positions, and deadly accurate fires to defeat the enemy. The reserve is usually small, perhaps a squad. 6-92
129 7. PERIMETER DEFENSE a. The platoon leader can employ the perimeter defense as an option when conducting an area or mobile defense. A perimeter defense is a defense oriented in all directions. The Infantry platoon uses it for self-security, and to protect other units located within the perimeter. The platoon can employ a perimeter defense in urban or woodland terrain. The platoon might be called upon to execute the perimeter defense under a variety of conditions, including: When it must secure itself against terrorist or insurgent attacks in an urban area. This technique also may apply if the platoon must conserve or build combat power in order to execute offensive tasks or patrolling missions. When it must hold critical terrain in areas where the defense is not tied in with adjacent units. When it has been bypassed and isolated by the enemy and must defend in place. When it conducts occupation of an independent assembly area or reserve position. When it begins preparation of a strongpoint. When it is directed to concentrate fires into two or more adjacent avenues of approach. 6-93
130 b. Y-SHAPE VARIATION The Y-shaped perimeter defense is a variation of the perimeter defense that uses the terrain effectively. This defense is used when the terrain, cover and concealment, or fields of fire do not support the physical positioning of the squads in a circular manner. The Y-shaped perimeter defense is so named because the squad s battle positions are positioned on three different axes radiating from one central point It is still a perimeter defense because it is effective against an attack from any direction. The Y-shaped defense provides all-round perimeter fires without having to position Soldiers on the perimeter. It is likely to be most effective in mountainous terrain, but it also may be used in a dense jungle environment due to limited fields of fire. All of the fundamentals of a perimeter defense previously discussed apply, with the following Although each squad battle position has a primary orientation for its fires, each squad must be prepared to reorient to mass fires into the engagement areas to its rear. When no most likely enemy approach is identified, or in limited visibility, each squad may have half its Soldiers oriented into the engagement areas to the front and half into the engagement areas to the rear. Ideally, supplementary individual fighting positions are prepared, allowing Soldiers to reposition when required to mass fires into one engagement area. 6-94
131 c. When a most likely enemy avenue of approach is identified, the platoon leader may adjust the normal platoon orientations to concentrate fires for the following reasons: This entails accepting risk in another area of the perimeter. The platoon security plan should compensate for this with additional observation posts, patrols, or other measures. The positioning of the platoon command post, reserve, or any sustainment assets is much more difficult due to a lack of depth within the perimeter 6-95
132 d. The most difficult aspect of the Y-shape perimeter defense is the fire control measures required. To fight this defense without casualties from friendly fire, the leaders must ensure the limits of fire for each weapon do not allow fires into the adjacent squad positions. In a mountainous environment, firing downward into the engagement area may make this simpler. Some measures to consider include: Position medium machine guns near the apex of the "Y" to allow a final protective line that covers the platoon front while firing away from the adjacent units. Cover the areas of the engagement areas closest to the apex with Claymores, nonpersistent mines, or obstacles to reduce the need for direct fires in these areas. Identify those positions at most risk to friendly fires and prepare the fighting position to protect the Soldier from fires in this direction. The loss of one squad position may threaten the loss of the entire platoon. To prevent this, plan and rehearse immediate counterattacks with a reserve or the least committed platoon. Consider allowing the enemy to penetrate well into the engagement areas and destroy him as in an ambush. Be aware that if a Y-shape defense is established on the prominent terrain feature and the enemy has the ability to mass fires, he may fix the platoon with direct fires and destroy it with massed indirect fires. 6-96


133 8. Fighting Positions Fighting positions protect Soldiers by providing cover from direct and indirect fires and concealment through positioning and proper camouflage. Because the battlefield conditions confronting Soldiers are never standard, no single standard fighting position design fits all tactical situations. Hasty fighting positions, used when there is little time for preparation, should be behind whatever cover is available. However, the term hasty does not mean that there is no digging. If a natural hole or ditch is available, use it. This position should give frontal cover from enemy direct fire but allow firing to the front and the oblique. When there is little or no natural cover, hasty positions provide as much protection as possible. A shell crater, which is 2 to 3 feet (0.61 to 1 meter) wide, offers immediate cover (except for overhead) and concealment. Digging a steep face on the side toward the enemy creates a hasty fighting position. A small crater position in a suitable location can later develop into a deliberate position. A skirmisher s trench is a shallow position that provides a hasty prone fighting position. When you need immediate shelter from enemy fire, and there are no defilade firing positions available, lie prone or on your side, scrape the soil with an entrenching tool, and pile the soil in a low parapet between yourself and the enemy. In all but the hardest ground, you can use this technique to quickly form a shallow, bodylength pit. Orient the trench so it is oblique to enemy fire. This keeps your silhouette low, and offers some protection from small-caliber fire. The prone position is a further refinement of the skirmisher s trench. It serves as a good firing position and provides you with better protection against the direct fire weapons than the crater position or the skirmisher s trench. Hasty positions are further developed into deliberate positions that provide as much protection as possible. The hole should be about 18 inches (46 centimeters) deep and use the dirt from the hole to build cover around the edge of the position. Prone position (hasty) 6-97
134 SECTION III PATROLS and PATROLLING (ATP APR 16; TC AUG13) a.introduction 1. If a patrol is made up of a single unit, such as a rifle squad sent out on a reconnaissance patrol, the squad leader is responsible. If a patrol is made up of mixed elements from several units, then the senior officer or NCO is designated as the patrol leader. This temporary title defines his role and responsibilities during the mission. The patrol leader may designate an assistant, normally the next senior man in the patrol, and subordinate element leaders he requires. 2. A patrol can consist of a unit as small as a fire team but are usually squad and platoon-sized. For larger combat tasks such as for a raid, the patrol is sometimes accompany. The planned action determines if the patrols are combat and reconnaissance. 3. Regardless of the type of patrol, the unit needs a clear task and purpose. 4. The leader of any patrol, regardless of the type or the tactical task assigned, has an inherent responsibility to prepare and plan for possible enemy contact while on the mission. Patrols always are assigned a tactical mission. On his return to the main body, the patrol leader reports to the commander and describes the patrol's actions, observations, and condition. b. PURPOSE OF PATROLLING There are several specific purposes which can be accomplished by patrolling Gathering information on the enemy, on the terrain, or on the populace. Regaining contact with the enemy or with adjacent friendly forces. Engaging the enemy in combat to destroy him or inflict losses. Reassuring or gaining the trust of a local population. Preventing public disorder. Deterring and disrupting insurgent or criminal activity. Providing unit security. Protecting essential infrastructure or bases. c. ORGANIZATION OF PATROLS 1. A patrol is organized to perform specific tasks. It must be prepared to secure itself, navigate accurately, identify and cross danger areas, and reconnoiter the patrol objective. If it is a combat patrol, it must be prepared to breach obstacles, assault the objective, and support those assaults by fire. Additionally, a patrol must be able to conduct detailed searches as well as deal with casualties and detainees. 2. The leader identifies those tasks that must be or will likely be conducted during the patrol and decides which elements will perform which tasks. Where possible, he should maintain squad and fire team integrity. Squads and fire teams may perform more than one task during the time a patrol is away from the main body or it may be responsible for only one task. The leader must 6-98
135 plan carefully to ensure he has identified and assigned all required tasks in the most efficient way. 3. Elements and teams for platoons conducting patrols include the common and specific elements for each type of patrol. The following elements are common to all patrols. a. HEADQUARTERS ELEMENT The headquarters element normally consists of the platoon leader and his RTO. The platoon sergeant may be designated as the assistant patrol leader. Combat patrols may include a forward observer, perhaps his RTO and a medic. Note. In this chapter the patrol leader is the person in charge of the patrol. In a platoon-size element that person would most likely be the platoon leader. The assistant patrol leader is the second person in charge of the patrol. In a platoon size element that person most likely is the platoon sergeant. b. AID AND LITTER TEAMS Aid and litter teams are responsible for locating, treating, and evacuating casualties. c. DETAINEE TEAMS Detainee teams are responsible for processing detainees, according to the five Ss (search, silence, segregate, speed, safeguard) and leader's guidance. These teams also may be responsible for accounting for and controlling recovered personnel. d. SURVEILLANCE TEAMS Surveillance teams are used to establish and maintain covert observation of an objective for as long as it takes to complete the patrol s mission. e. EN ROUTE RECORDER An en route recorder can be designated to record all information collected during the mission. f. COMPASS AND PACEMAN If the patrol does not have access to GPSs, or if it is operating in a location where there is no satellite reception, it may be necessary to navigate using terrain association, dead reckoning, or a combination of both. This is accomplished with a compass man and a pace man. g. ASSAULT TEAMS Combat patrols designate assault teams to close with the enemy on the objective or to clear the ambush kill zone. h. SUPPORT TEAMS Combat patrols designate teams to provide direct fire in support of the breach and assault teams. 6-99
136 i. BREACH TEAMS Combat patrols have breach teams to assist the assault team in getting to the objective. j. SEARCH TEAMS Search teams are designated to conduct a cursory or detailed search of the objective area. 4. INITIAL PLANNING AND COORDINATION FOR PATROLS a. Leaders plan and prepare for patrols using TLP. They must identify required actions on the objective, plan backward to the departure from friendly lines, then forward to the reentry of friendly lines. b. The patrol leader normally will receive the OPORD in the battalion or company command post where communications are good and vital personnel are available for coordination. Because patrols act semi-independently, move beyond the supporting range of the parent unit, and often operate forward of friendly units, coordination must be thorough and detailed. c. Patrol leaders may routinely coordinate with elements of the battalion staff directly. Unit leaders should develop tactical SOPs beyond what is found in ATP with detailed checklists to preclude omitting items vital to the mission accomplishment. d. Items coordinated between the leader and battalion staff, company commander or CoIST include: Changes or updates in the enemy situation. Best use of terrain for routes, rally points, and patrol bases. Light and weather data. Changes in the friendly situation. The attachment of Soldiers with special skills or equipment (engineers, sniper teams, military working dog teams, forward observers, or interpreters). Use and location of landing or pickup zones. Departure and reentry of friendly lines. Direct and indirect fire support on the objective and along the planned routes, including alternate routes. Rehearsal areas and times. The terrain for rehearsal should be similar to the objective, to include buildings and fortifications if necessary. Coordination for rehearsals includes security of the area, use of blanks, pyrotechnics, and live ammunition. Special equipment and ammunition requirements. Transportation support, including transportation to and from rehearsal sites. Signal plan, call signs frequencies, code words, pyrotechnics, and challenge and password. e. The leader coordinates with the unit through which his platoon or squad conducts its forward and rearward passage of lines. The leader also coordinates patrol activities with the leaders of other units patrolling in adjacent areas at the same time. 5. PATROL PREPARATIONS a. Units send out patrols under many and varied conditions on the battlefield. The specific actions taken in preparing for a patrol, while conducting the mission, and after returning to the main body will vary depending on the tactical situation. The principles, however, will remain the 6-100
137 same. During high-intensity combat, some of the actions described below may be abbreviated. b.those same actions may be executed in greater detail and specificity during stability or during support to civil authority. In general, patrol activities are more closely documented during operations in other than high-intensity combat. Patrol operations require considerable preparation before a patrol departs. The commander or platoon leader should brief the patrol leader and give him clear orders before sending him away from the main body. Patrol members should depart on patrol confident of the patrol s capabilities. This can be understood through detailed knowledge of the mission s task and purpose, the threats which may be encountered during the patrol, and good situational awareness. c. Patrol orders, pre-patrol briefings, and rehearsals should cover Environment, local situation and possible threats. The patrol leader should coordinate an intelligence briefing covering the operational environment, local civil situation, terrain and weather which might affect the patrol s mission, general and specific threats to the patrol, suspect persons, and vehicles and locations known to be in the patrol s area. Mine and IED threat. The patrol leader should make a mine and IED risk assessment based on the latest information available. This will determine many of the actions of the patrol. Patrol members must be informed of the latest mine and IED threats and restrictions to the unit s tactical SOPs. Operations update. The patrol leader should coordinate for an up-to-date briefing on the location and intentions of other friendly patrols and units in the patrol s area. This briefing should include the existing fire and maneuver control measures in effect, no-go or restricted areas, special effects of the patrol s area, and all other operational issues affecting the patrol and its mission. Mission and tasks. Every patrol leader should be given a specific task and purpose to accomplish with his patrol. Accordingly, each patrol member knows the mission and is aware of his responsibilities. Locations and route. The patrol leader must brief his patrol on all pertinent locations and routes. Locations and routes may include drop-off points, pick-up points, planned routes; rally points, exit and re-entry points, and alternates for each should be covered in detail. Posture. This is a vital consideration during a civil reconnaissance patrol. (Refer to FM 3-57 for more information.) The patrol leader should not depart until he is sure he completely understands what posture or attitude the leader wishes the patrol to present to the populace it encounters. The posture may be soft or hard depending on the situation and environment. The patrol posture may change several times during a patrol. Personnel recovery. Operations that focuses on recovering isolated or missing personnel before becoming detained or captured and extracting those detained or captured personnel through coordinated and well-planned operations. Actions on contact and actions at the scene of an incident. These are likely to be part of the unit s tactical SOPs but should be covered especially if there are local variations or new patrol members. Rules of engagement, rules of interaction, and rules for escalation of force. Each patrol member must know and understand these rules. Communications plan/lost communications plan. Every patrol member should know the means in which the patrol plans to communicate, to whom, how, and when it should 6-101
138 report. The patrol leader must ensure he has considered what actions the patrol will take in the event it loses communications. The unit may have established these actions in its tactical SOP, but all patrol members should be briefed on the communication plan and be given the appropriate frequencies, contact numbers, and passwords in effect. Electronic warfare countermeasures plan. This is especially important if the IED threat level is high. The patrol leader should clearly explain to all patrol members which electronic warfare devices are being employed and their significant characteristics. These issues may be covered by the unit s tactical SOP, but all patrol members should be briefed on the electronic warfare plan in effect during the patrol. Standard and special uniforms and equipment. Equipment should be distributed evenly among the patrol members. The location of essential or unique equipment should be known by all members of the patrol. SOPs should be developed to stipulate what uniform is to be worn for various types of patrols. The dress state will be linked to threats and posture of the patrol, so patrol members should be briefed in sufficient time to enable proper preparations. All patrols must have a day and night capability regardless of the expected duration of the patrol. Medical. Every Soldier should carry their own individual improved first aid kit per unit tactical SOP. The leader should ensure that every patrol has a medic and one CLS qualified Soldier with a CLS bag. All patrol members must know who is responsible for carrying the pack and know how to use its contents. Attachments. The patrol leader must ensure all personnel attached to the patrol are introduced to the other patrol members and briefed thoroughly on the tactical SOP; all patrol special orders; and existing chain of command. The following personnel may be attached to a unit going out on patrol: Interpreters Host-nation police, military police or local security forces. Explosive ordnance disposal teams. Female Soldiers specifically designated and trained to search local women. Military working dog teams. Foreign security forces. Host-nation forces. Provincial reconstruction teams. Equipment carried by the patrol will be environment- and task-specific and should cover Radios and electronic warfare equipment. Radios and electronic warfare equipment should be checked prior to every patrol ensuring it is serviceable and operates correctly. Batteries must be taken for expected duration of the patrol plus some extra for backup. Patrol members must be trained in the operation of all electronic warfare and radio equipment. It is the patrol leader s responsibility to ensure radios and electronic warfare equipment is switched on and working and communication checks are conducted prior to leaving the base location Weapons. All weapons must be prepared for firing prior to departure from the larger unit. Slings should be used to ensure weapons do not become separated from Soldiers 6-102
139 who became incapacitated. This also ensures a weapon cannot be snatched away from a distracted Soldier while he is speaking with locals and used against him. Ammunition. Sufficient ammunition, signal pyrotechnics, obscurants, and nonlethal munitions must be carried to enable the patrol to conduct its mission. The amount a patrol carries may be established by the unit s tactical SOP or by the patrol leader based upon an evaluation of the situation the patrol faces. Load-carrying equipment. Patrol members should carry sufficient team and personal equipment to enable them to accomplish other missions such as reassignment to a cordon position before returning to the larger unit for resupply. The unit s tactical SOP should establish the standard amount of equipment and supplies to be carried. The leader carefully considers the burden being placed on Soldiers going on a foot patrol, especially in extreme weather conditions or rugged terrain. Documentation. Team leaders are responsible to the patrol leader for ensuring appropriate documentation is carried by individuals for conducting the mission. Under normal circumstances, Soldiers should carry just their identification card and tags. The unit tactical SOP may prohibit or require the carrying of other appropriate theater specific documentation such as cards with rules on EOF or ROE. A number of equipment checks should be conducted prior to the patrol departing. These checks can include the following: Individual equipment check. It is the responsibility of every patrol member to check their individual equipment. Soldiers should ensure all loose items of carried equipment are secured. Team leader s equipment check. Leaders must ensure individual team members limit what they carry to which is required for the patrol. Team equipment must be checked for serviceability. Patrol leader s equipment check. Patrol leaders should check individual and team equipment from each team prior to deploying. d. COMBAT PATROLS A combat patrol provides security and harasses, destroys, or captures enemy troops, equipment, or installations. When the commander gives a unit the mission to send out a combat patrol, he intends the patrol to make contact with the enemy and engage in close combat. A combat patrol always tries to remain undetected while moving, but when it discloses its location to the enemy it is with a sudden and violent attack. For this reason, the patrol normally carries a significant amount of weapons and ammunition. It may carry specialized munitions. A combat patrol collects and reports information gathered during the mission, whether related to the combat task or not. The three types of combat patrols are raid, ambush, and security patrol. 1. RAID Raids are surprise attacks against a position or installation for a specific purpose other than seizing and holding the terrain. It is conducted to destroy a position or installation, to destroy or capture enemy soldiers or equipment, or to free prisoners. A raid patrol retains terrain just long enough to accomplish the intent of the raid. A raid always ends with a planned withdrawal off the objective and a return to the main body
140 2. AMBUSH An ambush is a surprise attack from a concealed position on a moving or temporarily halted target. An ambush patrol does not need to seize or hold terrain. It can include an assault to close with and destroy the target, or an attack by fire only. 3. SECURITY PATROL A security patrol is sent out from a unit location when the unit is stationary or during a halt to search the local area, detect enemy forces near the main body, and to engage and destroy the enemy within the capability of the patrol. This form of combat patrol normally is sent out by units operating in close terrain with limited fields of observation and fire. Although this form of combat patrol seeks to make direct enemy contact and to destroy enemy forces within its capability, it should try to avoid decisive engagement. A security patrol detects and disrupts enemy forces conducting reconnaissance of the main body or massing to conduct an attack. Security patrols normally are away from the main body of the unit for limited periods, returning frequently to coordinate and rest. They do not operate beyond the range of communications and supporting fires from the main body, especially mortar fires. 4. RAID A raid is a surprise attack against a position or installation for a specific purpose other than seizing and holding the terrain. It is conducted to destroy a position or installation, destroy or capture enemy soldiers or equipment, or free prisoners. A raid patrol retains terrain just long enough to accomplish the intent of the raid. A raid always ends with a planned withdrawal off the objective and a return to the main body. Raids are characterized by the following: Destruction of essential systems or facilities (command and control nodes, logistical areas, other high value areas). Provide or deny critical information. Securing of hostages or prisoners. Confusing the enemy or disrupting his plans. Detailed information collection (significant collection assets committed). Mission command from the higher headquarters to synchronize the operation. Creating a window of opportunity. Raids normally are conducted in five phases (See below) 1) Approach the objective. 2) Isolate the objective area. 3) Set conditions for the assault element. 4) Assault the objective. 5) Tactical movement away from the objective area

141 5. AMBUSH An ambush is a surprise attack from a concealed position on a moving or temporarily halted target. It can include an assault to close with and destroy the target or an assault by fire. An ambush need not seize or hold ground. The purpose of an ambush is to destroy or to harass enemy forces. The ambush combines the advantages of the defense with the advantages of the offense, allowing a smaller force with limited means the ability to destroy a much larger force. Ambushes are enemy-oriented. Terrain is held only long enough to conduct the ambush, and then the force withdraws. Ambushes range from simple to complex and synchronized; short duration of minutes to long duration of hours; and within hand grenade range, to maximum standoff. Ambushes employ direct fire systems as well as other destructive means, such as commanddetonated mines and explosives, and indirect fires on the enemy force. The attack may include an assault to close with and destroy the enemy or may just be a harassing assault by fire. Ambushes may be conducted as independent operations or as part of a larger operation. There are countless ways for leaders to develop an ambush. To assist the leader he clarifies what he wants, he develops the ambush based on its purpose, form, time, and formation. The purpose of an ambush is either harassment or destruction. A harassing ambush is one in which attack is by fire only (meaning there is no assault element). A destruction ambush includes assault to close with and destroy the enemy. The three forms of ambushes are point, area, and antiarmor. In a point ambush, Soldiers deploy to attack a single kill zone. In an area ambush, Soldiers deploy as two or more related point ambushes. These ambushes at separate sites are related by their purpose


142 (See figure below.) A unit smaller than a platoon normally does not conduct an area ambush. Antiarmor ambushes focus on moving or temporarily halted enemy armored vehicles Based on the amount of time available to set an ambush, ambushes are hasty and deliberate. A hasty ambush is conducted based on an unanticipated opportunity. It is used when a patrol sees the enemy before the enemy sees it, and the patrol has time to act. The leader gives the prearranged signal to start the action and all Soldiers move to concealed firing positions, prepared to engage the enemy. Depending on the mission, the patrol may allow the enemy to pass if the enemy does not detect the patrol
143 A deliberate ambush is conducted against a specific target at a location chosen based on intelligence. With a deliberate ambush, leaders plan and prepare based on detailed information allowing them to anticipate enemy actions and enemy locations. Detailed information includes: type and size of target, organization or formation, routes and direction of movement, time the force will reach or pass certain points on its route, and weapons and equipment carried. a. Ambush Site The ambush site is the terrain on which a point ambush is established. The ambush site consists of a support-by-fire position for the support element and an assault position for the assault element. An ideal ambush site Has a good field of fire into the kill zone. Has good cover and concealment. Has a protective obstacle. Has a covered and concealed withdrawal route. Makes it difficult for the enemy to conduct a flank attack. b. Kill Zone The kill zone is the part of an ambush site where fire is concentrated to isolate or destroy the enemy. An ideal kill zone has the following characteristics: Enemy forces are likely to enter it. It has natural tactical obstacles. Large enough to observe and engage the anticipated enemy force. A near ambush is a point ambush with the assault element within reasonable assaulting distance of the kill zone (less than 50 meters). Close terrain, such as an urban area or heavy woods, may require this positioning. It also may be appropriate in open terrain in a "rise from the ground" ambush. A far ambush is a point ambush with the assault element beyond reasonable assaulting distance of the kill zone (beyond 50 meters). This location may be appropriate in open terrain offering good fields of fire or when attack is by fire for a harassing ambush. c. Security Positions An ideal security position Does not mask fires of the main body. Provides timely information to the main body. (Gives the leader enough time to act on information provided.) Can provide a support-by-fire position. d. Rally Points The platoon leader considers the use and locations of rally points. The rally point is a place designated by the leader where the platoon moves to reassemble and reorganize if it becomes dispersed
144 The leader physically reconnoiters routes to select rally points whenever possible. He selects tentative points if he can only conduct a map reconnaissance. He confirms them by actual inspection as the platoon moves through them. Rally points must Be easy to find. Have cover and concealment. Be away from natural lines of drift. Be defendable for short periods. e. FORMATIONS Many ambush formations exist. This section only discusses the linear, L-shaped, and V-shaped (see figures below.) All of these formations require leaders to exercise strict direct fire control. Leaders need to understand strengths and weaknesses of their units and plan accordingly. The formation selected is based on the following: terrain, visibility, Soldiers available, weapons and equipment, ease of control, and target to be attacked. 1 Linear Ambush In an ambush using a linear formation, the assault and support elements parallel the target's route. This positions the assault and support elements on the long axis of the kill zone and 6-108
145 subjects the target to flanking fire. Only a target that can be covered with a full volume of fire can be engaged in the kill zone. A dispersed target might be too large for the kill zone. This is the disadvantage of linear formations. The linear formation is good in close terrain restricting the target's maneuver, and in open terrain where one flank is blocked by natural obstacles or can be blocked by other means such as Claymores. Claymores or explosives can be placed between the assault and support elements and kill zone to protect the unit from counter-ambush actions. When the ambushing unit deploys this way, it leaves access lanes through the obstacles so it can assault the target. An advantage of the linear formation is the relative ease by which it can be controlled under all visibility conditions. 2. L-Shaped Ambush An ambush in the L-shaped formation (see figure 6-8) is a variation of the linear formation. The long leg of the L (assault element) is parallel to the kill zone. This leg provides flanking fire. The short leg (support element) is at the end of and at a right angle to the kill zone. This leg provides 6-109
146 enfilade fire working with fire from the other leg. The L-shaped formation can be used at a sharp bend in a trail, road, or stream. 3. V-Shaped Ambush 6-110
147 The V-shaped ambush assault elements (see figure below) are placed along both sides of the enemy route so they form a V. Take extreme care to ensure neither group fires into the other. This formation subjects the enemy to both enfilading and interlocking fire. When performed in dense terrain, the legs of the V close in as the lead elements of the enemy force approach the point of the V. The legs then open fire from close range. Here, even more than in open terrain, all movement and fire is carefully coordinated and controlled to avoid fratricide. A wider separation of the elements makes this formation difficult to control, and fewer sites favor its use. Its main advantage, it is difficult for the enemy to detect the ambush until well into the kill zone. f. FINAL PREPARATIONS 6-111


148 Final preparations begin with the unit occupying an ORP and end with the main body prepared to depart for the ambush site. The unit halts at the ORP and establishes security. When ready, the leader conducts his reconnaissance to confirm the plan, positions the security element, and returns to the ORP. The security element leaves the ORP first. Teams of the security element move to positions from which they can secure the ORP and flanks of the ambush site. (See figure below.) g. OCCUPY THE SITE AND CONDUCT AMBUSH 6-112
149 Occupying the site and conducting the ambush begins with main body movement out of the ORP, and ends when the leader initiates a withdrawal. Common control measures include: Kill zone. Limit of advance. Assault by fire/ support-by-fire position. Assault position. Target registration point. 1. Time of Occupation As a rule, the ambush force occupies the ambush site at the latest possible time permitted by the tactical situation and amount of site preparation required. This reduces the risk of discovery and time Soldiers must remain still and quiet in position. 2. Occupying the Site Security elements are positioned first to prevent surprise while the ambush is being established. When the security teams are in position, the support and assault elements leave the ORP and occupy their positions. If there is a suitable position, the support element can overwatch the assault element's move to the ambush site. If not, both elements leave the ORP at the same time. The main body moves into the ambush site from the rear. Ideally, the leader emplaces the most casualty-producing weapons first, ensuring they have line of sight (LOS) along the entire kill zone. Once in place, the leader locates his subordinate units to complement and reinforce the vital positions. The leader then selects his location where he can best initiate and control the action. Once on the objective, movement is kept to a minimum in order to enhance security measures. 3. Positions Each Soldier must be hidden from the target and have LOS into the kill zone. At the ambush site, positions are prepared with minimal change in the natural appearance of the site. Soldiers conceal debris resulting from preparation of positions. 4. Confirming the Direct Fire Plan Claymores, explosives, and grenade launchers may be used to cover dead space left by automatic weapons. All weapons are assigned sectors of fire to provide mutual support. The unit leader sets a time by which positions must be prepared. 5. Movement in the Kill Zone Kill zone is not entered if entry can be avoided. When emplacing tactical obstacles, care is taken to remove tracks or signs which might alert the enemy and compromise the ambush. If claymores or explosives are placed on the far side, or if the appearance of the site might cause the enemy to check it, a wide detour around the kill zone should be made. Here, too, care is taken to remove all traces which might reveal the ambush. An alternate route from the ambush site also is planned


150 6. Initiating the Ambush Once all friendly elements are in position, the unit waits for enemy targets. When the target approaches, the security team spots it and alerts the ambush leader. The security team reports the target's direction of movement, size, and special weapons or equipment. Upon receipt of the report, the leader alerts the other elements. When most of the enemy force is in the kill zone, the leader initiates the ambush with the most casualty-producing weapon, medium machine gun fire, or the detonation of mines or explosives. The detonation of explosives can cause a pause in the initiation of fires due to the obscuration created by the explosion. Once conditions are set, cease or shift fires. The assault element may conduct an assault through the kill zone to the LOA. If the assault element must assault the kill zone, the leader signals to cease or shift fire. This also signals the start of the assault. Besides destruction of the enemy force, other kill zone tasks can include searching for items of intelligence value, capturing prisoners, and completing the destruction of enemy equipment. When the assault element has finished its mission in the kill zone, the leader gives the signal to withdraw to the ORP. Fire discipline is critical during an ambush. Soldiers do not fire until the signal is given. Then it must be delivered at once in the heaviest, most accurate volume possible. Well-trained gunners and well-aimed fire help achieve surprise and destruction of the target. When the target is to be assaulted, the ceasing or shifting of fire also must be precise. If it is not, the assault is delayed, and the target has a chance to react. Sector stakes should be used if possible


 where enemy movement is largely restricted to trails or streams.")
151 7. Withdrawal The withdrawal begins once the assault element completes its actions on the objective and ends with consolidation/reorganization at a designated rally point. On signal, the unit withdraws to the ORP, reorganizes, and continues its mission. At a set terrain feature, the unit halts and disseminates information. If the ambush fails and enemy pursues, the unit withdraws by bounds. Units should use obscurants to help conceal the withdrawal. Obstacles already set along the withdrawal routes can help stop the pursuit. 8. CONDUCTING AN AREA AMBUSH In an area ambush, Soldiers deploy in two or more related point ambushes. The platoon may conduct an area ambush as part of a company offensive or defensive plan, or it may conduct a point ambush as part of a company area ambush. The platoon is the smallest level to conduct an area ambush. Platoons conduct area ambushes (see figure 6-12) where enemy movement is largely restricted to trails or streams. The platoon leader (or company commander) selects one principal ambush site around which he organizes outlying ambushes. These secondary sites are located along the enemy s most likely 6-115
152 avenue of approach and escape routes from the principal ambush site. Squads normally are responsible for each ambush site. The platoon leader considers METT-TC to determine the best employment of the weapons squad. He normally locates the medium machine guns with the support element in the principal ambush site. Squads or sections responsible for outlying ambushes do not initiate their ambushes until the principal one has been initiated. They then engage to prevent enemy forces from escaping the principal ambush or reinforcing the ambushed force. 1. CONDUCTING A POINT AMBUSH In a point ambush, Soldiers deploy to attack an enemy in a single kill zone. The platoon leader is the leader of the assault element. The platoon sergeant or assistant patrol leader probably will locate with the platoon leader in the assault element. The security or surveillance teams should be positioned first. The support element should then be emplaced before the assault element moves forward. The support element must overwatch the movement of the assault element into position. The platoon leader must check each Soldier once he emplaces. The platoon leader signals the surveillance team to rejoin the assault element if it is positioned away from the assault location. 2. The platoon leader instructs the security element (or teams) to notify him of the enemy s approach into the kill zone using the SALUTE reporting format. The security element also must keep the platoon leader informed if additional enemy forces are following the lead enemy force. This will allow the platoon leader to know if the enemy force meets the engagement criteria directed by the company commander. The platoon leader must be prepared to give free passage to enemy forces too large or do not meet the engagement criteria. He must report to the company commander or CoIST enemy forces passing through the ambush unengaged. The platoon leader initiates the ambush with the greatest casualty-producing weapon, typically a command-detonated Claymore. He also must plan a back-up method, typically a medium machine gun, to initiate the ambush should the primary means fail. All Soldiers in the ambush must know the primary and back-up methods. The platoon should rehearse with both methods to avoid confusion and loss of surprise during execution of the ambush. 3. The platoon leader must include a plan for engaging the enemy during limited visibility. Based on the company commander s guidance, the platoon leader should consider the use and mix of tracers and employment of illumination, night vision devices, and thermal weapon sights. For example, if Javelins are not used during the ambush, the platoon leader still may employ the CLU with its thermal sights in the security or support element to observe enemy forces. The platoon leader also may include the employment of indirect fire support in his plan. Based upon the company commander s guidance, the platoon leader may employ indirect fires to cover flanks of the kill zone. This isolates an enemy force or assists the platoon s disengagement if the ambush is compromised or the platoon departs the ambush site under pressure. The platoon leader has a good plan (day and night) that signals the advance of the assault element into the kill zone to begin its search and collection activities. He should take into consideration the existing environmental factors. For example, obscurants may not be visible to the support element because of limited visibility or the lay of the terrain
153 4. Soldiers must know and practice relaying the signal during rehearsals to avoid the potential of fratricide. 5. The assault element must be prepared to move across the kill zone using individual movement techniques if there is return fire once they begin to search. Otherwise, the assault element moves across by bounding fire teams. 6. The assault element collects and secures all EPWs and moves them out of the kill zone to an established location before searching dead enemy bodies. The EPW collection point should provide cover and should not be easily found by enemy forces following the ambush. The friendly assault element searches from the far side of the kill zone to the near side. 7. Once the bodies have been thoroughly searched, search teams continue in this manner until all enemy personnel in and near the kill zone have been searched. Enemy bodies should be marked once searched; for example, folded arms over the chest and legs crossed to ensure thoroughness and speed and to avoid duplication of effort. 8. The platoon identifies and collects equipment to be carried back and prepares it for transport. Enemy weapon chambers are cleared and put on safe. The platoon also identifies and collects at a central point the enemy equipment to be destroyed. The demolition team prepares the fuse and awaits the signal to initiate. This is normally the last action performed before departing the ambush site. The flank security element returns to the ORP after the demolition team completes its task. 9. The flank security teams also may emplace antiarmor mines after the ambush has been initiated if the enemy is known to have armored vehicles which can quickly reinforce the ambushed enemy force. If a flank security team makes enemy contact, it fights as long as possible without becoming decisively engaged. It uses prearranged signals to inform the platoon leader it is breaking contact. The platoon leader may direct a portion of the support element to assist the security element in breaking contact. 10. The platoon leader must plan the withdrawal of the platoon from the ambush site. 11. The planning process should include the following: Elements normally are withdrawn in the reverse order they established their positions. Elements may return to the release point, then to the ORP, depending on the distance between the elements. The security element at the ORP must be alert to assist the platoon s return. It maintains security of the ORP while the remainder of the platoon prepares to depart. 12. Actions back at the ORP include, but are not limited to, accounting for personnel and equipment, stowing captured equipment, and first aid (as necessary). Upon return personnel within the patrol are reorganized as required and ammunition and equipment redistributed for movement out of the ORP
154 f. FUNDAMENTALS OF RECONNAISSANCE 1. Leaders use the seven fundamentals of reconnaissance to organize their patrols into two forces: a reconnaissance element, and a security element. The seven fundamentals are Ensure continuous reconnaissance. Do not keep reconnaissance assets in reserve. Orient on the reconnaissance objective. Report information rapidly and accurately. Retain freedom of maneuver. Gain and maintain enemy contact. Develop the situation rapidly. 2. RECONNAISSANCE ELEMENTS The reconnaissance element s task is to obtain information requirements for the purposes of facilitating tactical decision making. The primary means is R&S enabled by tactical movement and continuous, accurate reporting. The reconnaissance patrol leader decides how in-depth the reconnaissance will be. A thorough and accurate reconnaissance is important. However, avoiding detection is equally important. Below are some of the additional tasks normally associated with a reconnaissance element: Reconnoiter all terrain within the assigned area, route, or zone. Determine trafficability routes or potential avenues of approach (based on the personnel or vehicles to be used on the route). Inspect and classify all bridges, overpasses, underpasses, and culverts on the route. Locate fords or crossing sites near bridges on the route. Determine the time it takes to traverse the route. Reconnoiter to the limit of direct fire range. Terrain influencing the area, route, or zone. Built-up areas. Lateral routes. 3. ZONE RECONNAISSANCE METHODS A zone reconnaissance is conducted to obtain information on enemy, terrain, and routes within a specified zone. Zone reconnaissance techniques include the use of moving elements, stationary teams, or multiple area reconnaissance actions. 4. MOVING ELEMENT TECHNIQUES When moving elements are used, the elements (squads or fire teams) move along multiple routes to cover the whole zone. When the mission requires a unit to saturate an area, the unit uses one of the following techniques: the fan; the box; converging routes; or successive sectors


155 a. Fan Method When using the fan method, the leader first selects a series of ORPs throughout the zone to operate from. The patrol establishes security at the first ORP. Upon confirming the ORP location, the leader confirms reconnaissance routes out from and back to the ORP. These routes form a fan-shaped pattern around the ORP. The routes must overlap to ensure the entire area is reconnoitered. Once the routes are confirmed, the leader sends out R&S teams along the routes. When all R&S teams have returned to the ORP, the platoon collects d disseminates all information to every Soldier before moving on to the next ORP. Each R&S team moves from the ORP along a different fan-shaped route overlapping with others to ensure reconnaissance of the entire area. These routes should be adjacent to each other. Adjacent routes prevent the patrol from potentially making contact in two different directions. The leader maintains a reserve at the ORP


156 b. Box Method When using the box method, the leader sends his R&S teams from the ORP along routes forming a boxed-in area. He sends other teams along routes through the area within the box. All teams meet at a linkup point at the far side of the box from the ORP


157 c. Converging Routes Method When using the converging routes method, the leader selects routes from the ORP through the zone to a rendezvous point at the far side of the zone from the ORP. Each R&S team moves along a specified route and uses the fan method to reconnoiter the area between routes. The leader designates a time for all teams to linkup. Once the unit arrives at the rendezvous point, it halts and establishes security


158 d. Successive Sector Method The successive sector method is a continuation of the converging routes method. The leader divides the zone into a series of sectors. The platoon uses the converging routes within each sector to reconnoiter to an intermediate linkup point where it collects and disseminates the information gathered to that point. It then reconnoiters to the next sector. Using this method, the leader selects an ORP, a series of reconnaissance routes, and linkup points. The actions from each ORP to each linkup point are the same as in the converging routes method. Each linkup point becomes the ORP for the next phase. Upon linkup at a linkup point, the leader again confirms or selects reconnaissance routes, a linkup time, and next linkup point. This action continues until the entire zone has been reconnoitered. Once the reconnaissance is completed, the unit returns to friendly lines


159 5. STATIONARY ELEMENT TECHNIQUES Using the stationary element technique, the leader positions R&S teams in locations where they can collectively observe the entire zone for long-term, continuous information gathering. The leader considers sustainment requirements when developing his Soldiers load plans


160 6. MULTIPLE AREA RECONNAISSANCE When using multiple area reconnaissance the leader tasks each of his subordinate units to conduct a series of area reconnaissance actions within the zone 6-124
161 a. React to Indirect Fire SECTION IV Battle Drills (ATP , APR 16) 1. Dismounted. Unit personnel take the following actions: a. Any Soldier announces, INCOMING! b. Soldiers immediately assume the prone position or move to immediate available cover during initial impacts. c. The unit leader orders the unit to move to a rally point by giving a direction and distance. d. Soldiers move rapidly in the direction and distance to the designated rally point, after the impacts. e. The unit leaders report the contact to higher headquarters. b. React to Ambush (Near) 1. Dismounted unit (see figure J-6, page J-14) takes the following actions: a. Soldiers in the kill zone execute one of the following two actions: (1) Return fire immediately. If cover is not available, immediately and without order or signal, assault through the kill zone


162 (2) Return fire immediately. If cover is not available, without order or signal, occupy the nearest covered position and throw smoke grenades


163 b. Soldiers in the kill zone assault through the ambush using fire and movement. c. Soldiers not in the kill zone identify the enemy location, place well-aimed suppressive fire on the enemy's position and shift fire as Soldiers assault the objective. d. Soldiers assault through and destroy the enemy position. e. The unit leader reports the contact to higher headquarters

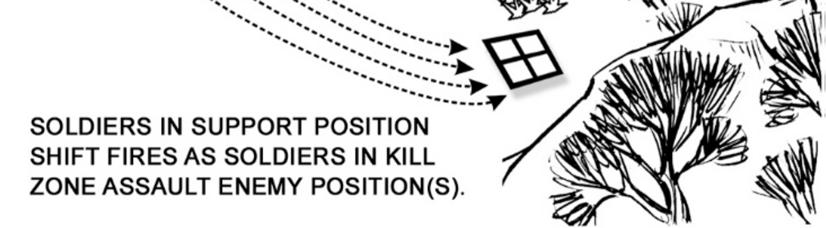
164 6-128

 containing the following elements: a. Alert. b. Weapon or ammunition (optional).")
165 c. React to Direct Fire Contact 1. The element in contact immediately returns well-aimed fire on known enemy position(s). Vehicles move out of the beaten zone. 2. Soldiers and vehicles assume the nearest covered and concealed position. 3. Element leaders locate and engage known enemy positions with well-aimed fire or battlesight fire command, and pass information to the unit leader and Soldiers. 4. Element leaders control the fire of their Soldiers by using standard fire commands (Initial and supplemental) containing the following elements: a. Alert. b. Weapon or ammunition (optional). c. Target Description d. Direction. e. Range. f. Method. g. Control (optional). h. Execution. g. Termination
 check the status of their personnel. 8.")
. b. Element leaders of the elements not in contact move to the front of their element.")
166 5. Soldiers and vehicle commanders maintain contact (visual or oral) with the leader, other Soldiers, and vehicles on their left or right. 6. Soldiers maintain contact with the team leader and indicate the location of the enemy positions. 7. Unit leaders (visually or orally) check the status of their personnel. 8. Element leaders maintain visual contact with the unit leader. 9. The unit leader moves up to the element in contact and links up with its leader. a. Unit leader brings the radio-telephone operator, forward observer, element leader of the nearest element, one crew-served weapon team (machine gun team if available). b. Element leaders of the elements not in contact move to the front of their element. c. The platoon sergeant moves forward with the remaining crew-served weapons and links up with the unit leader and assumes control of the support element. 10. The unit leader determines whether or not the unit must move out of the engagement area. 11. The unit leader determines whether or not the unit can gain and maintain suppressive fires with the element already in contact (based on the volume and accuracy of enemy 6-130
167 fires against the element in contact). 12. The unit leader makes an assessment of the situation identifies a. The location of the enemy position and obstacles. b. The size of the enemy force engaging the unit in contact. (The number of enemy automatic weapons, the presence of any vehicles, and the employment of indirect fires are indicators of enemy strength.) c. Vulnerable flanks. d. Covered and concealed flanking routes to the enemy positions. 13. The unit leader decides whether to conduct an assault, bypass (if authorized by the company commander), or break contact. 14. The unit leader reports the situation to higher headquarters and begins to maneuver the unit
168 SECTION I CADET RULES (AR 350-1, App. G-23b) 1. Cadets fight only enemy combatants 2. Cadets do not harm enemies who surrender. They disarm them and turn them over to their superiors 3. Cadets do not kill or torture enemy prisoners of war 4. Cadets collect and care for the wounded, whether friend or foe 5. Cadets do not attack medical personnel, facilities or equipment 6. Cadets destroy no more than the mission requires 7. Cadets treat civilians humanely 8. Cadets do not steal. Cadets respect private property and possessions 9. Cadets should do their best to prevent violations of the law of war 10. Cadets report all violations of the law of war to their superior SECTION II ROE/DETAINEE OPERATIONS (FM , 6SEP06; JP 1-02; CJCSI B, 13JUN05) 1. Definition - Rules of Engagement (ROE) are directives issued by competent military authority, which delineate the circumstances and limitations under which US forces will initiate or continue combat engagement with other forces encountered. 2. Rules of Engagement a. The ROE apply to US forces during all military operations and contingencies. Commanders may augment the ROE for specific operations. Commanders must assess the capabilities and intent of other forces and make recommendations for supplemental ROE through the chain of command. Clearly state the ROE in simple language. b. These ROE are intended for the following: (1) Implementing the right of self-defense, this is applicable worldwide, to all echelons of command. (2) Providing guidance governing the use of force consistent with mission accomplishment. (3) Use in peacetime operations other than war, during transition from peacetime to armed conflict or war, and during armed conflict in the absence of superseding guidance. 3. Guide for Handling Detainees, Captured Enemy Documents (CEDs), & Captured Enemy Equipment (CEE) a. Detainees, retained personnel, CEDs, and CEE are critical sources of combat intelligence. Often the Maneuver Battalion S2 is the first MI officer to encounter these sources. His actions are critical to the exploitation system. Information from these items is time sensitive, and these information sources need to be exploited at as low an echelon as possible. The S2 should anticipate requirements for support based on planned missions and request HUMINT collector support as necessary. If unable to receive HUMINT collector support, the S2 must be prepared to exploit these sources of information to the best of his ability and more importantly expedite their evacuation to locations and units where they can be exploited. b. Purpose 7-1
169 This guide is for battalion and brigade S2s. It explains standard procedures on what the S2 should do when his unit Captures an enemy Cadet or other detainee. Encounters a civilian on the battlefield. Finds or captures an enemy document. Discovers an unusual enemy weapon or other unusual piece of equipment during tactical operations. 4. PERSONNEL HANDLING OVERVIEW a. The Geneva Convention defines persons entitled to treatment as prisoners of war upon capture, in Article 4. b. The Geneva Convention defines the civilian population (exclusive of those civilian persons listed in Article 4) who benefit to varying degrees from the provisions of the Geneva Conventions. c. Persons in each of these categories have distinct rights, duties, and restrictions. Persons who are not members of the Armed Forces, as defined in Article 4, who bear arms or engage in other conduct hostile to the enemy thereby deprive themselves of many of the privileges attaching to the members of the civilian population. The capturing unit treats all combatants and noncombatants who are suspected of being part of the threat force as EPWs or retained personnel until their status can be determined. This determination normally occurs at the detainee collection point or at a higher echelon. Noncombatants are handled, questioned, detained, evacuated, and released in accordance with theater policy. In all cases, detainees are treated humanely. d. Detainees are treated humanely but with firmness at all times. High standards of discipline are required not only of detainees but also of capturing and escort forces. Fraternization with detainees or mistreatment or abuse of them is not only a violation but also is not conducive to good discipline. In addition to not being conducive to good discipline, the mistreatment or abuse of detainees is a violation of the UCMJ for which violators may be punished. The control of detainees is exercised through the issuance and firm enforcement of necessary instructions in their own language. Instructions relating to their control during evacuation from the combat zone should be as brief as possible. Care must be taken to ensure that detainees have a clear understanding of all instructions to them. e. At the capture point, the capturing element performs the following steps on detainees. The senior Cadet will ensure that the steps are performed. The steps are referred to as the "Five S's and a T". STEPS IN PERSONNEL HANDLING 1. SEARCH a. The capturing unit's first job is to disarm, search, and maintain positive control over all detainees. The detainees are disarmed and searched for concealed weapons and for equipment and documents of particular intelligence value immediately upon capture, unless the number of detainees captured, enemy action, or other circumstances make such a search impracticable. Until each detainee is searched, the responsible forces must be alert to prevent the use of concealed weapons or destruction of documents or equipment. 7-2
170 b. The capturing unit gathers all loose CEDs and CEE in the area. Identification documents and protective military equipment such as helmets or CBRN gear stay with the detainee unless otherwise directed by the battalion S2. (1) Equipment. Items of personal or individual equipment that are new or appear to be of a type not previously observed may be of intelligence value and should be processed and reported in accordance with the unit's SOP, specific evacuation instructions in Annex B (Intelligence) of the OPORD, and theater policy. Equipment for personal protection such as protective masks or protective clothing may not be taken unless replaced with equivalent equipment. (2) Documents. A CED is any piece of recorded information that has been in the hands of the enemy. CEDs include but are not limited to maps, sketches, photographs, orders, tactical and technical manuals and instructions, code books, log books, maintenance records, shipping and packing slips and lists, war and field diaries, personal diaries, pay books, newspapers, service records, postal savings books, payrolls, postcards and letters, and any written, printed, engraved, or photographic matter that may contain information relative to the enemy and to weather and terrain data. A capturing unit is normally not able to accurately determine the potential intelligence value of any documents found on the detainee. It is therefore normally expedient to remove all documents, with the exception of the detainee's primary identification document. These documents are sealed in a waterproof container and tagged with part C of the capture tag. If capture tags are not available, the document bag must be marked at a minimum to identify the detainee to whom the documents belong. (3) Personal effects. Except as provided in Step 1, detainees should be permitted to retain all of their personal effects including money; valuables; protective equipment, such as helmets, protective masks, and like items; effects and articles used for clothing or eating, except knives and forks; identification cards or tags; badges of grade and nationality; and articles having a personal or sentimental value. When items of equipment issued for the personal protection of detainees are taken from them, they must be replaced with equivalent items serving the same purpose. Although money and other valuables may be taken from detainees as a security measure, they must then be receipted for and a record thereof maintained in a special register. These administrative steps normally are not practical to accomplish prior to arrival of the detainee at an EPW camp. 2. SILENCE - Detainees are kept silent so that they cannot plan deception or encourage each other to resist. Keeping the detainees silent also prevents them from relieving the stress and shock of capture by talking with others. If the shock of capture is preserved, HUMINT collectors can take advantage of it in an approach. The capturing unit instructs or signals the detainees to be silent. If that does not work, the detainee is gagged. Guards give orders to detainees, but do not converse with them or give them any comfort items. 3. SAFEGUARD - All detainees are promptly evacuated out of the "danger" zone. Their presence may not be used to render points or areas immune to attack, nor should they be retained for participation in psychological warfare or other activities. The capturing forces must protect detainees from reprisals. Detainees will not be denied food, potable water, or appropriate clothing and shelter. Necessary medical attention will not be delayed. Those detainees held in an area should be provided protective facilities and equipment and should be oriented as to procedures to be followed in case of chemical, biological, and radiological agent attack. 7-3
171 SEGREGATE - The capturing unit separates officers from enlisted, senior from junior, male from female, and civilian from military within their capabilities to both guard and safeguard the detainees. (Physical segregation at this point is not always possible.) Deserters and people of different nationalities and ideologies should be further segregated. The capturing unit prepares a capture tag and puts one on each detainee (see DD Form 2745). 4. SPEED TO THE REAR a. The capturing unit moves detainees and CEDs to the unit supply point or other area where transportation to the rear is available for evacuation. Evacuation of detainees from the combat zone should be effected within the minimum time after capture. While in the combat zone, not only may detainees become casualties as the result of enemy fire but also the fluidity of operations, the wide dispersion of units, and the austerity of facilities may necessitate their rapid evacuation. b. The normal evacuation channel is from the detainee collection point through intermediate detainee holding areas to an internment facility at a higher echelon. Available returning transportation, however, may bypass any intermediate detainee holding area and proceed directly to a corps or theater internment facility. Detainees will then be processed directly into the corps or theater internment facility. Evacuation may be by foot, vehicle, rail, aircraft, or ship. Evacuate detainees who are litter patients through medical channels. c. The command (brigade and above) from which the detainees are being evacuated is responsible to provide transportation and rations and for coordinating all other matters related to the evacuation. Escort guards are furnished by the command (division and above) to which the detainees are being evacuated. 5. TAG - When the detainees have been searched and segregated, the capturing unit prepares a capture tag and puts one on each detainee. It is very important that the capturing unit fill out the Capture Tag as accurately and completely as possible. HUMINT collectors will use the information from the tag when preparing to interrogate detainees. The "capturing unit" and "location of capture" information will be used to provide direct feedback to the capturing unit when information of immediate tactical value is obtained. Each EPW tag has a different serial number used for the purpose of accountability and cannot be reproduced. The EPW tag is perforated into three parts: Part A is attached to the detainee, Part B is retained by the capturing unit, and Part C is attached to the detainee's property (see DD Form 2745). DOCUMENT HANDLING 1. DOCUMENTS FOUND ON ENEMY PRISONER OF WAR (EPWs) a. The battalion S2 and subordinate unit commander ensure that CEDs found on detainees are handled as follows. The capturing unit will (1) Search each detainee. (2) Return identification documents to detainees. It may be preferable to return only one identity document, to preclude the detainee from spreading extras around to cause confusion. The preferred ID document to return to the detainee is a picture ID (such as a military or government ID card). If the detainee has several identification documents, the S2 returns the ID that most accurately reflects the detainee's official status. This might be a military ID for a Cadet and a passport or government-issue ID for a civilian. If the detainee has several identification documents with different names, this may be an indicator of CI interest. The S2 notifies the nearest Counter Intelligence (CI) unit. 7-4
172 (3) Write the following on the top and bottom half of the EPW capture tag: Number of documents taken, date and time, location and circumstances of capture, capturing unit's designation. (4) Put CEDs in a waterproof bag, one per detainee. (5) Affix Part C of the capture tag to the bag. (6) Give CEDs to the senior escort. (7) Direct the senior escort to evacuate CEDs with the detainee. 2. DOCUMENTS FOUND IN THE AO a. An example of CEDs found in the AO is paperwork discovered in an overrun CP, but not on a detainee. The capturing unit will (1) Put CEDs in a waterproof bag. (2) Follow the same procedures described above, and tag the bag. (3) Evacuate the CEDs to the battalion S2. (4) Evacuate all CEDs as dictated by Annex B of the OPORD. This is normally through the MI chain (for example, from Battalion S2 to Brigade S2, to the first HUMINT collection or DOCEX unit in the MI chain). The S2 normally coordinates with the S4 for the use of supply vehicles returning empty to the rear for the transportation of large numbers of documents. 3. INITIAL DOCUMENT EXPLOITATION a. A combat unit without language-qualified personnel can perform limited battlefield DOCEX, mainly on maps and overlays. The unit S2 is normally responsible for any initial exploitation by the capturing unit. The S2 safeguards the items pending disposition. At the same time he (1) Looks over the document. (2) Does not mark or harm it in anyway. (3) Uses whatever resources are available to decipher it; for example, dictionaries and enemy map symbol guides. (4) Looks for information that has a direct bearing on his current mission. b. The S2 extracts the combat information and uses the SALUTE format as a template to organize the information. 4. EQUIPMENT HANDLING PROCEDURES a. CEE includes all types of foreign materiel found on a detainee or in the AO that may have military application. The capturing unit (1) Always permits the detainee to keep protective equipment and equipment for his personal well-being unless this gear is replaced by equivalent items by the capturing unit. This equipment includes helmet, CBRN gear, mess gear (excluding knife and fork). (2) Disposes of equipment in accordance with unit SOPs and instructions in Annex B of the OPORD. Most routine equipment is normally destroyed in place. Unusual or new equipment or equipment identified as being of technical intelligence is tagged with a CEE tag (Part C of DD Form 2745) and evacuated to the nearest technical intelligence unit. Communications equipment is also tagged and evacuated to the nearest signals intelligence unit. (3) Identifies equipment that cannot be easily evacuated; its location is passed through intelligence channels to the nearest unit that will be involved in its exploitation. 7-5
173 5. FIELD-EXPEDIENT TAGGING PROCEDURES - When no standard tag forms are available, the following field-expedient methods may be used: Use meals, ready-to-eat (MRE) cardboard or other type of paper. Write the capturing unit's designation. Write data and time of capture. Write POC coordinates. Write circumstances of capture. Identify EPW, captured document, or equipment captured. Put tag, without damaging the CED, in a waterproof bag. Attach EPW and CEE tags so they will not come off. 6. MEDICAL CARE a. Medical equipment and supplies to permit the administering of emergency first aid should be available at each EPW collecting point and EPW holding area. A qualified medical retained person, if available, may administer first aid to other detainees. All detainees suspected of having communicable diseases are isolated for examination by a medical officer. Wounded detainees may be questioned by intelligence personnel once the detainees are cleared by competent medical authority for questioning. b. For evacuation purposes, detainees may be classified as walking wounded or sick, or as non-walking wounded or sick. Walking wounded detainees are evacuated through MP EPW evacuation channels. Non-walking wounded are delivered to the nearest medical aid station and evacuated through medical channels. SECTION III - RISK MANAGEMENT PROCESS (ATP 5-19, APR 14) PRINCIPLES OF RISK MANAGEMENT 1. Risk management is the process of identifying, assessing, and controlling risks arising from operational factors and making decisions that balance risk cost with mission benefits (JP 3-0). The Army uses risk management (RM) to help maintain combat power while ensuring mission accomplishment in current and future operations. RM applies to operations and to nonoperational activities. Note. For more information on RM application to nonoperational activities, see DA Pam Principles of RM are: Integrate RM into all phases of missions and operations. Make risk decisions at the appropriate level. Accept no unnecessary risk. Apply RM cyclically and continuously. a. Integrate Risk Management Into All Phases of Missions and Operations - Army forces must integrate RM throughout planning, preparation, execution, and assessment activities. Army units should use RM for on- and off-duty activities. Commanders must emphasize RM in planning processes; they must dedicate sufficient time and other resources to RM during 7-6
174 planning to ensure Army forces manage risk effectively throughout all phases of missions and operations. b. Make Risk Decisions at the Appropriate Level - A risk decision is a commander, leader, or individual s determination to accept or not accept the risk(s) associated with an action he or she will take or will direct others to take. RM is only effective when the specific information about hazards and risks is passed to the appropriate level of command for a risk decision. Subordinates must pass specific risk information up the chain of command. Conversely, the higher command must provide subordinates making risk decisions or implementing controls with the established risk tolerance the level of risk the responsible commander is willing to accept. RM application must be inclusive; those executing an operation and those directing it participate in an integrated process. c. Accept No Unnecessary Risk - An unnecessary risk is any risk that, if taken, will not contribute meaningfully to mission accomplishment or will needlessly endanger lives or resources. Army leaders accept only a level of risk in which the potential benefit outweighs the potential loss. The process of weighing risks against opportunities and benefits helps to maximize unit capability, save lives, and preserve resources. The appropriate level of command makes prudent risk decisions after applying RM and weighing potential gain against potential loss. Commanders need not be risk averse. Forces may undertake even high-risk endeavors when commanders determine that the sum of the benefits exceeds the sum of the costs. Commanders establish the basis for prudent risk decisions through RM. d. Apply Risk Management Cyclically and Continuously - RM is a cyclical and continuous five-step process, applied across all Army operations (including training), individual and collective day-to-day activities and events, and base operations functions. Cadets use this cyclical process (illustrated in figure 1-1) to identify and assess hazards; develop, choose, implement, and supervise controls; and evaluate outcomes as conditions change. e. Application Levels of Risk Management - Army leaders use judgment to manage risk based on the situation. They approach RM at the appropriate application level, using a deliberate approach or a real-time approach. The main factor that differentiates their approach is the amount of time available for planning. A deliberate approach is more analytical but takes more time; a real-time approach is more intuitive and tends to take less time. Regardless of the amount of time available, Army forces manage risk throughout the operations process using the five steps of RM. (1) Deliberate Risk Management - Deliberate RM refers to situations in which ample time is available to apply the five-step process as part of detailed planning for an operation. At this level, experienced commanders, staff, Army leaders, and individuals apply RM steps and principles analytically. Deliberate RM is most effective when done in a group. The joint operation planning process illustrates ways to integrate RM into planning at the deliberate application level (see JP 5-0 for more information on joint operation planning). Other examples of deliberate RM include integrated planning of unit missions, tasks, or events; review of standard operating, maintenance, or training procedures; recreational activities; and the development of damage control and emergency response plans. The discussion in this chapter emphasizes deliberate RM. 7-7

175 Figure 7-1: A Cyclical, Continuous Process for managing Risk (2) Real-Time Risk Management - Army forces plan for all anticipated risks, but during execution, new risks can arise unexpectedly. Real-time RM refers to immediate management of hazards as they occur, usually during execution of an operation or performance of a task. In timeconstrained conditions, intuitive decision making tends to replace deliberate planning. Cadets may only have time for a quick mental or verbal assessment of the new or changing situation. Real-time RM and deliberate RM have the same foundation. Leaders must master the principles and steps of RM. They must practice applying them during planning and execution in timeconstrained situations so real-time RM becomes second nature. 3. Steps of Risk Management Step 1 Identify the hazards. Step 2 Assess the hazards. Step 3 Develop controls and make risk decisions. Step 4 Implement controls. Step 5 Supervise and evaluate. 7-8
 serve as a standard format for")

176 Figure 7-2: Assessment Steps and Management Steps a. Identify the Hazards - The mission variables mission, enemy, terrain and weather, troops and support available, time available, and civil considerations (METT-TC) serve as a standard format for identifying hazards, on- or off-duty. The factors of METT-TC are institutionalized in the Army. They are part of the common knowledge imparted through the Army s professional military education and the civilian education system. Some other resources and tools support the identification of hazards include Experience and other experts. Regulations, manuals, standard operating procedures (SOPs), and policies. Accident data. War-gaming what-if scenarios. Data from risk assessment matrixes. Readiness assessments. Cause and effect diagrams. Change analysis. Energy trace and barrier analysis. Logic diagrams. Mapping techniques. Training assessments. After action reviews (AARs). b. Assess the Hazards - To assess hazards, RM practitioners consider how identified hazards (conditions) could lead to harmful events and how those events would affect operations. They envision the potential for the events and their predictable effects. Risk levels reflect a 7-9
177 combination of the probability of occurrence and the severity of the adverse impact. In the context of RM, probability is the likelihood an event will occur; it is assessed as frequent, likely, occasional, seldom, or unlikely. In the context of RM, severity is the expected consequences of an event in terms of injury, property damage, or other mission-impairing factors; it is assessed as catastrophic, critical, moderate, or negligible. A risk level is a type of score that assesses the odds (probability) of something going wrong and the effect (severity) of the incident when it occurs. (1) Risk Levels - Planners assess hazards (the conditions and the events that could result) and assign associated risk levels during mission analysis; course of action (COA) development; COA analysis; and orders production, dissemination, and transition steps of the MDMP. Commanders and staff must consider aspects directly or indirectly related to the mission that could affect risk during operations. The result of this assessment is an initial estimate of a risk level for each identified hazard, expressed as Extremely high (EH). High (H). Medium (M). Low (L). (a) Planners determine the level of risk by using the risk assessment matrix (illustrated below). (b) Planners apply three sub-steps in step 2, using the risk assessment matrix Estimate the probability of a harmful event or occurrence from a hazard. Estimate the expected severity of an event or occurrence. Determine the level of risk for the estimated probability and severity. c. Implementing Controls to Mitigate or Eliminate Risk. RM practitioners implement appropriate controls to mitigate or eliminate risk. Commanders are responsible for the implementation and maintenance of controls. Commanders expect staff and subordinate leaders to implement and maintain the controls to standard. A method to supervise and evaluate the effectiveness of controls may be as important as their implementation. Active leader participation at the lowest levels is a critical element in ensuring control implementation and maintenance. The leadership and staff should develop and employ the most effective controls for a given set of circumstances, while abandoning those found less effective. They ensure controls are correctly implemented and determine their effectiveness by tools such as the after action review. 7-10
178 Risk Assessment Matrix Table 7-1: Risk Assessment Matrix Probability (expected frequency) Frequent: continuous, regular, or inevitable occurrences Likely: Several or numerous occurrences Occasional: Sporadic or intermittent occurrences 7-11 Seldom: Infrequent occurrences Unlikely: Possible occurrences but improbable Severity (expected consequence) A B C D E Catastrophic: Mission failure, unit readiness eliminated, death, I EH EH H H M unacceptable loss or damage Critical: Significantly degraded unit readiness or mission capability, II EH H H M L severe injury, illness, loss or damage Moderate: Somewhat degraded unit readiness or mission capability, III H M M L L minor injury, illness, loss or damage Negligible: Little or no impact to unit readiness or mission capability, minimal injury, loss or damage IV M L L L L Legend: EH -Extremely High Risk, H - High Risk, M - Medium Risk, L - Low Risk (1) Sub-step 1 Estimate the Probability of an Occurrence - Probability is an estimate, based on the information known about the hazard and on the hazard-related occurrences experienced by others in similar situations. The RM practitioner estimates the probability levels of harmful events occurring for each hazard, taking into account all relevant factors including the
179 mission, scheme of maneuver, and frequency of similar occurrences. Probability estimates take into account the current situation and previous similar situations. For the purpose of RM, the five levels of probability are Frequent (A). Likely (B). Occasional (C). Seldom (D). Unlikely (E). (2) Sub-step 2 Estimate the Expected Severity of an Occurrence - A severity level is a prediction of the effects of a harmful event on combat power, mission capability, or readiness. The severity level does not consider probability; severity is an estimate of the loss that would follow the envisioned event. The RM practitioner estimates the level of severity for each anticipated occurrence based on knowledge of the results of similar past occurrences. For the purpose of RM, severity is assessed at one of four levels: Catastrophic (I) - Severity is estimated as catastrophic when consequences of an event, if it occurs, are expected to include death, unacceptable loss or damage, mission failure, or the loss of unit readiness. Critical (II) - Severity is estimated as critical if the consequences of an event, if it occurs, are expected to include severe injury, illness, loss, or damage; significantly degraded unit readiness; or significantly degraded mission capability. Moderate (III) - Severity is estimated as moderate if the consequences of an event, if it occurs, are expected to include minor injury, illness, loss, or damage; degraded unit readiness; or degraded mission capability. Negligible (IV) - Severity is estimated as negligible if the consequences of an event are expected to include minimal injury, loss, or damage; little or no impact to unit readiness; or little or no impact to mission capability. (Table 1-2 summarizes examples of catastrophic, critical, moderate, and negligible severity.) Table 7-2: Levels of Severity and Examples of Consequences Level Sample Consequences Complete mission failure or the loss of ability to accomplish a mission. Death or permanent total disability. I Catastrophic Loss of major or mission-critical systems or equipment. Major property or facility damage. Severe environmental damage. Unacceptable collateral damage. II Critical Significantly degraded mission capability or unit readiness. 7-12
180 Level III Moderate IV Negligible Sample Consequences Permanent partial disability or hospitalization of at least 3 personnel. Extensive major damage to equipment or systems. Significant damage to property or the environment. Significant collateral damage. Degraded mission capability or unit readiness. Minor damage to equipment or systems, property, or the environment. Lost days due to injury or illness. Minimal injury or damage. Little or no impact to mission or unit readiness. First aid or minor medical treatment. Little or no property or environmental damage. (3) Sub-step 3 Determine Level of Risk - After identifying and analyzing hazards, RM practitioners determine the level of risk for each hazard. Using the standard risk assessment matrix, practitioners assess the level of risk as extremely high, high, medium, or low. To make this determination, they combine probability and severity levels estimated for each hazard. The vertical axis on the left side of the risk assessment matrix (table 1-1) shows severity, with the Roman numerals I through IV representing severity levels. The horizontal axis across the top of the matrix shows probability, with the capital letters A through E representing probability levels. Where each Roman numeral and capital letter intersects, the combination correlates with one of the four levels of risk. The level of risk is not an absolute measure of the relative danger of a given operation, activity, or event. Moreover, considerations for determining the initial level of risk include effects beyond the immediate situation. The assessment of a level of risk in step 2 is an initial assessment; practitioners will revise the level of risk when they complete step 3. Extremely High Risk - Extremely high risk refers to expected loss of ability to accomplish the mission if exposure occurs during operations. A determination of extremely high risk (sometimes recorded as EH) results from three possible combinations of probability and severity. The first combination assessed as extremely high risk is a probability estimate of frequent for an envisioned event that would have catastrophic consequences in terms of severity (IA). The next involves a probability estimate of likely for an event that would have catastrophic consequences (IB). The third combination is a probability estimate of frequent for an event expected to be of critical severity (IIA). For an assessment of extremely high risk, the consequences could extend beyond the current operation. When a risk is assessed as extremely high, practitioners carefully weigh the decision to continue against the potential gain from continuing the COA. High Risk - High risk refers to significant degradation of mission capabilities in terms of the necessary standard, inability to accomplish all parts of the mission, or inability to complete the mission to standard if exposure occurs during operations. A determination of high risk (sometimes recorded as H) results from five possible combinations of probability and severity. The first two combinations assessed as 7-13
181 high risk involve envisioned events for which the severity of the consequences would be catastrophic, and probability is estimated to be occasional (IC) or seldom (ID). The next two combinations involve events for which severity would be critical, and probability is estimated to be likely (IIB) or occasional (IIC). The final combination involves events expected to have moderately severe consequences, with a probability estimate of frequent (IIIA). An assessment of high risk implies that serious consequences will follow a hazardous event, if it occurs. Commanders carefully weigh the risk against the potential gain of the COA. Medium Risk - Medium risk refers to the expectation of degraded mission capabilities in terms of the necessary standard and reduced mission capability if exposure occurs during operations. A determination of medium risk (sometimes recorded as M) results from five possible combinations of probability and severity. The first combination assessed as medium risk involves a probability estimate of unlikely for an event expected to have catastrophic consequences (IE). The second is a probability estimate of seldom for an event expected to have consequences of critical severity (IID). Additional combinations assessed as medium risk involve the expectation of moderately severe consequences for events with probability estimates of likely (IIIB) or occasional (IIIC). Finally, an event that would cause negligible loss with a probability estimate of frequent (IVA) is assessed as medium risk. Low Risk - Low risk refers to expected losses that would have little or no impact on accomplishing the mission. A determination of low risk (sometimes recorded as L) results from seven possible combinations of probability and severity. The first combination assessed as low risk involves a probability estimate of unlikely for an event that would have consequences of critical severity (IIE). The next combinations are events expected to have consequences of moderate severity, with probability estimates of seldom (IIID) or unlikely (IIIE). Finally, events expected to have consequences of negligible severity, with probability estimates of likely or below (IVB, IVC, IVD, or IVE), are assessed as low risk. Either the event that would cause injury, damage, or illness is not expected, or losses would be minor and would have no long-term effect. d. Develop Controls and Make Risk Decisions (1) After assessing each hazard, Army leaders or individuals develop one or more controls that either eliminate the hazard or reduce the risk (probability and severity of loss) from a harmful occurrence. In developing controls, Army leaders must consider the reason for the hazard, not just the hazard in isolation. Controls can take many forms but normally fall into one of three categories: Educational controls. Physical controls. Hazard elimination controls. 7-14
182 (2) Effective controls meet the eight criteria of effectiveness Feasibility. Acceptability. Suitability. Support. Explicitness. Standards. Training. Leadership. The individual Develop the Initial Information Collection Plan A supporting risk assessment worksheet may be prepared with the information collection plan. The risk assessment information developed along with the information collection plan is used during the conduct of intelligence, surveillance, reconnaissance, and security. Gaps in the information collection plan lead to increased risk. Therefore, controls are needed to mitigate or eliminate such risk. Controls may be applied to Surveillance and reconnaissance assets Task organization shortfalls. Fire support coordination measures. Medical evaluation provisions. Criteria for Effective Controls Criteria Feasibility Acceptability Suitability Support Explicitness Standards Training Leadership Descriptions The unit has the capability to implement the control. The benefit gained by implementing the control justifies the cost in resources and time. The assessment of acceptability is largely subjective. Past experience, the commander s guidance, or other external restrictions influence the assessment. The control removes the hazard or mitigates (reduces) the residual risk to an acceptable level (determined by the responsible individual). Adequate personnel, equipment, supplies, and facilities necessary to implement the control are available. The control clearly specifies who, what, where, when, why, and how each control will be used. Guidance and procedures for implementing the control are clear, practical, and specific. Knowledge and skills of personnel are adequate to implement the control. Army leaders are ready, willing, and able to enforce standards necessary to implement the control. 7-15
183 Criteria The Individual Descriptions Individual personnel are sufficiently self-disciplined and capable of implementing the control. (3) Examples of Controls - Whether conducting deliberate or hasty risk assessment, RM practitioners identify all essential aspects of controls precisely including who, what, when, where, and how. Table 1-4 shows examples of preliminary documentation identifying who, what, when, where, and how for sample hazards and controls. RM practitioners completing DD Form 2977 must, at a minimum, document the what, who, and how aspects on the form. Table 7-3: Examples of Hazards and Controls Hazard Unsecured or unstable loads Unsecured hatches or ramps Unsecured crew and passengers exposed during operations on rough terrain (tracked vehicles) Improper passing Improper ground guiding Control Who: Supervisors, Army leaders, drivers, operators. What: Ensure loads are secured in accordance with loads plans and applicable manuals or publications. Where: In the assembly area. When: Before vehicle is allowed to leave. How: Emphasize cargo center of gravity, ammunition, and pyrotechnics. Who: Supervisors, Army leaders, drivers, operators. What: Inspect and correct unsafe conditions. Where: In the assembly area. When: Before executing operations (during preparation). How: Secure with locking pin or latch devices. Who: Supervisors, Army leaders, drivers, operators. What: Position is no higher than nametag defilade unless engaging targets; all persons wear seatbelts or harnesses as appropriate; equipment is stowed and secured according to load plans. Where: In the assembly area or motor park. When: Before and during operations (preparation and execution). How: Spot-check vehicles and crews Who: Supervisors, Army leaders, drivers, operators. What: Establish and enforce standards; train vehicle operators to pass other vehicles only at safe places and times while considering road visibility and traffic conditions. Where: In assembly areas and vehicle staging lanes. When: Train operators and drivers before licensing; brief operators and drivers during preparation (before execution). How: Verify training and licensing of drivers and operators; enforce standards. Who: Supervisors, Army leaders, drivers, operators. 7-16
184 Hazard Control What: Establish and enforce standards for operation of vehicles in congested areas (bivouac sites, forward operating bases, maintenance areas, assembly areas and battle positions). Where: Assembly areas, motor parks. When: Before licensing drivers and operators; before deployments or exercises. How: Require use of ground guides while operating in limited visibility, backing vehicles, moving vehicles in bivouac, and conducting maintenance; and during assembly and battle positions. (4) Residual Level of Risk - After RM practitioners identify effective controls, they return to the risk assessment matrix (see table 1-1) to determine the residual level of risk for each hazard and the overall residual risk for the operation. They should continue analyzing the hazards and proposing options to reduce or eliminate them until they have identified the most effective controls (see criteria in table 1-3). The appropriate level of command must approve the mission, making a final risk decision based on the residual level of risk. Planners should sort hazards and controls under consideration according to residual risk, placing the highest-risk hazards first. This allows decision makers at the appropriate level of command to identify the highest-risk hazards easily. Decision makers should keep in mind that the residual level of risk is valid (true) only if forces implement the controls. (5) Make Risk Decisions - The purpose of RM is to provide a basis for individuals and leaders to make sound and informed risk decisions. To make those decisions, they must know the established risk tolerance and the potential gain. Ultimately, commanders are responsible for determining the risk tolerance within the command and for making risk decisions for operations, missions, or tasks. The appropriate level of command or leadership must make risk decisions about specific hazards and controls, consistent with the risk tolerance guidance. Decision makers must balance risk against expected gains. When Cadets are off-duty, a risk decision may be a personal one. Individuals use RM to evaluate hazards, mitigate risks, and weigh costs versus benefits of an action both on- and off-duty. (For further guidance on the appropriate risk acceptance authority and nonoperational RM integration, see DA Pam In addition, Cadets should consult local regulations, SOPs, or other command policy.) e. Implement Controls - Cadets normally implement controls during the preparation activities of the operations process. Army leaders establish how the controls will be implemented and who will manage them. They ensure selected controls are translated into briefings and curricula and then integrated with training. They direct trainers to develop practical training solutions. They ensure units receive safety equipment and instructions on its use. Army leaders ensure subordinates fully understand and implement the controls. They ensure the implemented controls are maintained to standard. Examples of ways to disseminate guidance and ensure implementation of controls include Overlays and graphics. Drills for vehicle and aircraft silhouette identification. 7-17
185 Rehearsals and battle drills. Refresher training on intensive threat and friendly vehicle identification for all anti-armor and air defense weapons crews. Installation and maintenance of communications links for key civilian organizations. Operation of convoys with a prescribed minimum number of vehicles. Provisions to carry weapons and wear body armor and helmets when outside secure compounds. Accident awareness, safety briefings, and warnings. f. Supervise and Evaluate - Primarily, step 5 involves ensuring that controls are implemented and performed to standard. RM practitioners apply this step to validate that selected controls support achieving the end state. They identify weaknesses of controls and make changes or adjustments based on performance or changing situations, conditions, or events. However, supervision and evaluation are not limited to controls. Like other steps of RM, supervision and evaluation must occur throughout all phases of any operation or activity. RM practitioners supervise and evaluate all aspects of RM continuously. 7-18


186 This chapter discusses CBRN threats and hazards within the construct of the WMD proliferation continuum and describes how key players, such as state and non-state actors, attempt to acquire WMD-related materials. Understanding the difference between CBRN threats and hazards; the terms threat reduction cooperation, contamination avoidance, and chemical warfare; and the relationships between individuals and groups that may seek to harm the United States is critical to supporting the nation s strategy to combat WMD. CBRN operations include the employment of tactical capabilities that counter the entire range of CBRN threats and hazards through WMD proliferation prevention, WMD counterforce, CBRN defense, and CBRN consequence management activities. CBRN operations support operational and strategic objectives to combat WMD and operate safely in a CBRN environment. A CBRN environment consists of conditions found in an area resulting from immediate or persistent effects of CBRN attacks or unintentional releases. The following definitions are provided: WMD. WMD are CBRN weapons that are capable of causing a high order of destruction or mass casualties and exclude the means of transporting or propelling the weapon if such means are a separate, divisible part of the weapon. Threat reduction cooperation. Threat reduction cooperation consists of activities that are undertaken with the consent and cooperation of host nation authorities in a permissive environment to enhance physical security and to reduce, dismantle, redirect, and/or improve the protection of a state s existing WMD program, stockpiles, and capabilities. Contamination avoidance. Contamination avoidance is individual and/or unit measures that are taken to reduce the effects of CBRN hazards. Chemical warfare. Chemical warfare is all aspects of military operations involving the employment of lethal and incapacitating munitions/agents and the warning and protective measures associated with such offensive operations. Since riot control agents and herbicides are not considered to be chemical warfare agents, they will be referred to separately or under the broader term of chemical, which will be used to include all types of chemical munitions/agents collectively. SECTION I DETECT CHEMICAL AGENTS USING M8 OR M9 DETECTOR PAPER M8 M9 8-19
187 Note: M8 and M9 detector paper will not detect chemical-agent vapors. a. Attach the M9 detector paper to your MOPP gear and equipment while wearing chemicalprotective gloves. (1) Place the M9 detector paper on the MOPP gear on opposite sides of your body. (a) If you are right-handed, place a strip of M9 detector paper around your right upper arm, left wrist, and right ankle. (b) If you are left-handed, place a strip of M9 detector paper around your left upper arm, right wrist, and left ankle. Note: These are the places where a moving Soldier will most likely brush against a surface (such as undergrowth) that is contaminated with a liquid chemical agent. Note: Do not attach M9 detector paper to hot, dirty, oily, or greasy surfaces because it may give a false positive reading. (2) Place M9 detector paper on equipment where it will come in contact with contaminated objects and is visible to the operator. CAUTION- Firing weapons lubricated with lubricating oil, semi-fluid; lubricant, small arms; or lubricant, semifluid, automatic weapons (LSA) may cause false positive responses on the olive drab (OD) detector paper. a. Monitor the M9 detector paper constantly for any color change. If you observe a color change, immediately do the following: (1) Mask. (2) Give the alarm. (3) Decontaminate as necessary. (4) Assume MOPP 4. b. Detect chemical agents using M8 detector paper if you see a liquid that might be a chemical agent or if you observe a color change on the M9 detector paper. 1. Assume MOPP 4 immediately. 2. Prepare the M8 detector paper. Tear out a sheet from the book (use one-half sheet if it is perforated). Note: You may want to put the paper on the end of a stick or another object and then blot the paper on the suspected liquid agent. 3. Blot (do not rub) the M8 detector paper on the suspected liquid agent. Do not touch the liquid with your protective glove. Some decontaminants will give false positive results on 8-20
188 the M8 detector paper. The M8 detector paper may indicate positive results if used in an area where decontaminants have been used. 4. Observe the M8 detector paper for a color change. Identify the contamination by comparing any color change on the M8 detector paper to the color chart on the inside front cover of the booklet. (a) A yellow-gold color indicates the presence of a nerve (G) agent. (b) A red-pink color indicates the presence of a blister (H) agent. (c) A dark green color indicates the presence of a nerve (V) agent. (d) Any other color or no color change indicates that the liquid cannot be identified using 5. M8 detector paper. a. Store the booklet of M8 detector paper. b. Remain in MOPP4 even if the liquid cannot be identified. Use other types of chemical-agent detector kits to verify the test results. 6. Notify your supervisor of the test results. Note: M8 detector paper reacts positively to petroleum products, ammonia, and decontaminating solution number 2 (DS2). M9 detector paper reacts positively to petroleum products, insecticides, and antifreeze. Because M9 detector paper only detects (but does not identify) chemical agents, verify all readings with M8 detector paper. If you observe a color change on M8 or M9 detector paper, assume it is a liquid chemical agent. When conducting agent tests at night, remove any colored lens because it may provide a false negative response. Confirm the presence of contamination by using all means of chemical-agent detection available in your area of operation, including a visual check of your surroundings. If you determine that your reading is a false positive, perform the following actions before giving the all clear signal: 1. Ensure that every attempt has been made to recheck the area. 2. Contact your higher headquarters (HQ) or the person in charge, and report the negative results. 3. Await further guidance. The higher HQ contacts all adjacent/attached units to check the status of contamination in their areas. If all units report the absence of contamination, the information is reported up the chain of command. 4. Annotate the above actions on DA Form
 Place markers at the location where a dose rate of 1 centigray per hour cgyph) or more is measured. (2) Place markers so that the word \"ATOM\" faces away from the contamination.")
189 SECTION II MARK CBRN-CONTAMINATED AREAS 1. Employ contamination markers using the CBRN ID marking set. a. Emplace the RADIOLOGICAL markers. (1) Place markers at the location where a dose rate of 1 centigray per hour cgyph) or more is measured. (2) Place markers so that the word "ATOM" faces away from the contamination. (3) Print the following information clearly on the front of the markers: (a) Dose rate in Gyph. (b) Date-time group (DTG) (specify local or Zulu) of the detonation. If the DTG is not known, print "unknown." (c) The DTG (specify local or Zulu) of the reading. b. Emplace the BIOLOGICAL markers. (1) Place markers at the location where contamination is detected. (2) Place markers so that the word "BIO" faces away from the contamination area. (3) Print the following information clearly on the front of the marker. 8-22
190 (a) Name of agent, if known. If unknown, print "unknown." (b) DTG (specify local or Zulu) of detection. c. Emplace the CHEMICAL makers. (1) Place markers at the location where contamination is detected. (2) Place markers so that the word "GAS" faces away from the contamination area. (3) Print the following information clearly on the front of the marker: (a) Name of agent, if known. If unknown, print "unknown." (b) DTG (specify local or Zulu) of detection. d. Position the markers so that the recorded information faces away from the area of contamination and place adjacent marking signs at intervals of 25 to 100 meters, depending on terrain. e. If marking contamination in open terrain (e.g., desert, plains, rolling hills), raise markers to heights that permit approaching forces to view them at a distance up to 200 meters. 2. Employ contamination markers using the M328 CBRN Marking Kit. a. Emplace the RADIOLOGICAL markers. (1) Place markers at the location where a dose rate of 1 centigray per hour (cgyph) or more is measured. (2) Place markers so that the word "ATOM" faces away from the contamination. (3) Print the following information clearly on the front of the markers: (a) Dose rate in cgyph. (b) Date-time group (DTG) (specify local or Zulu) of reading. (c) DTG of detonation, if known. If the DTG is not known, print "unknown." b. Emplace the BIOLOGICAL markers. (1) Place markers at the location where contamination is detected. 8-23
191 (2) Place markers so that the word "BIO" faces away from the contamination area. (3) Print the following information clearly on the front of the markers: (a) Name of agent, if known. If unknown, print "unknown." (b) DTG (specify local or Zulu) of detection. If the DTG is not known, print "unknown." c. Emplace the CHEMICAL markers. (1) Place markers at the location where contamination is detected. (2) Place markers so that the word "GAS" faces away from the contamination area. (3) Print the following information clearly on the front of the marker. (a) Name of agent, if known. If unknown, print "unknown." (b) DTG (specify local or Zulu) of detection. If the DTG is not known, print "unknown." SECTION III PROTECT YOURSELF FROM CHEMICAL AND BIOLOGICAL (CB) CONTAMINATION USING YOUR ASSIGNED PROTECTIVE MASK WARNING Before donning and adjusting the mask, female warfighters will remove earrings, hair fasteners (hair clips, hair pins, combs, and rubber bands), hair knots, buns, or braids that will interfere with the mask seal and will let hair hang freely. When wearing the Ground Crew Ensemble, hair will be neatly tucked inside jacket. Facial hair could result in an improper mask fit resulting in illness or death. Do not wear contact lenses (soft or hard) while wearing the masks. Inadequate oxygen supply to the corneal surface, and exposure to dust, dirt, and smoke or gas may cause serious vision loss or eye damage. Personnel requiring vision correction will use the optical inserts that have been provided to them with their protective masks. 1. Don the mask. a. Stop breathing, and close eyes. b. Remove helmet, put helmet between legs above knees or hold rifle between legs and place helmet on the muzzle. If helmet falls continue to mask. c. Take off glasses, if applicable. 8-24
192 d. Open the mask carrier with left hand. e. Grasp the mask assembly with right hand, and remove it from the carrier. f. Place chin in the chin pocket, and press the facepiece tight against face. Note: The temple and forehead straps have already been adjusted during fitting. g. Grasp the tab and pull the head harness over the head. Ensure that the ears are between the temple straps and the cheek straps. Ensure that the head harness is pulled far enough over the head that the forehead straps are tight. h. Use one hand to tighten the cheek straps, one at a time, while holding the head pad centered on the back of head with the other hand. Ensure that the straps lay flat against the head. 2. Clear the mask. a. Seal the outlet disk valve by placing one hand over the outlet valve cover assembly. b. Blow out hard to ensure that any contaminated air is forced out around the edges of the facepiece. 3. Check the mask. a. Cover the inlet port of the filter canister or the inlet port of the armor quick disconnect with the palm of the hand, and inhale. b. Ensure that the facepiece collapses against face and remains so while holding your breath, which indicates that the mask is airtight. c. Remove any hair, clothing, or other matter between the face and the mask if the face piece does not collapse to face. d. Notify the chemical, biological, radiological, and nuclear (CBRN) noncommissioned officer (NCO) if the mask still does not collapse. 4. Resume breathing. Note: There is no time standards for donning the hood. 5. Complete steps 1 through 4 within 9 seconds. CAUTION BE CAREFUL WHEN PULLING ON THE HOOD BECAUSE IT COULD SNAG AND TEAR ON THE BUCKLES OF THE HEAD HARNESS. 6. Secure the mask hood. WARNING Be careful not to break facepiece seal when pulling protective hood over your head. 8-25
 Carefully pull excess protective hood material over head, neck and shoulders. (3) Grasp underarm straps. (4) Bring the male end of each underarm strap and fasten to female end.")
 Tuck inner skirt inside the collar of the CBRN protective suit. This can be done using the buddy system. c. For the M42- or M43-series protective mask, pull the hood over the head and zip the front closed to cover the bare skin.")
193 a. For the M50/M51-series protective mask. (1) Place hands up under the protective hood, stretch elasticized portion and raise protective hood up and over filters. (2) Carefully pull excess protective hood material over head, neck and shoulders. (3) Grasp underarm straps. (4) Bring the male end of each underarm strap and fasten to female end. (5) Tighten underarm straps. b. For the M48 series protective mask. (1) Carefully pull the back of the hood assembly over the head so hood covers the head, neck and shoulders. (2) Tuck inner skirt inside the collar of the CBRN protective suit. This can be done using the buddy system. c. For the M42- or M43-series protective mask, pull the hood over the head and zip the front closed to cover the bare skin. 8-26
 For masks equipped with the regular hood (a) Grasp the back edge of the hood skirt.")
194 d. For the M45-series protective mask, pull the M7 hood over the helmet and head so that the hood covers shoulders. e. For the M40-series protective mask, don the hood so that it lies smoothly on the head. (1) For masks equipped with the regular hood (a) Grasp the back edge of the hood skirt. (b) Pull the hood completely over the head so that it covers the back of the head, neck, and shoulders. (c) Zip the front of the hood closed by pulling the zipper slider downward. (d) Tighten the draw cord. (e) Secure the underarm straps by fastening and adjusting them. (f) Close your mask carrier. (g) Continue your mission. (2) For masks equipped with the quick-doff hood (a) Place hands inside the hood and expand the elastic gathering around the neck of the hood. (b) Stretch and carefully pull the hood over head so that the hood covers your head, neck and shoulders. 8-27
195 (c) Fasten the underarm straps. (d) Put on the helmet. (e) Close mask carrier. (f) Continue the mission. WARNING USE M8 DETECTOR PAPER TO CHECK FOR CONTAMINATION BEFORE USING THE DRINKING SYSTEM. IF CONTAMINATION IS DETECTED, DECONTAMINATE USING THE M295 DECONTAMINATION KIT. DO NOT CONNECT THE QUICK-DISCONNECT COUPLING TO YOUR CANTEEN UNTIL ALL SURFACES ARE FREE OF CONTAMINATION. CHEMICAL CONTAMINATION COULD ENTER YOUR MOUTH, AND YOU COULD BECOME A CASUALTY. DO NOT BREAK THE MASK SEAL WHILE DRINKING FROM THE CANTEEN. 7. Drink water while wearing the mask. a. Press in on the top of the outlet valve cover until the internal drink tube can be grasped between your teeth. b. Steady the mask assembly with one hand and pull the quick-disconnect coupling out of the outlet valve cover. For the M50/M51 protective mask pull drink coupler out of coupler receptacle, below the front module. c. Flip open the cover on the M1 canteen cap or open retaining strap on water canteen cap for the M50/M51protective mask. WARNING IF RESISTANCE IS NOT FELT, YOUR DRINKING SYSTEM IS LEAKING. DO NOT DRINK. REPLACE YOUR CANTEEN. IF RESISTANCE IS STILL NOT FELT, NOTIFY YOUR CBRN NCO. d. Push the quick-disconnect coupling into the canteen cap so that the pin enters the quick-disconnect coupling. For the M50/M51 protective mask push drink coupler into canteen cap so that seal snaps into the groove in the cap. e. Turn drink tube lever on front module assembly upward, until it stops and is fully opened, to position internal drink tube in front of mouth, and grasp internal drink tube between your lips (for the M50/M51 and M48 protective mask only.) WARNING DO NOT TILT YOUR HEAD BACK WHILE DRINKING. f. Blow to create positive pressure. You should feel some resistance. 8-28
196 g. Raise the canteen upside down and drink (if the system does not leak.) h. Stop drinking after several swallows and lower the canteen. Blow into the internal drink tube to prevent the canteen from collapsing. Repeat the drinking procedure as required. 8. Doff the mask for storage. a. M50/M51 protective mask (1) Remove headgear. (2) Loosen cheek straps completely by placing your thumbs behind the buckles and pulling forward so straps become loose. Grasp the front of the mask and lift it off your head. (3) Replace headgear. (4) Stow the audio frequency amplifier in the retaining loop located in the bottom of the mask carrier main stowage area before stowing the mask. (5) Grasp the cheek straps and carefully pull the head harness over the front of the mask. (6) Grasp the mask carrier flap tab and pull to open mask carrier flap. (7) Grasp the mask by the front module assembly, place in mask carrier eye lens first, covered by head harness skullcap and face it away from the body. b. M40A1 protective mask (1) Remove helmet. (2) Loosen cheek straps. (3) Place one hand on the front voicemitter to hold mask assembly on face, with other hand grasp head harness tab, pull the head harness over the front of the mask assembly and remove mask assembly. (4) Replace helmet. (5) Pull head harness over front of mask assembly. (6) Smooth the second skin/universal second skin over the front of the mask assembly. (7) Pull the forehead straps tight over the second skin/universal second skin, by pulling the head harness down as far as possible, by pulling on the harness tab. 8-29
197 (8) Hold the facepiece assembly up and put it in the mask carrier with the lenses facing away from your body. CAUTION It is important to completely close the hook and pile fastener on the mask carrier cover. Failure to do this will result in collection of debris and damage to the mask assembly. (9) Close the mask carrier. Seal the entire hook and pile fastener surface. (10) Stowing M40A1/M42-Series Mask With Quick Doff Hood (QDH). (a) Hold front of mask assembly in a horizontal position and smooth the QDH over it. (b) Store the ends of the underarm straps in a "V". (c) Fold the two edges of the QDH over the underarm straps to create a "V". (d) Fold the "V" up to cover the eye lenses. Do not let the QDH cover the chin opening. CAUTION To avoid damage to the mask assembly, DO NOT fold mask assembly when placing it in the mask carrier. c. M43 protective mask (e) Hold the facepiece assembly up and put it in the mask carrier with the lenses facing away from your body. (f) Close the mask carrier. Seal the entire hook and pile fastener surface. (1) Remove helmet. (2) Detach canister disconnect along with canisters from top of blower. Let hose and canisters hang from facepiece. (3) Turn blower off. (4) Using both hands, gently lift hood up over head; let hood hang from front of facepiece. (5) Loosen three head harness straps by rolling buckles forward. (6) Grip head harness and pull facepiece up and off head. 8-30
198 (7) Check that the facepiece is dry and free of oil or solvents before stowing. If facepiece is not dry and free of oil or solvents, clean as directed. (8) With hood hanging in front of facepiece, hold front of facepiece in a horizontal position (face down) and smooth the hood beneath it. (9) Fold hood and microphone cable up around the back of facepiece. (10) Open top flap on carrier. (11) To stow the items in the proper locations proceed as follows: d. M45 protective mask. (a) Place hose, canister disconnect and canisters into carrier section on the nametag side of the carrier. (b) Place facepiece on top of canisters. (c) Unsnap blower from harness. (d) Insert blower with controls up, into carrier section on the back side of the carrier. (e) Unclip shoulder, waist, and leg straps and remove blower harness. (f) Stow blower harness in carrier section with blower. (g) Make sure technical manual is stowed in carrier section with blower. (h) Close and seal top flap on carrier. (i) Store carrier with contents in dark, dry location. Hang carrier by one of the straps for storage. (1) Remove helmet. (2) Disconnect microphone (if issued) from helmet receptacle, then remove helmet. (3) Loosen cheek straps ONLY. (4) Place thumbs under both cheek tabs. Lift bottom of mask out and up over your head. 8-31
199 SECTION IV- MAINTAIN YOUR ASSIGNED PROTECTIVE MASK 1. Inspect your protective mask, carrier, hood, and accessories according to the PMCS tables located in the mask operator TM. a. Identify deficiencies and shortcomings. b. Correct operator level deficiencies. 2. Clean and dry the mask, hood, and authorized accessories and components IAW the mask operator TM. 3. Record uncorrected deficiencies on DA Form 5988-E or DA Form 2404 IAW DA Pam Provide the completed DA Form 5988-E or DA Form 2404 to your supervisor for his/her review and guidance. 5. Perform all maintenance without damaging your protective mask. SECTION V-PROTECT YOURSELF FROM CBRN INJURY/CONTAMINATION WITH THE JSLIST CHEMICAL-PROTECTIVE ENSEMBLE 1. Perform Before PMCS on the JSLIST ensemble in accordance with (IAW) TM a. Using a new garment, first use. (1) Remove the coat or trousers from the factory vacuum-sealed bags and store in trouser pocket. Note: Coat and trousers packaging includes resealable bags. Store bags in trousers pockets and retain for reuse in repackaging the JSLIST ensemble. (2) Perform Before PMCS according to table 2-1 located in TM (3) Mark the label with the date that the garment was removed from the package in permanent ink. a. Using a used garment. (1) Remove the coat or trousers from the clear plastic, resealable bag. (2) Check the wear date marked on the labels. If more than 120 days have elapsed since this date, replace the coat or trousers with new coat or trousers. Note: To conserve chemical protective overgarment assets, any used JSLIST overgarment coat or trouser that has exceeded the 120-day period may be used as a training only item (the words 8-32
200 TRAINING ONLY must be stenciled 2.5 inches high or larger on the outside of a sleeve or leg of the item, in a contrasting colored permanent ink). WARNING SERPACWA is for military and external use only. Do not apply to the eyes or to mucous membranes. This product, its packaging, and clothing or other materials exposed to SERPACWA should not be destroyed by burning due to the release of toxic fumes. Smoking should be avoided, be sure to avoid getting SERPACWA on smoking products. Be sure to clean hands before handling smoking products. 2. Apply SERPACWA (if command-directed). Note: SERPACWA is intended for use prior to exposure to chemical warfare agent (CWA) and only in conjunction with the JSLIST chemical protective ensemble. a. Before you assume MOPP Level 1, use a dry towel to wipe off sweat, insect repellent, camouflage paint, sand, or dirt from your skin at the areas shown on the packet label. b. Tear open the packet and squeeze about one-third of the pouch into the palm of your hand and rub it evenly around the wrists (site 1), neck (site 2), and boot tops of lower legs (site 3) until it forms a difficult to notice white film. c. Remove the remaining two-thirds of the SERPACWA from the pouch and rub it evenly onto your armpits (site 4), groin area (site 5), and waistline (site 6). d. After SERPACWA is applied, if exposure to CWA is either confirmed or suspected, follow the appropriate protocol for decontamination. e. For removal of SERPACWA in the absence of exposure to CWA, scrub the sites with a dry towel, or if possible, with a cloth using both soap and water. 3. Don the JSLISTS chemical protective ensemble, in MOPP Level 1 through 4 sequence within eight minutes. a. Assume MOPP Level 1. (1) Don the JSLIST overgarment trousers. (a) Extend your toes downward, put one leg into the trousers, and pull them up. Repeat the procedure for your other leg. (b) Close the slide fastener, and fasten the two fly opening snaps. (c) Pull the suspenders over your shoulders, and fasten the snap couplers. Adjust the suspenders to ensure that the trousers fit comfortably. 8-33
201 Note: The trouser length can be adjusted by raising or lowering the suspenders. (d) Adjust the waistband hook-and-pile fasteners for a snug fit. (2) Don the JSLIST overgarment coat. (a) Don the coat, and close the slide fastener up as far as your chest. (b) Secure the front closure hook-and-pile fasteners up as far as your chest. (c) Pull the bottom of the coat down over the trousers. Pull the loop out and away from the overgarment coat, and bring it forward between the legs. Pull on the loop until the bottom of the coat fits snugly over the trousers. b. Assume MOPP Level 2. Don the overboots. (1) Don the overboots (multipurpose overboots/black vinyl overboots/green vinyl overboots (MULO/BVO/GVO) over the combat boots. Adjust and secure the strap-and-buckle fasteners. (2) Pull the trouser legs over the overboots (MULO/BVO/GVO). Secure the hook-and-pile fasteners on each ankle to fit snugly around the boot c. Assume MOPP Level 3 by donning chemical-protective mask IAW task d. Assume MOPP Level 4. Don the gloves. (1) Push the sleeve cuffs up your arm. (2) Put on the gloves and glove liners (inserts). (3) Pull the sleeve cuffs over the top of the gloves, and secure the hook-and-pile fastener tape snugly on each wrist. 4. Doff the JSLIST chemical protective ensemble. a. Doff the gloves. (1) Unfasten the hook-and-pile fastener tape on each wrist, and remove the gloves (and liners if butyl rubber gloves are worn). (2) Put the gloves in the trouser pockets. 8-34
202 b. Untie the bow in the coat retention cord, unfasten the webbing strip snap, and release the coat retention cord loop. SECTION VI- DECONTAMINATE YOURSELF AND INDIVIDUAL EQUIPMENT USING CHEMICAL DECONTAMINATING KITS a. Decontaminate your hands, face, and the inside of your mask. (1) Remove one RSDL packet from your carrying pouch. (2) Tear it open quickly at any notch. (3) Remove the applicator pad from the packet, and save the packet as the remaining lotion can be added to the applicator pad, if required. (4) Thoroughly scrub the exposed skin of your hand, palm, and fingers with the applicator pad. Note: The applicator pad can be used from either side and may gripped in any manner allowing the applicator pad to be applied to the skin. (5) Switch the applicator pad to the other hand, and repeat the procedure. (6) Stop breathing, close eyes, grasp mask beneath chin and pull mask away from chin enough to allow one hand between the mask and your face. Hold the mask in this position during the following steps. Note: 1. Do not discard the applicator pad at this time. 2. If you were masked with your hood secured when you became contaminated, stop. Put on your protective gloves, and proceed 3. If you were not masked with the hood secured when you became contaminated, continue decontaminating the exposed skin. (7) Thoroughly scrub the exposed skin of your face with lotion from the applicator pad. (8) Thoroughly scrub across your forehead. (9) Beginning at one side, scrub up and down across your cheeks, nose, chin, and closed mouth. Avoid ingesting. (10) Scrub under the chin from the ear along the jawbone to the other ear to coat your skin with lotion. CAUTION Do not apply lotion to the lens of the protective mask. The RSDL may cause loss of transparency. 8-35
203 (11) Turn your hand over and scrub the inside surfaces of the mask that may touch your skin. Be sure to include the drinking tube. (12) Keep the applicator. (13) Seal your mask immediately, clear it, and check it. (14) Use the applicator and any remaining lotion in the packet. Without breaking the mask seal, scrub the applicator pad across the forehead, exposed scalp, the skin of the neck, ears, and throat. (15) Secure the hood. (16) Thoroughly scrub your hands with lotion again. (17) Assume MOPP Level 4 by putting on protective gloves. WARNING Do not discard the RSDL packaging or applicator pads into containers that contain HTH or STB. Heat and/or fire may result. Note: Use any remaining lotion to spot decontaminate weapons, personal equipment, and canteen cap that may have become contaminated. Allow RSDL to remain on skin for at least 2 minutes to destroy the chemical agent. Discard the used packet(s) and applicator pad(s) by leaving them in place. Do not put used packets in your pockets. Discard the carrying pouch after using the packets. Remove the decontaminating lotion with soap and water when operational conditions permit, such as an "All Clear" directive or after detailed troop decontamination. b. Decontaminate your skin using the M291 decontaminating kit within 1 minute of contamination. CAUTION The M291 decontaminating kit is for external use only. Keep decontaminating powder out of your eyes and out of any cuts or wounds. The decontaminating powder may irritate your skin or eyes. If your face has been contaminated, use water to wash the toxic agent out of your eyes, cuts, or wounds. After decontaminating with water, cover exposed cuts or wounds with appropriate first aid wrap or bandages before handling the decontaminating kit. Do not handle or hold leaking packets above your head. Do not touch or rub your eyes, lips, or the inside of your mouth with anything that has been in contact with the decontaminating powder. Do not attempt to decontaminate a loaded weapon. Always unload and clear the weapon and place the weapon on safe before starting decontaminating procedures. Immediate decontaminating techniques remove only the liquid hazard. (1) Certain items may still present a vapor hazard. a. Decontaminate your hands and face and the inside of your mask. (1) Remove one skin decontamination packet from your carrying pouch. 8-36
204 (2) Tear it open quickly at the notch. (3) Remove the applicator pad from the packet, and discard the empty packet. (4) Unfold the applicator pad, and slip your finger(s) into the handle. (5) Scrub the back of your hand, palm, and fingers until they are completely covered with black powder from the applicator pad. (6) Switch the applicator pad to the other hand, and repeat the procedure. Note: 1. Do not discard the applicator pad at this time. 2. If you were masked with your hood zipped and the drawstring pulled tight when you were contaminated, stop. Discard the applicator pad, put on your protective gloves, and go to step 3b. However, if you were masked, but the zipper and drawstring were not secure, go to step 3a(16). The stars in the illustration on page 2-5 of TM show areas of the face that should be scrubbed with an extra stroke because they are hard to decontaminate. 3. The procedure is the same regardless of the type of protective mask. If you are using the Joint Service Lightweight Integrated Suit Technology (JSLIST) with a hood attached to the protective jacket, ignore the instructions for the hood. (7) Scrub exposed skin of your face thoroughly until you are completely covered with black powder from the applicator pad. (8) Hold your breath, close your eyes, grasp the mask beneath your chin, and pull the hood and mask away from your chin enough to allow one hand between the mask and your face. (9) Scrub up and down across your face, beginning at the front of one ear, to your nose, and then to your other ear. (a) Scrub across your face to the corner of your nose. (b) Scrub an extra stroke at the corner of your nose. (c) Scrub across your nose, to the tip of your nose, and then to the other corner of your nose. (d) Scrub an extra stroke at the corner of your nose. (e) Scrub across your face to your other ear. (10) Scrub up and down across your face to your mouth and then to the other end of your jawbone. (a) Scrub across your cheek to the corner of your mouth. 8-37
205 c. Assume MOPP Level 4. (b) Scrub an extra stroke at the corner of your mouth. (c) Scrub across your closed mouth to the center of your upper lip. (d) Scrub an extra stroke above your upper lip. (e) Scrub across your closed mouth to the outer corner of your mouth (f) Scrub an extra stroke at the corner of your mouth. (g) Scrub across your cheek to the end of your jawbone. (11) Scrub up and down across your face to your chin and then to the other end of your jawbone. (a) Scrub across and under your jaw to your chin, cupping your chin. (b) Scrub extra strokes at the center of your chin. (c) Scrub across your upper jaw to the end of your jawbone. (12) Turn your hand out, and quickly wipe the inside of your mask where it touches your face. (13) Discard the applicator pad. (14) Seal your mask immediately, clear it, and check it. (15) Remove the second skin decontamination packet from the carrying pouch. (16) Repeat steps above. (17) Scrub your neck and ears until they are thoroughly covered with black powder without breaking the seal between your face and your mask. Scrub your hands again until they are completely covered with black powder. (1) Discard the applicator pad. (2) Put on your protective gloves. (3) Fasten your hood. d. Remove the decontaminating powder with soap and water when operational conditions permit. 8-38
206 e. Decontaminate your individual equipment using the M295 decontaminating kit. 1. Use the first mitt to decontaminate your gloves, the exposed areas of your mask and hood, your weapon, and your helmet. (a) Remove one decontamination packet from your pouch. (b) Tear the packet open at any notch. (c) Remove the decontamination mitt. (d) Discard the empty packet. (e) Unfold the decontamination mitt. (f) Grasp the green (nonpad) side of the decontamination mitt with your nondominant hand. Pat the other gloved hand with the decontamination mitt to start the flow of decontamination powder onto your glove. Rub your glove with the decontamination mitt until it is completely covered with decontaminating powder. SECTION VII-REACT TO CHEMICAL OR BIOLOGICAL (CB) HAZARD/ATTACK 1. Identify the CB hazard automatic-masking criteria. a. Don your protective mask automatically when any of the following situations occur: (1) A chemical alarm sounds. (2) A positive reading is obtained on detector paper. (3) Individuals exhibit symptoms of CB agent poisoning, such as difficulty breathing, coughing, wheezing, vomiting, or eye irritation. (4) You observe a spill or cloud of unknown material(s). (5) You react to an IED explosion where you suspect the release of a CB agent. (6) You observe a contamination marker. (7) Your supervisor orders you to mask. (8) You observe personnel wearing protective masks. (9) You observe other signs of a possible CB agent hazard/attack. b. Respond to the commander's policy of automatic masking. 8-39
207 Note: Commanders at all levels may establish a modified policy by designating additional criteria for automatic masking. 2. Protect yourself from CB contamination by using your assigned protective mask without fastening the hood within 9 seconds. Note: The mask provides protection against conventional warfare agents. The mask provides little if any protection from toxic industrial materials (TIMs), but it provides the best available protection to enable you to evacuate the hazard area. You may be required to evacuate to a minimum safe distance of at least 300 meters upwind from the contamination (if possible) or as directed by the commander. a. Stop breathing and close your eyes. b. Don the protective mask with hood. c. Clear the mask. d. Check the mask. e. Do not fasten the hood. f. Go immediately to the next step. 3. Give the alarm. a. Shout, "Gas, Gas, Gas." b. Give the appropriate hand-and-arm signal. c. Hit two metal objects together. 4. Take cover and/or assemble as directed, moving at least 300 meters upwind from the suspected contamination area to reduce exposure. 5. Decontaminate exposed skin within 1 minute of becoming contaminated using the individual decontaminating kit as necessary. 6. Cover all exposed skin and assume MOPP 4 as directed. a. Don the overgarment trousers. b. Don the overgarment coat. c. Don the overboots. 8-40
208 Note: Combat boots provide limited protection. Cover them as soon as possible because they absorb chemicals. (It takes a long time to put on the overboots; in an emergency, put them on last.) d. Don the protective gloves. e. Remove the ACH and protective eyewear. f. Loosen the DAPs. WARNING WHEN DOFFING THE IOTV FROM THE SHOULDER. TAKE CARE NOT TO SNAG THE FILTER CANISTER AND BREAK THE SEAL OF YOUR PROTECTIVE MASK. g. Doff the IOTV by lifting the front flap and detach side plate carriers by separating hook and loop fastener tape. Lift front carrier and detach internal elastic bands at hook and loop interface. Open the medical access hook and pile closure, loosen the left shoulder adjustment strap and slide vest off the right shoulder. h. Perform performance steps above i. Don the IOTV over the right shoulder by tightening the left shoulder adjustment strap and fastening the medical access hook and pile closure. Attach internal elastic bands at hook and loop interface and close the front carrier. Attach side plate carriers and close the front flap. j. Secure the DAP. k. Don the ACH. 7. Decontaminate your individual equipment using your individual equipment decontamination kit, as necessary. 8. Notify your supervisor of any suspected CB hazard/attack. 9. Continue the mission and perform any additional requirements as outlined in your unit's standing operating procedure (SOP). 8-41
209 Priority I URGENT Priority IA URGENT- SURG Priority II PRIORITY Priority III ROUTINE Priority IV CONVENIENCE SECTION I MEDEVAC (ATP , AUG14) Table 9-1: Categories of Evacuation Precedence Is assigned to emergency cases that should be evacuated as soon as possible and within a maximum of 1 hour in order to save life, limb, or eyesight and to prevent complications of serious illness and to avoid permanent disability. Is assigned to patients who must receive far forward surgical intervention to save life and stabilize for further evacuation. Is assigned to sick and wounded personnel requiring prompt medical care. This precedence is used when the individual should be evacuated within 4 hours or if his medical condition could deteriorate to such a degree that he will become an URGENT precedence, or whose requirements for special treatment are not available locally, or who will suffer unnecessary pain or disability. Is assigned to sick and wounded personnel requiring evacuation but whose condition is not expected to deteriorate significantly. The sick and wounded in this category should be evacuated within 24 hours. Is assigned to patients for whom evacuation by medical vehicles a matter of medical convenience rather than necessity. The NATO STANAG 3204 has deleted the category of Priority IV CONVENIENCE; however, this category is still included in the United States Army evacuation priorities as there is a requirement for it in an operational environment. 9-42
210 MEDEVAC REQUEST FORM 9-43
211 WARFIGHTING FUNCTIONS 1. Mission command 2. Movement and maneuver 3. Intelligence. 4. Fires. 5. Sustainment. 6. Protection. Multiplied by leadership, and complimented by information. RISK MANAGEMENT PROCESS 1. Identify the hazards. 2. Assess hazards. 3. Develop controls and make risk decisions. 4. Implement controls. 5. Supervise and evaluate. 9-44

212 OPERATION ORDER 9-45
213 Mission METT-TC Enemy Terrain and weather Troops and support available Time available Civil considerations 9-46
214 COMMON DEFENSE PLANNING CONSIDERATIONS 1. Establish security (OP, patrols, PWs). 2. Position key weapons: a. Coordinate with units on left and right. b. Establish FPF or PDF for machine gun. c. Ensure mutual support between machine guns d. Cover armor approaches with anti-armor e. Establish fire control measures. 3. Prepare positions: a. Check sectors of fire b. Check overhead cover and view positions from enemy vantage. c. Position in depth and achieve mutual support d. Select/prepare alternate and supplementary positions. 4. Integrate indirect fires, CAS, and obstacles with direct and indirect fire. 5. Check communications and establish emergency signals. 6. Designate ammunition, supply, PW, and casualty points. 9-47
215 PHASES OF DELIBERATE ATTACKS IN AN URBAN AREA 1.Reconnoiter the objective. 2.Move to the objective. 3.Isolate the objective. 4.Secure a foothold. 5.Clear the objective. 6.Consolidate and reorganize. 7.Prepare for future missions. 9-48
216 TROOP LEADING PROCEDURES 1. Receive the mission 2. Issue a warning order 3. Make a tentative plan 4. Initiate Movement 5. Conduct reconnaissance 6. Complete the plan 7. Issue the operations order 8. Supervise and refine the plan 9-49
217 AIRCRAFT REQUEST 1. Identification. 2. Precedence or priority. 3. Target description. 4. Target location. 5. Target time/date. 6. Desired ordnance and results. 7. Final control FIRE REQUEST 1. Observer identification. 2. Warning order. 3. Target location. 4. Target description. 5. Method of engagement. 6. Method of fire and control. 9-50
218 THREAT BASED FIRE CONTROL MEASURES 1. Engagement priorities. 2. Weapons-ready posture. 3. Engagement criteria. 4. Weapons control status. 5. Rules of Engagement (ROE). 6. Weapons safety posture. 7. Engagement techniques. 8. Fire patterns. 9. Target array. 9-51
219 TERRAIN BASED FIRE CONTROL MEASURES 1. Target reference point (TRP) 2. Engagement area 3. Sector of fire. 4. Direction of fire. 5. Terrain-based quadrant. 6. Friendly-based quadrant. 7. Maximum engagement line. 8. Restrictive fire line (RFL). 9. Final protective line (FPL) 9-52
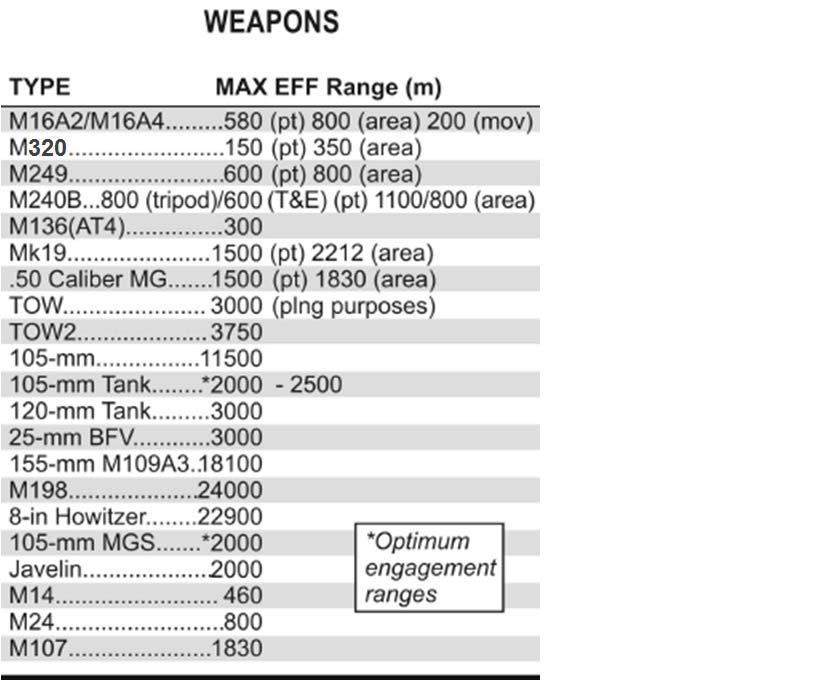
220 9-53

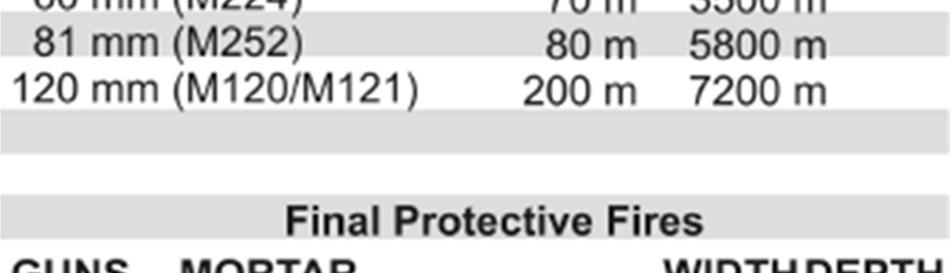
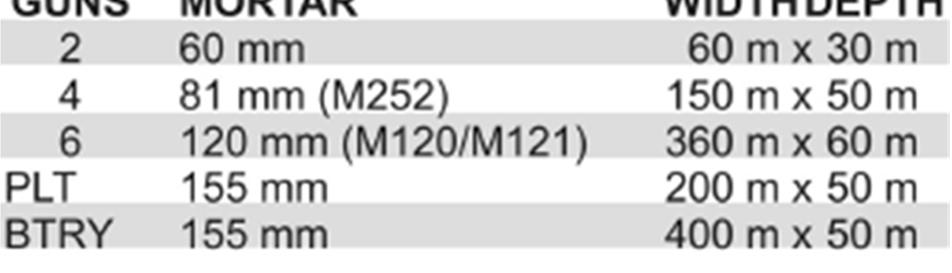
221 9-54
222 EXPLOSIVE HAZARD SPOT REPORT 1. Date-time group 2. Reporting unit and location 3. Contact method 4. Type of munitions 5. CBRN contamination 6. Resources threatened 7. Impact on mission 8. Protective measures taken 9. Recommended priority SALUTE 1. Size 2. Activity 3. Location 4. Unit 5. Time 6. Equipment 9-55


223 SECTION III CALL FOR FIRE 9-56
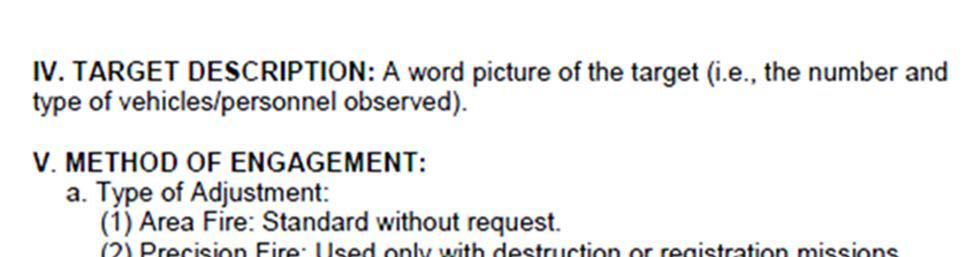
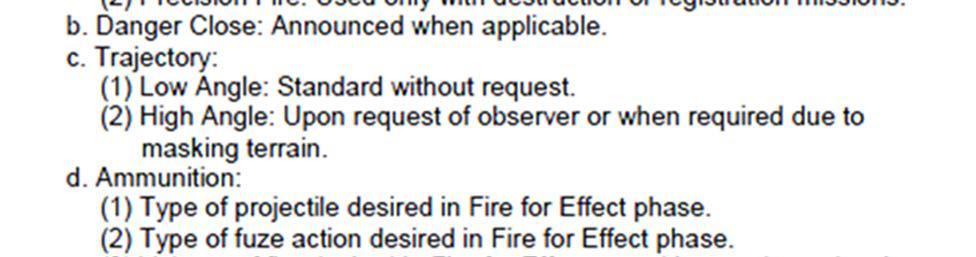

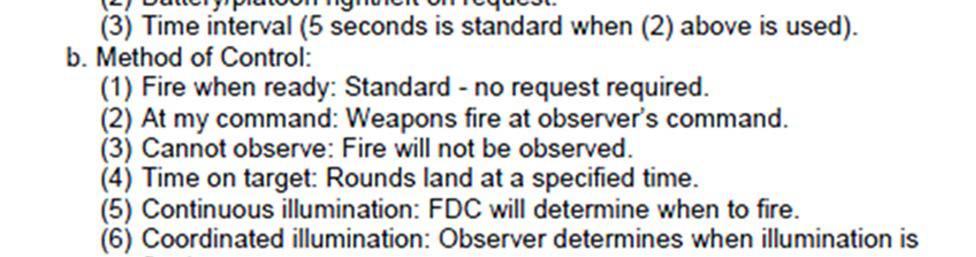

224 9-57

225 SECTION V: COMPREHENSIVE CADET & FAMILY FITNESS 9-58


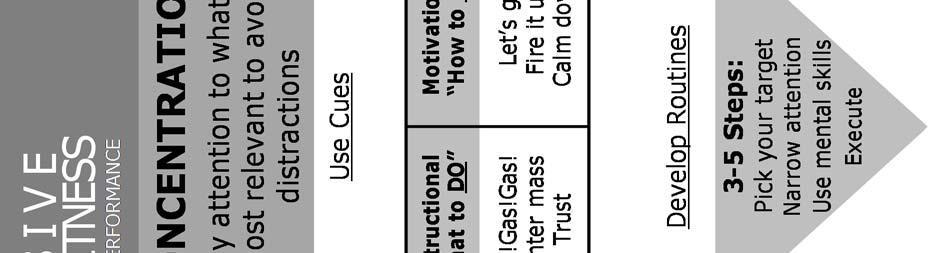


226 9-59

227 SECTION VII: USACC CST UNIFORM STANDARDS 9-60

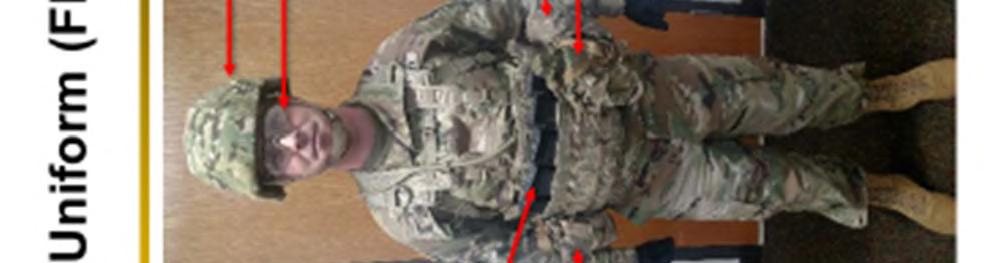

228 9-61


229 9-62

230 SECTION VIII STANDARD RANGE CARD 9-63
231 9-64
232 Chapter 10 -Land Navigation TC NOV 13 SECTION 1- COMPASS HANDLING AND USE Compasses are delicate instruments and should be cared for accordingly. A detailed inspection is required when first obtaining and using a compass. One of the most important parts to check is the floating dial, which contains the magnetic needle. The user also makes sure the sighting wire is straight, the glass and crystal parts are not broken, the numbers on the dial are readable, and that the dial does not stick. Metal objects and electrical sources can affect the performance of a compass. However, nonmagnetic metals and alloys do not affect compass readings. The following separation distances are suggested to ensure proper functioning of a compass: High-tension power lines...55 m. Field gun, truck, or tank...18 m. Telegraph or telephone wires and barbed wire...10 m. A compass in good working condition is very accurate. However, a compass has to be checked periodically on a known line of direction, such as a surveyed azimuth, using a declination station. Compasses with more than 3 degrees variation should not be used. If traveling with the compass unfolded, make sure the rear sight is fully folded down onto the bezel ring. This locks the floating dial, prevents vibration, and protects the crystal and rear sight from damage. USING A COMPASS Magnetic azimuths are determined using magnetic instruments such as lensatic and M2 compasses. Employ the following techniques when using the lensatic compass: center hold technique and compass-to-cheek technique. CENTERHOLD TECHNIQUE First, open the compass to its fullest so that the cover forms a straightedge with the base. Move the lens (rear sight) to the rearmost position, allowing the dial to float freely. Next, place your thumb through the thumb loop, form a steady base with your third and fourth fingers, and extend your index finger along the side of the compass. Place the thumb of the other hand between the lens (rear sight) and the bezel ring; extend the index finger along the remaining side of the compass, and the remaining fingers around the fingers of the other hand. Pull your elbows firmly into your sides; this places the compass between your chin and your belt. To measure an azimuth, simply turn your entire body toward the object, pointing the compass cover directly at the object. Once you are pointing at the object, look down and read the azimuth 9-65
233 from beneath the fixed black index line. (See Figure 8-2.) This preferred method offers the following advantages over the sighting technique: It is faster and easier to use. It can be used under all conditions of visibility. It can be used when navigating over all types of terrain. It can be used without putting down the rifle. However, the rifle is slung well back over either shoulder. It can be used without removing eyeglasses. COMPASS-TO-CHEEK TECHNIQUE Fold the cover of the compass containing the sighting wire to a vertical position; then fold the rear sight slightly forward. Look through the rear-sight slot and align the front-sight hairline with the desired object in the distance. Glance down at the dial through the eye lens to read the azimuth. Note. The compass-to-cheek technique is used almost exclusively for sighting. It is the best technique for this purpose. 9-66
234 SECTION 2- MAP TERRAIN FEATURES, COLORS, AND BASE LINES COLORS USED ON A MILITARY MAP By the fifteenth century, most European maps were carefully colored. Profile drawings of mountains and hills were shown in brown, rivers and lakes in blue, vegetation in green, roads in yellow, and special information in red. A look at the legend of a modern map confirms that the use of colors has not changed much over the past several hundred years. To facilitate the identification of features on a map, the topographical and cultural information is usually printed in different colors. These colors may vary from map to map. On a standard large-scale topographic map, the colors used and the features each represent are: a. Black. Indicates cultural (man-made) features such as buildings and roads, surveyed spot elevations, and all labels. b. Red-Brown. The colors red and brown are combined to identify cultural features, all relief features, no surveyed spot elevations, and elevation, such as contour lines on red-light readable maps. c. Blue. Identifies hydrography or water features such as lakes, swamps, rivers, and drainage. d. Green. Identifies vegetation with military significance, such as woods, orchards, and vineyards. e. Brown. Identifies all relief features and elevation, such as contours on older edition maps, and cultivated land on red-light readable maps. f. Red. Classifies cultural features, such as populated areas, main roads, and boundaries, on older maps. g. Other. Occasionally other colors may be used to show special information. These are indicated in the marginal information as a rule. BASE LINES In order to measure something, there must always be a starting point or zero measurement. To express direction as a unit of angular measure, there must be a starting point or zero measure and 9-67
235 a point of reference these two points designate the base or reference line. There are three base lines true north, magnetic north, and grid north. The most commonly used are magnetic and grid. a. True North. A line from any point on the earth's surface to the North Pole. All lines of longitude are true north lines. True north is usually represented by a star. b. Magnetic North. The direction to the north magnetic pole, as indicated by the north-seeking needle of a magnetic instrument. The magnetic north is usually symbolized by a line ending with half of an arrowhead. Magnetic readings are obtained with magnetic instruments, such as lensatic and M2 compasses. c. Grid North. The north that is established by using the vertical grid lines on the map. Grid north may be symbolized by the letters GN or the letter "y". DECLINATION DIAGRAM Declination is the angular difference between any two norths. If you have a map and a compass, the one of most interest to you will be between magnetic and grid north. The declination diagram shows the angular relationship, represented by prongs, among grid, magnetic, and true norths. While the relative positions of the prongs are correct, they are seldom plotted to scale. Do not use the diagram to measure a numerical value. This value will be written in the map margin (in both degrees and mils) beside the diagram. 9-68
236 a. Location. A declination diagram is a part of the information in the lower margin on larger maps. On medium-scale maps, the declination information is shown by a note in the map margin. b. Grid-Magnetic Angle. The G-M angle value is the angular size that exists between grid north and magnetic north. It is an arc, indicated by a dashed line that connects the grid-north and magnetic-north prongs. This value is expressed to the nearest 1/2 degree, with mil equivalents shown to the nearest 10 mils. The G-M angle is important to the map reader/land navigator because azimuths translated between map and ground will be in error by the size of the declination angle if not adjusted for it. c. Grid Convergence. An arc indicated by a dashed line connects the prongs for true north and grid north. The value of the angle for the center of the sheet is given to the nearest full minute with its equivalent to the nearest mil. These data are shown in the form of a grid-convergence note. d. Conversion. There is an angular difference between the grid north and the magnetic north. Since the location of magnetic north does not correspond exactly with the grid-north lines on the maps, a conversion from magnetic to grid or vice versa is needed. Major Terrain Features. (1) Hill. A hill is an area of high ground. From a hilltop, the ground slopes down in all directions. A hill is shown on a map by contour lines forming concentric circles. The inside of the smallest closed circle is the hilltop 9-69


237 Saddle. A saddle is a dip or low point between two areas of higher ground. A saddle is not necessarily the lower ground between two hilltops; it may be simply a dip or break along a level ridge crest. If you are in a saddle, there is high ground in two opposite directions and lower ground in the other two directions. A saddle is normally represented as an hourglass. Valley. A valley is a stretched-out groove in the land, usually formed by streams or rivers. A valley begins with high ground on three sides, and usually has a course of running water through it. If standing in a valley, three directions offer high ground, while the fourth direction offers low ground. Depending on its size and where a person is standing, it may not be obvious that there is high ground in the third direction, but water flows from higher to lower ground. Contour lines forming a valley are either U-shaped or V-shaped. To determine the direction water is flowing, look at the contour lines. The closed end of the contour line (U or V) always points upstream or toward high ground. 9-70


238 Ridge. A ridge is a sloping line of high ground. If you are standing on the centerline of a ridge, you will normally have low ground in three directions and high ground in one direction with varying degrees of slope. If you cross a ridge at right angles, you will climb steeply to the crest and then descend steeply to the base. When you move along the path of the ridge, depending on the geographic location, there may be either an almost unnoticeable slope or a very obvious incline. Contour lines forming a ridge tend to be U-shaped or V-shaped. The closed end of the contour line points away from high ground. Depression. A depression is a low point in the ground or a sinkhole. It could be described as an area of low ground surrounded by higher ground in all directions, or simply a hole in the ground. Usually only depressions that are equal to or greater than the contour interval will be shown. On maps, depressions are represented by closed contour lines that have tick marks pointing toward low ground. 9-71


239 Minor Terrain Features. Draw. A draw is a less developed stream course than a valley. In a draw, there is essentially no level ground and, therefore, little or no maneuver room within its confines. If you are standing in a draw, the ground slopes upward in three directions and downward in the other direction. A draw could be considered as the initial formation of a valley. The contour lines depicting a draw are U-shaped or V-shape, pointing toward high ground Spur. A spur is a short, continuous sloping line of higher ground, normally jutting out from the side of a ridge. A spur is often formed by two rough parallel streams, which cut draws down the side of a ridge. The ground sloped down in three directions and up in one direction. Contour lines on a map depict a spur with the U or V pointing away from high ground 9-72


240 Cliff. A cliff is a vertical or near vertical feature; it is an abrupt change of the land. When a slope is so steep that the contour lines converge into one "carrying" contour of contours, this last contour line has tick marks pointing toward low ground. Cliffs are also shown by contour lines very close together and, in some instances, touching each other Supplementary Terrain Features. (1) Cut. A cut is a man-made feature resulting from cutting through raised ground, usually to form a level bed for a road or railroad track. Cuts are shown on a map when they are at least 10 feet high, and they are drawn with a contour line along the cut line. This contour line extends the length of the cut and has tick marks that extend from the cut line to the roadbed, if the map scale permits this level of detail 9-73


241 Fill. A fill is a man-made feature resulting from filling a low area, usually to form a level bed for a road or railroad track. Fills are shown on a map when they are at least 10 feet high, and they are drawn with a contour line along the fill line. This contour line extends the length of the filled area and has tick marks that point toward lower ground. If the map scale permits, the length of the fill tick marks are drawn to scale and extend from the base line of the fill symbol 9-74
242 SECTION 1- M4 RIFLE AND CARBINE Chapter 11- Weapons Overview The Army standard service rifle is either the M16-series rifle or M4-series carbine. These weapons are described as a lightweight, 5.56-mm, magazine-fed, gas operated, air-cooled, shoulder-fired rifle or carbine. They fire in semiautomatic (single shot), three-round burst, or in automatic mode using a selector lever, depending on the variant. The weapon system has a standardized mounting surface for various optics, pointers, illuminators, and equipment, to secure those items with common mounting and adjustment hardware. Clearing Procedures for the M4 Series Weapon The first step in maintenance is to clear the weapon. This applies in all situations, not just after firing. This paragraph explains the techniques and procedures for clearing the M16-/M4-series weapon. Additional mechanical training is available in TM to include disassembly, maintenance, assembly, loading, and sight manipulation. WARNING: To be considered SAFE before disassembly, cleaning, inspecting, transporting, or storing, the weapon must be cleared. 1. Point the muzzle in a designated SAFE DIRECTION. Attempt to place selector lever on SAFE. If weapon is not cocked, lever cannot be placed on SAFE. 2. Remove the magazine by depressing the magazine catch button and pulling the magazine down. 3. To lock bolt open, pull charging handle rearward. Press bottom of bolt catch and allow bolt to move forward until it engages bolt catch. Return charging handle to full forward position. If you have not done so before, place the selector lever on SAFE. 4. Visually (not physically) inspect the receiver and chamber to ensure these areas contain no ammo. 5. With the selector lever pointing toward SAFE, allow the bolt to go forward by pressing the upper portion of the bolt catch. 6. Place the selector lever on SEMI and squeeze the trigger. 7. Pull the charging handle fully rearward and release it, allowing the bolt to return to the full forward position. 8. Place the selector lever on SAFE. 9. Close the ejection port cover. 9-75
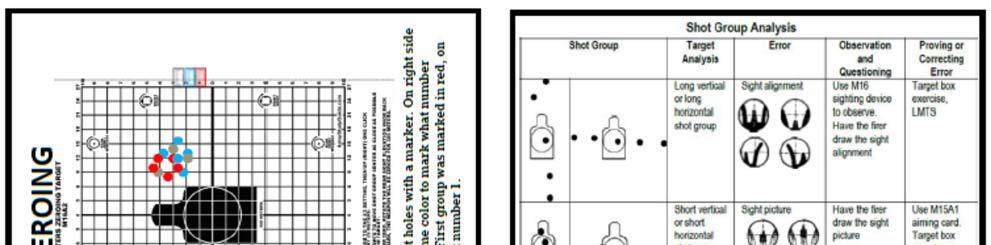
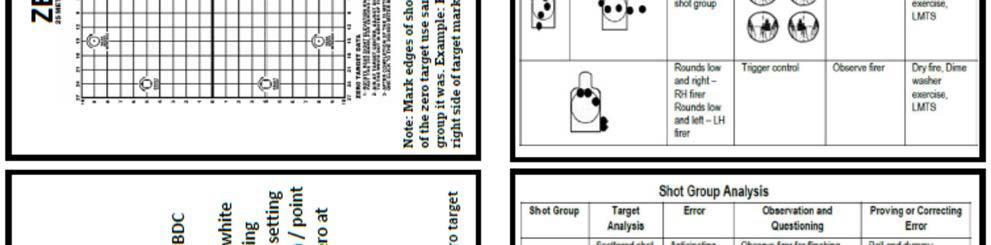

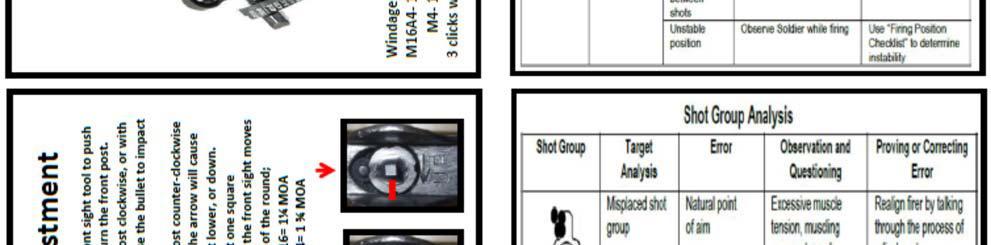
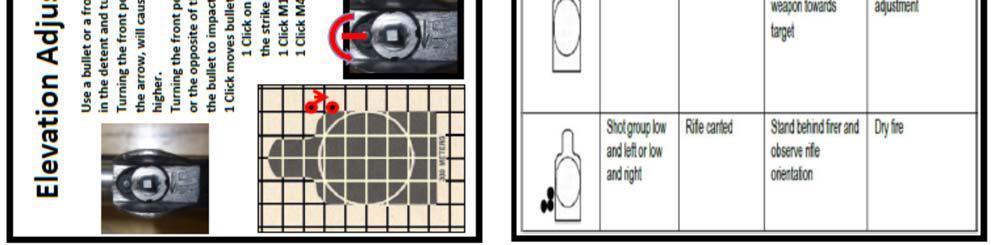
243 9-76
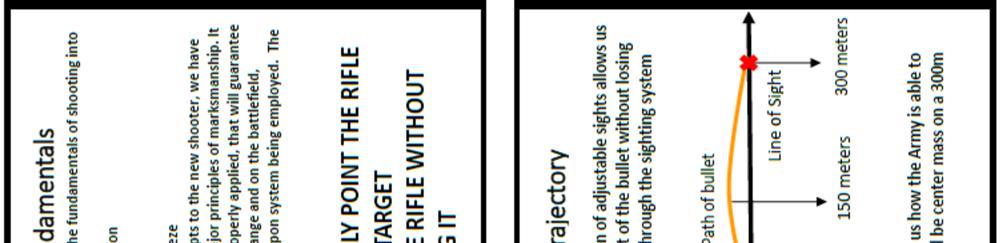

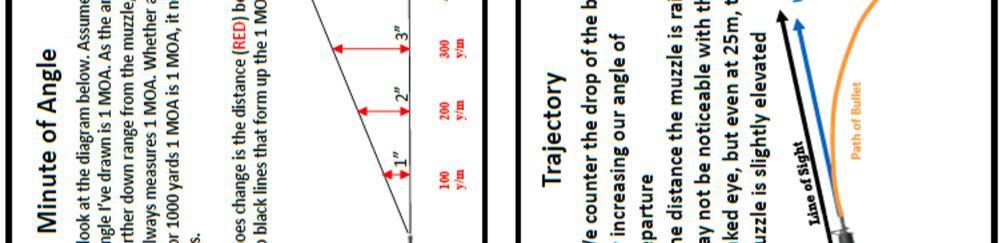
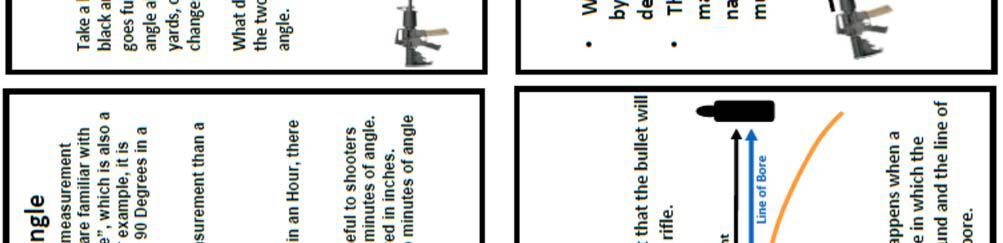
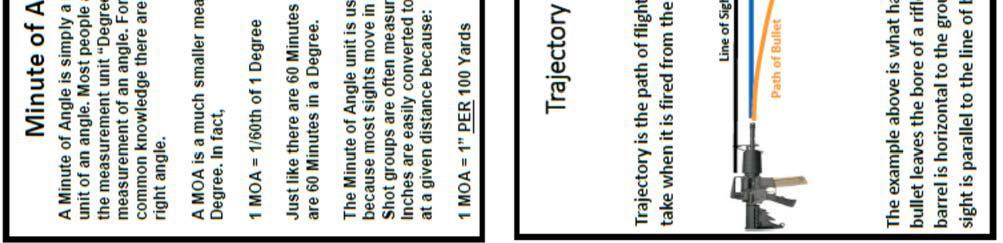
244 9-77
245 SECTION 2- M249 MACHINE GUN The 5.56-mm M249 machine gun supports the Soldier in both the offense and defense. The M249 provides a medium volume of close and continuous fire. The Soldier needs this to accomplish the mission. The M249 lets units engage the enemy with controlled and accurate fire from individual weapons. The medium-range, close defensive, and final protective fires delivered by the M249 MG form an integral part of a unit s defensive fires. This chapter also describes the weapon and the types of ammunition in detail and provides a table of general data. Although this chapter discusses employment of the M249 in the machine gun role, Soldiers also use this weapon in the automatic rifle role. DESCRIPTION AND DATA The M249 machine gun is a gas-operated, air-cooled, belt- or magazine-fed, automatic weapon that fires from the open-bolt position (Figure 1-1). Its maximum rate of fire is 850 rounds per minute. Ammunition feeds into the weapon from a 200-round ammunition box containing a disintegrating, metallic, split-link belt. Only in emergencies do M249 gunners use a 20- or 30- round M16 rifle magazine, in part because this increases the chance of stoppages. The gunner can fire the versatile M249 machine gun from the shoulder, hip, or underarm; with a bipod; or with a tripod. CLEARING PROCEDURES The first step in maintenance is to clear the weapon (Figure 1-8). This applies in all situations, not just after firing. The gunner must always assume the M249 machine gun is loaded. To clear the M249, the gunner performs the following procedures: 9-78

 Checks the feed pawl assembly under the feed cover.")
246 Moves the safety to the fire F position by pushing it to the left until the red ring is visible. With his right hand, palm up, pulls the cocking handle to the rear, locking the bolt in place. While holding the resistance on the cocking handle, moves the safety to the safe position by pushing it to the right until the red ring is not visible. (The gunner can only place the weapon on safe with the bolt locked to the rear.) Returns and locks the cocking handle to the forward position. Raises the cover and feed mechanism assembly, and conducts the five-point safety check for brass, links, or ammunition. 1) Checks the feed pawl assembly under the feed cover. 2) Checks the feed tray assembly. 3) Lifts the feed tray assembly and inspects the chamber. 4) Checks the space between the bolt assembly and the chamber. 5) Inserts two fingers of left hand into magazine well to extract ammunition or brass. Closes the cover and feed mechanism assembly, and moves the safety to the F position. With his right hand, palm up, returns the cocking handle to the rear position. Presses the trigger and at the same time eases the bolt forward by manually riding the cocking handle forward. 9-79
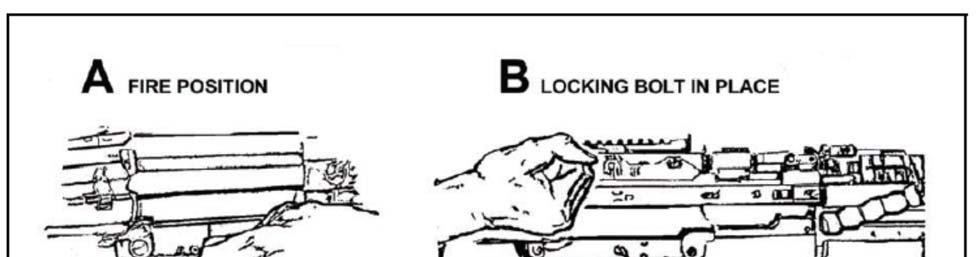
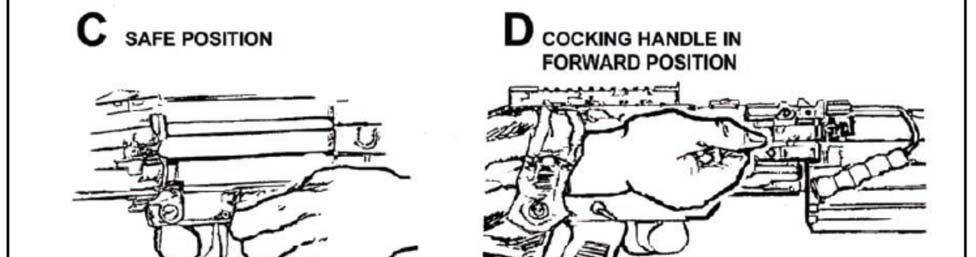
247 9-80

248 9-81
 BELT When loading belted ammunition always can t the weapon to the right.")

249 LOADING PROCEDURES To load the M249, the gunner must first clear it as described. (With the feed cover raised, the gunner makes sure his face is not exposed to the open chamber area while loading.) BELT When loading belted ammunition always can t the weapon to the right. Make sure the open side of the links is facing down, and place the lead link tab or first round of the belt in the tray groove against the cartridge stop. Place the rounds flat across the feed tray. With your left hand, count five to six rounds down to hold ammunition in place on the feed tray, while at the same time closing the feed cover with your right hand. When closing the feed cover, always place your hand in front of the rear sight to prevent accidentally changing the sight adjustment. UNLOADING PROCEDURES To unload the weapon-- Grasp the cocking handle with the right hand, palm facing upwards. Pull the cocking handle to lock the bolt to the rear. Hold the cocking handle with your right hand, and place the weapon on safe. With your left hand, push the cocking handle to the forward locked position. 9-82
250 Depending on whether you are using belt-fed or magazine-fed ammunition, do the following: Raise the feed cover and remove any ammunition or links from the feed tray. Perform the five-point safety check. Push the magazine release tab down and pull the magazine from the magazine well. Raise the feed cover and perform the five-point safety check. SECTION 3-M240B MACHINE GUN The M240B machine gunner supports the rifleman in both offensive and defensive operations. The 7.62-mm M240B provides a heavy volume of close and continuous fire. The M240B engages targets those rifles can engage, and does so with controlled and accurate fire. The longrange, close defensive, and final protective fires delivered by the M240B form an integral part of a unit s defensive fires. This chapter describes the weapon, its components, and its ammunition in detail; and it includes a table of general data. The M240B is a general-purpose machine gun. It mounts on a bipod, tripod, aircraft, or vehicle. It is belt fed, air cooled, gas operated, and fully automatic. It fires from an open bolt. Ammunition feeds from a 100-round bandoleer with disintegrating links. The gas from firing one round provides the energy to fire the next one. Thus, the gun fires automatically as long as it has ammunition and the gunner holds the trigger is held to the rear. As the gun fires, the links separate and eject from the side. Empty cases eject from the bottom. Each M240B is issued with a spare barrel. The gunner can change barrels quickly, because the weapon has a fixed head space. The bore of the barrel is chromium plated, reducing barrel wear to a minimum. However, gunners should never switch barrels between weapons. This could prove fatal. 9-83
251 CLEARING PROCEDURES The first step in maintenance of the M240B is to clear it. This applies in all situations, not just after firing. The gunner must always assume the M240B is loaded. To clear the M240B, he must- - Move the safety to the fire F position. With his right hand, (palm up) pull the cocking handle to the rear, ensuring that the bolt locks to the rear (bipod mode). Return the cocking handle to its forward position. Place the safety on S. Raise the cover assembly and conduct the four-point safety check for brass, links, or ammunition. Check the feed pawl assembly under the cover. Check the feed tray. Lift the feed tray and inspect the chamber. Check the space between the face of the bolt and chamber as well as the space under the bolt and operating rod assembly. Close the feed tray and cover assembly. Place the safety on F. Pull the cocking handle to the rear, and pull the trigger while manually riding the bolt forward. Close the ejection port cover. 9-84


252 9-85

253 FUNCTION CHECK The gunner must perform a function check to ensure that the M240B is correctly assembled by performing the following steps in order: Place the safety on F. Pull the cocking handle to the rear, locking the bolt to the rear of the receiver. Return the cocking handle to the forward position. Place the safety on S and close the cover. Pull the trigger. (Bolt should not go forward). Place the safety on F. Pull the cocking handle to the rear, pull the trigger, and ride the bolt forward. Close the ejection port cover. LOADING PROCEDURES The gunner makes sure the weapon is clear. He places the safety on F. With his palm facing up, he pulls the cocking handle to the rear. This puts the bolt assembly in the rear position. While the sear holds the bolt to the rear, the gunner manually returns the cocking handle to the forward 9-86
150-LDR-5012 Conduct Troop Leading Procedures Status: Approved
 Report Date: 05 Jun 2017 150-LDR-5012 Conduct Troop Leading Procedures Status: Approved Distribution Restriction: Approved for public release; distribution is unlimited. Destruction Notice: None Foreign
EXAMPLE SQUAD OPERATION ORDER FORMAT. [Plans and orders normally contain a code name and are numbered consecutively within a calendar year.
 EXAMPLE SQUAD OPERATION ORDER FORMAT OPERATION ORDER (OPORD) [Plans and orders normally contain a code name and are numbered consecutively within a calendar year.] References: The heading of the plan or
THE STRYKER BRIGADE COMBAT TEAM INFANTRY BATTALION RECONNAISSANCE PLATOON
 FM 3-21.94 THE STRYKER BRIGADE COMBAT TEAM INFANTRY BATTALION RECONNAISSANCE PLATOON HEADQUARTERS DEPARTMENT OF THE ARMY DISTRIBUTION RESTRICTION: Approved for public release; distribution is unlimited.
IDENTIFY THE TROOP LEADING PROCEDURE
 Lesson 1 IDENTIFY THE TROOP LEADING PROCEDURE Lesson Description: OVERVIEW In this lesson you will learn to identify the troop leading procedure (TLP) and its relationship with the estimate of the situation.
MECHANIZED INFANTRY PLATOON AND SQUAD (BRADLEY)
") (FM 7-7J) MECHANIZED INFANTRY PLATOON AND SQUAD (BRADLEY) AUGUST 2002 HEADQUARTERS DEPARTMENT OF THE ARMY DISTRIBUTION RESTRICTION: Approved for public release; distribution is unlimited. *FM 3-21.71(FM
(FM 7-7J) MECHANIZED INFANTRY PLATOON AND SQUAD (BRADLEY) AUGUST 2002 HEADQUARTERS DEPARTMENT OF THE ARMY DISTRIBUTION RESTRICTION: Approved for public release; distribution is unlimited. *FM 3-21.71(FM
CHAPTER 10. PATROL PREPARATION
 CHAPTER 10. PATROL PREPARATION For a patrol to succeed, all members must be well trained, briefed, and rehearsed. The patrol leader must have a complete understanding of the mission and a thorough understanding
Training and Evaluation Outline Report
 Training and Evaluation Outline Report Status: Approved 20 Feb 2018 Effective Date: 23 Mar 2018 Task Number: 71-CORP-5119 Task Title: Prepare an Operation Order Distribution Restriction: Approved for public
Warrior Tasks and Battle Drills
 Soldier Critical Skills Warrior Tasks and Battle Drills Shoot Maintain, employ, engage with assigned weapon system Employ hand grenades Move Perform individual movement techniques Navigate from one point
Preparing to Occupy. Brigade Support Area. and Defend the. By Capt. Shayne D. Heap and Lt. Col. Brent Coryell
 Preparing to Occupy and Defend the Brigade Support Area By Capt. Shayne D. Heap and Lt. Col. Brent Coryell A Soldier from 123rd Brigade Support Battalion, 3rd Brigade Combat Team, 1st Armored Division,
Training and Evaluation Outline Report
 Training and Evaluation Outline Report Status: Approved 30 Mar 2017 Effective Date: 14 Sep 2017 Task Number: 71-CORP-1200 Task Title: Conduct Tactical Maneuver for Corps Distribution Restriction: Approved
Headquarters, Department of the Army
 FM 3-21.12 The Infantry Weapons Company July 2008 Distribution Restriction: Approved for public release; distribution is unlimited. Headquarters, Department of the Army This page intentionally left blank.
COMMAND AND CONTROL FM CHAPTER 2
 CHAPTER 2 COMMAND AND CONTROL A company commander uses the command-and-control (C 2 ) process to ensure that his company accomplishes its missions. Many tools are available to assist him in planning and
150-MC-0006 Validate the Protection Warfighting Function Staff (Battalion through Corps) Status: Approved
 Status: Approved") Report Date: 14 Jun 2017 150-MC-0006 Validate the Protection Warfighting Function Staff (Battalion through Corps) Status: Approved Distribution Restriction: Approved for public release; distribution is
Report Date: 14 Jun 2017 150-MC-0006 Validate the Protection Warfighting Function Staff (Battalion through Corps) Status: Approved Distribution Restriction: Approved for public release; distribution is
Training and Evaluation Outline Report
 Training and Evaluation Outline Report Task Number: 01-6-0416 Task Title: Conduct Aviation Missions as part of an Area Defense Supporting Reference(s): Step Number Reference ID Reference Name Required
Integration of the targeting process into MDMP. CoA analysis (wargame) Mission analysis development. Receipt of mission
 Mission analysis development. Receipt of mission") Battalion-Level Execution of Operations for Combined- Arms Maneuver and Wide-Area Security in a Decisive- Action Environment The Challenge: Balancing CAM and WAS in a Hybrid-Threat Environment by LTC Harry
Battalion-Level Execution of Operations for Combined- Arms Maneuver and Wide-Area Security in a Decisive- Action Environment The Challenge: Balancing CAM and WAS in a Hybrid-Threat Environment by LTC Harry
Chapter FM 3-19
 Chapter 5 N B C R e c o n i n t h e C o m b a t A r e a During combat operations, NBC recon units operate throughout the framework of the battlefield. In the forward combat area, NBC recon elements are
TACTICAL EMPLOYMENT OF ANTIARMOR PLATOONS AND COMPANIES
 (FM 7-91) TACTICAL EMPLOYMENT OF ANTIARMOR PLATOONS AND COMPANIES HEADQUARTERS DEPARTMENT OF THE ARMY DECEMBER 2002 DISTRIBUTION RESTRICTION: Approved for public release; distribution is unlimited. (FM
APPENDIX D STUDENT HANDOUTS D-1
 APPENDIX D STUDENT HANDOUTS D-1 STUDENT HANDOUT # 1 FOR TSP 071-T-3401 GUIDELINES FOR DEVELOPING/WRITING ORDERS: Use factual information, avoid making assumptions. Use authoritative expression. The language
United States Volunteers-Joint Services Command Official Headquarters Website
 Home Join Us About USV JSC USV JSC Units Events & Activities Announcements Drill Calendar Newsletter Annual Report Our History USV JSC Regs For the Troops Photo Gallery Members Only Useful Links United
Training and Evaluation Outline Report
 Training and Evaluation Outline Report Status: Approved 21 May 2015 Effective Date: 03 Oct 2016 Task Number: 71-8-7511 Task Title: Destroy a Designated Enemy Force (Division - Corps) Distribution Restriction:
DISTRIBUTION RESTRICTION:
 FM 3-21.31 FEBRUARY 2003 HEADQUARTERS DEPARTMENT OF THE ARMY DISTRIBUTION RESTRICTION: Approved for public release; distribution is unlimited. FIELD MANUAL NO. 3-21.31 HEADQUARTERS DEPARTMENT OF THE ARMY
DIGITAL CAVALRY OPERATIONS
 Appendix B DIGITAL CAVALRY OPERATIONS The digitized squadron is composed of forces equipped with automated command and control systems and compatible digital communications systems. The major components
Training and Evaluation Outline Report
 Training and Evaluation Outline Report Task Number: 07-6-1063 Task Title: Conduct a Linkup (Battalion - Brigade) Distribution Restriction: for public release; distribution is unlimited. Destruction Notice:
Summary Report for Individual Task Supervise a CBRN Reconnaissance Status: Approved
 Report Date: 13 Mar 2014 Summary Report for Individual Task 031-516-2039 Supervise a CBRN Reconnaissance Status: Approved DISTRIBUTION RESTRICTION: Approved for public release; distribution is unlimited.
APPENDIX B. Orders and Annexes
 APPENDIX B Orders and Annexes Orders and annexes are critical components of the brigade s engineer C2. The brigade engineer, through the brigade commander, exercises functional control over the engineer
1. What is the purpose of common operational terms?
 Army Doctrine Publication 1-02 Operational Terms and Military Symbols 1. What is the purpose of common operational terms? a. Communicate a great deal of information with a simple word or phrase. b. Eliminate
Command, Control, and Troop-Leading Procedures
 Command, Control, and Troop-Leading Procedures The purpose of Command and Control (C2) is to implement the commander s will in pursuit of the unit s objective. C2 is both a system and a process. The essential
Training and Evaluation Outline Report
 Training and Evaluation Outline Report Status: Proposed 02 Feb 2017 Effective Date: N/A Task Number: 17-PLT-4010 Task Title: Conduct Zone Reconnaissance (Platoon) Distribution Restriction: Distribution
150-MC-0002 Validate the Intelligence Warfighting Function Staff (Battalion through Corps) Status: Approved
 Status: Approved") Report Date: 09 Jun 2017 150-MC-0002 Validate the Intelligence Warfighting Function Staff (Battalion through Corps) Status: Approved Distribution Restriction: Approved for public release; distribution
Report Date: 09 Jun 2017 150-MC-0002 Validate the Intelligence Warfighting Function Staff (Battalion through Corps) Status: Approved Distribution Restriction: Approved for public release; distribution
Report Date: 05 Jun 2012
 Report Date: 05 Jun 2012 Summary Report for Individual Task 158-100-4001 Understand how to establish and maintain a Positive Command Climate in relation to command responsibilities. Status: Approved DISTRIBUTION
The 19th edition of the Army s capstone operational doctrine
 1923 1939 1941 1944 1949 1954 1962 1968 1976 1905 1910 1913 1914 The 19th edition of the Army s capstone operational doctrine 1982 1986 1993 2001 2008 2011 1905-1938: Field Service Regulations 1939-2000:
Assembly Area Operations
 Assembly Area Operations DESIGNATION OF ASSEMBLY AREAS ASSEMBLY AREAS E-1. An AA is a location where the squadron and/or troop prepares for future operations, issues orders, accomplishes maintenance, and
Training and Evaluation Outline Report
 Training and Evaluation Outline Report Status: Approved 20 Mar 2015 Effective Date: 15 Sep 2016 Task Number: 71-8-5715 Task Title: Control Tactical Airspace (Brigade - Corps) Distribution Restriction:
Training and Evaluation Outline Report
 Training and Evaluation Outline Report Task Number: 71-8-5320 Task Title: Synchronize Information-Related Capabilities (Battalion- Distribution Restriction: for public release; distribution is unlimited.
Training and Evaluation Outline Report
 Training and Evaluation Outline Report Status: Approved 18 Feb 2015 Effective Date: 30 Sep 2016 Task Number: 71-9-6221 Task Title: Conduct Counter Improvised Explosive Device Operations (Division Echelon
Plans and Orders [CLASSIFICATION] Copy ## of ## copies Issuing headquarters Place of issue Date-time group of signature Message reference number
![Plans and Orders [CLASSIFICATION] Copy ## of ## copies Issuing headquarters Place of issue Date-time group of signature Message reference number](/thumbs/79/79022339.jpg "Plans and Orders [CLASSIFICATION] Copy ## of ## copies Issuing headquarters Place of issue Date-time group of signature Message reference number") Place the classification at the top and bottom of every page of the OPLAN or OPORD. Place the classification marking (TS), (S), (C), or (U) at the front of each paragraph and subparagraph in parentheses.
Place the classification at the top and bottom of every page of the OPLAN or OPORD. Place the classification marking (TS), (S), (C), or (U) at the front of each paragraph and subparagraph in parentheses.
150-MC-5320 Employ Information-Related Capabilities (Battalion-Corps) Status: Approved
 Status: Approved") Report Date: 09 Jun 2017 150-MC-5320 Employ Information-Related Capabilities (Battalion-Corps) Status: Approved Distribution Restriction: Approved for public release; distribution is unlimited. Destruction
Report Date: 09 Jun 2017 150-MC-5320 Employ Information-Related Capabilities (Battalion-Corps) Status: Approved Distribution Restriction: Approved for public release; distribution is unlimited. Destruction
Plan Requirements and Assess Collection. August 2014
 ATP 2-01 Plan Requirements and Assess Collection August 2014 DISTRIBUTION RESTRICTION: Approved for public release; distribution is unlimited. Headquarters, Department of the Army This publication is available
DANGER WARNING CAUTION
 Training and Evaluation Outline Report Task Number: 01-6-0447 Task Title: Coordinate Intra-Theater Lift Supporting Reference(s): Step Number Reference ID Reference Name Required Primary ATTP 4-0.1 Army
Information-Collection Plan and Reconnaissance-and- Security Execution: Enabling Success
 Information-Collection Plan and Reconnaissance-and- Security Execution: Enabling Success by MAJ James E. Armstrong As the cavalry trainers at the Joint Multinational Readiness Center (JMRC), the Grizzly
CHAPTER 2 DUTIES OF THE FIRE SUPPORT TEAM AND THE OBSERVER
 CHAPTER 2 DUTIES OF THE FIRE SUPPORT TEAM AND THE OBSERVER 2-1. FIRE SUPPORT TEAM a. Personnel and Equipment. Indirect fire support is critical to the success of all maneuver operations. To ensure the
Obstacle Planning at Corps, Division, and Brigade Levels
 Chapter 4 Obstacle Planning at Corps, Division, and Brigade Levels Commanders and staffs consider the use of obstacles when planning offensive, defensive, and retrograde operations. This chapter describes
CHAPTER COUNTERMINE OPERATIONS DEFINITIONS BREACHING OPERATIONS. Mine/Countermine Operations FM 20-32
 Mine/Countermine Operations FM 20-32 CHAPTER 8 COUNTERMINE OPERATIONS Countermine operations are taken to breach or clear a minefield. All tasks fall under breaching or clearing operations. These tasks
CLASSES/REFERENCES TERMINAL LEARNING OBJECTIVE
 CLASSES/REFERENCES TERMINAL LEARNING OBJECTIVE Day 1: Operational Terms ADRP 1-02 Operational Graphics ADRP 1-02 Day2: Movement Formations &Techniques FM 3-21.8, ADRP 3-90 Offensive Operations FM 3-21.10,
Training and Evaluation Outline Report
 Training and Evaluation Outline Report Task Number: 01-6-0029 Task Title: Maintain the BCT Current Situation for Aviation Supporting Reference(s): Step Number Reference ID Reference Name Required Primary
Section III. Delay Against Mechanized Forces
 Section III. Delay Against Mechanized Forces A delaying operation is an operation in which a force under pressure trades space for time by slowing down the enemy's momentum and inflicting maximum damage
MAY 2014 DISTRIBUTION RESTRICTION: Approved for public release; distribution is unlimited.
 FM 6-0 COMMANDER AND STAFF ORGANIZATION AND OPERATIONS MAY 2014 DISTRIBUTION RESTRICTION: Approved for public release; distribution is unlimited. This publication supersedes ATTP 5-01.1, dated 14 September
Depict the following operational terms and graphics. CO boundaries, Air and ground axis of advance for shaping and decisive Ops, unit symbols,
 Depict the following operational terms and graphics. CO boundaries, Air and ground axis of advance for shaping and decisive Ops, unit symbols, targets, and other graphics used during OPORDS.(ADRP 1-02)
Infantry Battalion Operations
 .3 Section II Infantry Battalion Operations MCWP 3-35 2201. Overview. This section addresses some of the operations that a task-organized and/or reinforced infantry battalion could conduct in MOUT. These
CADET HANDBOOK 2015 U.S. ARMY CADET COMMAND
 U.S. ARMY CADET COMMAND CADET HANDBOOK 2015 DISTRIBUTION RESTRICTION: APPROVED FOR PUBLIC RELEASE; DISTRIBUTION IS UNLIMITED. USACC, DoLD-E, CST Planning Branch, March 2015. CADET HANDBOOK This publication
(QJLQHHU 5HFRQQDLVVDQFH FM Headquarters, Department of the Army
 FM 5-170 (QJLQHHU 5HFRQQDLVVDQFH Headquarters, Department of the Army DISTRIBUTION RESTRICTION: Approved for public release; distribution is unlimited. *FM 5-170 Field Manual No. 5-170 Headquarters Department
Training and Evaluation Outline Report
 Training and Evaluation Outline Report Status: Approved 20 Apr 2015 Effective Date: 13 Sep 2016 Task Number: 71-8-3501 Task Title: Coordinate Electronic Warfare (Brigade - Corps) Distribution Restriction:
Training and Evaluation Outline Report
 Training and Evaluation Outline Report Task Number: 71-8-3510 Task Title: Plan for a Electronic Attack (Brigade - Corps) Distribution Restriction: for public release; distribution is unlimited. Destruction
FM MILITARY POLICE LEADERS HANDBOOK. (Formerly FM 19-4) HEADQUARTERS, DEPARTMENT OF THE ARMY
 HEADQUARTERS, DEPARTMENT OF THE ARMY") (Formerly FM 19-4) MILITARY POLICE LEADERS HANDBOOK HEADQUARTERS, DEPARTMENT OF THE ARMY DISTRIBUTION RESTRICTION: distribution is unlimited. Approved for public release; (FM 19-4) Field Manual No. 3-19.4
(Formerly FM 19-4) MILITARY POLICE LEADERS HANDBOOK HEADQUARTERS, DEPARTMENT OF THE ARMY DISTRIBUTION RESTRICTION: distribution is unlimited. Approved for public release; (FM 19-4) Field Manual No. 3-19.4
Tactical Employment of Mortars
 MCWP 3-15.2 FM 7-90 Tactical Employment of Mortars U.S. Marine Corps PCN 143 000092 00 *FM 7-90 Field Manual NO. 7-90 FM 7-90 MCWP 3-15.2 TACTICAL EMPLOYMENT OF MORTARS HEADQUARTERS DEPARTMENT OF THE
FM AIR DEFENSE ARTILLERY BRIGADE OPERATIONS
 Field Manual No. FM 3-01.7 FM 3-01.7 Headquarters Department of the Army Washington, DC 31 October 2000 FM 3-01.7 AIR DEFENSE ARTILLERY BRIGADE OPERATIONS Table of Contents PREFACE Chapter 1 THE ADA BRIGADE
Command and staff service
 Command and staff service No.1 Main roles of the platoon commander and deputy commander in the battle. Lecturer: Ing. Jiří ČERNÝ, Ph.D. jiri.cerny@unob.cz Course objectives: to describe and teach to students
Obstacle Planning at Task-Force Level and Below
 Chapter 5 Obstacle Planning at Task-Force Level and Below The goal of obstacle planning is to support the commander s intent through optimum obstacle emplacement and integration with fires. The focus at
Afghanistan National Army ANA THE INFANTRY RIFLE COMPANY (Part 1)
") Afghanistan National Army ANA 7-10.1 THE INFANTRY RIFLE COMPANY (Part 1) 15 October 2006 CHAPTER 1 COMPANY ORGANIZATION 1-1. A rifle company can be part of a light infantry, commando, or mechanized infantry
Afghanistan National Army ANA 7-10.1 THE INFANTRY RIFLE COMPANY (Part 1) 15 October 2006 CHAPTER 1 COMPANY ORGANIZATION 1-1. A rifle company can be part of a light infantry, commando, or mechanized infantry
Maneuver Leaders Role in Observation Planning
 Maneuver Leaders Role in Observation Planning King of Battle Reclaiming the Throne... Not Without the Queen LTC JACK D. CRABTREE LTC JONATHAN A. SHINE CPT GEORGE L. CASS As observed by observer-coach-trainers
Training and Evaluation Outline Report
 Training and Evaluation Outline Report Task Number: 07-2-1378 Task Title: Defend in an Urban Area (Platoon-Company) Distribution Restriction: Approved for public release; distribution is unlimited. Destruction
CHAPTER 2 FIRE SUPPORT DUTIES AND RESPONSIBILITIES
 CHAPTER 2 FIRE SUPPORT DUTIES AND RESPONSIBILITIES You have a FSCOORD at each echelon of command from company through brigade. He is called the company, battalion, or brigade FSO. At brigade level, the
Training and Evaluation Outline Report
 Training and Evaluation Outline Report Status: Approved 07 Jan 2015 Effective Date: 03 Oct 2016 Task : 71-8-7648 Task Title: Plan Offensive Operations During Counterinsurgency Operations (Brigade - Distribution
Culture / Climate. 2-4 Mission command fosters a culture of trust,
 Culture / Climate Document Title Proponent Page Comment ADP 1 The Army TRADOC 2-8 Unit and organizational esprit de corps is built on an open command climate of candor, trust, and respect, with leaders
CHAPTER 5 SECURITY OPERATIONS
 CHAPTER 5 SECURITY OPERATIONS The reconnaissance platoon conducts security operations to protect the main body from enemy observation and surprise attack. These operations give the main body commander
Doctrine Update Mission Command Center of Excellence US Army Combined Arms Center Fort Leavenworth, Kansas 1 May 2017
 Mission Command Center of Excellence US Army Combined Arms Center Fort Leavenworth, Kansas 1 May 2017 Doctrine Update 2-17 The United States Army Combined Arms Center publishes the Doctrine Update periodically
Chapter 1. Introduction
 MCWP -. (CD) 0 0 0 0 Chapter Introduction The Marine-Air Ground Task Force (MAGTF) is the Marine Corps principle organization for the conduct of all missions across the range of military operations. MAGTFs
Training and Evaluation Outline Report
 Training and Evaluation Outline Report Status: Approved 03 Mar 2014 Effective Date: 20 Apr 2018 Task Number: 71-CO-1001 Task Title: Conduct Unit Training Management (Platoon-Company) Distribution Restriction:
Command and staff service. No. 10/5 The logistic and medical support service during C2 operations.
 Command and staff service No. 10/5 The logistic and medical support service during C2 operations. Course objectives: to clear up of responsibilities and duties of S-1,S-4 and health assistant at the CP,
Chapter 2. Battle Command
 Chapter 2 Battle Command This chapter provides the techniques and procedures used by MP leaders at company and platoon level to C 2 their organizations. OVERVIEW 2-1. Battle command is the art of battle
Army Planning and Orders Production
 FM 5-0 (FM 101-5) Army Planning and Orders Production JANUARY 2005 DISTRIBUTION RESTRICTION: Approved for public release; distribution is unlimited. HEADQUARTERS DEPARTMENT OF THE ARMY This page intentionally
Training and Evaluation Outline Report
 Training and Evaluation Outline Report Status: Approved 10 Feb 2015 Effective Date: 05 Jun 2018 Task Number: 71-CORP-6220 Task Title: Develop Personnel Recovery Guidance (Brigade - Corps) Distribution
Tank Platoon. December DISTRIBUTION RESTRICTION: Approved for public release; distribution is unlimited.
 *ATP 3-20.15 + MCRP 3-10B.1 Tank Platoon December 2012 DISTRIBUTION RESTRICTION: Approved for public release; distribution is unlimited. *This publication supersedes FM 3-20.15, 22 February 2007. Headquarters,
SBCT Infantry Battalion
 ATP 3-21.21 SBCT Infantry Battalion DISTRIBUTION RESTRICTION: Approved for public release; distribution will be unlimited. * Headquarters, Department of the Army This publication is available at Army Knowledge
Armor Basic Officer Leaders Course
 Armor Basic Officer Leaders Course Purpose To provide Commanders in the Field with Armor/Cavalry Platoon Leaders trained in the fundamentals of tank and reconnaissance platoon weapon systems and capabilities,
Sandhurst 2018 Training Guidance. CPT Philip Anderson
 Sandhurst 2018 Training Guidance CPT Philip Anderson Intent Training Guidance Intent To empower all teams to train successfully but also to ensure that the integrity and uncertainty of the competition
Religious Support and the Operations Process JULY DISTRIBUTION RESTRICTION: Approved for public release; distribution is unlimited.
 ATP 1-05.01 Religious Support and the Operations Process JULY 2018 DISTRIBUTION RESTRICTION: Approved for public release; distribution is unlimited. This publication supersedes ATP 1-05.01, dated 12 May
Summary Report for Individual Task Write the CBRN Portion to Brigade's Tactical Standard Operating Procedures (TACSOP) Status: Approved
 Status: Approved") Report Date: 12 Mar 2014 Summary Report for Individual Task 031-506-4010 Write the CBRN Portion to Brigade's Tactical Standard Operating Procedures (TACSOP) Status: Approved DISTRIBUTION RESTRICTION: Approved
Report Date: 12 Mar 2014 Summary Report for Individual Task 031-506-4010 Write the CBRN Portion to Brigade's Tactical Standard Operating Procedures (TACSOP) Status: Approved DISTRIBUTION RESTRICTION: Approved
FM (FM ) Tactics, Techniques, and Procedures for the Field Artillery Battalion
 Tactics, Techniques, and Procedures for the Field Artillery Battalion") 22 March 2001 FM 3-09.21 (FM 6-20-1) Tactics, Techniques, and Procedures for the Field Artillery Battalion DISTRIBUTION RESTRICTION: Approved for public release; distribution is unlimited. ARMY HEADQUARTERS,
22 March 2001 FM 3-09.21 (FM 6-20-1) Tactics, Techniques, and Procedures for the Field Artillery Battalion DISTRIBUTION RESTRICTION: Approved for public release; distribution is unlimited. ARMY HEADQUARTERS,
Training and Evaluation Outline Report
 Training and Evaluation Outline Report Task Number: 07-6-1043 Task Title: Conduct Non-Combatant Evacuation (Battalion - Brigade) Distribution Restriction: for public release; distribution is unlimited.
Training and Evaluation Outline Report
 Training and Evaluation Outline Report Task : 71-8-5702 Task Title: Determine Integrated Airspace User Requirements (Brigade-Corps) Distribution Restriction: for public release; distribution is unlimited.
UNITED STATES ARMY TRAINING AND DOCTRINE COMMAND. NCO 2020 Strategy. NCOs Operating in a Complex World
 UNITED STATES ARMY TRAINING AND DOCTRINE COMMAND NCO 2020 Strategy NCOs Operating in a Complex World 04 December 2015 Contents Part I, Introduction Part II, Strategic Vision Part III, Ends, Ways, and
Armor and Mechanized Infantry Company Team
 ATP 3-90.1 Armor and Mechanized Infantry Company Team JANUARY 2016 DISTRIBUTION RESTRICTION: Approved for public release; distribution will be unlimited. This publication supersedes FM 3-90.1, 9 December
The Infantry Rifle Platoon and Squad
 FM 3-21.8 (FM 7-8) The Infantry Rifle Platoon and Squad MARCH 2007 DISTRIBUTION RESTRICTION: Approved for public release; distribution is unlimited. HEADQUARTERS DEPARTMENT OF THE ARMY This page intentionally
Environment: Some iterations of this task should be performed in MOPP 4. This task should be trained under IED Threat conditions.
 Report Date: 20 Oct 2017 Summary Report for Staff Drill Task Drill Number: 71-DIV-D7658 Drill Title: React to a Mass Casualty Incident Status: Approved Status Date: 20 Oct 2017 Distribution Restriction:
NATURE OF THE ASSAULT
 Chapter 5 Assault Breach The assault breach allows a force to penetrate an enemy s protective obstacles and destroy the defender in detail. It provides a force with the mobility it needs to gain a foothold
OF THE DEFENSE FUNDAMENTALS CHAPTER 9
 CHAPTER 9 FUNDAMENTALS OF THE DEFENSE The immediate purpose of defensive operations is to defeat an enemy attack. Army forces conduct defensive operations as part of major operations and campaigns, in
Headquarters Department of the Army
 ATP 3-09.23 (FM 3-09.21) Field Artillery Cannon Battalion DISTRIBUTION RESTRICTION: Approved for public release; distribution is unlimited. This publication supersedes FM 3-09.21 Tactics, Techniques, and
OPERATIONAL TERMS AND GRAPHICS
 FM 1-02 (FM 101-5-1) MCRP 5-12A OPERATIONAL TERMS AND GRAPHICS SEPTEMBER 2004 DISTRIBUTION RESTRICTION: Approved for public release; distribution is unlimited. HEADQUARTERS DEPARTMENT OF THE ARMY This
Chapter 2. Standard NBC Reports. NBC 1 Report FM 3-3, C1
 , C1 Chapter 2 NBC Warning and Reporting System (NBCWRS) The primary means of warning units of an actual or predicted CB hazard is the NBC Warning and Reporting system (NBCWRS). It is a key in limiting
TACTICAL ROAD MARCHES AND ASSEMBLY AREAS
 APPENDIX Q TACTICAL ROAD MARCHES AND ASSEMBLY AREAS Section I. TACTICAL ROAD MARCHES Q-1. GENERAL The ground movement of troops can be accomplished by administrative marches, tactical movements, and tactical
Training and Evaluation Outline Report
 Training and Evaluation Outline Report Status: Approved 10 Feb 2015 Effective Date: 21 Apr 2017 Task Number: 05-PLT-5001 Task Title: Perform an Initial Infrastructure Assessment Distribution Restriction:
Training and Evaluation Outline Report
 Training and Evaluation Outline Report Status: Approved 28 Mar 2017 Effective Date: 08 Feb 2018 Task Number: 71-BN-7361 Task Title: Organize Foreign Security Forces for Battalion Distribution Restriction:
Training and Evaluation Outline Report
 Training and Evaluation Outline Report Status: 03 Oct 2016 Effective Date: 15 Feb 2017 Task Number: 12-EAC-1228 Task Title: Coordinate Human Resources Support During Offense, Defense, Stability and Defense
Commander and Staff Organization and Operations
 Change No. 1 FM 6-0, C1 Headquarters Department of the Army Washington, DC, 11 May 2015 Commander and Staff Organization and Operations 1. Change 1 to FM 6-0, 5 March 2014, adds the supersession statement
Training and Evaluation Outline Report
 Training and Evaluation Outline Report Status: Approved 10 Aug 2005 Effective Date: 22 May 2017 Task Number: 12-BDE-0009 Task Title: Process Replacements (S1) Distribution Restriction: Approved for public
Mobile Gun System Platoon. February Headquarters, Department of the Army
 ATP 3-20.16 Mobile Gun System Platoon February 2013 Headquarters, Department of the Army DISTRIBUTION RESTRICTION: Approved for public release; distribution is unlimited. This publication is available
This publication is available at Army Knowledge Online (https://armypubs.us.army.mil/doctrine/index.html). To receive publishing updates, please
. To receive publishing updates, please") This publication is available at Army Knowledge Online (https://armypubs.us.army.mil/doctrine/index.html). To receive publishing updates, please subscribe at http://www.apd.army.mil/adminpubs/new_subscribe.asp.
This publication is available at Army Knowledge Online (https://armypubs.us.army.mil/doctrine/index.html). To receive publishing updates, please subscribe at http://www.apd.army.mil/adminpubs/new_subscribe.asp.
BRIEFING FORMATS. Section I. Mission Analysis Briefing
 Section I. Mission Analysis Briefing Section II. Course of Action Briefing Section III. Wargaming Briefing Section IV. The Decision Briefing Section V. OPLAN/OPORD Briefing Section VI. Execution and Supervision
Training and Evaluation Outline Report
 Training and Evaluation Outline Report Status: 22 Sep 2010 Effective Date: 12 Sep 2016 Task Number: 16-TM-1001 Task Title: Conduct Religious Services Distribution Restriction: for public release; distribution