Pediatric and Obstetric Emergency Preparedness Toolkit
|
|
|
- Thomasina Robinson
- 5 years ago
- Views:
Transcription


1 1
2 Pediatric and Obstetric Emergency Preparedness Toolkit A Guideline for Hospitals Preface How well we respond to and recover from a disaster is the true test of emergency preparedness planning. New York State Department of Health (NYSDOH) recognizes that the level at which its hospitals are prepared to handle a mass casualty event is a critical part of emergency planning. Throughout the state, hospitals are diverse and often specialize in specific types of patient care. During a mass casualty event, hospitals may be required to treat specific patient care needs for which they may be unfamiliar. To a large degree, care of the newborn, pediatric and obstetric patient is such a specialty. With this realization of a gap in care, NYSDOH collaborated with many local and state agencies to develop an emergency toolkit for hospitals. This toolkit is to be used as guidance to hospitals throughout the state to develop their own unique emergency plan. The toolkit is especially designed for those hospitals that do not have pediatric intensive care services or obstetric or newborn services and must prepare for such patients during the time of a disaster. It was our intent for the toolkit to be simple to use, containing laminated cards for removal and easy reference. Although this toolkit is by no means comprehensive in the specialty areas of newborn, pediatric and obstetric care, it is our intention that in regards to planning for these specialty areas, this toolkit will greatly reduce the amount of disaster plan development time spent by each hospital. Our goal is that the toolkit will be an asset in the development of each hospital's unique emergency preparedness plan, thus allowing the hospital time to focus on its specific needs and abilities during the time of a mass casualty event and, ultimately, be capable and prepared to serve its community well. 2
3 Purpose The purpose of this toolkit is to provide guidance to hospitals throughout New York State in preparing their own unique emergency disaster plan. It is especially useful to the hospitals that do not routinely care for pediatric, newborn or obstetric patients. The toolkit provides an outline for roles and actions of hospital personnel, volunteers, families and the community during an emergency and guides hospital emergency planning to ensure the pediatric and obstetric population will be well cared for during a mass casualty event. The toolkit is not meant to be a comprehensive document for the specialty areas of pediatrics, newborn care or obstetrics, but rather to be a checklist of ideas and situations the hospital should consider and plan for in the event of an emergency. It discusses strategies of how the medical staff would triage, care for and protect the pediatric patient until the legal guardians were located or proper authorities found safe placement. It discusses the probable need for extra staffing as well as the need for obtaining specialty equipment and nurses with specialty skills. Transportation and security of the patient is discussed along with the need for and importance of having a family information and support center. Along with planning strategies, specific guidelines and practice standards are also provided in the toolkit. These guidelines and standards pertain to such topics as pharmaceutical needs and dietary considerations as well as guidelines and standards for decontamination and infection control measures. Many of these specific guidelines are on laminated cards, which can be removed and posted for easy reference. In providing guidance, standards and useful, proactive planning strategies for hospitals under one cover, it is our intention that the toolkit will greatly reduce the amount of disaster plan development time spent by hospitals in preparing their own emergency plan. It will assist the hospital to focus on its locally specific needs and abilities so it is able to develop an emergency plan specific and unique to its community. 3
4 Section 1 Introduction During a mass casualty or terrorist event, it is recognized that all hospitals, even those that are not pediatric trauma centers or specialized pediatric hospitals, might receive critically ill or injured pediatric patients. Additionally, it is acknowledged by the healthcare community that there has been limited attention to the specific needs of the pediatric population and their families in disaster response preparation. The New York City Department of Health and Mental Hygiene (NYCDOHMH) and the New York State Department of Health (NYSDOH) recognized this planning gap. As a result, the NYCDOHMH and its Centers for Bioterrorism Preparedness Planning (CBPP) developed a document entitled Hospital Guidelines for Pediatrics in Disasters. The Department would like to acknowledge the Division of Family Health toolkit committee members for their advocacy for the needs of women and children during times of emergency and for providing leadership for this project. Without their dedication to the subject, this document would not have been possible. The goal of this effort was to provide hospitals, especially those that do not normally admit children, or have no Pediatric Intensive Care Services or Obstetric/Newborn services, with some useful, proactive planning strategies and tools for providing protection, treatment, and acute care for pediatric and obstetric patients during a disaster. The following hospital guidelines and recommendations for children in disasters initially developed by NYCDOHMH have been modified by the NYSDOH to address the needs of suburban and rural upstate hospitals and to address the needs of obstetric patients. The NYSDOH wishes to thank NYCDOHMH for their willingness to allow for adaptation of their work to provide a statewide perspective. 4
5 Focus of Guidelines The intent of this toolkit is to provide hospitals without pediatric or obstetric services, hospitals without pediatric intensive care services, and hospitals without pediatric trauma services help in planning for the care of pediatric and obstetric patients in emergencies. Fifteen topics related to pediatric and obstetric disaster preparedness were selected: Decontamination of Children Planning Guidelines Dietary Needs of Children Emergency Department Surge Considerations and Inpatient Bed Assignment Security Emergency Preparedness for Childbirth Equipment for Pediatric Disasters Family Information & Support Center Infection Control Considerations Pharmaceutical Needs Psychological Needs of Children Planning Guidelines Staffing Recommendations Security Training Recommendations Transportation of Pediatric Patients Triage General guidelines and suggested educational resources for each of these fifteen topics follow. It is recognized that the toolkit is not comprehensive with respect to all aspects of planning for the special needs of the pediatric and obstetric population. What it does provide is useful, expert-reviewed guidance documents and planning tools that should greatly reduce the amount of plan development and preparation time for each individual hospital. Committee Members Marilyn A. Kacica, MD, MPH - Chair Medical Director Division of Family Health New York State Department of Health Diane M. Smith, RN (retired) Associate Public Health Preparedness Representative Office of Public Health Preparedness New York State Department of Health Michelle Cravetz, MS, RN-BC Director (former) Bureau of Women's Health Division of Family Health New York State Department of Health Wendy B. Stoddart, RN, BSN Director American Indian Health Program Division of Family Health New York State Department of Health 5
6 Contributors Christopher A. Kus, MD, MPH Associate Medical Director Division of Family Health New York State Department of Health Kathi J. Miller, CNM Public Health Graduate Assistant Division of Family Health New York State Department of Health Diana Volkman, RN Health Systems Emergency Preparedness Representative Western Regional Office New York State Department of Health Gloria Hale, MPH EMSC Coordinator (former) Bureau of Emergency Medical Services New York State Department of Health Marjorie Geiger, MPH Assistant Director Bureau of Emergency Management Systems New York State Department of Health Jeanne C. Behr, MSEd Public Health Emergency Representative Public Health Emergency Preparedness New York State Department of Health Lorie Liptak Deputy Director Health Systems Emergency Preparedness New York State Department of Health William Maliha, MD Medical Director Health Systems Emergency Preparedness New York State Department of Health William M. Bullard Former Associate Director Public Health Preparedness Program New York State Department of Health Patrick J. Russell Stockpile Coordinator Center for Environmental Health New York State Department of Health Michael G. Perillo, DC, MPH Associate Director Health Emergency Preparedness New York State Department of Health Lisa Sweet, RD Public Health Nutritionist Bureau of Nutrition Risk Reduction New York State Department of Health Edward G. Horn, PhD Director Division of Environmental Health Assessment New York State Department of Health Adela Salame-Alfie, PhD Assistant Director Division of Environmental Health Investigation New York State Department of Health Richard Aubrey, MD, MPH Director Central New York Regional Perinatal Center Patricia E. Anders Director of Emergency Preparedness Training Public Health Preparedness Office New York State Department of Health Susan Cuomo-Whitney, RN, BSN Public Health Representative Office of Local Health Services New York State Department of Health Eileen M. Franko, DrPH, MPH Director Bureau of Occupational Health New York State Department of Health Anne Ryan, MS, RN, CEN Emergency Preparedness Coordinator University Hospital, Upstate Medical Center 6
7 Acknowledgements NYSDOH extends its thanks to the following organizations for their willingness to allow use and adaptation of their materials: The New York City Department of Health and Mental Hygiene The Oklahoma University College of Pharmacy and Oklahoma City-County Health Department The Ontario Society of Nutrition Professionals in Public Health The American College of Nurse-Midwives 7
8 Section 2 Planning Guidelines All hospitals should plan for pediatric or obstetric patients to arrive during a disaster. All hospitals need to recognize the potential for receiving pediatric and/or obstetric patients during a natural disaster, terror event or other public health emergency. In a public health emergency, the following may occur: 1. Pediatric and pregnant patients might present to ANY hospital, whether or not the facilities have pediatric or obstetric units; 2. Critically ill pediatric patients might present to the nearest or easiest to reach hospital; and 3. Transfer of patients to specialized hospitals might not be feasible. Therefore, during disasters all hospitals and all providers must be prepared to deliver care to pediatric and obstetric patients. During the 9/11 terrorist event, nearly 100 different hospitals received patients. While most of these patients walked, ran, or took buses, taxis or boats, the minority waited to be transported by ambulance. Self-evacuating pediatric victims and their caregivers and women in labor will go to the nearest hospital, the most convenient hospital, or the hospital they are most familiar with regardless of the capabilities of that hospital for specialty, obstetric or pediatric care. All hospitals, even those that are not pediatric trauma centers or specialized pediatric hospitals, might receive critically ill or injured children in a mass casualty or disaster event. Pediatric patients may initially be brought to the nearest centers, as ambulances attempt to expedite their return to the disaster scene to maximize the care of patients. Even after onscene triage is established, severely injured children may be brought to the nearest medical center because the patient is simply too unstable to survive a longer transport time. Additionally, due to traffic congestion, unsafe conditions, or lack of appropriate vehicles, ambulances may initially be unable to travel to hospitals that are more distant. Each hospital, even hospitals that do not routinely provide pediatric or obstetric services, needs to plan for the possibility that pediatric or obstetric patients arriving at their hospital during a disaster might require emergency evaluation, critical care, surgical services, inpatient care, and/or psychosocial support and should be prepared to offer these services accordingly. Therefore, NYSDOH recommends the development of a committee or workgroup within each hospital to develop an annex to their Comprehensive Emergency Management Plan (CEMP) that addresses pediatric and obstetric patient needs in the event of a disaster. The general guidelines for the development of such a plan follow. 8
9 Plan for Transport of Pediatric/Obstetric Patients The first element to consider is the possibility that the number of pediatric or obstetric patients requiring admission might exceed the normal patient capacity or expertise of hospital staff. For those hospitals without specialty pediatric or obstetric services, transfer of patients to a center with specialty pediatric or obstetric services may be necessary. Therefore, these hospitals should establish relationships with appropriate hospital facilities that do admit pediatric and obstetric patients to facilitate transfer (in accordance with a signed Transfer and Affiliation Agreement), if conditions permit. Consideration for transfer and affiliation agreements should go beyond traditional network relationships and should include geographical proximity due to the unpredictability of traffic obstructions during the acute phase of a disaster. All hospitals must also consider the need for evacuation of pediatric/obstetric patients during a disaster that renders the hospital unsafe or inoperable. Plans need to be made that take into account the needs of current patients, as well as arriving patients. Plan for Pediatric and Obstetric Inpatient Care if Transport is Delayed During the first 24 to 48 hours of a disaster involving much of the region, transfer might be difficult or impossible due to local conditions, lack of transport vehicles and personnel, or lack of capacity at resource hospitals. Therefore, all hospitals must be prepared to provide emergent pediatric/obstetric care and inpatient admission, even for critically injured patients, until such time that safe transport can be arranged. For hospitals without pediatric intensivists or pediatric trauma surgeons, it is recommended that relationships be developed with pediatric intensive care specialists and pediatric trauma surgeons at outside hospitals to provide, at the minimum, telephone consultations or support for admitting physicians. Facilities may need to plan carefully for locations where laboring women, infants and small children can be safely accepted and housed in the event of disasters, including pandemics. Key considerations in planning for delivery of obstetric services must include how to keep healthy pregnant women and neonates separate from infectious patients, and how to ensure that staff members who care for pregnant or laboring women and their infants are not putting them at higher risk for infection. Separate entrances and treatment areas with adequate signage should be considered. 9
10 Survey Staff for Pediatric and Obstetric Expertise Many levels of staffing are required, including the ability to provide emergency evaluation and treatment of children and pregnant and/or laboring women in the hospital setting. Yet, not every hospital has a full complement of pediatric specialists, obstetricians and pediatric/obstetric nurses. It is recommended, therefore, that hospitals survey their staff and admitting physicians to develop a database of personnel with pediatric and obstetric experience and training and update that database annually. For example, emergency department physicians may have considerable experience with children; anesthesiologists and/or otolaryngologists may be knowledgeable about intubations of children. The gaps identified by this survey should be addressed by providing physicians, nurses, social workers, and other staff the necessary skill, knowledge and training to provide timely efficient care in the event of a disaster. Appoint a Pediatric/Obstetric Physician Coordinator and a Pediatric/Obstetric Nursing Coordinator It is recommended that hospitals appoint both a physician and a nurse as planning coordinators for pediatrics and obstetrics. These coordinators should serve as liaisons between different internal hospital committees that are addressing emergency preparedness issues, as well as assist in the development and use of pediatric and obstetric hospital protocols and procedures. It is envisioned that these positions would advocate for the medical and nursing needs of children and pregnant or laboring women during the planning phase for a disaster. When projecting implementation of the Incident Command System (ICS) during a disaster, the hospital's ICS chart should include a position for Pediatric Medical/Technical Specialist or similar role. It is important to list a specific person and alternates for this position before the incident occurs. Increase Pediatric, Obstetric and Disaster Training Increased numbers of medical and nursing staff should be trained to provide appropriate pediatric emergency care with courses such as Pediatric Advanced Life Support (PALS), Advanced Pediatric Life Support (APLS), Neonatal Advanced Life Support (NALS), and pediatric disaster drills. Updates and re-certifications should be arranged as well. Training and drills for handling emergency childbirth should also be initiated. New versions of Chemical, Biological, Radiological, Nuclear, and Explosive (CBRNE) Hazardous Materials Classes should include pediatrics and the specific needs of children and their families during a disaster involving hazardous materials. Web-based courses are available and should be considered. 10
11 Section 3 Staffing Recommendations for Pediatrics during a Disaster Purpose: The recommendations included in this section address the critical issue of hospital staffing for pediatric services during a disaster. Appropriate allocation of personnel and the delegation of responsibilities are critical to mitigate the confusion and chaos created by disaster situations. Staffing considerations for pediatric patients should be planned for prior to a disaster and is one of the important issues to be considered by the hospital's Emergency Preparedness Planning Committee and addressed in the hospital's CEMP. The following recommendations were created primarily to address needs of institutions that do not have significant pediatric services or pediatric staff. When applicable, Hospital Incident Command System (HICS) positions should also be utilized by hospitals. Section Contents General Guidelines Planning: Survey Staff for Pediatric Experiences Mitigation: Create Pediatric Leadership Positions for Key Personnel and Qualified Staff o Physician Coordinator for Pediatric Emergency Care in a Disaster o Nursing Coordinator for Pediatric Emergency Care in a Disaster Response: Staffing for a Coordinated and Comprehensive Emergency Management Plan Sample HICS Job Action Sheets ( o Pediatric Services Unit Leader o Medical/Technical Specialist-Pediatric Care o Pediatric Logistics Unit Leader Staffing Recommendations for Obstetrics during a Disaster General Guidelines Pre-identify hospital staff with specialty skills or experience in the treatment of pediatric patients. Develop a plan to utilize the specific skills of the above personnel, including call-down and notification procedures. Create key pediatric positions these persons will occupy in a disaster event. If necessary, train additional staff who are willing to care for pediatric patients. Integrate the pediatric staffing plan into your hospital's CEMP. 11
12 Planning: Survey Staff for Pediatric Experiences One of the first steps in pediatric planning is identifying members of the hospital's staff with pediatric skills and/or training. These members will become the primary pediatric caregivers. Staff with pediatric training and skills will most likely list pediatric emergency medicine, emergency medicine, pediatrics, pediatric surgery or family medicine as their area of specialty. Other staff may have some pediatric experience in their specialty training and should be considered as an additional source of staffing. These staff may include, but are not limited to, personnel trained in anesthesia, otolaryngology, trauma surgery, general surgery, orthopedics, urology, neurosurgery, and thoracic surgery. Staff with pediatric experience may also include family nurse practitioners. Special attention must be paid to skills required for critical resuscitation procedures during the planning phase, especially for hospitals with limited pediatric specialty providers. Airway management, resuscitation, and critical care skills may be necessary during both pediatric and obstetric emergencies. Staff qualified to perform such procedures will be necessary during a disaster and should be identified in advance. For example, pediatric airway management may be performed by an anesthesiologist or otolaryngologist. Resuscitation and critical care medicine may be performed by anesthesiologists and general surgeons. Included in this cadre of staff are nurses, physician assistants, and nursing assistants who work in the hospital's emergency department (ED), operating rooms (ORs), post anesthesia care units (PACUs), intensive care units (ICUs), inpatient units and outpatient clinics. If qualified staff members are not available to perform such procedures, consideration should be given to training staff that are willing to provide these services. (See Section 4 Training.) Once these primary pediatric caregivers are identified, their names and contact information should be maintained as a special call-down sheet for pediatric disasters. Regular survey updates are needed to maintain a current roster of experienced staff. The Emergency Preparedness Planning Committee should determine how that information is maintained and how that information is communicated to the Incident Command Center during a pediatric disaster. It may also be useful to know if there are pharmacists, respiratory therapists, dieticians and social workers with pediatric experience, as well. 12
13 Mitigation: Create Pediatric Leadership Positions for Key Personnel and Qualified Staff The following designated staff members should serve as key personnel to coordinate the various elements of pediatric care and planning and serve as regular members of the Emergency Preparedness Planning Committee. Following are two key positions suggested for assignment to qualified clinical personnel: Physician Coordinator for Pediatric Emergency Care in a Disaster A qualified member of the medical staff nominated by the ED Medical Director and approved by the Emergency Preparedness Planning Committee to assume the following responsibilities: i. Ensure adequate skill and knowledge of hospital's medical staff and staff physicians in emergency care and resuscitation of infants and children. ii. Assist with development and periodic review of ED medications, equipment, supplies, policies, and procedures. iii. Lead and assist with the development and updating of the hospital's CEMP, granting special attention to the needs of pediatric patients. iv. Serve as a liaison to appropriate in-hospital and out-of-hospital pediatric care committees in the community (if they exist). v. Serve as a liaison to a definitive care hospital and trauma center, needed to integrate services or facilitate transfer for the continuum of care of the patient. vi. Facilitate pediatric emergency education for ED health care providers. vii. Identify, in advance, appropriately qualified staff that can/will accept responsibility for the immediate or extended care of pediatric patients during a disaster. Nursing Coordinator for Pediatric Emergency Care in a Disaster A qualified member of the nursing staff nominated by the Director of Nursing and approved by the Emergency Preparedness Planning Committee to assume the following responsibilities: i. Ensure adequate skill and knowledge of hospital's nursing staff in emergency care and resuscitation of infants and children and routine care of pediatric patients. ii. Identify, in advance, appropriately qualified staff that can/will accept responsibility for the immediate or extended care of pediatric patients during a disaster. iii. Facilitate nursing continuing education in pediatrics. iv. Lead the development and updating of the hospital's policies and procedures for pediatric care. v. Serve as a liaison to appropriate in-hospital pediatric care committees. vi. Serve as a liaison to inpatient nursing as well as to facilitate transfer for the continuum of care of the patient. vii. Assist with development and periodic review of pediatric medications, equipment and supplies as a member of the Emergency Preparedness Planning Committee. 13
14 Response: Staffing for a Coordinated and Comprehensive Emergency Management Plan Since many levels of staffing are required to respond adequately to a disaster involving pediatric patients, it is important that the designated team that will look after the welfare of the pediatric patients be as all encompassing as possible. A Medical/Technical Specialist Pediatric Care should be identified for pediatric medical and nursing care. (See the Sample Job Action Sheets at the end of this chapter.) While the team will include such clinical staff as physicians, nurses and ancillary ED and inpatient personnel to provide emergency evaluation and treatment to children of all ages, additional staff may be called upon to respond to non-clinical pediatric patient needs. Also included at the end of this chapter are Sample Job Action Sheets that may be used to distribute tasks to staff designated to ancillary leadership positions. Along with the Physician and Nursing Coordinators who will act as the point persons for clinical care, a general Pediatric Logistics Unit Leader and a Pediatric Services Unit Leader should also be assigned to monitor non-clinical areas. These Unit Leaders will facilitate accurate communication between non-clinical areas and oversee disaster response in areas such as Procurement, Transportation, Materials/Supplies and Nutrition. In planning to meet the immediate physical needs of the pediatric patient population during a disaster, hospitals may further prepare for child victims by considering psychological treatment that addresses their possible reactions to disaster including acute stress disorder, grief and anger. With this in mind, it is recommended that hospitals prepare for the mental health needs of pediatric patients and coordinate a response plan that incorporates the skills of psychiatrists, psychiatric nurses, social workers and a hospital chaplain. (See Section 14 The Psychosocial Needs of Children during a Disaster for additional information). 14
15 Sample HICS Job Action Sheet Pediatric Services Unit Leader You report to: (Operations Chief) Command Center: Mission: To ensure that the pediatric treatment and holding areas are properly assigned, equipped, and staffed during an emergency. Immediate (Operational Period 0-2 Hours): Receive appointment from Unit Leader Read this entire job action sheet Obtain briefing from Unit Leader Gather external information from Treatment Area Supervisor/ED Charge Nurse regarding: Number of expected pediatric patients and their conditions Current total number of ED patients Expected time of patient arrival Determine number of available pediatric/crib beds [inpatient] and report to Operations Chief for planning purposes Determine qualified, on-site pediatric staff members Determine additional staff needed based on expected patient volume Alert Discharge Unit Leader to institute early discharge/transfer of patients Initiate Pediatric Response Team as per plan Predetermined Physicians for Pediatric Response (Pediatric/Family/Practice/Staff/Community) Predetermined Nurses (with pediatric experience and/or PALS/ENPC certification) Predetermined ancillary technicians with pediatric experience Others as predetermined Determine need for opening of a Pediatric Safe Area (dependent on expected number of unaccompanied children during the disaster) Assign Pediatric Safe Area Coordinator Communicate with Operations Chief to assure coordination of non-pediatric ancillary/support personal are assigned to each area Assure preparation of a pre-designated Pediatric Disaster Care Area 15
16 Clear area Designate each specific area per plan and based on expected casualties Assure support personnel are assigned to each area Assure delivery of medical and non-medical pediatric equipment Assure set-up of pediatric equipment by clinical staff Receive pediatric patients Communicate findings to Treatment Area Supervisor for dissemination as per disaster plan Following triage of all children, move uninjured/unaffected children to pre-designated Pediatric Safe Area Intermediate (Operational Period 2-12 Hours): Assess ongoing staffing needs based on patient status report form: Pediatric healthcare personnel (emergency department, inpatient, and OR) Non-pediatric ancillary/support personnel Pediatric Safe Area Coordinator Assess additional medical and non-medical equipment/supply needs Communicate with Pediatric Logistics Unit Leader via Operations Chief to Logistics Chief Assure delivery of needed supplies to pediatric designated areas Assess Pediatric Response Team basic needs: Food Rest Psychological support Obtain status of pediatric casualties (discharges, admissions, transfers, and Pediatric Safe Area) and report of Operations Chief Hold information sessions with Public Information Officer as needed Obtain Child Survey Forms (See Section 5 Security) from all pediatric patient areas Report any unidentified or unaccompanied pediatric patients to Operations Chief Extended (Operational Period Beyond 12 Hours): Debrief Pediatric Response Team and Pediatric Safe Area Coordinator regarding: Summary of Incident Review of areas of success Identify opportunities of success Thank and congratulate team 16
17 Sample HICS Job Action Sheet Medical/Technical Specialist- Pediatric Care Mission: Advise the Incident Commander or Operations Section Chief, as assigned, on issues related to pediatric emergency response. Date: Start: End: Position Assigned to: Initial: Position Reports to: Signature: Hospital Command Center (HCC) Location: Telephone: Fax: Other Contact Info: Radio Title: Immediate (Operational Period 0-2 Hours) Time Initial Receive appointment and briefing from the Incident Commander or Operations Section Chief, as assigned. Read this entire Job Action Sheet and review incident management team chart (HICS Form 207). Put on position identification. Notify your usual supervisor of your HICS assignment. Document all key activities, actions, and decisions in an Operational Log (HICS Form 214) on a continual basis. Meet with the Command staff, Operations and Logistics Section Chiefs and the Medical Care Branch Director to plan for and project pediatric patient care needs. Communicate with the Operations Section Chief to obtain: Type and location of incident Number and condition of expected pediatric patients Estimated arrival time to facility Unusual or hazardous environmental exposure Request staffing assistance from the Labor Pool and Credentialing Unit Leader, as needed, to assist with rapid research as needed to determine hazard and safety information critical to treatment and decontamination concerns for the pediatric victims. Provide pediatric care guidance to Operation Section Chief and Medical Care Branch Director based on incident scenario and response needs. Ensure pediatric patient identification and tracking practices are being followed. Communicate and coordinate with Logistics Section Chief to determine pediatric: Medical care equipment and supply needs Medications with pediatric dosing Transportation availability and needs (carts, cribs, wheelchairs, etc.) Communicate with Planning Section Chief to determine pediatric: Bed availability Ventilators Trained medical staff (MD, RN, PA, NP, etc.) Additional short and long range pediatric response needs Ensure that appropriate pediatric standards of care are being followed in all clinical areas. 17
18 Immediate (Operational Period 0-2 Hours) Time Initial Collaborate with the PIO to develop media and public information messages specific to pediatric care recommendations and treatment. Participate in briefings and meetings and contribute to the Incident Action Plan, as requested. Document all communications (internal and external) on an Incident Message Form (HICS Form 213). Provide a copy of the Incident Message Form to the Documentation Unit. Immediate (Operational Period 2-12 Hours) Time Initial Continue to communicate and coordinate with Logistics Section Chief the availability of pediatric equipment and supplies. Coordinate with Logistics and Planning Section Chiefs to expand/create a Pediatric Patient Care area, if needed. Continue to monitor pediatric care activities to ensure needs are being met. Meet regularly with the Operations Section Chief and Medical Care Branch Director for updates on the situation regarding hospital operations and pediatric needs. Extended (Operational Period Beyond 12 Hours) Time Initial Ensure the provision of resources for pediatric mental health and appropriate event education for children and families. Continue to ensure pediatric related response issues are identified and effectively managed. Continue to meet regularly with the Operations Section Chief or Incident Commander, as appropriate, for situation status updates and to communicate critical pediatric care issues. Ensure your physical readiness through proper nutrition, water intake, rest and stress management techniques. Observe all staff and volunteers for signs of stress and inappropriate behavior. Report concerns to the Mental Health Unit Leader. Provide for staff rest periods and relief. Upon shift change, brief your replacement on the status of all ongoing operations, issues and other relevant incident information. 18
19 Demobilization/System Recovery Time Initial Ensure return/retrieval of equipment and supplies and return all assigned incident command equipment. Upon deactivation of your position, ensure all documentation and Operational Logs (HICS Form 214) are submitted to the Operations Section Chief or Incident Commander, as appropriate. Upon deactivation of your position, brief the Operations Section Chief or Incident Commander, as appropriate, on current problems, outstanding issues and follow-up requirements. Submit comments to the Operations Section Chief or Incident Commander, as appropriate, for discussion and possible inclusion in the after-action report; topics include: Review of pertinent position descriptions and operational checklists Recommendations for procedure changes Section accomplishments and issues Participate in stress management and after-action debriefings. Participate in other briefings and meetings as required. Documents/Tools Incident Action Plan HICS Form Incident Management Team Chart HICS Form Incident Message Form HICS Form Operational Log Hospital emergency operations plan Hospital organization chart Hospital telephone directory Radio/satellite phone Local public health reporting forms 19
20 Sample HICS Job Action Sheet Pediatric Logistics Unit Leader You report to: (Logistics Chief) Command Center: MISSION: To ensure that the pediatric needs are addressed by Procurement, Transportation, Materials Supply, and Nutritional Supply during an emergency. IMMEDIATE: Receive appointment from Logistics Chief Read this entire job action sheet Obtain briefing from Logistics Chief Number of expected pediatric patients and their conditions Timeline for supply needs Depending on the extent of HEICS activation, meet with Logistics Chief and Distribute tasks to the following Unit Leaders: Procurement Unit Leader: Receive briefing from Logistics Chief and Pediatric Logistics Unit Leader Initiate Procurement Disaster Call list if warranted Work with vendors for pediatric supplies including hospital vendors and community resources (local pharmacies and grocery stores) for back-up resources Transportation Unit Leader: Receive briefing from Logistics Chief and Pediatric Logistics Unit Leader Initiate Transportation Disaster Call list if warranted Count open stretchers, carts, cribs, and wheelchairs for pediatric transportation If adult transport equipment options are used, ensure all are appropriately modified and safe for pediatric transport Report transportation options to Logistics Chief Coordinate delivery of transportation options to designated pediatric area or ED depending on scenario Designate transporters as needed from CS staff or Labor pool Ensure that all transporters are aware of pediatric safety issues and are not to leave pediatric patients unattended (see Section 9 Transportation for more information) 20
21 Materials/Supplies Unit Leader: Receive briefing from Logistics Chief and Pediatric Logistics Unit Leader Initiate Materials/Supplies Disaster Call list if warranted Collect and coordinate essential pediatric medical equipment and supplies Assist in preparation of pre-designated Pediatric Disaster Care Areas with Pediatric Services Unit Leader (See Section 4 Equipment Recommendations for more information) Assist in preparation of pre-designated Pediatric Safe Area with Pediatric Services Unit Leader (See Section 5 Security for more information) Nutritional Supply Unit Leader: (See Section 12 Pediatric Dietary Needs for additional information) Receive briefing from Logistics Chief and Pediatric Logistics Unit Leader Initiate Nutritional Call list if warranted Estimate number of pediatric meals needed for 48 hours (See Section 12 Pediatric Dietary Needs for more information) Estimate pediatric food/snacks/hydration needs for Pediatric Safe Area INTERMEDIATE: Obtain regular updates from Logistics Chief Assess additional equipment/supply needs for pediatrics Address pediatric concerns, questions and issues as needed EXTENDED: Document actions and decisions, submit reports to Logistics Chief Participate in debriefing Review areas of success Identify opportunities for improvement Thank and congratulate team 21
22 Staffing Recommendations for Obstetrics during a Disaster Purpose: The recommendations included in this section address the critical issue of hospital staffing for obstetrics services during a disaster. Appropriate allocation of personnel and the delegation of responsibilities are critical to mitigating the confusion and chaos created by disaster situations. Staffing considerations for obstetric patients should be planned prior to a disaster and are important issues to be considered by the hospital's Emergency Preparedness Planning Committee and addressed in the hospital's CEMP. The following recommendations were created primarily to address needs of institutions that do not have significant obstetric services or staff. When applicable, hospital ICS positions should also be utilized or adapted by hospitals. General Guidelines The volume of pregnant and laboring patients that present at a non-birthing hospital is not likely to match the demand for pediatric services. Consequently, the facility may not need to plan for as many staff dedicated to obstetrics as to pediatrics. However, it is necessary for facilities to consider carefully how the needs of prenatal, laboring, birthing and fresh postpartum cases will be handled should the situation arise where women cannot access their usual provider or planned birthing hospital during an emergency. Planning steps are similar to those taken in planning for the needs of pediatric patients: Pre-identify hospital staff with specialty skills or experience in the treatment of obstetric patients. Survey staff for obstetric and newborn care expertise. Develop a plan to utilize the specific skills of the above personnel, including call-down and notification procedures. Establish leadership roles for obstetric services in disasters. Determine how obstetric medical and nursing service coordinators will interact with pediatric medical and nursing service coordinators. If necessary, train additional staff who are willing to care for obstetric patients and neonates. Integrate an obstetric staffing plan into your hospital's CEMP. Appoint medical and nursing staff coordinators for emergency obstetric care. Review current policies and procedures for emergency childbirth and identify staffing needs. Identify gaps in knowledge and trained staff, then provide training with opportunities for annual refreshers. Drill as necessary to keep knowledge and skills refreshed. 22
23 Section 4 Training Purpose: The recommendations included in this section suggest training to ensure that pediatric patients receive appropriate care at all hospital facilities during a mass casualty, disaster, or terrorism-related event. General medical and disaster training as well as pediatricspecific education options are included, all of which are recommended to enhance hospital response. Section Contents General Guidelines Training Recommendations o Hospitals with Pediatric Service, but no Pediatric Intensive Care Unit o Hospitals without Inpatient Pediatric Services o Hospitals without Obstetric Services Primary Disaster and Emergency Courses o Training Resources o American Heart Association Sponsored Courses o Emergency Nurses Association Sponsored Courses o American College of Surgeons Sponsored Course o American Burn Association Sponsored Course o Other Disaster Courses American Medical Association/National Disaster Life Support Foundation (AMA/NDLSF) Sponsored Courses Medical Society of the State of New York (MSSNY) Sponsored Course American Academy of Pediatrics/American College of Emergency Physicians (AAP/SCEP) Sponsored Course New York State Department of Health and the National Association of Emergency Medical Technicians (NAEMT) Sponsored Course Emergency Nurses Association (ENA) Sponsored Course American College of Surgeons (ACS) Sponsored Course Department of Homeland Security Sponsored Course o Additional Trauma Courses Society of Trauma Nurses (STN) Sponsored Course National Association of Emergency Medical Technicians (NAEMT) in Collaboration with the American College of Surgeons (ACS) Committee on Trauma Sponsored Course o Additional Critical Care and Disaster Courses Society of Critical Care Medicine (SCCM) Sponsored Courses o Additional Websites for Disaster Preparedness Information o Sources or Information for Emergency Preparedness for Childbirth o Sources for Obstetric Simulators Manufacturers' Websites 23
24 General Guidelines Disaster and emergency training includes education in both the core principles of disaster management and the emergency treatment of adult, obstetric and pediatric patients requiring basic, advanced and trauma life support. All hospitals should address the pediatric and obstetric populations when planning training courses for staff who will likely respond during a disaster. Additionally, the hospital emergency preparedness planning committee should consider the "pediatric and obstetric surge capacity" of the current staffing, whether the hospital has these services or not. To develop comfort in caring for pediatric and obstetric patients, staff are encouraged to enroll and/or to participate in additional pediatric and childbirth training courses, beyond that of basic proficiency. Training Recommendations Hospitals with Pediatric Service, but no Pediatric Intensive Care Unit (PICU) Hospitals with general pediatric inpatient services should prepare for the same possibilities listed for hospitals with a PICU. In addition, critical pediatric patients might require intensive care and subsequent monitoring when transfer is not immediately possible. Possible locations for temporary placement of critical pediatric patients include: Adult Medical Intensive Care Unit; Adult Cardiac Care Unit; Surgical Care Unit; Post-Anesthesia Care Unit; or Another appropriate in-patient intensive care unit. The staff anticipated to be responsible for the various levels of pediatric care should have the appropriate basic pediatric disaster training. Since pediatric intensivists and pediatric critical care nurses are not available at these facilities, the applicable training recommendations are recommended for Medical and Surgical ICU nurses and physicians as well as for nurse practitioners. Hospitals without Inpatient Pediatric Services These hospitals should develop disaster plans that address all of the possibilities for needed pediatric care. While pediatric specialty staff may not normally be available at these facilities, it is recommended that certain staff be pre-identified and pre-designated to staff pediatric surge capacity areas. These pre-designated individuals should receive appropriate training necessary to provide adequate care to the pediatric population during a disaster. 24
25 Hospitals without Obstetric Services During times of disasters, pregnant women are likely to experience greater rates of complications, including premature labor and birth, low birth weight infants and neonatal and infant deaths. Stress is increased during these times, and stress combined with lack of proper nutrition and hydration can result in premature delivery. During disasters, pregnant women need access to skilled professional health assessment and methods of hydration, including intravenous hydration. All hospitals should develop disaster plans that address the possibility for admitting pregnant women who are affected by the disaster and laboring women in need of delivery. While obstetricians and midwives may not normally be available at these facilities, it is recommended that certain staff be pre-identified and predesignated to staff obstetric areas, should the service be needed. These pre-designated individuals should receive appropriate training necessary to provide adequate care to pregnant and laboring women and their neonates during a disaster. 25
26 Primary Disaster and Emergency Courses Staff members who are anticipated to be assigned to pediatric inpatient surge capacity areas (in the event the usual hospital inpatient pediatric capacity is exceeded and these patients cannot be transferred) should receive training listed below: All Direct Care Providers (Nurses and Physicians) Training Recommendations for Pediatrics Pediatric Advanced Life Support (PALS) Basic Disaster Life Support (BDLS) Additional suggested training program recommendations for nurses and physicians include: Disaster Drill which includes pediatric patients Nurses Emergency Nursing Pediatric Course (ENPC) Physicians Advanced Trauma Life Support (ATLS) Advanced Burn Life Support (ABLS) Advanced Cardiac Life Support (ACLS) All Direct Care Providers (Nurses and Physicians) Training Recommendations for Obstetrics Advanced Cardiac Life Support (ACLS) Pediatric Advanced Life Support (PALS) Basic Disaster Life Support (BDLS) Emergency Childbirth Training Additional suggested training program recommendations for nurses and physicians include: Disaster Drill which includes obstetric patients or obstetric simulators 26
27 Training Resources American Heart Association Sponsored Courses 9.pdf Pediatric Advanced Life Support (PALS) Course Description The American Heart Association PALS course is based on science evidence from the 2005 AHA Guidelines for CPR and ECC. The goal of the PALS course is to aid the pediatric healthcare provider in developing the knowledge and skills necessary to efficiently and effectively manage critically ill infants and children, resulting in improved outcomes. Skills taught include recognition and treatment of infants and children at risk for cardiopulmonary arrest; the systematic approach to pediatric assessment; effective respiratory management; defibrillation and synchronized cardioversion; intraosseous access and fluid bolus administration; and effective resuscitation team dynamics. Course Length Approximately 14 hours Intended Audience Pediatricians, emergency physicians, family physicians, physician assistants, nurses, nurse practitioners, paramedics, respiratory therapists, and other healthcare providers who initiate and direct advanced life support in pediatric emergencies. Advanced Cardiac Life Support (ACLS) Course Description The American Heart Association ACLS course is totally redesigned for healthcare providers who either direct or participate in the resuscitation of a patient, whether in or out of hospital. Through the ACLS course, providers will enhance their skills in the treatment of the adult victim of a cardiac arrest or other cardiopulmonary emergencies. ACLS emphasizes the importance of basic life support CPR to patient survival; the integration of effective basic life support with advanced cardiovascular life support interventions; and the importance of effective team interaction and communication during resuscitation. ACLS is based on simulated clinical scenarios that encourage active, hands-on participation through learning stations where students will practice essential skills individually, as part of a team, and as team leader. Realistic simulations reinforce the following key concepts: proficiency in basic life support care; recognizing and initiating early management of periarrest conditions; managing cardiac arrest; identifying and treating ischemic chest pain and acute coronary syndromes; recognizing other life-threatening clinical situations (such as stroke) and providing initial care; ACLS algorithms; and effective resuscitation team dynamics. Course Length 13½ hours, approximately, including breaks Intended Audience Medical providers such as physicians, nurses, emergency medical technicians, paramedics, respiratory therapists, and other professionals who may respond to a cardiovascular emergency. 27
28 Emergency Nurses Association Sponsored Courses Emergency Nursing Pediatric Course (ENPC) Course Description ENA developed the Emergency Nursing Pediatric Course (ENPC) to improve the care of the pediatric patient by increasing the knowledge, skill, and confidence of the emergency nurse. This course provides core-level pediatric knowledge and psychomotor skills needed to care for pediatric patients in the emergency care setting. ENPC is the only pediatric emergency nursing course written by pediatric nurse experts. Course Length 16 hours Intended Audience Nurses who are expected to care for pediatric patients following a disaster. Although the course is geared towards nurses in an emergency setting, the content can easily be utilized by nurses who will need to provide care to pediatric patients who may require in-patient hospital services. American College of Surgeons Sponsored Course Advanced Trauma Life Support (ATLS) Course Description The doctor who first attends to the injured patient has the greatest opportunity to impact outcome. This course provides an organized approach for evaluation and management of seriously injured as well as a foundation of common knowledge for all members of the trauma team. The objectives for the course include: (1) Assess the patient's condition rapidly and accurately; (2) Resuscitate and stabilize the patient according to priority; (3) Determine if the patient's needs exceed a facility's capabilities; (4) Arrange appropriately for the patient's definitive care; and, (5) Ensure that optimum care is provided. Course Length 2 or 2.5 days Intended Audience Doctors who care for injured patients. 28
29 American Burn Association Sponsored Course Advanced Burn Life Support (ABLS) Course Description The course provides guidelines in the assessment and management of the burn patient during the first 24 hours post injury. Following a series of lectures, case studies are presented for group discussions. An opportunity will be given to work with a simulated burn patient to reinforce the assessment, stabilization, and the American Burn Association transfer criteria to a Burn Center. Final testing consists of a written exam and practical assessment return demonstration. Course Length 8 hours Intended Audience Physicians, nurses, physician assistants, nurse practitioners, therapists, and paramedics. Other Disaster Courses American Medical Association/National Disaster Life Support Foundation (AMA/NDLSF) Sponsored Courses Core Disaster Life Support (CDLS) (Also available as ecdls, for those who prefer an online learning format.) Course Description The awareness level course is presented in a didactic format, providing an overview of disasters including natural and accidental manmade events, traumatic and explosive events, nuclear and radiologic events, biological events, and chemical events. The focus of the course is to discuss and apply a unique approach to disaster management called the D-I-S-A-S-T-E-R paradigm. The overarching aim is to introduce participants to basic concepts and terms that are reinforced in detail in the BDLS and ADLS courses. Course Length 4 hours Intended Audience EMTs, allied health workers and technicians, law enforcement, entry-level Medical Reserve Corps, some office-based health care professionals, police, firefighters, emergency management personnel, government officials, health care administrators, social workers, disaster relief workers, and anyone needing and introductory program. 29
30 Decon Disaster Life Support Course Description The ability to decontaminate a large number of victims from a chemical or radiological event will require large numbers of personnel trained and equipped to provide decontamination. Although healthcare providers in PPE will be needed to render immediate care and triage victims, the majority of the workforce that provides decontamination in a disaster of this nature should be non-clinical, hospital-based personnel. This program is designed to meet this need. Course Length 12 hours Intended Audience Physicians, physician assistants, nurse practitioners, nurses, emergency medical technicians, paramedics, allied health professionals, medical students, law enforcement officers, fire fighters, first responders, hospital administrators, decontamination personnel, emergency managers, hospital safety/security personnel and non-clinical personnel. Basic Disaster Life Support (BDLS) (Also available as ebdls, for those who prefer an online learning format.) Course Description BDLS is targeted to multiple disciplines including emergency medical service (EMS) personnel, hazardous materials personnel, public health personnel, and health care providers. The course is designed to teach a group of multiple disciplines simultaneously, with the goal of developing a commonality of approach and language in the healthcare community. This will improve the care and coordination of response in Weapon of Mass Destruction (WMD) disasters and public health emergencies. The BDLS course is a review of the all-hazards topics including natural and accidental man-made events, traumatic and explosive events, nuclear and radiological events, biological events, and chemical events. Also included is information on the health care professional s role in the public health and incident management systems, community mental health, and special needs of underserved and vulnerable populations. Course Length 8 hours Intended Audience Physicians, registered or licensed practical nurses, paramedics or national intermediate EMTs, physician assistants, allied health professionals, dentists, pharmacists, public health professionals, veterinarians, health professions students, and mental health professionals. Advanced Disaster Life Support (ADLS) Course Description ADLS is an advanced practicum of the principles introduced in Basic Disaster Life Support (BDLS). ADLS includes lectures on the following: MASS Triage in detail, community and hospital disaster planning, media and communications during disasters, and mass fatality management. In addition, small group interactive sessions allow students to work through a series of difficult questions of disaster management in a tabletop format. Course Length 16 hours Intended Audience Physicians, nurse practitioners, physician assistants, nurses, emergency medical technicians, paramedics, pharmacists, allied health professionals, and medical students. 30
31 Medical Society of the State of New York (MSSNY) Sponsored Course Biological, Chemical, and Nuclear Emergencies Course (BCNE) Course Description This curriculum is a 16-module program designed to assist physicians in obtaining experience in bio-terrorism preparedness training. There are eleven Biological Agents, four Chemical Agents including a Chemical Overview and one Nuclear Radiological Emergencies modules. These modules will provide valuable information during any public health emergency involving these agents. Course Length Online format Intended Audience For physician members; however, non-members are eligible to enroll Bioterrorism Reference Cards can be down loaded from this link or may be obtained free of charge from MSSNY. American Academy of Pediatrics/American College of Emergency Physicians (AAP/SCEP) Sponsored Course Advanced Pediatric Life Support (APLS) Course Description Covers basics of pediatric emergency medicine. The course curriculum is designed to present the information physicians need to assess and care for critically ill and injured children during the first few hours in the emergency department or office-based setting. Course Length 2 days Intended Audience Physicians. Also available for nurses, paramedics. 31
32 New York State Department of Health and the National Association of Emergency Medical Technicians (NAEMT) Sponsored Course Pre-hospital Pediatric Care Course (PPCC) Course Description The New York State EMSC Prehospital Pediatric Care Course (PPCC), a continuing education course for EMTs, was designed to reinforce or enhance the knowledge and skills of all prehospital providers in assessing and treating children in the field. Course Length 1 to 2 days Intended Audience Emergency medical technicians and paramedics. Emergency Nurses Association (ENA) Sponsored Course Trauma Nursing Core Course (TNCC) Course Description ENA developed and implemented the TNCC for national and international dissemination as a means of identifying a standardized body of trauma nursing knowledge. The TNCC (Provider) is a 16- or 20-hour course designed to provide the learner with cognitive knowledge and psychomotor skills. Nurses with limited emergency nursing clinical experience, who work in a hospital with limited access to trauma patients, or who need greater time at the psychomotor skill stations are encouraged to attend courses scheduled for the 20-hour format. The purpose of TNCC is to present core-level knowledge, refine skills and build a firm foundation in trauma nursing. Course Length 16 or 20 hours Intended Audience Nurses; other healthcare providers may attend as observers. 32
33 American College of Surgeons (ACS) Sponsored Course Disaster Management and Emergency Preparedness (DMEP) Course Description This course is both didactic and interactive. It addresses core competencies as outlined by the American College of Surgeons (ACS) Committee on Trauma (COT) Disaster and Mass Casualty Management Committee. Major topics addressed include planning, triage, incident command, injury patterns and pathophysiology, and consideration for special populations. Small group discussions are based on illustrative scenarios. The course requires a pre and post test, which are reviewed onsite. A comprehensive syllabus and supportive CD with resource material is provided. Course Length 1 day Intended Audience Acute care providers (i.e., surgeons; anesthesiologists; emergency medicine physicians; ER, OR, ICU and trauma nurses; and pre-hospital professionals) who will most likely be the first receivers of casualties following major disasters. Other health care providers, administrators, public health personnel, and emergency managers are also encouraged to attend. Department of Homeland Security Sponsored Course Hospital Emergency Response Training (HERT) for Mass Casualty Incidents (MCI) Train-the-Trainer Course (at the Alabama Noble Training Center) Course Description This course prepares the Hospital Emergency Response Team for mass casualty incidents. Course Length 2.5 or 3 days Intended Audience Hospital administrators, physicians, nurses, security personnel and other hospital staff who are part of or manage their hospital s Emergency Response Team. 33
34 Additional Trauma Courses Society of Trauma Nurses (STN) Sponsored Course Advanced Trauma Care for Nurses (ATCN) Course Description This advanced course, designed for the registered nurse interested in increasing his/her knowledge in management of the multiple trauma patient, is only run in conjunction with a colocated ATLS course. Nurse participants audit the ATLS lectures. During the ATLS skill and testing stations, the nurses are separated from the physician group and directed through ATCN skill stations. ATCN skill stations include: initial assessment and management, airway and ventilatory management, pediatric trauma, hemorrhagic shock, musculoskeletal & spinal trauma, and head trauma. Course Length 2 days Intended Audience Nurses, physicians National Association of Emergency Medical Technicians (NAEMT) in Collaboration with the American College of Surgeons (ACS) Committee on Trauma Sponsored Course Pre-Hospital Trauma Life Support Course (PHTLS) Course Description The course focuses on trauma patients in the pre-hospital environment, teaching how to identify, manage, and transport them with the highest level of care and give them the greatest chance of survival. Course Length 1 day for EMTs, 2 days for paramedics Intended Audience EMTs, nurses, and physicians. 34
35 Additional Critical Care and Disaster Courses Society of Critical Care Medicine (SCCM) Sponsored Courses Fundamentals of Critical Care Support (FCCS) Course Description This course addresses fundamental management principles for the first 24 hours of critical care. Student objectives include prioritization of assessment needs for the critically ill patient, selection of appropriate diagnostic tests, identification and response to significant changes in the unstable patient, recognition of and management of acute life-threatening conditions, and determination of the need for expert consultation and/or patient transfer and preparation for accomplishing optimal transfer. Course Length 2 days Intended Audience All medical providers, includes pediatric considerations. Fundamentals of Disaster Medicine (FDM) 1 day, all medical providers, includes pediatric considerations Course Description Fundamental Disaster Management (FDM) prepares healthcare professionals to treat victims of natural or manmade mass casualty events. It arms critical care professionals with the expertise to manage the critical care response to large-scale disasters. This course focuses on critically ill patients who are admitted to your hospital and is a must for healthcare providers who may come in contact with critically ill and/or injured patients after a mass casualty event. Course Length 1 day Intended Audience Critical care health professionals including pharmacists, respiratory care professionals, nurses, nurse practitioners, physician assistants, and physicians. Also, persons who have successfully completed Society of Critical Care Medicine s Fundamental Critical Care Support (FCCS) course and who are expected to have significant critical care responsibilities during an emergency. 35
36 Hospital Disaster Management (HDM) Course Description How do you manage a sudden surge in critically ill or injured patients that overwhelms your critical care capacity? The Society s Hospital Mass-Casualty Disaster Management (HDM) course addresses this challenge within the context of disaster preparedness and response. This course prepares non-critical care healthcare professionals to augment hospital inpatient capacity, specifically critical care capacity, in the wake of a disaster. Course Length 1 day Intended Audience Non-critical care healthcare providers. Additional Websites for Disaster Preparedness Information Agency for Healthcare Research and Quality (AHRQ) Agency for Healthcare Research and Quality site with general preparedness information American Academy of Family Physicians American Academy of Family Physicians website with links to emergency/disaster preparedness and disaster training opportunities Center for Trauma Response, Recovery and Preparedness for Health Care Communities Center for Trauma Response, Recovery and Preparedness for Health Care Communities website with links to educational materials for disaster and emergency preparedness Centers for Disaster Control and Prevention Centers for Disease Control and Prevention site with links to Emergency Preparedness and Response Critical Illness and Trauma Foundation, Inc. Above URL is for ordering "Bioterrorism & Trauma Training: An All Hazards Approach to Multiple Casualty Events", a CD-ROM written by Critical Illness and Trauma Foundation Inc. Emergency Medicine Services for Children (EMSC) EMSC website with links to resources and toolboxes regarding disaster preparedness 36
37 Illinois Emergency Medical Services for Children Illinois EMS-C site with additional links to disaster and emergency preparedness websites Jumpstart Pediatric Mass Casualty Incident (MCI) Triage Tool Links to information about JumpSTART triage system National Center for Disaster Preparedness Pediatric Preparedness for Disasters and Terrorism: A National Consensus Conference, Executive Summary 2003 Sources of Information for Emergency Preparedness for Childbirth Blue Cross Blue Shield of Massachusetts Childbirth emergency preparedness for non-clinicians and laypersons World Health Organization Birth and emergency preparedness in antenatal care: Integrated management of pregnancy and childbirth (IMPAC), Standards for Maternal and Neonatal Care, 2006, accessible at: Managing complications in pregnancy and childbirth A guide for midwives and doctors, accessible at: The Journal of Perinatal Education Introducing emergency preparedness into childbirth education American College of Nurse Midwives Giving birth "in place," emergency preparedness for childbirth Johns Hopkins University Emergency Obstetric Care: Quick Reference Guide for Frontline Providers,
38 Sources for Obstetric Simulators Manufacturers' Websites NOELLE Birthing Simulator, Human Patient Simulator, PediaSIM, SimBaby, Code Blue Baby PROMPT Birthing Simulator Force Monitoring
39 Section 5 Security Purpose: Previous literature regarding the security of the pediatric population primarily addressed preventing infant abductions. The recent Gulf Coast hurricanes of 2005 highlighted the importance of this critical need in the care of the pediatric population. The focus of this document is to raise the level of awareness regarding the issue of the pediatric population and security issues during an emergency or incident that would require a child to go to a hospital. Hospitals, especially those that do not routinely take care of the pediatric population, need to pay special attention to the specific security needs of this group and take the necessary precautions to ensure proper care of these individuals while they are in the hospital. Another concern during a disaster-level event is when a minor accompanies an adult to the hospital and the adult is in need of care. The child could easily be lost during the chaos of such an event. These recommendations for pediatric security during a disaster are intended to assist planning for the needs of all pediatric patients presenting to any hospital during a disaster. The recommendations included in the section focus primarily on pediatric patient/visitor tracking and creating a pediatric safe area. Section Contents General Guidelines Pediatric Patient Tracking o Tracking options for both the accompanied and the unaccompanied or displaced child Protocol to Rapidly Identify and Protect Displaced Children Child Identification Survey Form Sample survey form utilized in the protocol to rapidly identify and protect displaced children Setting Up a Pediatric Safe Area (PSA) Recommendations for establishing a supervised area within the hospital to safely cohort unaccompanied children during a disaster Pediatric Safe Area Checklist Useful steps to create a Pediatric Safe Area Job Action Sheet: Pediatric Safe Area Coordinator JAS for supervising Pediatric Safe Area staff Pediatric Safe Area Registry Sheet Sample registry form for the Pediatric Safe Area, utilized to assist staff in documenting location and final disposition of children References 39
40 General Guidelines All hospitals responding to a disaster are advised to: 1. Develop a protocol to rapidly identify and protect displaced children which includes: o Creating a Child ID document to record any key identifying information about the child for use in later tracking or reunion with caregivers. A computerized patient tracking and locator system is being developed by the NYSDOH for use on a statewide basis. The basic elements expected to be captured in the patient tracking and locator system are reflected in the Child Identification Survey later in this section. While this system is under development, each hospital may want to develop a similar and, if possible, compatible system to capture these same data elements. o Developing a Pediatric Tracking System that addresses both the accompanied and unaccompanied child. 2. Create a Pediatric Safe Area that will serve as a holding area for uninjured, displaced or medically cleared children awaiting adult caregivers. A Pediatric Safe Area Checklist has been provided to assist in the establishment of such an area. 3. Identify a Pediatric Safe Area (PSA) Coordinator who will assume the responsibility of setting up and supervising the pediatric safe area in the event of a disaster. Included in this section is a Sample Job Action Sheet, which outlines the PSA Coordinator position. 4. Create and use a Pediatric Safe Area registry sheet to document child activity such as transfer status, location and final disposition. 5. Facilities should carefully consider how they will credential and clear volunteers pre-event to ensure the safety of children that may be in their care. Pediatric Patient Tracking Hospitals have historically served as safe havens for displaced persons during a disaster. During the August 2003 Blackout, many members of the NYC community came to hospitals as secure places known to have functioning generators and supplying light, safety and nourishment. Abandoned children are also often brought first to a hospital emergency department for evaluation. During a disaster, hospitals may again serve as safe havens and may find themselves host to displaced and unaccompanied children. As a recent example, Hurricane Katrina and the ensuing floods and chaos caused over 3,000 children to be displaced throughout the United States. 1 These displaced children, if unaccompanied, are at special risk for maltreatment, neglect, exploitation and subsequent psychological trauma. Hospitals and medical clinics will therefore need to be especially alert to the safety and mental health issues of these children. The issue of pediatric patient tracking has historically been restricted to maternity and pediatric wards. Much of the literature refers to the cases of infant security and the reduction of pediatric patient abductions from various hospital wards. There are specific measures discussed that can be taken to prevent the abduction of pediatric patients, such as the use of identification bands. Examples of systems that might be considered include the tracking devices used to prevent infant abductions or those used to monitor long-term care patients at risk of elopement. 40
41 Patient Tracking the Accompanied Child in Disaster There are two populations of accompanied children during a disaster that should be addressed: 1. The pediatric patient a sick or injured child is hospitalized because of the disaster and is separated from the responsible adult. An example of this could be if the responsible adult was also admitted as a patient. 2. The pediatric visitor a well child accompanies a sick or injured adult because of the disaster. An example of this could be if an adult who was caring for a minor at the time of the disaster or event needed to be hospitalized. Presently, many hospitals have policies in place for the tracking of minors from pediatric and maternity wards such as using identification bands. A possible solution to tracking minors during a disaster is to use a system of identification bands for the minors and corresponding responsible adults. The bands would be distributed and placed as soon as these individuals make contact with the emergency department. Care must be taken to place quickly and correctly bands or other identification devices on both parties. Special attention needs to be taken to ensure that this measure is completed as soon as possible at the entry point to the hospital to reduce the possibility of human error during the matching and placing of the bands. The stress of a disaster may be exacerbated by the separation of mothers and their neonates, infants and children. Facilities should endeavor to ensure, whenever possible, that mothers and their children are evacuated to the same location or a method is developed to ensure that family members are located and reunited as soon as is reasonably possible. The identification bands used should include the following information that will be useful in maintaining a tight link between the pediatric patient or visitor and the accompanying adult: Name of pediatric patient/ visitor and date of birth Name of adult and date of birth Admission date of adult Admission date of pediatric patient Date of visit of pediatric visitor Relationship between child and adult In addition, a more sophisticated approach to tracking could be implemented by the use of bar-coded bracelets as identifiers that can be affixed to the pediatric patient or visitor and to the adult at the time of entry to emergency department or other point of entrance to the hospital. In this manner, the same bar code is assigned to the adult and the pediatric patient/visitor(s) with the adult. For further information, hospitals may also review the infant abduction protocols in place at their facility or from another local facility that currently provide obstetric services, as well as the National Center for Missing and Exploited Children's publication entitled For Healthcare Professionals: Guidelines on Prevention and Response to Infant Abductions. 2 Accessible at: 41
42 Patient Tracking the Displaced or Unaccompanied Child in a Disaster Rapid identification and protection of displaced children (less than 18 years old) is imperative in order to reduce the potential for maltreatment, neglect, exploitation and emotional injury. A critical aspect of pediatric disaster response is effectively addressing the needs of children who are displaced from their families and legal guardians. The separation of children from significant others is a recognized factor influencing the psychological responses of children after a disaster. All hospitals, medical clinics and shelters providing care to child survivors of disasters should immediately implement appropriate child-safety measures in direct response to this crisis. Initiatives such as "Operation Child ID" implemented in Camp Gruber, Oklahoma, after Hurricane Katrina in 2005, have provided a rapid, systematic protocol for successfully identifying and protecting displaced children. The CDC reviewed this protocol and considers it to be a useful resource to share with its partners to promote a safer and healthier environment for displaced children in shelters. 1 The following protocol has been adapted from the September 28, 2005 CDC Health Advisory, Instructions for Identifying and Protecting Displaced Children, to address displaced children during disasters in New York State. Protocol to Rapidly Identify and Protect Displaced Children Survey all children entering the hospital or medical clinic to ensure all children are identified. Children who are not accompanied by an adult have a high probability of being listed as missing by family members. Therefore, it is important to find out where they were sleeping/being held and the name and age of person(s) who is/are supervising them, if available. A sample survey form for identifying a displaced child is attached. Place a hospital-style identification bracelet (or, ideally, a picture identification card) on the child and a matching one on the supervising adult(s), if such an adult is available. Check frequently to make sure that the wristband matches that of the adult(s) seen with the child in the hospital or medical clinic. If there is no supervising adult, the child should be taken to the hospital's pre-determined Pediatric Safe Area (see following pages) where he/she can be appropriately cared for until a safe disposition or reunification can be made. The names of all children identified through the survey as not being with their legal guardians or who are unaccompanied should be considered at high risk and immediately reported to the hospital's emergency operations center. Additional reporting should also be made to the National Center for Missing and Exploited Children (NCMEC) at THE- LOST ( ). The NCMEC can then crosscheck them with the names of children who have been reported missing. Children may also be reported as missing using the following Web site: _US After the high risk children have been reported, a complete list of all children's names in the hospital, clinic or shelter should be sent to the NYS Hospital Emergency Resource Database System (HERDS) if activated and the information is requested. A complete list should also be sent to the NCMEC in case adults and/or children have provided incorrect information about their relationship and status. Unaccompanied children and those who are not with their legal guardians should undergo a social and health screening taking into consideration an assessment of the relationship between the child and accompanying adult, ideally performed by a physician, nurse or social worker with pediatric experience. 42
43 If NYSDOH, another New York State agency, or NCMEC informs you that the child has been reported as missing, locate the child and facilitate reunification of the child and his/her legal guardian. Again, facilities should do all they can to ensure that children and families are reunited as soon as is reasonably possible. Child Identification Survey Form The following is a sample form that may be used in the tracking of children in times of emergency. This form may be used at intake to match children with accompanying adults and to identify unaccompanied children. The form may also be used to track each child's discharge to other means of care or to responsible adults. A form such as this should be completed for each child presenting during the emergency event. Please note the form has space for photographs. It is recommended that intake areas have access to digital cameras or cameras with instantly developing film in order to take photographs as children are taken in. 43
44 CHILD IDENTIFICATION SURVEY Child s Name: Child s Usual Address: Phone: Parents /Guardians Names: Receiving Facility: Date of Arrival: / / Time of Arrival: : AM PM Accompanied Unaccompanied Age of Child: Yrs. Months Pediatrician s Name: Pediatrician s Phone Number: Where did the child come from? Where was he/she found? Be as specific as possible, including neighborhood or street address. Description of Child Sex: Male Female Attach photograph here: Race, if known: Hispanic, Black non-hispanic, White non-hispanic, Asian, Middle Eastern, Native American, unable to determine. Is the child verbal? Yes No If speaking, language spoken: Hair Color: Eye Color: Glasses: No Yes, color: Height: Weight: Birthmarks, scars or other markings: Clothing worn when found/presented: If the child was accompanied: Name of Individual Accompanying the Child: Relationship to Child: Form of ID checked: Attach copy. Was the child accompanied by an adult or another child? Adult Child If accompanied by an adult, was the child living with this adult prior to the emergency? Yes No Does the individual have any proof of legal guardianship or relationship? Yes No If yes, make copy and attach. If the child and adult were separated after arrival at the facility, where is the accompanying adult now? 44
45 If accompanied by someone other than the parent or guardian, what is known about the parent/guardian s current whereabouts? Nothing is known at this time. Their current location is: Is it known if there are orders of protection or other custody issues? No known custody/protective issues. Issue(s): If the child was unaccompanied: Where and when was the parent/guardian last seen? Are the whereabouts of the parent or guardian currently known? No Yes Location: Phone number: Cell phone number: address: Has the parent or guardian been contacted? No Yes, contacted by: At (time): Date: / / Plans for reuniting child with parent/guardian: Child History/Treatment Experience While at the Facility Is the child on any medications? No Unknown Yes List: Does the child have any allergies? No Yes List: Unknown Does the child have any known pre-existing conditions/medical problems/special needs? No Unknown Yes List: Was the child treated for an injury or illness while at the facility? No Yes Explain: Was the child admitted to the facility? (Be specific as to room or location.) No, he/she was taken to the Safe Area at:. Yes, he/she is currently:. Case Disposition/Discharge The child was transferred to another facility for a higher level of care. Facility to which the child was transferred: Phone number: Date: / / Time: The child was released to another agency. Agency: Agency Contact: Phone number: Date: / / Time: The child was released to an individual. Parent Guardian Name: Phone number: Date: / / Time: 45
46 Pediatric Safe Areas Create a supervised area to cohort all unaccompanied pediatric visitors or unaccompanied medically cleared pediatric patients in one central and safe location. This central location will need to be pre-assigned and secured to ensure that minors cannot leave the area without an appropriate escort. Security personnel or other responsible staff will need to be trained to supervise and assist pediatric visitors who may be frightened or who have other mental health issues because of being involved in a disaster and separated from family members. Included in this section are three forms that may be helpful for the necessary hospital planning for a Pediatric Safe Area. These forms include: 1. Pediatric Safe Area Checklist. This form was adapted from the Chicago Department of Health and outlines recommended steps to ensure that the Pediatric Safe Area is appropriately setup to receive children. 2. Pediatric Safe Area Coordinator Job Action Sheet (JAS). Created for the staff coordinating the pediatric safe area. By having a JAS, staff can readily review what steps need to be taken to prepare for the possible influx of pediatric patients. See JAS at the end of this chapter. 3. Pediatric Safe Area Register. This is a sample form that could potentially be used in the Pediatric Safe Area to monitor the arrival and departure of children. A copy of this register should be made available to the hospital Emergency Operations Center (EOC) on a frequent basis. 46
47 Pediatric Safe Area Checklist Area Reviewed: Date Reviewed: Reviewer: Time Reviewed: Area of Concern 1. Is access to the area selected as the Pediatric Safe Area able to be controlled? Can children be contained in this area? (Consider stairwells, elevators, doors.) 2. Is there a plan for security of the unit? 3. Have you conducted drills of the plans for this area with relevant departments? 4. Do you have a plan to identify the children? 5. Do you have a plan for identifying the mental health needs of these children? 6. If there is need, can various age groups be separated into different areas? (Consider whether older children pose a safety issue for younger children.) 7. Are enough staff available to adequately supervise the children? (Consider that younger children need more staff to supervise.) 8. Do you have a sign-in/sign-out sheet for all children and adults who enter the area? 9. Are all children admitted to the area required to have appropriate identification bracelets? 10. If children need to leave the area to use bathrooms, are there appropriate methods to escort them? 11. Is there a safe, stable area near a sink but away from eating areas for diapering? 12. Are there appropriate facilities for hand washing? 13. Does the area have fire and smoke alarms? 14. Is there adequate egress in case of fire? 15. Do the windows open? (Consider whether the windows could be used for egress in case of fire.) 16. Are the windows appropriately protected? Do they have window guards? 17. Is the area free of blinds, drapes or cords that could pose a strangulation hazard? 18. Are electrical outlets child-safe/covered? 19. Is the area free of any water basins/buckets/sinks that could pose a drowning hazard? 20. Is the area free of fans and heaters that could pose a safety risk? If fans or heaters are used, are they sectioned-off at a safe distance so that they do not pose a risk for burns or amputation? Finding Yes No Follow-up Action Needed 47
48 Finding Area of Concern Yes No 21. If radiators or hot pipes run through the area, are they covered to prevent burn hazards? 22. Are under sink areas and cupboards appropriately locked? 23. Is the area free of small toys and parts that would pose choking hazards? 24. Are cabinets and tables free of items that might topple on children? Is the area free of unstable, heavy items or carts that might topple on children? 25. If medical supplies are in the area, are medication carts and supply carts locked? Is access sufficiently controlled? Are medications and syringes at least 48" off the floor? 26. Are there safe, adequate sleeping accommodations available (i.e. foam mats on the floor) to avoid co-sleeping? 27. Are infants placed on their backs to sleep to reduce the risk of SIDS? 28. Are mattress surfaces firm and soft pillows and toys removed from infant sleeping areas? 29. Is the area smoke-free? 30. Are there adequate age-appropriate games, videos and toys to occupy the children? 31. Are there nutritious, age-appropriate snacks available for the children, avoiding foods that comprise a choking hazard for younger children? 32. Are there nearby childcare centers or other experts who could be approached to help or advise should it be necessary? 33. Have staff/volunteers who will be working in this unit received security clearance (e.g., no known child protection issues or criminal history)? Follow-up Action Needed 48
49 Sample Job Action Sheet Pediatric Safe Area (PSA) Coordinator You report to: (Pediatric Services Unit Leader) Hospital Command Center Location: Telephone: Fax: Other Contact Info: Radio Title: Mission: To ensure that the pediatric safe area (PSA) is properly staffed and stocked for an emergency and to ensure the safety of children requiring the PSA until an appropriate disposition can be made. Immediate (0 to 2 hours): Receive appointment from Pediatric Services Unit Leader (PSUL) Read the entire Job Action Sheet Obtain briefing from the PSUL Ascertain that the predestinated pediatric safe area is available If not immediately available, take appropriate measures to make the area available as soon as possible Gather information about how many pediatric persons may present to the area Make sure that enough security staff is available for the PSA Make sure that there is adequate communication in the PSA Make sure that there is a sign-in/sign-out log for the PSA Make sure that all items in the PSA checklist have been met; if there are any deficiencies, address them as soon as possible and report them to the PSUL 49
50 Intermediate (2 to 12 hours): Ascertain the need for ongoing staff for the PSA Maintain a registry of children in the PSA as they arrive or as they are released to an appropriate adult Determine estimated length of time for the expected operational period of the PSA Maintain communication with the PSUL for planning needs Determine if any pediatric persons in the PSA have specific medical or non-medical needs Prepare an informational session for the pediatrics person in the PSA Prepare to make arrangements for sleeping capacities if needed Ascertain if there will be any additional needs required for this event (volunteers, staff, security and equipment) Make sure that pediatric persons have the appropriate resources such as food, water, medications, age-appropriate reading materials and entertainment for their stay Report frequently to the PSUL concerning the number of children in the PSA Extended (Operational period beyond 12 hours): Make sure the PSA staff have enough breaks, water and food during their working periods Coordinate with Psychological Support for ongoing mental health evaluations of volunteers and pediatric persons in case there is a need for psychosocial resources Document all action/decisions with a copy sent to the PSUL Other concerns: 50
51 # Name of Child Age Arrival Time Pediatric Safe Area Registry Sheet Discharge Time Disposition* Name of Responsible Adult** & Relationship to Child Responsible Adult Signature Contact Phone # *Disposition: Admitted to Hospital (A); Discharged to Parent (D-P); Discharged to Relative (D-R); Discharged to Other (D-O); Social Services Placement (SS); Police (NYPD) **Name of Responsible Adult: Adult responsible for child at time of discharge. PSA Coordinator should determine if child could be discharged to this adult based on hospital policy. 51
52 References 1. CDC Health Advisory Instructions for Identifying and Protecting Displaced Children. Centers for Disease Control and Prevention Web site. September 28, Available at: Accessed February 18, Rabun JB Jr, for the National Center for Missing & Exploited Children. For Healthcare Professionals: Guidelines on Prevention of and Response to Infant Abductions. 9th ed [online]. National Center for Missing & Exploited Children; Available at: Accessed February 18,
53 Section 6 Infection Control Purpose: The following recommendations are based on limited published materials concerning infection control information that is specifically applicable to hospital management of a large influx of children (and accompanying adults) affected by a biological disaster. While the principles of infection control are the same for adults and children, there are some unique issues in the population that will be highlighted. The following infection control guidance addresses the 3 populations of concern in a pediatric emergency: Exposed/symptomatic children Exposed/asymptomatic children Unexposed neonates and mothers Section Contents General Guidelines o Recommendations for use of authoritative guidance documents for infection control measures for the pediatric population Infection Control Measures for Exposed/Asymptomatic Children Infection Control Measures for Exposed/Symptomatic Children Cohorting of Children in a Hospital Setting Environmental Measures for Pediatric Units Additional Infection Control Measures for Unexposed Neonates Staff-to-Child Ratio and Group Size Indicator References Appendices Toy Cleaning Protocol o Appendix 6-1 Sanitation Procedure o Appendix 6-2 Appropriate Selection and Use of Sanitizer o Appendix 6-3 Sanitation Glossary General Guidelines For all children who are symptomatic due to a biological event, use applicable HICPAC Guidelines (currently 2007 Guidelines for Isolation Precautions in Hospitals); 1 recommendations (such as duration of isolation) sometimes differ between adults and children. For asymptomatic infants, toddlers, and other children requiring diapering, feeding, toileting, and assistance with hand hygiene, use guidelines that are applicable to day care settings. (See the following Web sites: US Department of Health and Human Services, 13 Indicators of Quality Child Care: Research Update, Available at: 2 and American Academy of Pediatrics, American Public Health Association, and National Resource Center (NRC) for Health and Safety in Child Care, Caring for Our Children (CFOC): National Health and Safety Performance Standards: Guidelines for Out-of-Home Child Care Programs, 2nd edition. Available at:
54 General Infection Control Measures Transmission of an infectious agent requires three elements: a source (or reservoir) of infectious agents, a susceptible host with a port of entry receptive to the agent, and a mode of transmission for the agent. 1 Modes of transmission vary by type of organism and can be categorized into 3 major categories: contact (direct or indirect), droplet or airborne. Based on the specific characteristics of an infectious agent, a clinical case definition for exposed/symptomatic and exposed/asymptomatic children will need to be provided or developed. Promptly evaluate and separate unexposed and exposed/asymptomatic children as soon as possible from symptomatic children and symptomatic adults. While there is a known risk of transmission of infectious agents from infectious children to caregivers, the presence of caregivers (asymptomatic or symptomatic) may be in the best interest of the child (asymptomatic or symptomatic). Caregivers must be instructed in relevant isolation and care procedures as outlined in the hospital infection control manual on exposed/asymptomatic and exposed/symptomatic children. Signage should be posted in all relevant areas and fact sheets or parent education sheets handed out. Infection Control Measures for Exposed/Asymptomatic Children 1 Primary caregivers of exposed children should also be considered exposed and need to be screened for symptoms on a regular basis or when entering the facility. If it is in the best interest of a child that potentially infectious caregivers are allowed to visit, then they should use appropriate barrier precautions (e.g. mask) and remain in the patient's room. Similarly exposed/asymptomatic children may be cohorted. In very infectious situations, the whole facility may be cohorted. Day care approaches apply for the routine care of children and need to be communicated concisely and understandably to the caregivers who accompany the admitted child. 2,3 Hand hygiene is paramount. Children and caregivers need to be taught how to perform appropriate hand hygiene in a playful manner, such as singing "Happy Birthday" to ensure at least 20 seconds of hand washing with soap and water. Hand-washing by children and caregivers should be performed: o Before and after eating and giving medication. o After diapering, toileting, cleaning, and the handling of body fluids, even if gloves are used. As a priority: educate emergency caregivers (parents or others) about sanitary considerations and demonstrate specific isolation procedures to children in a playful manner. 54
55 Infection Control Measures for Exposed/Symptomatic Children 1 In addition to the points listed under infection control measures for exposed/asymptomatic children, the following points apply: HICPAC Isolation guidelines apply: appropriate to the nature of the illness/exposure. 1 Cohort as necessary (same exposure/same symptoms) based on space availability. Use of surgical facemasks as source containment (e.g. during transport) is inappropriate in infants. It may be possible to instruct toddlers in an age-appropriate manner to wear masks if constant supervision is possible. Children over 3 years must be instructed and their compliance evaluated. Respiratory hygiene/cough etiquette as an alternative to masking should be emphasized. 4 Cohorting of Children in a Hospital Setting Ideally cohort according to age group to accommodate sanitary needs of infants and young children (e.g., diapering, toileting, hand hygiene, feeding and cleaning). Traumatized children may regress under duress and may require additional help with sanitary needs. Smaller group size is associated with a lower risk of infection in child care settings (See 13 Indicators of Quality Child Care, p.16). 2 Support infection control by aiming for recommended age-appropriate staff-to-child ratios. (See 13 Indicators of Quality Child Care, p.15: Staff:Child Ratio and Group Size Indicator). 2 Environmental Measures for Pediatric Units Establish hand hygiene procedures and ensure adequate supplies of soap, sinks, paper towels and alcohol-based hand sanitizers in patient rooms. For infants/young children: establish diapering protocols and distribute to caregivers. 2,3 Hospitals without pediatric services have diapering protocols for adults, which should be easy to adapt for infants and children. For infants/young children: use the DHHS document 2 (or similar) for guidance pertaining to setting up sanitary changing stations. For young children: toys should be easy to clean (hard plastic not fuzzy) and not be shared with other children. Toy cleaning protocol is attached as appendices. For young children: assign individual sleeping mats (if used). For infants/young children: adequate clean linens, disposable diapers, changes of clothing. Waste/soiled linen collection units should be child safe, adequate in number, constructed to permit hands free use. Have cleaning/disinfecting materials stored in a child safe manner. Have cleaning/disinfection procedures and schedules in place for toilets, bathrooms, changing stations, sleeping mats, toys, etc. 55
56 Note any restrictions on disinfectant products used and do not use while in direct contact with children. Any reusable equipment or toys should be appropriately cleaned following hospital infection control procedures, or as recommended for the agent of concern. In addition to existing cleaning/disinfection procedures, schedules should also be in place for cleaning/disinfecting changing stations, sleeping mats, toys, and other items and equipment that may become contaminated and a source for passing on infection. A 2-minute contact with household bleach (1/4 cup per gallon tap water) or other Environmental Protection Agency-approved agent is recommended for sanitization. 3 Read labels carefully to ensure that cleaning products are nontoxic to children. Additional Infection Control Measures for Unexposed Neonates Whenever possible, keep healthy mothers and their infants together. Cohort mothers and children together as a single unit. Behavioral, emotional and mental discomfort/disorders in the mother may be exacerbated by the emergency environment. When they cannot be kept together, ensure that there is good communication with the family, so that they are aware of where the patients are and what type of care they are receiving. Remember in selecting the location for cohorting that newborns require a dry, clean, warm environment to promote thermoregulation and minimize stress. A quiet environment would be best for promoting mother-infant bonding. Alternative sites for care of newborns and their mothers may need to be arranged in order to keep the neonate and new mother out of close proximity to infectious patients. Caregiver ratios need to be lower for newborns and infants than for older children. See the day care standards that follow as a guide to staff-to-child ratios. 56
57 Staff-to-Child Ratio and Group Size Indicator There are two sources of guidance for staff-to-child ratios and group size. Caring for Our Children outlines national standards used for child care, 3 however, there are specific state regulations regarding staff-to-child ratio and group size. 5 The Caring for Our Children standard (ST 002) 3 appears in the first chart. The New York State Day Care Center Regulations 5 are cited in the second chart. Either of these may be used for guidance on group size and ratios. Caring for Our Children Standards 2 Age of Children Child-to-Staff Ratio Maximum Group Size Birth-12 months 3: months 3: months 4: months 5: year olds 7: year olds 8: year olds 8: year olds 10: year olds 12:1 24 NYS Day Care Licensing Standards 5 Age of Children Child-to-Staff Ratio Maximum Group Size Under 6 weeks 1:3 6 6 weeks-18 months 1: months 1: years 1: years 1: years 1:9 24 Thru 9 years 1: years 1:15 30 According to Caring for Our Children, when there are mixed age groups in the same room, the child-to-staff ratio and group size shall be consistent with the age of the majority of the children when no infants or toddlers are in the mixed age group. When infants or toddlers are in the mixed age group, the child-to-staff ratio and group size for infants and toddlers shall be maintained. 2,3 Similarly, NYS Day Care Regulations state that children under three years of age may not participate in mixed age groups except that for limited periods of time at the beginning and end of the child day care center's daily operation. Infants may never be placed in mixed age groups. When toddlers are cared for in mixed age groups, the staff-to-child ratio and maximum group size applicable to children, aged 18 months to 36 months, must be followed. When children 3 years of age or older are cared for in mixed age groups, follow the staff-tochild ratio and maximum group size applicable to the majority of the children in the group. 57
58 That is, unless the difference in age between the youngest and oldest child in the group is more than two years. In that case, the staff-to-child ratio and maximum group size applicable to children 2 years older than the youngest child in the group shall apply. 5 Smaller group size is associated with a lower risk of infection in childcare. The risk of illness in children between the ages of 1 and 3 years of age increases as the group size increases to 4 or more. Children in groups of 3 or fewer have no more risk of illness than children cared for at home. 6,7 The risk of repeated ear infections increases in one- to six-year-old children who attend childcare in groups of more than 6 children. 8 The risk of Haemophilus influenza infections increases for children 1 year of age or older in a childcare setting with 4 or more children. The risk of infection peaks in settings with 21 or more children. Smaller childcare centers, not just those with smaller class sizes, have lower rates of disease. Outbreaks of Hepatitis A occur at the rate of 3% in centers that enroll less than 20 children but 53% in those that enroll 51 or more children. 9 Children in small child care centers in France had 2 to 3 times the risk of repeated infections (e.g., upper respiratory tract infections, otitis media, conjunctivitis) than children in family child care settings with no more than 3 children. 10 Lower child-to-staff ratios reduce the transmission of disease. There is little research available that examines the relationship between particular child-to-staff ratios and children's health (a major gap that needs to be addressed). However, the research that is available suggests that fewer children per adult reduces the transmission of disease because caregivers are better able to monitor and promote healthy practices and behaviors. 11,12 58
59 References 1. Siegel JD, Rhinehart E, Jackson M, Chiarello L, for the Healthcare Infection Control Practices Advisory Committee. The 2007 guideline for isolation precautions: preventing transmission of infectious agents in healthcare settings [Centers for Disease Control and Prevention Web site]. Atlanta, GA: Public Health Service, US Department of Health and Human Services, Centers for Disease Control and Prevention; Available at: Accessed February 9, Fiene R. 13 Indicators of Quality Child Care. National Resource Center for Health and Safety in Child Care, University of Colorado, collaborator [Assistant Secretary for Planning and Evaluation Web site]. Washington, DC: Office of the Assistant Secretary for Planning and Evaluation; Health Resources and Services Administration/Maternal and Child Health Bureau, United States Department of Health and Human Services; Available at: Accessed February 9, American Academy of Pediatrics, American Public Health Association, National Resource Center for Health and Safety in Child Care and Early Education. Caring for Our Children: National Health and Safety Performance Standards: Guidelines for Out-of-Home Child Care Programs. 2nd ed [National Resource Center for Health and Safety in Child Care and Early Education Web site]. Elk Grove Village, IL: American Academy of Pediatrics and Washington, DC: American Public Health Association; Available at: Accessed February 9, Respiratory hygiene/cough etiquette in healthcare settings page. Centers for Disease Control and Prevention Web site. Available at: Accessed February 9, Day care regulations page. New York State Office of Children & Family Services Web site. Available at: Accessed February 9, Bartlett AV, Orton P, Turner M. Day care homes: the silent majority of child day care. Rev Infect Dis. 1986;8(4): Bell DM, Gleiber DW, Mercer AA, Phifer R, Guinter RH, Cohen AJ, Epstein EU, Narayanan M. Illness associated with child day care: a study of incidence and cost. Am J Public Health. 1989;79(4): Hardy AM, Fowler MG. Child care arrangements and repeated ear infections in young children. Am J Public Health. 1993;83(9): Hadler SC, Erben JJ, Francis DP, Webster HM, Maynard JE. Risk factors for hepatitis A in day-care centers. J Infect Dis. 1982;145(2): Collet JP, Burtin P, Kramer MS, Floret D, Bossard N, Ducruet T. Type of day-care setting and risk of repeated infections. Pediatrics. 1994;94(6 Pt 2): Bredekamp S, ed. Developmentally appropriate practice in early childhood programs serving children from birth through age 8. Exp ed. Washington, DC: National Association for the Education of Young Children; Panel on Child Care Policy, Committee on Child Development Research and Public Policy, Commission on Behavioral and Social Sciences and Education, National Research Council. Who Cares for America s Children? Child Care Policy for the 1990s. Hayes CD, Palmer JL, Zaslow MJ, eds. Washington, DC: National Academy Press;
60 APPENDIX 6-1 SANITATION PROCEDURE AREA CLEAN SANITIZE FREQUENCY Classrooms/Child Care/Food Areas Countertops/tabletops, floors, door, and cabinet X X Daily and when soiled. handles Food preparation & service surfaces X X Before and after contact with food activity; between preparation of raw and cooked foods. Carpets and large area rugs X Vacuum daily when children are not present. Follow carpet cleaning method approved by the local health authority. Clean carpets only when children will not be present and ensure that they are dry before children return. Clean carpets at least monthly in infant areas, at least every 3 months in other areas, and when soiled. Small rugs X Shake outdoors or vacuum daily. Launder weekly. Utensils, surfaces and toys that go into the mouth or have been in contact with saliva or other body fluids Toys that are not contaminated with body fluids. Dress-up clothes not worn on the head. Sheets and pillowcases, individual cloth towels (if used), combs and hairbrushes, washcloths and machine-washable cloth toys. (None of these items should be shared among children.) X X After each child s use, or use disposable, one-time utensils or toys. X Weekly and when visibly soiled. Blankets, sleeping bags, cubbies X Monthly and when soiled. Hats X After each child s use or use disposable hats that only one child wears. Cribs and crib mattresses X Weekly, before use by a different child, and whenever soiled or wet. Phone receivers X X Weekly. Toilet and Diapering Areas Hand washing sinks, faucets, surrounding X X Daily and when soiled. counters, soap dispensers, door knobs Toilet seats, toilet handles, door knobs or cubicle X X Daily, or immediately if visibly soiled. handles, floors Toilet bowls X X Daily. Changing tables, potty chairs (Use of potty X X After each child s use. chairs in childcare is discouraged because of high risk of contamination.) General Facility Mops and cleaning rags X X Before and after use, daily wash mops and rags in detergent and water, rinse in water, immerse in sanitizing solutions, and wring as dry as possible. After cleaning and sanitizing, hang mops and rags to dry. Waste and diaper containers X Daily. Any surface contaminated with body fluids: saliva, mucus, vomit, urine, stool, or blood X X Immediately. Adapted from Keeping Healthy, National Association for the Education of Young Children
61 APPENDIX 6-2 APPROPRIATE SELECTION AND USE OF SANITIZER One of the most important steps in reducing the spread of infectious diseases among children and childcare providers/caregivers is the cleaning and sanitizing of surfaces that could possibly pose a risk to children or staff. In addition to standard precautions, routine cleaning with detergent and water is the most useful method for removing bacteria from surfaces in the childcare setting. However, some items and surfaces require an additional step after cleaning to reduce the surface germs to a level that is unlikely to transmit disease. This step is called sanitizing. A household bleach and water mixture, or one of a variety of other industrial products, can be used. Sanitizer solutions can be applied in various ways: Spray bottle, for diaper changing surfaces, toilets, and potty chairs. Cloths rinsed in sanitizing solution for food preparation areas, large toys, books, and activity centers. Dipping the object into a container filled with the sanitizing solution, for smaller toys. The concentration and duration of contact of the sanitizer varies with the application and bacteria. More chemical is required when a cloth or objects are dipped into the solution. Each dipping releases germs into the solution, potentially contaminating it. When you apply the sanitizing solution to a surface, follow the instructions for that solution to determine the dilution and minimum contact time. In general, it is best not to rinse off the sanitizer or wipe the object dry right away. A sanitizer must be in contact with the bacteria long enough to kill them. For example, minimum contact time is two minutes when using a properly prepared solution of bleach water applied from a spray bottle to cleaned and rinsed surfaces. The contact time is a minimum of one minute for clean, rinsed dishes submerged in a container that is filled with properly prepared bleach solution. The label on industrial sanitizers gives instructions for using the special chemicals. Since chlorine evaporates into the air leaving no residue, surfaces sanitized with bleach may be left to air dry. Some industrial sanitizers require rinsing with fresh water before the object can be used again. Label spray bottles and containers with the solution s name in which sanitizers have been diluted for direct application, such as bleach sanitizer, and the dilution of the mixture. Although solutions of household bleach and water are merely irritating if accidentally swallowed, some other types of sanitizer solutions are toxic. Keep all spray containers and bottles with diluted and undiluted sanitizer out of the reach of children. Household Bleach with Water A solution of household bleach with water is recommended. It is effective, economical, convenient, and readily available. However, it must used with caution on metal or metallic surfaces. If bleach is found to be corrosive on certain materials, a different sanitizer may be required. When purchasing household bleach, make sure that the bleach concentration is for household use, and not for industrial application. Household bleach is typically sold at retail stores in two strengths: 5.25% hypochlorite (regular strength bleach) or 6.00% hypochlorite (ultra strength bleach) solutions. The solution of bleach and water is easy to mix, nontoxic, safe if handled properly, and kills most infectious agents. Recipe for a spray application on surfaces that have been detergent-cleaned and rinsed in bathrooms, diapering areas, countertops, tables, toys, door knobs and cabinet handles, phone receivers, hand washing sinks, floors, and surfaces contaminated by body fluids (minimum contact time = 2 minutes): ¼ cup household bleach + 1 gallon of cool water OR 1 tablespoon bleach + 1 quart of cool water Recipe for weaker bleach solutions for submerging of eating utensils that have been detergent-cleaned and rinsed (minimum contact time = 1 minute): 1 tablespoon bleach + 1 gallon of cool water A solution of bleach and water loses its strength and is weakened by heat and sunlight. Therefore, mix a fresh bleach solution every day for maximum effectiveness. Any leftover bleach solution should be discarded at the end of the day. References: Canadian Paediatric Society. Well Being: A Guide to Promote the Physical Health, Safety and Emotional Well- Being of Children in Child Care Centers and Family Day Care Homes. 2nd ed. Toronto, ON; Centers for Disease Control and Prevention. The ABC s of Safe and Healthy Child Care;
62 APPENDIX 6-3 SANITATION GLOSSARY Bacteria Plural of bacterium. Bacteria are organisms that may be responsible for localized or generalized diseases and can survive in and out of the body. They are much larger than viruses and can usually be treated effectively with antibiotics. Bacteriostatic Having the ability to inhibit the growth of bacteria. Body fluids Urine, feces, saliva, blood, nasal discharge, eye discharge, and injury or tissue discharge. Caregiver Used here to indicate the primary staff who work directly with the children, that is, director, teacher, aide, or others in the facility. Clean/Cleaning Free of or the removal of dirt and debris (such as blood, urine, and feces) by scrubbing and washing with a detergent solution and rinsing with water. Contaminated/Contamination Having the presence of infectious microorganisms in or on the body, on environmental surfaces, on articles of clothing, or in food or water. Disinfect To eliminate virtually all germs from inanimate surfaces with chemicals (e.g., products registered with the U.S. Environmental Protection Agency as disinfectants ) or physical agents (e.g., heat). In the childcare environment, an effective disinfect is 1:64 dilution of domestic bleach made by mixing a solution of ¼ cup household liquid chlorine bleach with 1 gallon of tap water. It must be prepared fresh daily to remove bacteria from environmental surfaces and other inanimate objects that have been contaminated with body fluids (see Body fluids). It is necessary that the surfaces have first been cleaned (see Clean) of organic material before applying bleach and at least 2 minutes of contact time with the surface occurs. (Since complete elimination of all germs may not be achieved using the 1:64 dilution of domestic bleach solution, technically, the process is called sanitizing, not disinfecting. The term sanitize is used in these standards most often, but disinfect may appear in other or earlier publications when addressing sanitation in childcare.) To achieve maximum germ reduction with bleach, the pre-cleaned surfaces should be left moderately or glistening wet with the bleach solution and allowed to air dry or hand dried only after at least 2 minutes of contact time. A slight chlorine odor should emanate from this solution. If there is no chlorine smell, a new solution needs to be made, even if the solution was prepared that day. The 1:64 diluted solution will contain parts per million (ppm) chlorine. Two minutes of contact with a coating of a sprayed 1:64 diluted solution of ¼ cup household liquid chlorine bleach in one gallon of tap water prepared fresh daily is an effective method of surface-sanitizing of environmental surfaces and other inanimate objects that have first been thoroughly cleaned of organic soil. By itself, bleach is not a good cleaning agent. Household bleach is sold in the conventional strength of 5.25% hypochlorite and a more recently marketed ultra bleach that contains 6% hypochlorite solution. In childcare, either may be used in a 1:64 dilution. Bleach solutions much less concentrated than the recommended dilution have been shown in laboratory tests to kill high numbers of bloodborne viruses, including HIV and hepatitis B virus. This solution is not toxic if accidentally ingested by a child. However, since this solution is moderately corrosive, be careful handling it and when wetting or using it on items containing metals, especially aluminum. DO NOT MIX UNDILUTED BLEACH OR THE DILUTED BLEACH SOLUTION WITH OTHER FLUIDS, ESPECIALLY ACIDS (E.G., VINEGAR), AS THIS WILL RESULT IN THE RAPID EVOLUTION OF HIGHLY POISONOUS CHLORINE GAS. Commercially prepared detergent-sanitizer solutions or detergent cleaning, rinsing, and application of a non-bleach sanitizer that is at least as effective as the chlorine bleach solution is acceptable as long as these products are nontoxic for children, are used according to the manufacturer s instructions, and are approved by the state or local health department for use as a disinfectant in place of the bleach solution. These methods are used for toys, children s table tops, diaper changing tables, food utensils, and any other object or surface that is significantly contaminated with body fluids. Sanitizing food utensils can be accomplished by using a dishwasher or equivalent process, usually involving more dilute chemicals than are required for other surfaces. Facility The legal definition is the buildings, the grounds, the equipment, and the people involved in providing child care of any type. 62
63 APPENDIX 6-3 SANITATION GLOSSARY, continued Infectious Capable of causing an infection (a condition caused by the multiplication of an infectious agent in the body). Sanitizer/Sanitizing A substance that removes/ The process of removing filth or soil and small amounts of certain bacteria. For an inanimate surface to be considered sanitary, the surface must be clean (see Clean) and the number of germs must be reduced to such a level that disease transmission by that surface is unlikely. This procedure is less rigorous than disinfection (see Disinfect) and is applicable to a wide variety of routine housekeeping procedures involving, for example, bedding, bathrooms, kitchen countertops, floors, and walls. To clean, detergent or abrasive cleaners may be used but an additional sanitizer solution must be applied to sanitize. A number of EPAregistered detergent/disinfectant products are also appropriate for sanitizing. Directions on product labels must be followed closely. See APPENDIX 6-2 SELECTING AN APPROPRIATE SANITIZER. Standard Precautions Apply to contact with non-intact skin, mucous membranes, and blood, all body fluids, and excretions except sweat, whether or not they contain visible blood. The general methods of infection prevention are indicated for all people in the childcare setting and are designed to reduce the risk of transmission of microorganisms from both recognized and unrecognized sources of infection. Although standard precautions are designed to apply to hospital settings, with the exceptions detailed in this definition, they also apply in childcare settings. Standard precautions involve use of barriers as in universal precautions, as well as the cleaning and sanitizing of contaminated surfaces. Transmit To pass an infectious organism or germ from person to person. 63
64 Section 7 Pediatric Hospital-Based Disaster Triage Purpose: This section of the toolkit assists hospitals with existing pediatric services and those without them in planning for large-scale disaster triage of pediatric patients. These guidelines are based on the premise that the triage system used for routine emergencies should be used be as closely as possible for catastrophic emergencies as well. A triage system for emergencies should employ multiple levels of triage to ensure that pediatric patients receive the most accurate sorting possible, consistent with available resources and staff. The goal is to implement triage in such a manner that limited pediatric resources are used with optimal efficiency. Note: For the purposes of this section, the assumption is that a hospital will have planned for and purchased equipment, as well as will have identified the additional staff that will be mobilized to manage its expected surge in pediatric patients. Hospitals, both with and without specialty pediatric resources, must identify in advance which staff will serve as the leaders and members of its pediatric disaster response team. Working with this team, as well as local pediatric emergency care and disaster experts, it should be determined how best to apply existing resources to achieve the best triage system possible. Section Contents Pediatric Hospital-Based Disaster Triage: Introduction Mass Casualties Involving Children Overview of Triage Recommendations o Communication and Documentation o Personnel Pediatric Hospital Triage A Multi-Tiered Approach Sample Job Action Sheet Visual Inspection Officers Sample Job Action Sheet - Recorder Visual Assessment of Children Assessment Criteria o Assessment of Breathing o Assessment of Circulation o Assessment of Appearance/ Mental Status o Additional Points of Assessment Additional Points of Assessment of Children o Breathing o Circulation o Appearance o Mental Status Assessment Table 9 Standard Glasgow Coma Scale 64
65 Table 10 Pediatric Glasgow Coma Scale for Infants and Young Children o Characteristics Unique to Each Age Group Pain Assessment Brief Review of Anatomic and Physiologic Differences References Appendices o Pediatric Assessment Reference Card o Children with Special Health Care Needs Reference Card Introduction The unique characteristics of children make them more vulnerable in infectious, natural or manmade disasters. While all children have these vulnerabilities, children with special health care needs may also have specific conditions which can place them at even greater risk. The vulnerabilities of children to natural or manmade disasters and in infectious situations have been described by the Illinois Emergency Medical Services for Children project: Because their skin is thinner and they have a larger surface-to-mass ratio than adults, children are more vulnerable to agents that act on the skin. Children are particularly vulnerable to aerosolized biological or chemical agents because their respiratory rate is faster and they inhale relatively larger doses of the substance than an adult would in the same time. In addition, because the breathing zone of children is closer to the ground, children are more vulnerable to agents like Sarin and chlorine because these agents are heavier than air and accumulate close to the ground. Children have less fluid reserve than adults have and can become dehydrated faster, so they are more vulnerable to the effects of agents that produce vomiting and/or diarrhea. Infants, toddlers, and young children do not have the motor skills to escape from the area of a chemical, biological or other terrorist incident. Children lack cognitive decision-making skills that would help them to figure out how to flee danger or to follow directions from others. Children have smaller circulating blood volumes than adults so if treatment is not immediate, relatively small amounts of blood/fluid loss can lead to irreversible shock or death. Because children are more sensitive to changes in body temperature, have a faster metabolism, and less blood and fluid reserves, a child's condition can shift from stable to life-threatening very rapidly. Mass Casualties Involving Children Children are likely to be among the victims in most mass casualty events. They have a higher likelihood of morbidity or mortality because of their anatomy and physiology. Recent history has proven that children may also be targets of terrorism. 1 For these reasons, every hospital should anticipate having pediatric victims appear on their doorstep in the event of disaster and must start planning to address the issue of treating pediatric patients. 65
66 A frequently recommended first responder triage system specifically for children, named Jumpstart, derived by Romig in 2002, is based on an adult triage system called START (Simple 66
67 Triage and Rapid Treatment). This pediatric triage system places an emphasis on assessing and opening up the airway along with providing rescue breaths and pulse checks, recognizing the unique physiology of children in whom respiratory failure, rather than cardiac failure, causes death. 2 However, JumpSTART is a triage system designed to be used primarily in the pre-hospital setting to determine priority for transport. Hospital-based disaster triage encompasses more complex issues, and must reflect the hospitals resources, space allocation, anticipation of numbers of incoming victims, and repeated reassessment of the patients. Additionally, hospital-based triage becomes even more complex if decontamination is required prior to entry into the hospital. The core of this new triage system is the application of the clinical, history and physical assessment skills that is used in an emergency department triage on a day-to-day basis by experienced nurses and clinicians. However, the new triage system structures the allocation of treatment/care and staffing to provide "the greatest good for the greatest number." One priority for hospital-based triage is to maximize care of the critically injured by preventing over-triage, which is defined as an overflow of minimally injured/sick and already treated into the critical care areas or emergency department. Quickly establishing treatment and evaluation areas for these minimally injured away from critical areas in the emergency department needs to be addressed. Another priority of hospital-based triage is triage accuracy. This depends largely on the experience of the clinical staff performing triage. Clinicians not used to evaluating acutely ill children generally over-triage into more severe categories, thus potentially misallocating resources. 3 These guidelines were created to assist both hospitals with existing pediatric services and those without to address these priorities and to plan for large-scale disaster triage of pediatric patients. More importantly, the guidelines represent the best-case scenario. Each institution needs to modify the guidelines to reflect their capacity in terms of physical and staff resources. Pre-hospital Triage: Decontamination and EMS triage may or may not be performed in the field for all patients. The majority of patients will bypass EMS and go directly to the closest hospital or to the hospital of their choice. Pre-hospital triage will not be discussed in this section. 67
68 4-7 Overview of Triage Recommendations Communication and Documentation A disaster-specific triage form and chart should be developed. In addition to a traditional chart system, unconventional ways of communication such as tags or writing pertinent information on skin or clothes should also be considered. While time-consuming questions and assessments not relevant in a disaster scenario should be removed from the disaster triage form, assessments such as a chronic medical condition, proximity to a disaster scene or exposure to harmful agents are important depending on the type of disaster. Information such as identifiers, guardians, instructions and procedures needs to be communicated. Quickly identifying unaccompanied minors is important because they require special attention and more staffing resources (e.g., accompaniment, special discharge procedure). Direct communication of new information, such as the need for decontamination between triage and the command center/ local authority, is important and should be facilitated. Unit leaders in the triage and treatment areas should communicate with each other directly. Personnel In the event of a disaster, additional personnel performing triage will be required and should be identified and trained in advance. Pediatric experience results in more accurate triage of infants and children. Pediatric patients may be sicker following a disaster because of their unique physiology and their appearance may be deceiving. Therefore, the triage officers triaging pediatric patients ideally should have pediatric experience. Visual Inspection Officers can be used for first impression triaging. A sample Job Action Sheet Visual Inspection Officers is included in this section. If decontamination or isolation is required, more than one Visual Inspection Officer will be required. Each treatment area within the ED and hospital (See Figure 7.1) should have a unit leader who ensures that patients receive an initial and periodic reassessment and that patient flow is maintained. Communication of unit leaders with each other should address moving up- or downgraded patients between areas and should be direct. In addition, personnel guiding unaccompanied children through triage are needed. Recorders, who do not have to be medical professionals, should help collect personal information at all points during the triage and initial treatment process. 68
69 Pediatric Hospital Triage A Multi-Tiered Approach 4-7 Each hospital needs to determine criteria for switching to a two-tiered triage algorithm based on their mass casualty incident (MCI) capacity or the need for performing additional screens (biological, chemical, or radiological scenarios). This recommended process incorporates two forms of triage: a rapid visual assessment to identify quickly the sickest patients and then a more detailed triage assessment to redefine. See Figure 7.1 for a graphic representation of these concepts. Tier 1 Visual Assessment (See Figure 7.1) The first de cision is whether the patient will require decontamination secondary to potential chemical or radiological contamination: YES: Decontamination is required Visual assessment officers outside the hospital (before decontamination) and inside the hospital (after decontamination) constantly assess the flow of patients, prioritize patients for decontamination and assign them to the appropriate treatment area. Prioritization of the critically ill "to the front of the line" is vital to move them quickly into the resuscitation areas in the emergency department or designated critical care area. Even infants and children appearing dead should be moved into the hospital for a resuscitation attempt. There should be a rapid visual assessment conducted by an experienced clinician (Visual Inspection Officer #1) for those patients who will need immediate decontamination. This first assessment determines the priority of decontamination, bringing the more critical patients through the decontamination line first and those less critical later. Patients that do not require decontamination should be sent to the appropriate clinical care area. Since decontamination is not benign and patients may deteriorate during the process, a repeat second visual assessment should occur after decontamination or immediately inside the hospital. This is useful in confirming the first assessment and directing patients to the triage and treatment areas for a more detailed assessment. The second rapid visual assessment is performed by Visual Inspection Officer #2. This second visual assessment allows the person to be sent to the appropriate clinical care area. It would be helpful to assign a recorder to each Visual Inspection Officer. NO: Decontamination is not necessary The patient will receive only one visual assessment, and will then be sent to the appropriate clinical care area. Table 7.1a Color Codes and Respective Acuity Areas for Pati ent Sorting 8 Critical Unstable Potentially Unstable Stable Color Triage Red Yellow Green Clinical Care Area Resuscitation Area Triage Area or other designated area Fast Track or other designated area 69
70 Figure 7.1 Multi-tiered Adult/Pediatric Triage/ED Patient Flow Victim(s) present(s) to facility Is decontamination or isolation necessary? NO Proceed directly to Tier 2 Visual Inspection Visual Inspection Officer #2 YES Tier 1 Visual Inspection Visual Inspection Officer #1/Recorder #1 Determine patient order through Decon Unit based on patient condition as determined by visual inspection Outside/'Warm' Inside/'Cold' Tier 2 Visual Inspection Visual Inspection Officer #2/Recorder #2 Reassess inside hospital post-decon RED Resuscitation Area Critical, Unstable YELLOW Triage Area Potentially Unstable GREEN Fast Track Minor Conditions, Stable Morgue Emergency Department Treatment and/or Holding Definitive Clinical Management or Discharge 70
71 Both over-triage and under-triage are expected. Reassessments and up- and down-grading patients at multiple steps during the triage process are key to optimal utilization of ED resources. Tier 2 Triage (See Figure 7.2) These more detailed assessments occur inside the hospital treatment areas, triage areas, fast track area, and to some extent in the resuscitation area. Triage will include a more detailed hands-on physical exam and pertinent history taking. The patient's condition will be either reconfirmed, down-triaged to lower level of care or up-triaged to higher level of care. Because children can deteriorate abruptly, it is critical to reassess them repeatedly until care is transferred. The unit leaders for each treatment area will supervise and ensure initial and repeat assessments of all children in all areas. Figure 7.2 Triage Algorithm Morgue BLACK Dead Victim(s) present(s) to facility Resuscitation Area RED Critical/unstable Absent airway, breathing or circulation (a) Compromised airway, moderate to severe respiratory symptoms or compromised circulation, unresponsive, or responsive to pain only (AVPU) (a) ED Treatment Area YELLOW Potentially unstable Normal airway, mild respiratory symptoms, normal circulation, and/or significant mechanism of injury or illness (b) Altered appearance or behavior (c) Severe pain (d) Fast Track Area GREEN Stable Normal airway, breathing, circulation and mental status, no significant mechanism of injury or illness Footnotes: (a) See this section s text and tables for details of assessment; (b) See this section s text and tables for details (e.g. significant trauma, possible exposure, underlying illness; (c) See this section s text for developmental stages and age-appropriate behavior; (d) See this section s text for pediatric pain scale. Note: Patients 8 years or less of age without accompanying caretaker or those with special needs and all patients 5 years or less of age in the presence of a caretaker should all go through t his Triage assessment and should not be considered stable by visual inspection alone. These groups of patients require history that is more detailed and a physical. 71
72 Sample Job Action Sheet Visual Inspection Officers Reports to: Location: There will be two Visual Inspection Officers, one before and one after the decontamination process. Mission: To provide first impression or visual assessment of pediatric and obstetric patients in the initial (pre-decontamination) triage area and assign patients to one of three triage priorities: RED (Critical/Unstable), YELLOW (Potentially Unstable), or GREEN (Stable). Immediate (first 2 hours): Initiate a hands-off process to evaluate patients via first impression or visual assessment. Assign patients based on first impressions. Color triage corresponds to the level of acuity of injury. The table below defines the terms used for acuity and their corresponding clinical care areas. Table 7.1b Color Codes and Respective Acuity Areas 8 Critical Unstable Potentially Unstable Stable Color Triage Red Yellow Green Clinical Care Resuscitation Triage Area Fast Track Area Area or other designated or other designated area area The level of acuity dictates to which clinical area the patient will proceed or the order in which they go through decontamination. Special Situations: 1. Patients less than 8 years old: In situations where staff is unfamiliar with patients less than 8 years old and patients do not appear to be in critical condition upon visual assessment, identify these patients as Yellow (potentially Unstable). These patients are sent to Triage, where a more detailed history and physical is obtained. 2. Patients with special needs: In situations where staff is unfamiliar with patients with special needs and patients do not appear to be in critical condition upon visual assessment, identify these patients as Yellow (Potentially Unstable). These patients are sent to Triage, where a more detailed history and physical is obtained. (See Appendix 7.3.) 3. Patients with exposures requiring decontamination: There will be two Visual Inspection Officers, one before and one after the decontamination process. a. The Visual Inspection Officer 1 (before the decontamination process) decides each patient s priority in which to undergo decontamination, prior to any medical intervention. b. After the decontamination, the parties will encounter the Visual Inspection Officer 2 for a second visual assessment. Here patients will be assigned to one of three triage priorities. RED (Critical/Unstable), YELLOW (Potentially Unstable), and GREEN (Stable). 72
73 Sample Job Action Sheet Recorder Reports to: Location: There will be a Recorder assigned to each of two Visual Inspection Officers who are posted before and after the decontamination process. Mission: To document the first impression or visual assessment of pediatric and obstetric patients performed by the Visual Inspection Officers in the initial (pre-decontamination) triage area and assign patients to one of three triage priorities: RED (Critical/Unstable), YELLOW (Potentially Unstable), or GREEN (Stable). Immediate (first 2 hours) and as assigned: Record results of the hands-off process and document to which triage area a patient is transferred. (Color triage corresponds to the level of acuity of injury or illness.) Ensure accuracy of patient tracking. Document patient assignment and whether accompanied/unaccompanied. Document interfacility transfers (into and from the facility). Document fatalities. Share information with local Emergency Operation Center, pu blic health and law enforcement personnel in coordination with Liaison Officer. Document personnel movement through the triage area. Ensure preservation/continuity of documentation through interface with Patient Registration Unit Leader. 73
74 Visual Assessment of Children Visual assessment of a patient's immediate status is done daily in every emergency department by experienced nurses and physicians who quickly decide who needs emergency treatment and who can go through a longer registration and routine triage. The visual assessment described here uses this same technique for rapid mass casualty sorting. The assessment done prior to decontamination would be done by staff in decontamination gear, making it difficult to physically assess patients or to have meaningful communication with them. The visual assessment described here is based on the Pediatric Visual Assessment Triangle: Breathing, Circulation, and Appearance. (See Figure 7.3.) 9 The core element of primary triage is dependent upon identifying abnormal elements of these three areas. Once an abnormal criterion is identified, the patients are immediately sent to the RED Resuscitation Area, where the patient will receive immediate care. Figure 7.3 Pediatric Visual Assessment (Triangle) 9 Important points to remember Although the ABC mnemonic tool is very helpful in remembering the key elements of pediatric visual assessment, the order of assessment should be B, C, A (Breathing, then Circulation, then Appearance). With infants and young children, form a visual impression before you approach to begin the hands-on assessment process. Abruptly approaching a young child who is already distressed can increase the child's agitation, potentially exacerbating the child's clinical condition. Maintain a calm, reassuring manner whenever you assess a very young patient. To assess younger children, have a parent hold the child or allow the child to sit on a parent's lap if possible. Encourage the parent to participate in the examination. Consider age-related factors throughout the assessment. Allowing infants to suck on a pacifier or gloved finger can calm them. If at any point during the first impression you identify a significant clinical problem, immediately discontinue your visual assessment, approach the child, and begin the handson initial assessment. Do not delay lifesaving interventions to initiate monitoring. Fever may make infants and children irritable or somnolent, which can affect the assessment. 74
75 Assessment Criteria Assessment of Breathing The Visual Inspection Officer will form a first impression about a patient's respiratory status (See Table 7.2.) If critical or unstable, the patient will be considered RED and sent to the decontamination area ahead of the line or to the resuscitation area, as appropriate. If potentially unstable after decontamination, the patient will be considered YELLOW and sent to the Triage Area or to the appropriate treatment area after decontamination. Frequent re-evaluation is necessary. If breathing is stable, consider the child GREEN. Continue assessment for circulation and appearance based on Tables 7.3 and 7.4. Assessment Airway Table 7.2 Assessment for Breathing 8 Critical/Unstable RED Partial to complete obstruction by secretions or blood Potentially Unstable YELLOW Patient with secretions Stable GREEN Patent Work of Absent or increased work with periods of Normal Normal Breathing weakness Central Skin Color Pallid, mottled, or cyanotic Inspection Absent to decreased chest movements Normal Normal Additional Points to Remember In children, respiratory arrest is the primary cause of cardiac arrest. The critical window between onset of apnea and onset of cardiac arrest in children is very short no more than a minute or two. A child's airway is narrow er at all levels than an adult's. The child's anatomy results in higher airflow resistance, so when further narr owed by edema or secretions, the child experiences greatly increased resistance to airflow. Avoid actions that could agitate or frighten a child who is in respiratory distress. Assessment of Circulation The Visual Inspection Officer will form a first impression about a patient's circulatory status, based on Table 7.3. If critical or unstable, the patient will be considered RED and sent to the decontamination area ahead of the line or to the resuscitation area, as appropriate. If potentially unsta ble, the patient will be considered YELLOW and sent to the Triage Area or other designated ar ea after decontamination. If circulation is stable, then continue assessment for appearance based on Table 7.4. Pink Pink 75
76 Assessment Table 7.3 Assessment for Circulation 8 Critical/Unstable RED Potentially Unstable YELLOW Stable GREEN Skin Color Pallid, mottled, or cyanotic Normal Normal Assessment of Appearance/Mental Status The Visual Inspection Officer will form a first impression about a patient's appearance and mental stat us. See Table 7.4 for the TICLS Tool for quick assessment of appearance. Table 7.4a AV PU Scale can be used to further assess mental status. Assessment of mental status in children is age-dependent. If the patient is critical or unstable, the patient will be considered RED and sent to the Resuscitation Area. If the patient is unresponsive to verbal commands but not acting appropriately, send the patient to YELLOW Holding and Treatment Area. If the patient is alert, send the patient to Fast Track GREEN. Appearance Tone Table 7.4 Appearance (TICLS Tool) 10 Questions to be answered Is there vigorous movement with good muscle tone, or is the child limp? Is the child alert and attentive to surroundings, or apathetic? Interactivity Will the child reach for a toy? Does the child respond to people, objects, and sounds? Consolability Does comforting the child alleviate agitation and crying? Look/Gaze Do the child's eyes follow your movement, or is there a vacant gaze? Speech/Cry Are vocalizations strong, or are they weak, muffled, or hoarse? Assessment Patient Response Table 7.4a AVPU Scale 10 Critical/Unstable Potentially Unstable Stable RED YELLOW GREEN Responsive only to pain or unresponsive Responsive to verbal commands Alert Table 7.5 First Impression of Pediatric Respiratory Emergencies 9 Assessment Distress Failure Arrest Mental status Muscle tone/body position Alert, agitated, or combative Normal; may assume tripod position Extreme agitation or reduced responsiveness Normal tone or hypotonic Unresponsive Atony Chest movement Present Present Absent Work of breathing Increased Greatly increased with periods of weakness Absent Skin color Pink or pallid Pallid, mottled, or cyanotic Cyanotic 76
77 Additional Points of Assessment If the child displays abnormal vital signs or heart rate and respiration rate are values that are consistently above or below normal ranges, send the patient to RED Resuscitation Area. Factors such as fever and anxiety may cause transient abnormal vital signs. Medical staff discretion is needed for these cases. Send the patient to RED Resuscitation Area when there is doubt. Table 7.6 Average Pediatric Heart Rates by Age * / Table 7.7 Average Pediatric Respiratory Rates by Age 9 Age (years) Heart Rate * (beats per minute) Respiration Rate (breaths per minute) Infant (birth to <1 year) Toddler ( 1 to <3 years) Preschooler (3 to <6 years) School-aged (6 to <12 years) Adolescent (12 to 18 years) * Pulse rates for a child who is sleeping may be 10 percent less. S Signs and symptoms A Allergies M Medications P Past medical problems L Last food or liquids E Events leading to illness or injury Table 7.8 SAMPLE History 9 Assessment findings and history Particular drug and food allergies Medications the child is currently taking; time and amount of last dose Especially chronic medical conditions such as asthma, which may predispose to morbidity/mortality Ask about last food and drink This will be of special relevance in a disaster. Specific questions will depend on type of event 77
78 Additional Points of Assessment of Children Breathing In a child who is able to breathe spontaneously, perform the following detailed assessments: Evaluate work of breathing and breath sounds: o Inspiratory retractions in the suprasternal, supraclavicular, intercostal, or subcostal areas o Inspiratory nasal flaring o Head bobbing Listen for stridor, grunting or gurgling Count the respiratory rate for a 30-second period Assess the respiratory depth and pattern Evaluate central color at the lips, tongue, and oral mucosa Inspect for chest trauma Auscultate chest by placing the stethoscope below each axilla in turn and compare breath sounds of right and left lung fields to see if equal Decreased breath sounds Wheezing Crackles Optional: initiate pulse oximetry (this may be time-consuming and is not needed for triage process during disasters) Circulation Note skin c olor at the lips and tongue, the palms, or the soles of the feet; abnormal skin color (pallor, mottling, or cyanosis) indicates an urgent condition. Palpate the central pulse. Recommended sites: o Newborn: base of umbilical cord. o Infants and young children: carotid artery. If central pulse present, evaluate strength; weak pulse can indicate decompensated shock. Count rate for 30 secon ds and double this figure for t he rate per minute. If child is uncooperative, count the rate by auscultating with th e stethoscope over left side of chest between sternum and nipple. Compare peripheral and central pulses; they should be similar. Weak or irregular peripheral pulses indicate either poor peripheral perfusion or exposure to cold ambient temperatures; hot skin may indicate fever, infecti on, or hyperthermia caused by very warm ambient temperatures. Check capillary ref ill time; delayed capillary refill (more than 3 seconds) may indicate po or perfusion or exposure to cool ambient temperatures. 78
79 Appearance Level of Consciousness: All well children will constantly interact with their environment. Proceed with initial assessment when child is markedly irritable, agitated or has reduced responsiveness. Interaction with Parent: A child will respond to his/her name being called. Proceed with initial assessment when the child has a markedly slow or absent response, inconsolable crying, or failure to recognize a parent. Response to Others: A child will recognize your presence. Proceed with initial assessment when there is no response to your presence. Muscle Tone and Body Position: A child will assume a comfortable position. An infant will have his extremities in a flexed position. There will be equal movement with their limbs. Proceed with initial assessment when there is hypotonia, rigidity, or inability to sit. Mental Status Assessment Knowledge of unique developmental factors is important in evaluating for normal mental status in pediatric patients. Some of these are outlined below, but it is recommended to refer to other texts for a more comprehensive review of developmental stages. (See Section 14 The Psychosocial Needs of Children during a Disaster.) Problems arise whenever the caretaker/parent is not present. A standard Glasow Coma Scale is provided (See Table 7.9.) 9,11,12 A modified version of the 9,11,12 Glasgow Coma Scale (see Table 7-10) has been adapted for assessing infants and young children who lack the developmental maturity to speak or to respond to commands. The resultant score may be helpful for detecting changes in the child's condition over time, but is not designed to help with immediate management decisions and triage. Eye Opening Table 7.9 Standard Glasgow Coma Scale 9,11,12 Pts Best Verbal Response Pts Best Motor Response Pts Spontaneous 4 Oriented 5 Follows commands 6 To verbal stimuli 3 Confused 4 Localizes pain 5 To pain 2 Inappropriate words 3 Withdraws to pain 4 None 1 Incomprehensible sounds 2 Flexion to pain 3 None 1 Extension to pain 2 None 1 Table 7.10 Pediatric Glasgow Coma Scale for Infants and Young Children 9,11,12 Eye Opening Pts Best Verbal Response Pts Best Motor Response Pts Spontaneous 4 Coos, babbles 5 Normal spontaneous movements 6 To speech 3 Irritable, cries 4 Withdraws to touch 5 To pain 2 Cries to pain 3 Withdraws to pain 4 None 1 Moans to pain 2 Abnormal flexion 3 None 1 Abnormal extension 2 None 1 79
 o Normal: explores the environment (e.g., looking or walking around).")
80 Characteristics Unique to Each Age Group Infants (0 to <18 months) o Ambulation begins at approximately 1 year old. o Easily consolable by caregiver (e.g., smiles and coos with parent). o Appropriate reaction to others - stranger anxiety associated with crying is normal. Toddlers (18 months to <3 years) o Normal: explores the environment (e.g., looking or walking around). o Talking appropriate for development: simple words and short sentences. Preschool (3 years to 6 years) o Talking: more prominent and longer sentences; ability for others to understand. School-aged (7 years to 12 years) o Able to verbalize their needs: HOWEVER, the child may regress to earlier stage of development. Pain Assessment Measuring pain in infants and children is difficult. Changes in vital signs (heart rate, breathing rate, and blood pressure), facial expression and behavior are most widely used to rate pain. Regular measurements should be taken and recorded. There are different pain rating scales used for infants and children. One example is illustrated below: Table 7.11 Faces Pain Rating Scale 13 80
81 Brief Review of Anatomic and Physiologic Differences 9 There are fundamental anatomic and physiologic differences between children and adults that directly affect: How assessment is performed, How children respond to illness and injury, and How treatment and transportation decisions are made. Pediatric Airway Considerations More anterior than adult (less head tilt to open the airway). Smaller diameter of airway than an adult (easily blocked by secretions or blood). Large tongue in relation to jaw size (likely to cause obstructions when child is unconscious). Infants prefer to breathe through the nose (nasal obstructions can cause respiratory distress). Airway Assessment: Is the child effectively moving air? Is the child able to speak or cry vigorously? Ask the parent to lift the child's shirt. Look for signs of airway obstruction. Observe movement of the chest or abdomen. Is there a potential for airway compromise? Listen for sounds that indicate airway obstruction or excessive secretions. Stridor: A high- or low-pitched sound that occurs when the child breathes in that indicates partial obstruction of the upper airway. Foreign body. Swelling (from disease, poison, etc.) 81
82 If a Foreign Body Airway Obstruction (FBAO) is suspected: Provide humidified high concentration oxygen by non-breather mask or blow-by oxygen tubing until treatment can be completed. If airway swelling is suspected, keep the child in the position most comfortable for breathing. Call another clinician for assistance. Breathing Assessment: Is the child breathing adequately? Look for: Movement of chest o The chest should move smoothly with no noticeable difference from left to right. o The depth and rhythm of chest movement should be regular. Extra effort used to breathe o Is the child working hard just to breathe? o The extra effort of moving air into the lungs or out of the lungs indicates respiratory distress and eventually can exhaust the child. Blue skin tone. Listen for lung sounds. Count respirations. If the chest is not rising, begin ventilation with a bag-valve mask and supplemental oxygen. Reassess the airway. Position the head. Unlike for an adult, ventilate with just enough pressure to see the chest rise. Circulation Assessment: Determine if perfusion is sufficient. Compare peripheral and central pulses, Skin temperature, and Skin tones. Unlike in adults, blood pressure is not a reliable indicator of poor perfusion in children and should not be the determining factor used to decide if the child has hypoperfusion. Blood pressure can be measured in children over three, particularly when the condition is non-urgent and there is no need to expedite transport. Begin circulation assessment by detecting and stopping active bleeding. Use direct pressure, elevation, and when necessary, the proximal pressure point. Remember that seemingly small blood losses can be significant as a child has a much smaller blood volume than an adult. 82
83 References 1. Amir LD, Aharonson-Daniel L, Peleg K, Waisman Y, Israel Trauma Group. The severity of injury in children resulting from acts against civilian populations. Ann Surg. 2005;241(4): Romig LE. Pediatric triage. A system to JumpSTART your triage of young patients at MCIs. JEMS. 2002;27(7):52-58, Maldonado T, Avner JR. Triage of the pediatric patient in the emergency department: are we all in agreement? Pediatrics. 2004;114(2): Cronin JG, Wright J. Rapid assessment and initial patient treatment team a way forward for emergency care. Accid Emerg Nurs. 2005;13(2): Eitel DR, Travers DA, Rosenau AM, Gilboy N, Wuerz RC. The emergency severity index triage algorithm version 2 is reliable and valid. Acad Emerg Med. 2003;10(10): Lovejoy JC. Initial approach to patient management after large-scale disasters. Clin Ped Emerg Med. 2002;3(4): O Neill KA, Molczan K. Pediatric triage: a 2-tier, 5-level system in the United States. Pediatr Emerg Care. 2003;19(4): Sanddal ND, Hansen JD, Rahm NS. CUPS Assessment Table. In: Critical Trauma Care by the Basic EMT. 4th ed. Bozeman, MT: Critical Illness and Trauma Foundation; 1997: Foltin GL, Tunik MG, Cooper A, Markenson D, Treiber M, Skomorowsky A, eds. Paramedic TRIPP Version 1.0 Teaching Resource for Instructors in Prehospital Pediatrics. New York, NY: Center for Pediatric Emergency Medicine; American Academy of Pediatrics. Pediatric Education for Prehospital Professionals (PEPP). 1st ed. Boston, MA: Jones and Bartlett Publishers; 2000: Holmes JF, Palchak MJ, MacFarlane T, Kuppermann T. Performance of the pediatric Glasgow Coma Scale in children with blunt head trauma. Acad Emerg Med. 2005;12(9): James HE. Neurologic evaluation and support in the child with an acute brain insult. Pediatr Ann. 1986;15(1): Whaley LF, Wong DL. Nursing Care of Infants and Children. 3rd ed. St. Louis, MO: Mosby; New York State Department of Health Emergency Medical Services for Children Program. New York State Pediatric Assessment Reference Card Available at: Accessed February 18, New York State Department of Health Emergency Medical Services for Children Program. Children with Special Health Care Needs Prehospital Care Reference Card Available at: Accessed February 18,
84 Appendices Appendices 7-1/7-2 Pediatric Assessment Reference Card from New York State Emergency Medical Services Includes Pediatric Assessment, APGAR Scores, Resuscitation, CPR Notes, ALS Guidelines, Glasgow Coma Score, Respiratory/Cardiac Arrest Treatment. Appendix 7-3 Children with Special Health Care Needs Reference Card from New York State Emergency Medical Services Includes Listen to the Caregivers, Technology-Assisted Children, Tracheostomy, BLS, ALS, Central Intravenous Catheters, CSF Shunt, Gastrostomy, Colostomy or Ileostomy, Ureterostomy or Nephrostomy Tube or Foley Catheter. 84

85 Airway & Appearance (Open/Clear Muscle Tone /Body Position) Updated 2011 General Impression (First view of patient) Abnormal: Abnormal or absent cry or speech. Decreased response to parents or environmental stimuli. Floppy or rigid muscle tone or not moving. A B Normal: Normal cry or speech. Responds to parents or to environmental stimuli such as lights, keys, or toys. Good muscle tone. Moves extremities well. C Circulation to Skin (Color / Obvious Bleeding) Abnormal: Cyanosis, mottling, paleness/pallor or obvious significant bleeding. Normal: Color appears normal for racial group of child. No significant bleeding. Work of Breathing (Visible movement / Respiratory Effort) Abnormal: Increased/excessive (nasal flaring, retractions or abdominal muscle use) or decreased/absent respiratory effort or noisy breathing. Normal: Breathing appears regular without excessive respiratory muscle effort or audible respiratory sounds. Decision/Action Points: Any abnormal findings or life-threatening chief complaint such as major trauma/burns, seizures, diabetes, asthma attack, airway obstruction, etc (urgent) proceed to Initial Assessment. Contact ALS if ALS not already on scene/enroute. All findings normal (non-urgent) proceed to Initial Assessment. Airway & Appearance (Open/Clear Mental Status) Abnormal: Obstruction to airflow. Gurgling, stridor or noisy breathing. Verbal, Pain, or Unresponsive on AVPU scale. Normal: Clear and maintainable. Alert on AVPU scale. PEDIATRIC ASSESSMENT Initial Assessment (Primary Survey) Continue assessment throughout transport Breathing (Effort / Sounds / Rate / Central Color) Abnormal: Presence of retractions, nasal flaring, stridor, wheezes, grunting, gasping or gurgling. Respiratory rate outside normal range. Central cyanosis. Normal: Easy, quiet respirations. Respiratory rate within normal range. No central cyanosis. Circulation (Pulse Rate & Strength / Extremity Color & Temperature / Capillary Refill / Blood Pressure) Abnormal: Cyanosis, mottling, or pallor. Absent or weak peripheral or central pulses; Pulse or systolic BP outside normal range; Capillary refill > 2 sec with other abnormal findings. Normal: Color normal. Capillary refill at palms, soles, forehead or central body 2 sec. Strong peripheral and central pulses with regular rhythm. Decision/ Action Points: Any abnormal finding Immediate transport with ALS. If ALS is not immediately available, meet ALS intercept enroute to hospital or proceed to hospital if closer. Open airway & provide O 2. Assist ventilations, start CPR, suction, or control bleeding as appropriate. Check for causes such as diabetes, poisoning, trauma, seizure, etc. Assist patient with prescribed bronchodilators or epinephrine auto-injector or administer meds if approved and appropriate. All findings on assessment of child normal Continue assessment, detailed history & treatment at scene or enroute. Normal Respiratory Rate: Normal Pulse Rate: Lower Limit of Normal Systolic BP: Infant (<1yr): Infant: Infant: >60 (or strong pulses) Toddler (1-3yr): Toddler: Toddler: >70 (or strong pulses) Preschooler(4-5yr): Preschooler: Preschooler: >75 School-age(6-12yr): School-age: School-age: >80 Adolescent(13-18yr): Adolescent: Adolescent: >90 Pulses slower in sleeping child / athlete Estimated min.sbp >70 + (2 x age in yr) This reference card should NOT replace or supersede regional prehospital medical treatment protocols Paid for by HRSA Emergency Services for Children State Partnership grant 6H33MC /2011
86 APGAR Score 0 pt 1 pt 2 pts Appearance Blue Pink Body All Pink Blue Limbs Pulse Absent < Grimace/Reflex None Grimace Cough/Sneeze Activity Limp Some flexion Active motion Respirations Absent Slow/Irregular Good Neonatal Resuscitation Dry, Warm, Position, Tactile Stimulation Call for ALS back-up if needed Suction if airway obstruction or BVM needed Apnea/Gasping, HR <100 or central cyanosis with room air. O 2 if sat stays < 95% HR<60 after 30 sec. BVM Chest 120/min - 3:1 1/3 to 1/2 chest depth 2 thumb encircle chest or 2 fingers ALS available & HR <60 Consider intubation Epinephrine mg/kg IV/IO/ET 1:10,000 q 3-5 min CPR Notes: Start CPR for cardiac arrest or HR<60 with poor perfusion. AEDs with pediatric capabilities preferred if patient < 25kg or 55lb (<8 yr old). If unavailable, may use adult AED. Do not pause CPR for more than 10 sec.for pulse checks, intubation, patient transfer or other reasons. Give medications during CPR whenever possible. Pediatric ALS Guidelines Glasgow Coma Score Infants Children /Adults Eye Opening Spontaneous 4 Spontaneous To speech/sound 3 To speech To pain 2 To pain No response 1 No response Verbal Response Coos or babbles 5 Oriented Irritable crying 4 Confused Cries to pain 3 Inappropriate words Moans to pain 2 Incomprehensible None 1 None Motor Response Spontaneous.6 Obeys commands Withdraws touch 5 Localizes pain Withdraws pain.4 Withdraws pain Abnormal flexion 3 Abnormal flexion Abnormal extension 2 Abnormal extension No response 1 No response Respiratory or Cardiac Arrest Infant Child Adol/Adult VENT RATE 20/min 12-20/min 12/min Patient with pulses COMPRESS Encircle or 1 or 2 METHOD 2 fingers hands 2 hands DEPTH 1/3 (1 1/2 in) 1/3 (2 in) at least 2 in COMPRESS RATE(minimum) 100/min 100/min 100/min C:V RATIO 15:2 15:2 30:2 (2 people) Push HARD & FAST, allow full chest RECOIL! Do not synchronize ventilations/compressions after intubation - ventilate at 8-10/min when no pulses. After defibrillation, do 2 full minutes of CPR starting with compressions before pulse/rhythm check. Adolescent/Adult protocols apply to patients with obvious signs of puberty (breast development obvious through clothing, facial hair, etc), acne, adult appearance/size, or visible axillary hair Asystole or PEA Start CPR Intubate if needed to maintain airway. Epinephrine: 0.01 mg/kg 1:10,000 IV/ IO 0.1 mg/kg 1:1000 ET.Continue Epinephrine q 3-5 min, same dose Bradycardia Open airway & ventilate with oxygen. Intubate if needed to maintain airway and decreased consciousness Start CPR if HR<60 with poor perfusion. Epinephrine: 0.01 mg/kg 1:10,000 IV/ IO 0.1 mg/kg 1:1000 ET Continue Epinephrine q 3-5 min, same dose Atropine 0.02 mg/kg IV/ IO 0.03 mg/kg ET minimum dose 0.1 mg maximum dose 0.5 mg child; 1 mg adol. Consider transcutaneous pacing as needed. VF or Pulseless VT Defibrillate 2j / kg (after 2 min CPR) Continue CPR, ventilate with O 2 ; Intubate if needed to maintain airway, Epinephrine: 0.01 mg/kg 1:10,000 IV/ IO (q3-5 min) 0.1 mg/kg 1:1000 ET Defibrillate 4j / kg; Resume CPR immed. Amiodarone 5mg/kg IV/IO (pref) or Lidocaine 1mg / kg IV/ IO/ ET Defibrillate 4-10 J/kg q 2 min as needed (up to adult dose) Use Magnesium 25-50mg/kg IV/ IO if torsades de pointes or hypomagnesemia Consider possibility of hypoxia, hypovolemia, hypothermia, hydrogen ion (acidosis), hyper/hypokalemia, hypoglycemia, tamponade, tension pneumothorax, toxins/poisons/drugs, trauma or thrombosis (coronary or pulmonary) and treat if present. This reference card should NOT replace or supersede regional prehospital medical treatment protocols Paid for by HRSA Emergency Services for Children State Partnership grant 6H33MC /2011

87 Appendix
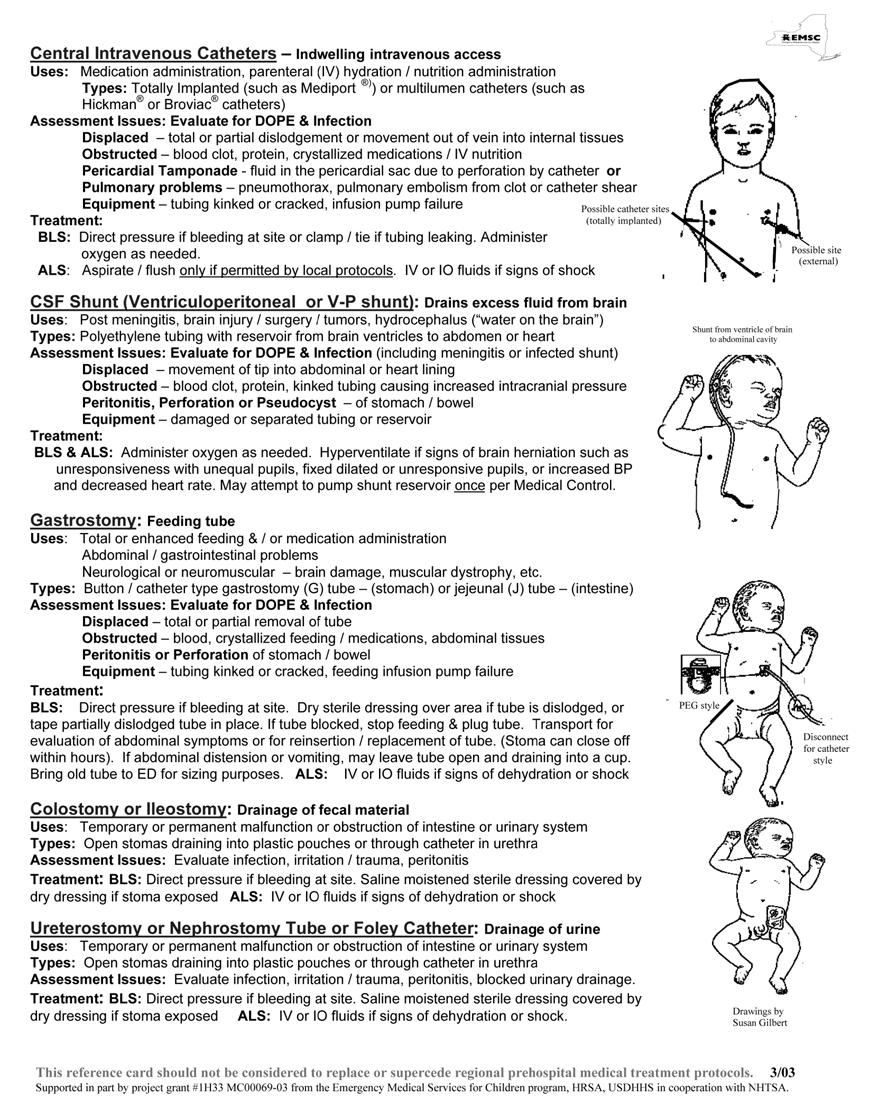
88 88
89 Section 8 Pediatric Decontamination/Prophylaxis DVD Resource: The Agency for Health Care Research and Quality (AHRQ) has made available for free, upon individual request, a DVD entitled The Decontamination of Children: Preparedness and Response for Hospital Emergency Departments. The information in this DVD outlines the key differences between treating children and adults, describes the important steps necessary for decontamination, and provides an overview of the process and systems needed to respond to this need. The DVD can be ordered at: - AHRQ Publication No DVD, August Purpose: These recommendations are intended to assist in planning for the needs of all children requiring decontamination that present to the hospital during a disaster or terrorist attack. Children require special considerations that may not be addressed in the general Hospital Decontamination Plan. These guidelines will assist hospitals to decontaminate properly infants and children in a timely manner. Section Contents General Guidelines Decontamination Recommendations Based on Age of Child o Children less than 2 years of age (Infants and Toddlers) o Children 2 to <8 years of age (Preschool and Young Children) o Children 8 to 18 years of age (School-Aged Children) Pharmaceutical Needs o Home Preparation for Emergency Dosages of: Doxycycline for Infants and Children Exposed to Anthrax Ciprofloxacin for Infants and Children Exposed to Anthrax Doxycycline for Children Over 8 Years of Age Exposed to Brucellosis Co-trimoxazole for Children Less Than 8 Years of Age Exposed to Brucellosis Rifampin for Children and Adults Exposed to Brucellosis Tamiflu for Infants and Children Exposed to Influenza Doxycycline for Infants and Children Exposed to Plague Ciprofloxacin for Infants and Children Exposed to Plague Doxycycline for Infants and Children Exposed to Tularemia Ciprofloxacin for Infants and Children Exposed to Tularemia References 89
90 General Guidelines 1-10 Infants and children have unique needs that require special considerations during the process of hospital-based decontamination. Separation of families during decontamination should be avoided, especially under conditions of large number of patients in a chaotic situation; however, medical issues take priority. Older children may resist or be difficult to handle out of fear, peer pressure, and modesty issues, even in front of their parents or caregivers. If the water temperature is below 98 F, the risk of inducing hypothermia increases proportionately with the smaller, younger child. Attention to airway management is a priority throughout decontamination showers. It cannot be assumed that the parents or caregivers will be able to decontaminate both themselves and their children at the same time. "Hot zone" personnel should recognize the need to assist them. A large volume, low-pressure water delivery system (e.g., handheld hose sprayers that are child-friendly ) should be incorporated into the hospital decontamination showers. Regarding considerations such as hypothermia, airway management, separation of families and the ability to effectively decontaminate a child: the smaller the child, the bigger the problem. 90
91 Decontamination Recommendations Based on Age of Child 1-10 Children should be divided into three groups by age: Less than 2 years old (infants and toddlers), ages 2 to 8 years old (pre-school/young children), and ages 8 to 18 years old (school age). The recommendations are based on the child's estimated age, since asking children's ages may be impractical due to the limitations of the PPE worn by decontamination team members or to a large influx of patients. The recommendations are meant as general guidelines. Children Less Than 2 Years of Age (Infants and Toddlers) Infants and toddlers represent the most challenging group to safely decontaminate due to their developmental stage, their dependent nature and their physical characteristics. These special needs and considerations are the most important: All infants and toddlers should be placed on a stretcher and disrobed by either the child's caregiver or hot zone personnel. (Use trauma shears, if necessary, to speed the disrobing process.) A hand should be kept on the infant or toddler at all times, even when bedrails are raised. (Small children can fall through.) Some have found plastic laundry baskets to be useful in moving infants through the decontamination area. It is not recommended that the child be carried due to the possibility of injury resulting fro m a fall, or from dropping a slippery and squirming child. All clothes and items that cannot be decontaminated should be placed in appropriate containers or bags as provided by the hospital and labeled. Ensure the temperature of the shower does not present a danger to the infant/toddler. Each infant and toddler should then be accompanied through the decontamination shower by either his or her caregiver or hot zone personnel to ensure the entire patient is properly decontaminated. Special attention must be given to the child's airway while in the shower. Children and their families (parents or caregivers) should not be separated unless critical medical issues take priority. Once through the shower, the infant's or toddler's caregiver or cold zone personnel escort should be given a towel and sheets to dry off the child, and a hospital gown to dress the child. Immediately, the child should be given a unique identification number on a wristband and then triaged to an appropriate area for medical evaluation. Remember that temperature regulation is a major issue for infants and toddlers. If necessary, cover the child with a blanket. 91
92 Children 2 to <8 Years of Age (Preschool and Young Children) From age, two up to eight, children should be able to walk and speak, yet will still look like a child with considerable variations in physiology and anatomy. Ambulatory children should be assisted in disrobing by either the child's caregiver or hot zone personnel. All clothes and items that cannot be decontaminated should be placed in appropriate containers or bags as provided by the hospital and labeled. Each child should be directly accompanied through the shower by either the child's caregiver or hot zone personnel to ensure the entire patient is properly decontaminated. It is recommended that the child not be separated from family member(s) or the adult caregiver unless serious medical conditions dictate otherwise. Once through the shower, each child should be given a towel and sheets to dry, and a hospital gown. Immediately, the child should be given a unique identification number on a wristband and then triaged to an appropriate area for medical evaluation. Ask if they would like a blanket. In the case of children with special health care needs or injured children who are nonambulatory: Non-ambulatory children should be placed on a stretcher by hot zone personnel and disrobed (using trauma shears if necessary). Again, all clothes and items that cannot be decontaminated should be placed in appropriate containers or bags as provided by the hospital and labeled. o o Each non-ambulatory child on a stretcher is escorted through the decontamination shower and assisted with decontamination to ensure the entire patient is properly decontaminated. Children of this age may be averse to the showering of their face. Care should be taken to keep their airway open during the showering procedure. 92
93 Children 8 to 18 Years of Age (School-Aged Children) At the age of 8 years and upward, the airway anatomy approximates that of an adult. Although it is tempting to regard this age group as small adults, there are special needs unique to this age group. First, privacy is likely to be a bigger issue with this age group than with younger children, so steps should be taken to protect modesty of the patient and limit the number of people to which the child appears to be exposed. Second, this group will be more likely to want explanations about procedures. The child is likely to be more cooperative if age-appropriate explanations are given. Ambulatory children should be instructed to disrobe by hot zone personnel. All clothes and items that cannot be decontaminated should be labeled and placed in appropriate containers or bags as provided by the hospital. Children of this age should able to accomplish this themselves. Each ambulatory child should then walk through the decontamination shower, preferably in succession with their parent or caregiver, and essentially decontaminate him/herself. Non-ambulatory children should be placed on a stretcher by hot zone personnel and disrobed (using trauma shears if necessary). This may include children with mobility impairments, children with special healthcare needs or injured children. Clothing should be placed in appropriate containers or bags provided and labeled. Then, each non-ambulatory child should be escorted through the decontamination shower and assisted with decontamination to ensure the entire patient is properly decontaminated. Once through the shower, each child should be given a towel and sheets to dry, and a hospital gown. Immediately, the child should be given a unique identification number on a wristband and then triaged to an appropriate area for medical evaluation. Ask if they would like a blanket. Children and their families (parents or caregivers) should not be separated unless critical medical issues take priority. 93
94 Pharmaceutical Needs 11 General Needs: There are resources for clinicians who are unfamiliar with pediatric dosing. The listing below is not intended to be all-inclusive, nor should it be considered an endorsement of any particular product. Color Coding Kids/Broselow Pediatric Emergency Tape - This system uses a colorcoded measuring tool based on height-weight correlations to determine the proper pediatric dose to administer. The color measurement system allows near instantaneous weight determination. The color-coded cardboard measuring tape is laid down alongside a supine pediatric patient. The color zone used to measure the child lists the proper amount of medication dosages, proper equipment sizes, IV infusion information, and other pertinent information specific to that size patient. The full system includes a smart cart with color-coded drawers, containing medications that relate to the measuring tool. For more information, go to: Pedi-Wheel - This is a pocket reference tool with vital information related to pediatric emergencies where the patient is aged preemie to age 16. On one si de, the clinician can dial the patient's age and windows reveal average weight, blood pressure, heart rate, respiratory rate, and sizes for ET tube and laryngoscope blades. The other side can be used to dial the patient's weight to calculate doses of 14 emergency medications. Information conforms to ACLS and PALS guidelines for fluid resuscitation, defibrillation and cardioversion. It can also accurately calculate percentage of body surface burned. Freeware for PDAs - There are several websites that make available downloadable freeware. Information can be loaded onto PDAs for reference use. Among the websites are Drexel University's library site ( and Softpedia ( Prophylaxis Using Adult Doses: The following documents, developed by the Oklahoma University College of Pharmacy and the Oklahoma City - County Public Health Department, provide explanations of how to prepare emergency dosages of the following medications which can be printed and given to patients and family members. English versions of the following appear in this section of the toolkit: (Spanish and Vietnamese versions are available upon request.) Doxycycline for anthrax, brucellosis, plague and tularemia prophylaxis Ciprofloxacin for anthrax, plague and tularemia prophylaxis Co-trimoxazole suspension or tablet for brucellosis prophylaxis Rifampin for brucellosis prophylaxis Oseltamivir (Tamiflu ) for influenza exposure Note: The sample documents that follow assume a specific formulation of each drug. Prior to copying and distributing the instruction sheets, please determine whether the instructions need to be altered based on a different formulation/dosage of the drug. 94
95 Home Preparation for Emergency Doses of Doxycycline for Infants and Children Exposed to Anthrax Once you have been notified by your federal, state, or local authorities that you have been exposed to anthrax, you may need to prepare emergency doses of doxycycline for infants and children using doxycycline tablets. You will need: One (1) 100-milligram (mg) doxycycline tablet Metal teaspoon One (1) teaspoon (tsp) and one-half (½) tsp measuring spoons [NOTE: Measuring spoons are preferred, however if they are not available, use the metal sp oon to grind, measure and give the medicine.] One (1) small bowl One of these foods: chocolate syr up maple syrup caramel syrup applesauce unsweetened applesauce jarred pureed baby fruit Directions 1. Put one (1) 100-mg doxycycline tablet into a small bowl. Crush the tablet with the back of the metal spoon until no large pieces are seen. 2. Add four (4) level tsp of a food to the crushed doxycycline. Stir them together until the drug looks evenly mixed with the food. 3. Use the chart that follows to find out how much of the mixture to give the child. 95
96 How Much of the Doxycycline Mixture to Give a Child The number of teaspoons of the doxycycline mixture to give a child depends on the child's weight. If the child's weight is unknown, weigh the child before giving the first dose. The chart below tells you how much to give a child for one (1) dose. You should give the child two (2) doses each day for ten (10) days. One (1) dose is given in the morning and one (1) dose is given in the evening. If the child weighs: Give the child: 4 to 11 pounds (lb) One-half (½) teaspoon (tsp) (2.5 ml) of the doxycycline mixture 12 to 22 lb One (1) tsp (5 ml) of the doxycycline mixture 23 to 33 lb One and one-half (1½) tsp (7.5 ml) of the doxycycline mixture 34 to 45 lb Two (2) tsp (10 ml) of the doxycycline mixture 46 to 55 lb Two and one-half (2½) tsp (12.5 ml) of the doxycycline mixture 56 to 65 lb Three (3) tsp (15 ml) of the doxycycline mixture 66 to 77 lb Three and one-half (3½) tsp (17.5 ml) of the doxycycline mixture 78 to 88 lb Four (4) tsp (20 ml) of the doxycycline mixture [or one (1) 100-mg tablet] >88 lb Children heavier than 88 lb who are exposed to anthrax should take mg tablet of doxycycline two (2) times a day (at the same time each day if possible) for ten (10) days. If the child cannot swallow tablets, use the directions for preparing a mixture and give four (4) teaspoons twice a day. How Already Prepared Doxycycline Mixture Should be Stored Prepare the doxycycline mixture daily. Store the mixture in a covered container and refrigerate. Mixture will keep for at least 24 hours. After 24 hours, throw away any unused portions. 96
97 Home Preparation for Emergency Dosages of Ciprofloxacin for Infants and Children Exposed to Anthrax Once you have been notified by your federal, state, or local authorities that you have been exposed to anthrax, it may be necessary to prepare emergency doses of ciprofloxacin for infants and children using ciprofloxacin tablets. You will need: One (1) 500-milligram (mg) ciprofloxacin tablet Metal teaspoon One (1) teaspoon (tsp) and one-half (½) tsp measuring spoons [NOTE: Measuring spoons are preferred, however if they are not available, use the metal spoon to grind, measure and give the medicine.] One (1) small bowl One of these foods: chocolate syrup maple syrup caramel syrup unsweetened applesauce jarred pureed baby fruit ketchup Directions 1. Put one (1) 500-mg ciprofloxacin tablet into a small bowl. Crush the tablet with the back of the metal spoon until no large pieces are seen. 2. Add six (6) level teaspoons of a food to the crushed ciprofloxacin. Stir them together until the drug looks evenly mixed with the food. 3. Use the chart that follows to find out how much of the mixture to give the child. 97
98 How Much of the Ciprofloxacin Mixture to Give a Child The number of teaspoons of the ciprofloxacin mixture to give a child depends on the child's weight. If the child's weight is unknown, weigh the child before giving the first dose. The chart tells you how much to give a child for one (1) dose. You should give the child two (2) doses each day for ten (10) days. Give one (1) dose in the morning and one (1) dose in the evening. If the child weighs: Give the child: pounds (lb) One-half (1/2) tsp (2.5 ml) of the ciprofloxacin mixture lb One (1) tsp (5 ml) of the ciprofloxacin mixture lb One and one-half (1-1/2) tsp (7.5 ml) of the ciprofloxacin mixture lb Two (2) tsp (10 ml) of the ciprofloxacin mixture lb Two and one-half (2-1/2) tsp (12.5 ml) of the ciprofloxacin mixture lb Three (3) tsp (15 ml) of the ciprofloxacin mixture lb Three and one-half (3-1/2) tsp (17.5 ml) of the ciprofloxacin mixtur e lb Four (4) tsp (20 ml) of the ciprofloxacin mixture lb Four and one-half (4-1/2) tsp (22.5 ml) of the ciprofloxacin mixture lb Five (5) tsp (25 ml) of the ciprofloxacin mixture lb Five and one-half (5-1/2) tsp (27.5 ml) of the ciprofloxacin mixture lb Six (6) tsp (30 ml) of the ciprofloxacin mixture [or one (1) 500-mg tablet] >73 lb Children heavier than 73 pounds who are exposed to anthrax should take one (1) 500-mg tablet of ciprofloxacin two (2) times a day (at the same time each day if possible) for ten (10) days. If the child cannot swallow tablets, use the directions for preparing a mixture and give six (6) teaspoons twice a day. How Already Prepared Ciprofloxacin Mixture Should be Stored Prepare the ciprofloxacin mixture daily. Store the mixture in a covered container and refrigerate. Mixture will keep for at least 24 hours refrigerated. After 24 hours, throw away any unused portions. 98
99 Home Preparation for Emergency Dosages of Doxycycline for Children Over 8 Years of Age Exposed to Brucellosis Once you have been notified by your federal, state, or local authorities that you have been exposed to brucellosis, it may be necessary to prepare emergency doses of doxycycline for infants and children using doxycycline tablets. You will need: One (1) 100-milligram (mg) doxycycline tablet Metal teaspoon One (1) teaspoon (tsp) and one-half (½) tsp measuring spoons [NOTE: Measuring spoons are preferred, however if they are not available, use the metal spoon to grind, measure and give the medicine.] One (1) small bowl One of these foods: c hocolate syrup maple syrup caramel syrup applesauce unsweetened applesauce jarred pureed baby fruit Directions 1. Put one (1) 100-mg doxycycline tablet into a small bowl. Crush the tablet with the back of the metal spoon until no large pieces are seen. 2. Add four (4) level teaspoons of a food or drink to the crushed doxycycline. Stir them together until the drug looks evenly mixed with the food or drink. 3. Use the chart that follows to find out how much of the mixture to give the child. 99
100 How Much of the Doxycycline Mixture to Give a Child The number of teaspoons of the doxycycline mixture to give a child depends on the child's weight. If the child's weight is unknown, weigh the child before giving the first dose. The chart tells you how much to give a child for one (1) dose. You should give the child two (2) doses each day for ten (10) days. One (1) dose is given in the morning and one (1) dose is given in the evening. If the child weighs: Give the child: 4-11 pounds (lb) One-half (1/2) tsp (2.5 ml) of the doxycycline mixture lb One (1) tsp (5 ml) of the doxycycline mixture lb One and one-half (1-1/2) tsp (7.5 ml) of the doxycycline mixture lb Two (2) tsp (10mL) of the doxycycline mixture lb Two and one-half (2-1/2) tsp (12.5 ml) of the doxycycline mixture lb Three (3) tsp (15 ml) of the doxycycline mixture lb Three and one-half (3-1/2) tsp (17.5 ml) of the doxycycline mixture lb Four (4) tsp (20 ml) of the doxycycline mixture [or one (1) 100-mg tablet] >88 lb Children heavier than 88 pounds who are exposed to brucellosis should take one (1) 100-mg tablet of doxycycline two (2) times a day (at the same time each day if possible) for 3-6 weeks. If the child cannot swallow tablets, use the directions for preparing a mixture and give four (4) teaspoons twice a day. How Already Prepared Doxycycline Mixture Should be Stored Prepare the doxycycline mixture daily. Store the mixture in a covered container and refrigerate. Mixture will keep for at least 24 hours refrigerated. After 24 hours, throw away any unused portions. Note: Children receiving doxycycline for brucello sis prophylaxis should also receive rifampin. See rifampin instructions for dosing. 100
101 Home Preparation for Emergency Dosages of Co-trimoxazole for Children Less Than 8 Years of Age Exposed to Brucellosis Once you have been notified by your federal, state, or local authorities that you have been exposed to brucellosis, it may be necessary to prepare emergency doses of co-trimoxazole for infants and children using co-trimoxazole tablets. You will need: One (1) 800/160-milligram (mg) co-trimoxazole tablet Metal teaspoon One (1) teaspoon (tsp) and one-half (½) teaspoon (tsp) measuring spoons [NOTE: Measuring spoons are preferred, however if they are not available, use the metal spoon to grind, measure and give the medicine.] One (1) small bowl One of these foods: choco late syrup maple syrup caramel syrup applesauce unsweetened applesauce jarred pureed baby fruit Directions 1. Put one (1) 800/160-mg co-trimoxazole tablet into a small bowl. Crush the tablet with the back of the metal spoon until no large pieces are seen. 2. Add five (5) level teaspoons of a food or drink to the crushed co-trimoxazole. Stir them together until the drug looks evenly mixed with the food or drink. 3. Use the chart that follows to find out how much of the mixture to give the child. 101
102 How Much of the Co-trimoxazole Mixture to Give a Child The number of teaspoons of the co-trimoxazole mixture to give a child depends on the child's weight. If the child's weight is unknown, weigh the child before giving the first dose. The chart tells you how much to give a child for one (1) dose. You should give the child two (2) doses each day. Give one (1) in the morning and one (1) in the evening. If the child weighs: Give the child: 4-7 pounds (lb) One-half (1/2) tsp (2.5 ml) of the co-trimoxazole mixture 8-15 lb One (1) tsp (5 ml) of the co-trimoxazole mixture lb One and one-half (1-1/2) tsp (7.5 ml) of the co-trimoxazole mixture lb Two (2) tsp (10 ml) of the co-trimoxazole mixture lb Two and one-half (2-1/2) tsp (12.5 ml) of the co-trimoxazole mixture lb Three (3) tsp (15 ml) of the co-trimoxazole mixture lb Three and one-half (3-1/2) tsp (17.5 ml) of the co-trimoxazole mixture lb Four (4) tsp (20 ml) of the co-trimoxazole mixture lb Four and one-half (4-1/2) tsp (22.5 ml) of the co-trimoxazole mixture lb Five (5) tsp (25 ml) of the co-trimoxazole mixture [or one (1) 800/160-mg tablet] >75 lb Children heavier than 75 pounds and less than 8 years old, who are exposed to brucellosis should take one and one-half (1-1/2) 400/160-mg tablets of co-trimoxazole two (2) times a day (at the same time each day if possible) for 3-6 weeks. How Already Prepared Co-trimoxazole Mixture Should be Stored Prepare the co-trimoxazole mixture daily. Store the mixture in a covered container and refrigerate. Mixture will keep for at least 24 hours refrigerated. After 24 hours, throw away any unused portions. Note: Children receiving co-trimoxazole for brucellosis prophylaxis should also receive rifampin. See rifampin instructions for dosing. 102
103 Home Preparation for Emergency Dosages of Rifampin for Children and Adults Exposed to Brucellosis Once you have been notified by your federal, state, or local authorities that you have been exposed to brucellosis, it may be necessary to prepare emergency doses of rifampin for infants and children using rifampin capsules. You will need: Two (2) 300-milligram (mg) rifampin capsules Metal teaspoon One (1) teaspoon (tsp) and one-half (½) tsp measuring spoons [NOTE: Measuring spoons are preferred, however if they are not available, use the metal spoon to grind, measure and give the medicine.] One (1) small bowl One of these foods: chocolate syrup unsweetened applesauce maple syrup jarred pureed baby fruit caramel syrup ketchup Directions 1. Open two (2) 300-mg rifampin capsules into a small bowl. Put the contents of the capsules into a small bowl and discard the empty capsule. Crush the contents with the back of the metal spoon until no large pieces are seen. 2. Add six (6) level teaspoons (tsp) of a food to the crushed rifampin. Stir them together until the drug looks evenly mixed with the food. 3. Use the chart on the following page to find out how much of the mixture to give the child. 103
104 How Much of the Rifampin Mixture to Give a Child The number of teaspoons of the rifampin mixture to give a child depends on the child's weight. If the child's weight is unknown, weigh the child before giving the first dose. The chart tells you how much to give the child for one (1) dose. You should give the child one (1) dose each day for 3-6 weeks. If the child weighs: Give the child: <10 pounds (lb) One-half (1/2) tsp (2.5 ml) of the rifampin mixture lb One (1) tsp (5 ml) of the rifampin mixture lb Two (2) tsp (10 ml) of the rifampin mixture lb Three (3) tsp (15 ml) of the rifampin mixture lb Four (4) tsp (20 ml) of the rifampin mixture lb Five (5) tsp (25 ml) of the rifampin mixture lb Six (6) tsp (30 ml) of the rifampin mixture >88 lb Children heavier than 88 pounds who are exposed to brucellosis should take two (2) 300-mg rifampin capsules once a day (at the same time each day if possible) for 3-6 weeks. If the child cannot swallow capsules, use the directions for preparing a mixture and give six (6) teaspoons once a day. How Already Prepared Rifampin Mixture Should be Stored Prepare the rifampin mixture daily. Store the mixture in a covered container and refrigerate. Mixture will keep for at least 24 hours refrigerated. After 24 hours, throw away any unused portions. Note: Children 8 years or older should also receive doxycycline. Children less than 8 years old should also receive co-trimoxazole. Please see additional sheets for directions and dosing of those drugs. 104
105 Home Preparation for Emergency Dosages of Oseltamivir (Tamiflu ) for Infants and Children Exposed to Influenza Once you have been notified by your federal, state, or local authorities that you have been exposed to influenza, it may be necessary to prepare emergency doses of oseltamivir for infants and children using oseltamivir capsules. You will need: One (1) 75-milligram (mg) oseltamivir capsule Metal teaspoon One (1) teaspoon (tsp) measuring spoon [NOTE: Measuring spoons are preferred, however if they are not available, use the metal spoon to grind, measure and give the medicine.] One (1) small bowl One of these foods: chocolate syrup maple syrup caramel syrup applesauce jarred pureed baby fruit apple juice strawberry jam Directions 1. Put the contents of one (1) 75-mg oseltamivir capsule into a small bowl, discarding the empty capsule. Add two (2) level teaspoons of water. Stir the water and capsule contents for one (1) minute. 2. Add three (3) level teaspoons of a food or drink to the oseltamivir and water mixture. Stir them together until the drug looks evenly mixed with the food or drink. The final concentration is 3 mg/ml (2 tsp = 30 mg). 3. Use the following chart to find out how much of the mixture to give the child. 105
106 How Much of the Oseltamivir (Tamiflu ) Mixture to Give a Child The number of teaspoons of the oseltamivir mixture to give a child depends on the child's weight. If the child's weight is unknown, weigh the child before giving the first dose. The chart tells you how much to give a child for one (1) dose. You should give the child one (1) dose each day (once in the morning). If the child weighs: Recommended dose: <33 pounds (lb) Two (2) tsp (30 mg) of the oseltamivir solution lb Three (3) tsp (45 mg) of the oseltamivir solution lb Four (4) tsp (60 mg) of the oseltamivir solution >88 lb Five (5) tsp (75 mg) of the oseltamivir solution Adults and adolescents The recommended oral dose of oseltamivir prophylaxis of influenza in 13 years and older adults and adolescents 13 years of age and older is 75 mg once daily for ten (10) days. Treatment should begin within two (2) days of exposure. How Prepared Oseltamivir (Tamiflu ) Solution Should be Stored Prepare the oseltamivir mixture daily. If mixed with food, store the mixture in a covered container and refrigerate. Mixtures made with juice can be stored at room temperature. Mixture will keep for at least 24 hours. After 24 hours, throw away any unused portions. 106
107 Home Preparation for Emergency Dosages of Doxycycline for Infants and Children Exposed to Plague Once you have been notified by your federal, state, or local authorities that you have been exposed to plague, it may be necessary to prepare emergency doses of doxycycline for infants and children using doxycycline tablets. You will need: One (1) 100-milligram (mg) doxycycline tablet Metal teaspoon One (1) teaspoon (tsp) and one-half (½) teaspoon (tsp) measuring spoons [NOTE: M easuring spoons are preferred, however if they are not available, use the metal spoon to grind, measure and give the medicine. ] One (1) small bowl One of these foods: chocolate syrup maple syrup caramel syrup applesauce unsweetened applesauce jarred pureed baby fruit Directions 1. Put one (1) 100-mg doxycycline tablet into a small bowl. Crush the tablet with the back of the metal spoon until no large pieces are seen. 2. Add four (4) level teaspoons of a food to the crushed doxycycline. Stir them together until the drug looks evenly mixed with the food. 3. Use the chart on the following page to find out how much of the mixture to give the child. 107
108 How Much of the Doxycycline Mixture to Give a Child The number of teaspoons of the doxycycline mixture to give a child depends on the child's weight. If the child's weight is unknown, weigh the child before giving the first dose. The chart tells you how much to give the child for one (1) dose. You should give the child two (2) doses each day. Give one (1) dose in the morning and one (1) dose in the evening for seven (7) days. If the child weighs: Give the child: 4-11 pounds (lb) One-half (1/2) tsp (2.5 ml) of the doxycycline mixture lb One (1) tsp (5 ml) of the doxycycline mixture lb One and one-half (1-1/2) tsp (7.5 ml) of the doxycycline mixture lb Two (2) tsp (10 ml) of the doxycycline mixture lb Two and one-half (2-1/2) tsp (12.5 ml) of the doxycycline mixture lb Three (3) tsp (15 ml) of the doxycycline mixture lb Three and one-half (3-1/2) tsp (17.5 ml) of the doxycycline mix ture lb Four (4) tsp (20 ml) of the doxycycline mixture [or one (1) 100-mg tablet] >88 lb Children heavier than 88 pounds who are exposed to plague should take one (1) 100-mg tablet of doxycycline two (2) times a day (at the same time each day if possible) for seven (7) days. If the child cannot swallow tablets, use the directions for preparing a mixture and give four (4) teaspoons twice a day. How Prepared Doxycycline Mixture Should be Stored Prepare the doxycycline mixture daily. Store the mixture in a covered container and refrigerate. Mixture will keep for at least 24 hours refrigerated. After 24 hours, throw away any unused portions. 108
109 Home Preparation for Emergency Dosages of Ciprofloxacin for Infants and Children Exposed to Plague Once you have been notified by your federal, state, or local authorities that you have been exposed to plague, it may be necessary to prepare emergency doses of ciprofloxacin for infants and children using ciprofloxacin tablets. You will need: One (1) 500-milligram (mg) ciprofloxacin tablet Metal teaspoon One (1) teaspoon (tsp) and one-half (½) teaspoon (tsp) measuring spoons [N OTE: Measuring spoons are preferred, however if they are not available, use the metal spoon to grind, measure and give the medicine.] One (1) small bowl One of these foods: cho colate syrup maple syrup caramel syrup unsweetened applesauce jarred pureed baby fruit ketchup Directions 1. Put one (1) 500-mg ciprofloxacin tablet into a small bowl. Crush the tablet with the back of the metal spoon until no large pieces are seen. 2. Add six (6) level teaspoons (tsp) of a food to the crushed ciprofloxacin. Stir them together until the drug looks evenly mixed with the food. 3. Use the chart on the following page to find out how much of the mixture to give the child. 109
110 How Much of the Ciprofloxacin Mixture to Give a Child The number of teaspoons of the ciprofloxacin mixture to give a child depends on the child's weight. If the child's weight is unknown, weigh the child before giving the first dose. The chart tells you how much to give a child for one (1) dose. You should give the child two (2) doses each day. Give one (1) dose in the morning and one (1) dose in the evening for seven (7) days. If the child weighs: Give the child: 4-5 pounds (lb) One-half (1/2) tsp (2.5 ml) of the ciprofloxacin mixture lb One (1) tsp (5 ml) of the ciprofloxacin mixture lb One and one-half (1-1/2) tsp (7.5 ml) of the ciprofloxacin mixture lb Two (2) tsp (10 ml) of the ciprofloxacin mixture lb Two and one-half (2-1/2) tsp (12.5 ml) of the ciprofloxacin mixture lb Three (3) tsp (15 ml) of the ciprofloxacin mixture lb Three and one-half (3-1/2) tsp (17.5 ml) of the ciprofloxacin mixture lb Four (4) tsp (20 ml) of the ciprofloxacin mixture lb Four and one-half (4-1/2) tsp (22.5 ml) of the ciprofloxacin mixture lb Five (5) tsp (25 ml) of the ciprofloxacin mixture lb Five and one-half (5-1/2) tsp (27.5 ml) of the ciprofloxacin mixture lb Six (6) tsp (30 ml) of the ciprofloxacin mixture [or one (1) tablet] >60 lb Children heavier than 60 pounds who are exposed to plague should take one (1) 500-mg tablet of ciprofloxacin two (2) times a day (at the same time each day if possible) for seven (7) days. If the child cannot swallow tablets, use the directions for preparing a mixture and give six (6) teaspoons twice a day. How Prepared Ciprofloxacin Mixture Should be Stored Prepare the ciprofloxacin mixture daily. Store the mixture in a covered container and refrigerate. Mixture will keep for at least 24 hours refrigerated. After 24 hours, throw away any unused portions. 110
111 Home Preparation for Emergency Doses of Doxycycline for Infants and Children Exposed to Tularemia Once you have been notified by your federal, state, or local authorities that you have been exposed to tularemia, it may be necessary to prepare emergency doses of doxycycline for infants and children using doxycycline tablets. You will need: One (1) 100-milligram (mg) doxycycline tablet Metal teaspoon One (1) teaspoon (tsp) and one-half (½) teaspoon (tsp) measuring spoons [NOTE: Measuring spoons are preferred, however if they are not available, use the metal spoon to grind, measure and give the medicine.] One (1) small bowl One of these foods: cho colate syrup maple syrup caramel syrup applesauce unsweetened applesauce jarred pureed baby fruit Directions 1. Put one (1) 100-mg doxycycline tablet into a small bowl. Crush the tablet with the back of the metal spoon until no large pieces are seen. 2. Add four (4) level teaspoons of a food to the crushed doxycycline. Stir them together until the drug looks evenly mixed with the food. 3. Use the chart on the following page to find out how much of the mixture to give the child. 111
112 How Much of the Doxycycline Mixture to Give a Child The number of teaspoons of the doxycycline mixture to give a child depends on the child's weight. If the child's weight is unknown, weigh the child before giving the first dose. The chart tells you how much to give the child for one (1) dose. You should give the child two (2) doses each day. Give one (1) dose in the morning and one (1) dose in the evening for 14 days. If the child weighs: Give the child: 4-11 pounds (lb) One-half (1/2) tsp (2.5 ml) of the doxycycline mixture lb One (1) tsp (5 ml) of the doxycycline mixture lb One and one-half (1-1/2) tsp (7.5 ml) of the doxycycline mixture lb Two (2) tsp (10 ml) of the doxycycline mixture lb Two and one-half (2-1/2) tsp (12.5 ml) o f the doxycycline mixture lb Three (3) tsp (15 ml) of the doxycycline mixture lb Three and one-half (3-1/2) tsp (17.5 ml) of mixture the doxycycline lb Four (4) tsp (20 ml) of the doxycycline mixture [or one (1) 100- mg doxycycline tablet] >88 lb Children heavier than 88 lb who are exposed to tularemia should take one (1) 100-mg doxycycline tablet two (2) times a day (at the same time each day if possible) for 14 days. If the child cannot swallow tablets, use the directions for preparing a mixture and give four (4) teaspoons twice a day. How Prepared Doxycycline Mixture Should be Stored Prepare the doxycycline mixture daily. Store in a covered container and refrigerate. Mixture will keep for at least 24 hours. After 24 hours, throw away any unused portions. 112
113 Home Preparation for Emergency Dosages of Ciprofloxacin for Infants and Children Exposed to Tularemia Once you have been notified by your federal, state, or local authorities that you have been exposed to tularemia, it may be necessary to prepare emergency doses of ciprofloxacin for infants and children using ciprofloxacin tablets. You will need: One (1) 500-milligram (mg) ciprofloxacin tablet Metal teaspoon One (1) teaspoon (tsp) and one-half (½) teaspoon (tsp) measuring spoons [N OTE: Measuring spoons are preferred, however if they are not available, use the metal spoon to grind, measure and give the medicine.] One (1) small bowl One of these foods: cho colate syrup maple syrup caramel syrup unsweetened applesauce jarred pureed baby fruit ketchup Directions 1. Put one (1) 500-mg ciprofloxacin tablet into a small bowl. Crush the tablet with the back of the metal spoon until no large pieces are seen. 2. Add six (6) level teaspoons of a food to the crushed ciprofloxacin. Stir them together until the drug looks evenly mixed with the food. 3. Use the chart on the following page to find out how much of the mixture to give the child. 113
114 How Much of the Ciprofloxacin Mixture to Give a Child The number of teaspoons of the ciprofloxacin mixture to give a child depends on the child's weight. If the child's weight is unknown, weigh the child before giving the first dose. The chart tells you how much to give a child for one (1) dose. You should give the child two (2) doses each day. Give one (1) dose in the morning and one (1) dose in the evening for 14 days. If the child weighs: Give the child: pounds (lbs) One-half (1/2) tsp (2.5 ml) of the ciprofloxacin mixture lb One (1) tsp (5 ml) of the ciprofloxacin mixture lb One and one-half (1-1/2) tsp (7.5 ml) of the ciprofloxacin mixture lb Two (2) tsp (10 ml) of the ciprofloxacin mixture lb Two and one-half (2-1/2) tsp (12.5 ml) of the ciprofloxacin mixture lb Three (3) tsp (15 ml) of the ciprofloxacin mixture lb Three and one-half (3-1/2) tsp (17.5 ml) of the ciprofloxacin mixture lb Four (4) tsp (20 ml) of the ciprofloxacin mixture lb Four and one-half (4-1/2) tsp (22.5 ml) of the ciprofloxacin mixture lb Five (5) tsp (25 ml) of the ciprofloxacin mixture lb Five and one-half (5-1/2) tsp (27.5 ml) of the ciprofloxacin mixture lb Six (6) tsp (30 ml) of the ciprofloxacin mixture [or one (1) 500-mg ciprofloxacin tablet] >73 lb Children heavier than 73 lb who are exposed to tularemia should take one (1) 500-mg ciprofloxacin tablet two (2) times a day (at the same time each day if possible) for 14 days. If the child cannot swallow tablets, use the directions for preparing a mixture and give six (6) teaspoons twice a day. How Prepared Ciprofloxacin Mixture Should be Stored Prepare the ciprofloxacin mixture daily. Store the mixture in a covered container and refrigerate. Mixture will keep for at least 24 hours refrigerated. After 24 hours, throw away any unused portions. 114
115 References 1. Occupational Safety and Health Standards, 29 CFR , Hazardous Materials, Hazardous Waste Operations and Emergency Response. United States Department of Labor Occupational Safety and Health Administration Web site. April 3, Available at: Accessed February 18, OSHA Best Practices for Hospital-based First Receivers of Victims from Mass Casualty Incidents Involving the Release of Hazardous Substances. OSHA Best Practices page. United States Department of Labor Occupational Safety and Health Administration Web site. January Available at: Accessed February 18, Concept of Operations Plan (CONOPS) for Public Health and Medical Emergencies. For Federal, State, and Local Planners page. U.S. Department of Health and Human Services Web site. March Available at: Accessed February 18, Okumura T, Takasu N, Ishimatsu S, Miyanoki S, Mitsuhashi A, Kumada K, Tanaka K, Hinohara S. Report on 640 victims of the Tokyo subway Sarin attack. Ann Emerg Med. 1996;28(2): Macintyre AG, Christopher GW, Eitzen E Jr, Gum R, Weir S, DeAtley C, Tonat K, Barbera JA. Weapons of mass destruction events with contaminated casualties: effective planning for health care facilities. JAMA. 2000;283(2): Barbera JA, Macintyre AG. Jane s Mass Casualty Handbook: Hospital. Emergency Preparedness and Response. 1st ed. Surrey, UK: Jane s Information Group, Ltd; Hick JL, Hanfling D, Burstein JL, Markham J, Macintyre AG, Barbera JA. Protective equipment for health care facility decontamination personnel: regulations, risks, and recommendations. Ann Emerg Med. 2003;42(3): Hick JL, Penn P, Hanfling D, Lappe MA, O'Laughlin D, Burstein JL. Establishing and training health care facility decontamination teams. Ann Emerg Med. 2003;42(3): Markenson D, Redlener I. Pediatric Preparedness for Disasters and Terrorism: A National Consensus Conference Executive Summary [Centers for Disease Control and Prevention Emergency Preparedness and Response Web site]. National Center for Disaster Preparedness. Columbia University, Mailman School of Public Health; Available at: Accessed February 18, Testimony Before the Children and Families Subcommittee of the Senate Committee on Health, Education, Labor, and Pensions, 107th Cong, 1st Sess (2001) (testimony of Joseph L. Wright, MD, MPH, FAAP on Behalf of the American Academy of Pediatrics). Available at: Accessed February 18, Oklahoma University College of Pharmacy and Oklahoma City-County Public Health Department. How to prepare medication for children. 115
116 Section 9 Transportation Purpose: These recommendations suggest the appropriate procedure for the transportation of pediatric patients following a disaster. The section presents guidelines for both inter- and intra-hospital transport of stable and unstable pediatric patients. Pediatric patients may not always be accompanied by an adult during a disaster; therefore, these patients will require additional staffing and supply needs during their transport. Section Contents General Guidelines Transport of Pediatric Patients within the Hospital o Transport Personnel o Transport Equipment o Chaperone and Safety Personnel Transport of Pediatric Patients from the Hospital to Other Facilities o Unstable Patients or Potentially Unstable Patients Table 9.1 Appropriate Use and Type of Car Seats General Guidelines All hospitals need to plan for the potential necessity of delivering extended care to pediatric patients duri ng a disaster. As part of this care, patients will need to be transported from clinical area to clinical area (including inpatient units) or to diagnostic testing (such as radiology, CT scan, and ultrasound). For those centers without specialized pediatric services, transfer of pediatric patients (after initial evaluation and stabilization) to a center with advanced pediatric capacity might be desired. However, transfer might not be possible due to local conditions and safety concerns, lack of appropriate transport vehicles and personnel, and/or lack of capacity at the usual pediatric resource hospitals. 116
117 Transport of Pediatric Patients within the Hospital General guidelines for transporting pediatric patients between hospitals units or diagnostic testing areas I. Transport personnel: A. Personnel to transport stable patients a. All transport personnel should be oriented to the special needs of a pediatric transport. b. Pediatric patients may not be left alone at any time. B. Personnel to transport unstable patients a. Use usual transport personnel. b. Additional staff skilled in pediatric airway management and familiar with pediatric resuscitation will be necessary. c. Pediatric patients may not be left alone at any time. II. Transport equipment: A. Have airway management and resuscitation supplies available, which are appropriate for all age groups. (See Section 11 Equipment Recommendations.) B. Identi fy appropriate transport vehicle(s): a. Adult stretchers may be appropriate for children >8 years old. b. Smaller children may require a crib, additional transport personnel, and /or converting an adult stretcher by adding padding to the inside rails to assure safety during transport. III. Chaperone and safety personnel: A. Parents or adult caregivers should be encouraged to stay with children. B. If no adult caregiver is available, appropriate personnel must accompany and supervise pediatric patients to assure their safety at all times. C. Patients on stretchers a. Patients less than 6 years old and not in an appropriate crib require continuous 1:1 observation. b. Patients 6 years old and older should be evaluated for ability to follow safety rules while on the stretcher. c. Individual patients separated from other pediatric patients require constant 1:1 observation by staff. D. Stable ambulatory patients may be cohorted in a Pediatric Safe Area with staff experienced or trained in observation of groups of children, such as schoolteachers, social workers, or day care workers. (See Section 5 Security.) a. All ambulatory patients transported individually out of the Emergency Department require 1:1 adult supervision. 117
118 Transport of Pediatric Patients from the Hospital to Other Facilities During a disaster, local conditions might preclude safe or efficient tra vel on the streets or highways or the usual pediatric receiving centers might be overwhelmed with patient volume a nd unable to ac cept transfers. Therefore, all hospitals must be prepared to provide emergent and continued pediatric care. Even in the event that transfer to a pediatric center might be possible, the usual mechanisms for interhospital transfers should not be relied upon because these staff and equipment will be utilized to respond to the actual disaster. Therefore, hospitals should consider alternative mechanisms for safe pediatric transfers. I. Stable Patients A. In accordance with NYS regulations, arrange for car seats if appropriate. (See Table 9.1.) Potential sources for appropriate car seats: a. Purchase or obtain through donation. b. Identify local sources of car seats in case needed. c. Survey employees to determine availability of car seats in employee vehicles. B. Identify appropriate transport vehicles if an ambulance is not available: a. Cars or vans may be appropriate for children who can sit up (car seats may be necessary). b. The driver must be able to communicate via cell phone or radio with the hospital emergency command center. c. If available, appropriate medical personnel should accompany patients during transport. II. Unstable Patients or Potentially Unstable Patients A. Identify an appropriate transport vehicle a. Ambulance with Emergency Medical Technician (EMT) or Paramedic augmented with: 1. Hospital staff skilled in pediatric airway management and resuscitation. 2. Equipment appropriate for the age and acuity of patient. b. Consider entering into a Memorandum of Understanding (MOU) with ambulance providers at distant locations who are less likely to be involved with local disaster response. B. Specialty pediatric transport teams from referral pediatric institutions. 118
119 Age & Weight Seat Type Seat Positioning Table 9.1 Appropriate Use and Type of Car Seats Infants Toddlers Young Children Up to 1 year old AND 20 lb or less Over 1 year to 4 years old AND between 20 lb and 40 lb Ages 4-8, less than 4' 9" AND over 40 lb Infant only or rear-facing Convertible or forward- Belt positioning booster convertible facing seat Rear-facing only Forward-facing Forward-facing Caution: All children age 12 and under should ride in the back seat. 119
120 Section 10 Surge Considerations Emergency Department Surge Considerations and In-patient Bed Assignments for Pediatric Patients During a Disaster Purpose: These recommendations are intended to help hospitals prepare for surge capacity needs, such as additional bed resources and emergency department space allocation, which may arise in the event of a disaster involving children. The section presents a model disaster scenario that can be scaled according to the predicted response of each individual hospital and includes general principles that should act as guidelines for all hospital disaster plans. Section Contents General Guidelines Transfer Considerations For Hospitals Without Pediatric Intensive Care Units Additional Resources o Trauma Score, see o Injury Severity Score, see o Model Inter-facility Transfer Agreement, see Planning Scenarios Emergency Department Surge Considerations and In-patient Bed Assignments o Scenario I Non-Trauma Hospital with a Pediatric Intensive Care Unit o o Scenario II Hospital with General Pediatric Services but without a Pediatric Intensive Care Unit Scenario III Hospital without Pediatric Services General Guidelines To prepare for the reception and care of potential pediatric patients, the hospital's emergency preparedness planning committee should address each of the following issues in order to plan for surge capacity needs. 1. Identify providers with general or specific pediatric clinical expertise. Examples may include MDs or RNs from Emergency Medicine, Nurse Practitioners, Family Medicine, Surgeons or others with recent pediatric experience. If no pediatric expertise is found, identify those who would be willing to provide pediatric services, then provide them with training as described under Section 4 Training. 2. Identify pediatric drug dosing guidelines and pediatric equipment including ventilators, appropriately sized airway supplies (Ambu bags, facemasks, endotracheal tubes, stylets, oral airways, chest tubes, Foley catheters, over the needle IV catheter/io needleless, etc.) that should be available to serve the potential pediatric population. (See Section 11 Equipment Recommendations.) Also, determine the availability of in-patient beds for pediatric patients, including operating rooms and pediatric surge ICU beds within the facility in the event these services are needed. 120
121 3. The hospital committee should determine the volume of cribs, port-a-cribs, or playpens that should be in a storage area for use in possible pediatric disaster scenarios. However, many hospitals without a pediatric ward will be unlikely to have any cribs available. If adult beds are used, the following actions should be taken: o Children will have to be boarded in adult beds that have side rails. o The bed should be set at the lowest possible height. o The bed should be unplugged so the buttons to adjust the bed do not work. 4. Identify the hospital's pediatric surge capacity, such as when the institution will exhaust the supply of clinicians, equipment, medications, operating rooms, and pediatric ICU beds based on the number and severity of potential pediatric patients for various hazardous events. 5. Develop a list of other hospitals with pediatric capacity for possible transfer of patients should the hospital receive or expect to receive more children than the hospital can handle. Establish Memoranda of Understanding (MOU) or Interfacility Transfer Agreements with these other facilities, if possible. 6. Develop a plan for stabilization and transfer of injured patients if more pediatric patients require admission than the hospital is able to handle. 7. Set up a system to request transport teams and more MDs and RNs to help as needed. 8. Set up a family assistance area for families of victims and a separate area for media contact. 9. Set up a plan for decontamination of patients if chemical or radioactive contamination is suspected. See Section 8 Pediatric Decontamination/Prophylaxis for more detailed information concerning protocols for pediatric decontamination. 10. Set up a plan to address questions raised by the news media and anxious parents and family members. As previously noted, the media and family members should be in separate spaces. 11. Plan for enhanced security to handle large numbers of family members and other nonmedically affected individuals. Expect approximately four to five visitors/family per pediatric patient. 12. As previously mentioned, develop a Pediatric Safe Area temporarily to care for non-injured or medically released unaccompanied children. See Section 5 Security. 13. Develop a system to identify and track pediatric victims. See Child ID Survey Form located in Section 5 Security. A frequently updated list should be maintained and relayed to the hospital emergency operating center and the hospital family assistance center. 14. Consider what a surge in pediatrics patients would mean in terms of non-medical supplies (e.g., cribs, infant seats, diapers, formula, and baby food). See Section 12 Pediatric Dietary Needs. 121
122 Transfer Considerations for Hospitals without Pediatric Intensive Care Units The transfer criteria for critical pediatric patients must be planned for hospitals that do not have a Pediatric Intensive Care Unit (PICU). If a hospital does not have a Pediatric ED or a PICU, any child (especially a young child, infant or toddler) with a need for an operative procedure or PICU care may require stabilization and transfer. These children should be identified by predetermined criteria. For example, the predetermined criteria may include: Determination based on trauma score (Pediatric Trauma Score or Revised Trauma Score); or Determination based on the need for other intensive level of care (intubation, assisted ventilations, comatose, increased intracranial pressure, shock, inotropic support, ongoing seizures, or other major organ failure). Prearranged agreements with ambulance agencies and receiving hospitals should be in place. Hospitals should have agreements with their traditional referral hospitals as well as with those closest geographically or with the shortest transport routes. During a disaster, transportation may be difficult due to traffic closures or other obstructions. Additional Resources Online Revised Trauma Score Calculator may be found at: Online Pediatric Trauma Score Calculator may be found at: A sample of an interfacility transfer agreement can be found at the California Emergency Medical Services Authority website located at: Planning Scenarios Emergency Department Surge Considerations and Inpatient Bed Assignments In order to prepare for the pediatric bed needs during a disaster, the Centers for Bioterrorism Preparedness Program (CBPP) Pediatric Task Force created a disaster scenario to better describe the necessary bed resource demands that hospitals might expect. Assume 40 pediatric patients of all ages arrive at Hospital A following an explosive disaster. 5 critically ill or injured (Red Tag) 10 moderately ill or injured (Yellow Tag) 25 minimally injured or uninjured (Green Tag) 122
123 The following sets of planning recommendations for emergency department surge capacity space and in-patient bed assignments address three categories of hospitals: non-trauma hospital with a pediatric intensive care unit; hospitals with general pediatric units, but without pediatric intensive care units; and hospitals without any pediatric in-patient units. Scenario I Non-Trauma Hospital with a Pediatric Intensive Care Unit The following is a suggested plan for the distribution of pediatric victims upon arrival at a hospital with pediatric intensive care unit capability but not a certified trauma center. Hospitals must consider their own resources and personnel when creating their pediatric preparedness plan. Emergency Department Surge Considerations Red-tagged patients, or critical patients, should be placed in the most acute beds of the pediatric emergency area. When this area becomes saturated, remaining critical pediatric patients should go to the adult critical care areas in the emergency department. In the absence of a trauma team, overall responsibility will be with the emergency department attendings with appropriate transfer to the PICU/pediatric ward attendings. Pediatric surgery should be immediately consulted in the absence of a trauma team for patients with penetrating injuries to the abdomen or thorax. All other surgical specialties (neurosurgery, orthopedics, ENT, ophthalmology, etc.) should be placed on standby. Yellow tagged patients, those moderately injured or ill, should be placed in a non-acute area of the pediatric emergency department with overflow going to non-acute care areas of the adult emergency department. Yellow tagged patients need to be treated and assigned disposition in a timely manner and reevaluated frequently to ensure their condition does not deteriorate and warrant immediate medical intervention. Green tagged patients, minor or non-injured patients should be triaged to the waiting room or to the pediatric clinic area or another large room capable of handling a large number, depending on day of week and time of disaster. Green tagged patients need to be re-evaluated frequently to ensure their condition does not deteriorate and warrant immediate medical intervention. When medically reasonable, Green tagged patients should be discharged as soon as possible to an appropriately identified adult caregiver as per hospital policy. 123
124 Assignment of In-patient Bed Space The most critical cases and/or youngest victims should receive priority for Pediatric Intensive Care Unit beds. Once the PICU is full, overflow patients could be managed by Pediatrics in the Post Anesthesia Care Unit (PACU) if the patient required surgery, or in monitored beds on the pediatric ward, adult medical or surgical ICUs. Moderately injured or ill patients requiring admission should be admitted to the pediatric ward until all beds are utilized. At that point, the hospital must decide to increase the ward census (add 1 more bed per room if space allows) or board the oldest pediatric patients on adult wards. If possible, all children should board on the same adult ward for ease of nursing care and to improve the children's psychological wellbeing. Facilities may consider cohorting children by age. Scenario II Hospitals with a General Pediatric Service but without a Pediatric Intensive Care Unit The following is a suggested plan for the distribution of pediatric victims upon arrival at a hospital without pediatric intensive care unit (PICU) capability, but has an in-patient pediatric unit. Hospitals must consider their own resources and personnel when creating their pediatric disaster plan. Most hospitals that do not have a PICU also do not have a dedicated pediatric emergency department. If your hospital has a pediatric emergency department, follow the above guidelines. It is likely the hospital will have a general emergency department. Emergency Department Surge Capacity Considerations Red-tagged patients, or critical patients, should be placed in the most acute care area of the emergency department. When that area becomes saturated, remaining critical patients should go to a monitored observation area in your emergency department. Overall responsibility will be with the emergency department attending and transferred to the pediatric ward attending. If the hospital has a trauma team, they should be immediately consulted and the trauma team attending will take responsibility for all children requiring trauma surgery. Pediatric surgery should be immediately consulted in the absence of a trauma team for patients with penetrating injuries to the abdomen or thorax. All other surgical specialties (neurosurgery, orthopedics, ENT, ophthalmology, etc.) should be placed on standby. 124
125 Yellow tagged patients, moderately injured or ill, should be placed in the non-acute care areas of the emergency department with yellow tag overflow going to waiting room areas, or other designated areas, that are converted to patient care areas for the duration of the disaster. Yellow tagged patients need to be treated and assigned disposition in a timely manner and re-evaluated frequently to ensure their condition does not deteriorate and warrant immediate medical intervention. Admitted patients should be transferred up to the pediatric ward as soon as possible. Green tagged patients, minimally or non-injured, should be triaged to the waiting room, lobby, or the pediatric clinic area depending on the day of the week and time of disaster. Green tagged patients need to be reevaluated frequently to ensure their condition does not deteriorate and warrant immediate medical intervention. When medically reasonable, green tagged patients should be discharged as soon as possible to an appropriately identified adult caregiver as per hospital policy. Assignment of In-patient Bed Space for Hospitals without Pediatric Intensive Care Units Pediatric critical care patients should be transferred to a hospital that can provide a higher level of care as soon as possible. Until transfer is completed, patients can be managed by pediatric staff in the post-operative recovery room if the patient required surgery, or in monitored beds on the pediatric ward or in adult medical or surgical ICUs. Moderately injured or ill children requiring admission should be admitted to the pediatric ward until all beds are utilized. At that point, the hospital must decide to increase the pediatric ward census (add 1 more bed per room if space allows) or board the oldest pediatric patients on adult wards. If possible, all children should board on the same adult ward for ease of nursing care and to improve the children's psychological wellbeing. Scenario III Hospitals without a Pediatric Service The following is a suggested plan for the distribution of pediatric victims upon arrival at a hospital without pediatric intensive care unit (PICU) capability or pediatric in-patient wards. Hospitals must consider their own resources and personnel when creating their pediatric disaster plan. As previously recommended, all hospitals should keep a designated number of cribs or playpens in a storage area for use in possible pediatric disaster scenarios. However, it is unlikely that hospitals without a pediatric ward will have any cribs available. Use of adult beds may be considered if the following actions are taken: Children will have to be boarded in adult beds that have side rails. The bed should be set at the lowest possible height. The bed should be unplugged so the buttons do not function. 125
126 All pediatric patients requiring admission should be transferred to a hospital that can provide a higher level of care as soon as it is medically and technically possible. Unstable patients will require initial management at the receiving hospital where they first arrive prior to transfer. Emergency Department Surge Capacity Considerations Red-tagged patients, or critical patients, should be placed in the most acute care area of the emergency department. When that area becomes saturated, remaining critical patients should go to a monitored observation area in your emergency department. Overall responsibility will be with the emergency department attending. If the hospital has a trauma team, they should be immediately consulted and the trauma team attending will take responsibility for all children requiring trauma surgery. Adult surgery should be immediately consulted in the absence of a trauma team for patients with penetrating injuries to the abdomen or thorax, as they will be the most capable specialty to perform immediate intervention. All other surgical specialties (neurosurgery, orthopedics, ENT, ophthalmology, etc.) should be called into the hospital or placed on standby. Yellow tagged patients, moderately injured or ill, should be placed in the non-acute care areas of the emergency department. Yellow tagged patients need to be reevaluated frequently to insure their condition does not deteriorate and warrant immediate medical intervention. Yellow tag overflow should go to the waiting room or other designated area that will be converted to patient care areas for the duration of the disaster. Patients requiring admission should be transferred up to adult in-patient wards as soon as possible. The beds should be at the lowest possible height, ha ve side rails, and have the electronic bed functions disabled so that the buttons will not function. Green tagged patients, minimally or non-injured, shoul d be triaged to the waiting room, lobby, or to the adult clinic area depending on the day of the week and time of disaster. Green tagged patients need to be reevaluated frequently to ensure their condition does not deteriorate and warrant immediate medical intervention. When medically reasonable, green tagged patients should be discharged as soon as possible to an appropriately identified adult caregiver as per hospital policy. Assignment of In-patient Beds for a Hospital without a Pediatric Service Pediatric critical care patients should be transferred to a hospital tha t can provide a higher level of care as soon as possible. Until transfer arrangements are completed, critical pediatric patients can be managed by Anesthesia in the Recovery Room, if the patient required surgery, or in adult medical or surgical ICUs, or monitored beds on adult in-patient wards until the pediatric patient can be safely transferred. Non-critical patients requiring admission can be admitted to an adult ward if appropriate transfer is delayed or unavailable. If possible, all children should board on the same adult ward for ease of nursing care and to improve the children's psychological wellbeing. 126
127 Section 11 Equipment Recommendations Minimal Pediatric Equipment Recommendations for Emergency Departments* The following table (Table 11.1) has been modified from the New York Sta te 911 Hospital Receiving Guidelines. 1 The amounts given are the minimal recommended number of items per one expected critical patient in an Emergency Department. Each institution must determine its expected surge capacity for pediatric critical pa tients and should adjust inventory according to the number of patients fo r which it will plan. For example, i f Hospital A decides to prepare for an influx of 4 critical pediatric patients, then the numbers in the amounts column should be multiplied by 4. Additionally, many hospitals are creating and stocking disaster carts to be used in designated areas. It is recommended that hospitals also consider stocking a cart specifically for the Emergency Department for a Pediatric Critical Care Area. *Amounts based on needs expected per one critical pediatric patient of unknown age or size. d Equipment Type Size Amount Importanc e Ambu Bags Infant 2 Essential Child 2 Essential Arm Board - 2 Desirable Blood Pressure Cuffs Infant/Small Child 1 Essential Chest Tubes Sizes 12F, 16F, 20F, 24F, 28F 2 each size Essential Dosing Chart, Pediatric - 1 Essential ETCO 2 Detectors (pediatric, disposable) - 2 Essential ET Tubes each size Essential Foley Catheters Sizes 8F, 10F, 12F 6 each size Essential Gastrostomy tubes Sizes 12F, 14F, 16F 2 each size Desirable Infant Scale - 1 for any # patients Essential Intraosseous Needles - 8 Essential Intravenous Infusion Pumps (with pediatric dosing capability) - 1 Desirable Laryngoscope Blades Macintosh 0,1,2 2 each size Essential Miller 0,1,2 2 each size Essential Laryngoscope Handles Pediatric 2 Essential 127
128 Equipment Type Size Amount Importance Masks - Face masks, clear selfinflating bag (500cc) Infant 10 Essential Child 10 Essential Masks - Non Rebreather Infant 10 Essential Child 2 Essential Nasal Cannula Infant 2 Desirable Child 2 Desirable Nasogastric Tubes Sizes 6F, 8F, 10F, 10 each 12F, 14F, 16F size Essential Nasopharyngeal Airways All pediatric sizes 1 each size Desirable Newborn Kit / Obstetric/Delivery Kit - 1 Essential Oral Airways All pediatric sizes 00, 01 2 each size Essential Over the Needle Intravenous 5 each Sizes 20, 22, 24 Catheters size Essential Restraining Board Pediatric 1 Desirable Resuscitation Tape, length based (Broselow) Reference - 2 Essential Seldinger Technique Vascular Access Sizes 4F, 5F 3 each size Desirable Kit Catheters 15cm 3 each length size Desirable Infant 2 Essential Semi Rigid Cervical Spine Collars Small Child 2 Essential Child 2 Essential Suction Catheters 5F, 8F 5 each size Essential Syringes, 60cc, catheter tip (for use with G/T tube) - 2 Essential Tracheostomy Tubes Sizes 00 to 6 2 each size Essential Warming Device (overhead warmer for newborns) - 1 Desirable Reference 1. New York City Fire Department. Emergency Department Standards. 6th ed. New York, NY;
129 Section 12 Pediatric Dietary Needs Purpose: In order to adequately prepare for the influx of p ediatric patients that may result from a disaster involving children, hospitals must also consider the requirements for providing age-appropriate food and potable water to this population while they are patie nts or visitors in the facility. The Pediatric Dietary Needs section provides nutritional guideline s for hospitals that do not typically provide pediatric in-p atient services. T he recommendations in this section include: Pediatric dietary recommendations for healthy child ren and children with special needs; and sample disaster menus for children including menus for special dietary needs. The disaster menus focus on foods that require little to no preparation and are both easy and inexpensive to store. Section Contents General Guidelines Table 12.1 Pediatric Dietary Recommendations o Healthy children o Children with special needs o Diabetic children Table 12.2 Sample Pediatric Disaster Menu: A sample diet for pediatric patients listing foods that require a minimal amount of preparation or power supply to maintain food temperatures Table 12.3 Pediatric Nutrition Guidelines for Primary Health Care Providers o Birth to 6 months o 6 to 9 months o 9 to 12 months o 12 to 18 months o 18 to 24 months o 2 to 3 years o 3 to 6 years (preschoolers) References Resources General Guidelines NYSDOH recommends that hospitals maintain access to a 5-day food and drinking water supply for use during an emergency. It is also recommended that hospitals develop a network of resources for supplies of food and water if the routine supplier is unavailable or unable to meet the demand. The nutritional supplies recommended for both healthy children and those with special dietary needs are listed in Table
130 Age Healthy Children Table 12.1 Pediatric Dietary Recommendations 1 0 to 6 months These children are breast-fed or formula-fed by bottle only. Comments: If the mother is not available to breastfeed, the first choice is to give breast milk by bottle. Some breast- may not fed children immediately take bottlefeeding. Continue to feed: eventually the child will feed from the bottle. 6 months to 1 year 1 to 2 years 6-9 months baby cereal, jarred baby food or mashed table food is appropriate, along with formula or breast milk months soft, bite-sized pieces of food Recommendation: Ready-to- is preferred since vegetables, (i.e., feed formula it is immediately ready for use mashed and requires no refrigeration or potatoes and preparation. Powdered baby meats) along formula may be used as long with formula or as a safe water supply is breast milk. available. Powdered formula will have a longer shelf life than ready-to-feed formula. There should be milk-based, soy-based and hypoallergenic formula available. This age group eats table food. Young children will need soft, bite-sized foods. Avoid foods that can cause choking such as hot dogs, grapes and chunks of meat unless cut in pea-sized pieces. Hydration: Water, Pedialyte See sample menu below. 2 years and above This age group eats table food. Young children will need finger foods. Avoid foods that can cause choking such as hot dogs or grapes for youngest children. Hydration: Water, Pedialyte See sample menu below. 130
131 Table 12.1 Pediatric Dietary Recommendations, continued 1 Children with Patients with feeding tubes: There are 3 types of tube feedings: Special Needs Nasogastric (N/G), orogastric (O/G), and gastrostomy (G/T). The first 2 are used for acute patients; the third is used for chronic patients. N/G or O/ G Tube: Used for both nasogastric and orogastric feedings and are temporary measures, mostly used in pediatric emergency rooms or pediatric in-patient areas for acute feeding issues, gastric decompression, and/or delivery of oral medications such as activated charcoal. G/T Tube: Used with a 60cc syringe, catheter tip and a bolus continuous feed or pump. Infants (0 to 12 months): In fant formula should be used through the tube. 12 months to 18 years of age: Pediatric formulas should be used (i.e., Resource Just for Kids, PediaSure or Nutren Jr.). For adolescents, adult enteral product may be appropriate, based on clinical judgment. (Powdered products similar to Pediasure are now available.) Hydration: Tap or bottled water. Comments: The same feeding pump used for adults can also be used to feed children. Use saline water to clean the area when the feeding tube is inserted into the patient. Change feeding bags every 8 hours and clean prior to adding more formula. Diabetic Children The nutritional needs of this group will be determined by the patient's body weight and (insulin) medicine requirements. Recomme ndation: Patients may require between meal snacks to control blood glucose. 131
132 Table 12.2 Sample Pediatric Disaster Menu The following sample diet for pediatric patients lists foods that require the minim al amount of preparation or power supply to maintain temperatures. Day 1 Day 2 Day 3 Breakfast Breakfast Breakfast 0 to 6 Breast milk or milk- or soy- Breast milk or milk- or soy- Breast milk or milk- or soybased months based formula based formula formula 6 months to 1 year Iron-fortified baby cereal Jarred baby fruit Iron-fortified baby cereal Jarred baby fruit Iron-fortified baby cereal Jarred baby fruit Breast milk or milk- or soy- Breast milk or milk- or soy- Breast milk or milk- or soy- based formula based formula based formula >1 year Cheerios (or substitute) Cheerios (or substitute) Cheerios (or substitute) UHT milk (1 to 2 years) or powdered milk (>2years) UHT milk (1 to 2 years ) or powdered milk (>2years) UHT milk (1 to 2 years) or powdered milk (>2years) Diced canned fruit Diced canned fruit Diced canned fruit Lunch Lunch Lunch 0 to 6 months 6 months to 1 year Breast milk or milk- or soy- Breast milk or milk- or based formula soy-based formula Jarred baby meat Jarred baby meat Jarred baby vegetable Jarred baby vegetable Jarred baby fruit Jarred baby fruit Breast milk or milk- or soy- Breast milk or milk- or based formula soy-based formula Macaroni and cheese 1 to 2 years Canned beef stew Jarred baby vegetable Diced peaches Bread/crackers UHT milk >2 years Cream cheese/jelly sandwich Diced peaches Graham crackers Powdered milk Dinner Jarred baby vegetable Diced pears Bread/crackers UHT milk Macaroni and cheese Diced pears Graham crackers Powdered milk Dinner Breast milk or milk- or soybased formula Jarred baby meat Jarred baby vegetable Jarred baby fruit Breast milk or milk- or soybased formula Tuna or canned chicken Jarred baby vegetable Diced fruit cocktail Bread/crackers UHT milk Peanut butter * /jelly sandwich Diced fruit cocktail Graham crackers Powdered milk Dinner 0 to 6 Breast milk or milk- or soy- Breast milk or milk- or Breast milk or milk- or soybased months based formula soy-based formula formula 6 months to 1 year Jarred baby meat Jarred baby vegetable Jarred baby fruit Jarred baby meat Jarred baby vegetable Jarred baby fruit Jarred baby meat Jarred baby vegetable Jarred baby fruit Breast milk or milk- or soy- Breast milk or milk- or Breast milk or milk- or soy- based formula soy-based formula based formula 1 to 2 years Cheese slices chopped Canned chicken chopped Cheese ravioli Jarred baby vegetable Applesauce Bread/crackers UHT milk Jarred baby vegetable Diced peaches Bread/crackers UHT milk Jarred baby vegetable Baby fruit Bread/crackers UHT milk >2 years Cheese sandwich Canned pineapple Graham crackers Powdered milk * Be alert for allergies. Chicken sandwich Diced peaches Graham crackers Powdered milk Cheese ravioli Mandarin oranges Graham crackers Powdered milk 132
133 Table 12.3 Pediatric Nutrition Guidelines for Primary Healthcare Providers When a child presents with several red flags, it is recommended to refer the caregiver to a registered dietitian (RD) for a nutritional assessment. Developmental Age Guidelines Red Flags Characteristics Birth to 6 months Sucks well on nipple 2 Finishes each feeding within 45 minutes by age 4 months 2 Signs of hunger in newborns are increased alertness or activity, mouthing or rooting. Crying is a late indicator of hunger 3 Exclusive breastfeeding is recommended for the first 6 months for healthy term infants 4,5 Encourage parents to feed whenever baby show signs of hunger 3 Encourage parents to hold their baby during feedings and make eye contact 6 Breastfed or partially breastfed infants drinking less than 1L (32oz) formula daily should receive a daily vitamin D supplement of 400IU (10µg) 4,7 Dark-skinned infants and infants whose mothers enter pregnancy and lactation with low vitamin D status are particularly at risk for developing vitamin D deficiency rickets; 7 therefore it is important to promote the recommendation for adequate vitamin D to these parents If an infant is not breastfed or is partially breastfed, cow's milk-based iron-fortified infant formulas are the most acceptable alternative 1,4 Hypoallergenic formula should be given if allergy to milk-based formula is suspected 8 Soy-based formula should be given to infants who cannot take dairy-based products for health, cultural, religious or personal reasons, such as vegan lifestyle or 4 galactosemia Research has shown that there is no link between ironfortified infant formula and constipation 8,9 Serial growth measurements have unexpectedly crossed 2 or more centiles downwards (failure to thrive) 11 Newborn not being fed whenever they show signs of hunger 3 Healthy, full-term breastfed infant: o Loses more than 7% of birth weight o Does not regain birth weight by 10 days o Does not have at least 3 bowel movements each day 2 o Does not have at least 6 wet diapers each day by day 4 with urine that is clear or pale yellow 12,13 During the first 4 months, 4 infant not being fed frequently Exclusively breastfed infant is not receiving a vitamin D supplement, particularly those at risk 4,7 Infant formula is not iron- fortified 4 Liquids (including water) or solids other than breast milk or iron-fortified formula are given before 4 months (6 months is recommended) 4,10 Infant is fed using a propped bottle 4,7 Infant cereal is given in a bottle 1,4 Private well water used for infant feeding is not being 4 regularly tested For the first 4 months, water for infant formula is not brought to a rolling boil for 2 minutes 4 Infant formula is not being mixed correctly (i.e., correct dilution) 1 133
134 Table 12.3 Pediatric Nutrition Guidelines for Primary Healthcare Providers, continued Age Birth to 6 months Developmental Characteristics Guidelines Breastfed infants tend to become leaner than formulafed infants after 3 to 4 months. This should be anticipated when assessing growth to avoid unnecessary supplementation with formula or early introduction of solids 1,11 Fruit juice, water or any beverages other than breast milk or formula should not be given 1,4,5 To prevent infant botulism, honey should not be given prior to 1 year of age 4 For the prevention of allergy, the avoidance of solid food for at least 4 months and preferably 6 months is recommended 10 Red Flags 6 to 9 months At 6 months, babies are physiologically and developmentally ready for solid foods 4 Sits independently for a short time 14 Drinks from a cup held by an adult 1 Eats soft food from a 2 spoon or adult's fingers Uses both hands to hold a bottle 14 Prefers parents to feed 14 Plays with spoon 1 Initial refusal of new flavors and textures is common. It may take 3-10 offerings before an infant accepts a new food 1 Finger-feeding can be introduced 14 By 9 months, picks up small items using thumb and first finger (e.g., oat ring cereal) 2 Continued breastfeeding is recommended 4,5 If infant is not breastfed or is partially breastfed, cow's milk-based iron-fortified infant formulas are the most acceptable alternative until 9 to 12 months 1,4 For infants unable to take cow's milk products, give commercial soy formula until 2 years 4 At 6 months, introduce ironcontaining foods, such as iron-fortified cereals (see Dietary sources of iron later in this section). 4,5 Introduce vegetables and fruit next. At about 9 months, introduce whole cow's milk and milk products 4,15 Introduce one new food at a time with an interval of 2 to 7 days before introducing another to allow infant to acquire a taste for a new food and make it easier to identify the cause of an allergic reaction 1,15 Serial growth measurements have unexpectedly crossed 2 or more centiles downwards 11 Breastfed or partially breastfed infant drinking less than 32oz (1L) formula not receiving a vitamin D supplement, particularly those at risk 4,7 Infant formula is not being mixed correctly (i.e., correct dilution) 1 Cow's milk is given instead of breast milk or infant formula 4 Iron-containing foods have not been introduced by 7 months of age 4,16 Infant is not eating willingly or parents imply that they forcefeed 1 Infant is drinking more than 4oz (125mL) of fruit juice per day 15,17 Fruit drinks, pop, coffee, tea, cola, hot chocolate, soy beverage, other vegetarian beverages, herbal tea or herbal products, egg white or honey is given 4 134
135 Table 12.3 Pediatric Nutrition Guidelines for Primary Healthcare Providers, continued Age 6 to 9 months Developmental Characteristics Some infants have a more sensitive gag reflex and may not tolerate anything but pureed foods at first 8 Guidelines Start with small serving sizes (1 to 3tsp) 1 Complementary foods should initially be provided 2 to 3 times a day 15 Infants will indicate hunger or satiety. Forced feeding may promote negative associations with eating 1 Mealtime environment should be free of distractions such as television and activities 18 Gradually offer food with more texture, progressing from pureed to mashed consistency and then to soft finger foods of about 1.4-inch pieces 8,15 Offer some breast milk or formula in a cup. Use a cup regularly with meals by 8 8 months of age Wait until 1 year of age to introduce egg white to minimize the risk of allergic reactions 4 Honey should not be given prior to 1 year of age 4 Coffee, tea, cola and hot chocolate should not be given 4 Red Flags Infant cereal is given in a bottle 1,4 Infant is fed using a propped bottle 1,4 135
136 Table 12.3 Pediatric Nutrition Guidelines for Primary Healthcare Providers, continued Age 9 to 12 months Developmental Characteristics Begins to take an active independent role in 8 feeding Assists with spoon; some become independent 14 Refining pincer grasp 14 Can hold cup and suck or sip contents, but may spill 1,8,14 More willing to accept lumpy textures, especially when selffeeding 8 Initial refusal of new flavors and textures is common. It may take up to 10 offerings before infant accepts a new food 8 Licks food from lower lip 1 Guidelines Continued breastfeeding is recommended 4,5 Breastfed babies should receive a daily vitamin D supplement until the infant's diet includes at least 400IU (10µg)/day from other dietary sources (see Dietary sources of vitamin D later in this section) or until 1 year of age. 4,7 Between 9-11 months, increase the number of times infants are fed complementary foods to 3 to 15 4 times a day Parents/caregivers should encourage self-feeding by offering more textured finger/table foods 1,15 Include baby at the table for family mealtimes 18 Mealtime environment should be free of distractions like television and activities 18 Whole (3.25%) cow's milk can complement or replace breast milk or replace formula between 9 to 12 months. 4,15 1% or 2% milk is not recommended until age 2. 4 Skim milk is inappropriate before age 2 4 Limit deli and luncheon mea ts such as hot dogs, bacon and smoked meat 19 Fruit juice offers no nutritional benefits over whole fruit 17 Offer a cup with breast milk, formula, cow's milk, 100% juice or water during meals so that a natural transition from bottle to cup will take place 1,8 Red Flags Serial growth measurements have unexpectedly crossed 2 or more centiles downwards 11 Breastfed or partially breastfed infant drinking less than 1L (32oz) formula not receiving a vitamin D supplement, particularly those at risk 4,7 At 10 months, consistently refuses lumpy or textured foods 16 Infant is not supervised during feeding 4 Drinks juice in a bottle or a transportable covered cup that allows the baby to consume juice easily throughout the day 17 Fruit drinks, pop, coffee, tea, cola, hot chocolate, soy beverage, other vegetarian beverages, herbal tea or herb al products, egg white or honey is given 4 136
137 Table 12.3 Pediatric Nutrition Guidelines for Primary Healthcare Providers, continued Age 12 to 18 months Developmental Characteristics Picks up and eats finger foods 2 Grasps spoon with whole hand Holds cup with 2 hands Holds and tips bottle 14 Compared with the first year of life, a decreased or sporadic appetite is common 1 Unfamiliar foods are often rejected the first time 1 Guidelines Whole (3.25%) cow's milk can complement or replace breast milk or replace formula. 1% or 2% milk is not recommended until age 2. Skim milk is inappropriate before age 2 4 If soy formula is given to babies who cannot take dairy-based products, continue until 2 years of age. Soy beverage, rice milk or other vegetarian beverages are not recommended under 2 years of age due to low fat content 4 At 12 months of age, babies should have a daily intake of 5µg (200IU) of vitamin D 4 that they can get with 2 cups (500mL) of milk (see Dietary sources of vitamin D later in this section). A supplement may need to be 4,7 recommended Drinking too much milk can lead to iron deficiency. Bab ies 12 months of age or older should drink 16 to 24oz (500 to 750mL) of milk/day 20 Parents should encourage child to feed themselves at the beginning of a meal when they are hungry, but help if they tire later in the meal 4 The child should be included at family mealtimes 18 Continue to provide 3 to 4 meals a day. Additional nutritious snacks may be offered 1 to 2 times a day 15 By 12 months of age, babies should be eating a variety of foods from each of the 4 food groups of Canada's Food Guide 1,4 Red Flags Serial growth measurements have unexpectedly crossed 2 or more centiles downwards 11 Breastfed child not receiving a vitamin D supplement 4,7 Skim milk is regularly given 4 Drinking liquids primarily from a baby bottle 16 Not eating a variety of table foods 4 Consistently refuses lumpy or textured foods 16 At 15 months of age, does not finger/self-feed 4,16,18 Parents not recognizing and responding to the child's verbal and non-verbal hunger cues 4 Child is not supervised during feeding 4,18 Excessive fluid consumption, e.g., milk (more than 24oz daily), 20 juice (more than 4 to 6oz daily), 17 pop and fruit drinks 1,4 137
138 Age 12 to 18 months Table 12.3 Pediatric Nutrition Guidelines for Primary Healthcare Providers, continued Developmental Characteristics Guidelines If a child is eating according to Canada s Food Guide, is growing well and is healthy, vitamin/mineral supplements are rarely necessary. The nutrient of greatest concern during this period is iron 21 The development of healthy eating skills is a shared responsibility: parents and caregivers should provide a selection of nutritious, ageappropriate foods and decide when and where food is eaten; babies and children should decide how much they want to eat. Pressuring a child to eat may lead to overeating or the development of aversions to certain foods 1,4,18 Fruit juice offers no nutritional benefits over whole fruit 17 Excessive fruit juice consumption may be associated with diarrhea, flatulence, abdominal distension, tooth decay and poor weight gain 8,18 Fruit drinks and pop are not recommended as they displace nutrient-dense foods and beverages. Encourage 18 parents to offer water Red Flags 138
139 Table 12.3 Pediatric Nutrition Guidelines for Primary Healthcare Providers, continued Age 18 to 24 months Developmental Characteristics Chews broad range of foods 14 Self-feeding predominates 14 Displays curiosity and desire to be independent 1 Food neophobia (fear of the new) increases through early childhood and then declines. 22 Unfamiliar foods are often rejected the first time 1 Food likes and dislikes become prominent 1 Tends to go on food jags (refusal of all but 4 or 5 favorite foods over 18 an extended period) In non-controlling, noncoercive conditions, healthy children have the ability to selfregulate the amount of food and energy consumed 23 Guidelines Small, nutritious, frequent and energy-dense feedings are important to meet nutrient and energy needs 4 Avoid foods with the potential to cause choking (see Choking and Aspiration below) 1,4, 18 Limit deli and luncheon meats such as hot dogs, bacon and smoked meat 19 Parents should role-model healthy eating and introduce age-appropriate table manners 8 Let the child assume responsibility for how much to eat. Forcing a child to clean their plate may lead to overeating or the development of aversions to certain foods 1,18 15 to 20 minutes is an appropriate length of time to stay at the table 18 If a child is eating according t o Canada s Food Guide, is growing well and is healthy, vitamin/mineral supplements are rarely necessary. The nutrient of greatest concern during this period is iron 21 Limit fluids such as juice and milk between meals 1 Fruit drinks and pop are not recommended as th ey displace nutrient-dense foods and beverages. Encourage parents to offer water 18 Red Flags Serial growth measurements have unexpectedly crossed 2 or more centiles downwards 11 Not eating a variety of table foods 4 Skim milk is given regularly 4 Soy beverage, rice milk, other vegetarian beverages or herbal teas are given 4 Child is not supervised when eating 4,18 Child does not finger/selffeed 4,16,18 Drinking liquids primarily from a baby bottle 16 Parents pressure or reward child to eat 18 Child grazes on food all day 18 Excessive fluid consumption, e.g., milk (more than 24oz daily), 20 juice (more than 4 to 6oz daily), 17 pop and fruit drinks 1,4 139
140 Table 12.3 Pediatric Nutrition Guidelines for Primary Healthcare Providers, continued Age 2 to 3 years Developmental Characteristics B y 2 years of age, eats most foods without 2 coughing and choking By 2 years of age, eats with a utensil with little spilling 2 By 30 months of age, lifts and drinks from a cup and replaces it on the table 2 May be resistant to new foods 18 Food preferences increase with frequency of exposure. It may take 5 to 15 exposures to a new food before a child learns to like it 22,24 It is normal for children to lose interest in mealtimes. When hungry, they will focus on eating. When satisfied, their attention turns elsewhere 1,19 Guidelines Children aged 2 and older can get the nutrients and calories they need for healthy growth and development by following Canada's Food Guide 19 Canada's Food Guide recommends that children aged 2 to 3 eat 2 cups (500mL) of vegetables and fruit each day 19 (see Pesticides on Vegetables and Fruit later in this section for ways to minimize pesticide residues) Offer 2 cups (500mL) of milk or fortified soy beverage daily to help meet the vitamin D requirement 19 Offer a variety of nutritious foods, including some choice s that contain fat such as milk and peanut butter 19 Serve small, nutritious meals and snacks and allow the 8,19 child to ask for seconds Structure and routine for eating is important for young children. Grazing between meals and snacks should be limited 18 The amount of food eaten will vary day to day depending on the child's appetite, activity level and whether they are experiencing a growth spurt, or if they are excited or overly tired 19 Let the child assume responsibility for how much to eat. Forcing a child to clean their plate may lead to overeating or the development of aversions to certain foods 1,18,19 Red Flags Serial growth measurements have unexpectedly crossed 2 or more centiles downwards 11 BMI-for-age 5th percentile or 95th percentile 11 Drinking liquids primarily from a baby bottle 16,18 Excessive fluid consumption, e.g., milk (more than 24oz daily), 20 juice (more than 4 to 6oz daily), 17 pop and fruit drinks 1,4 Child does not self-feed 4,16,18 Parent not allowing the child to decide how much to eat 1,18,19 Parents are using a highly restrictive approach to feeding 18 Grazes on food or beverages throughout the day 18 More than 2 hours of TVwatching daily
141 Table 12.3 Pediatric Nutrition Guidelines for Primary Healthcare Providers, continued Age 2 to 3 years Developmental Characteristics Guidelines Encourage parents to be patient. If an unfamiliar food is rejected the first time, it can be offered again later 19 Food should not be used as a reward 1,18,23 Encourage parents to sit down and eat with the child, provide a pleasant setting and leave the TV off during mealtimes 8,19 A multivitamin is rarely needed for a healthy child who is growing well and following Canada's Food Guide 19 Fruit drinks and pop are not recommended as they displace nutrient-dense foods and beverages. Encourage parents to offer water 18 Red Flags Age Developmental Characteristics Guidelines Red Flags 3 to 6 years (preschoolers) By age 4, looks for 2 adult approval Food preferences increase with frequency of exposure. It may take 5 to 15 exposures to a new food before a child learns to like it 22,24 It is normal for children to lose interest in mealtimes. When hungry, they will focus on eating. When satisfied, their attention turns elsewhere 19 Serve small, nutritious meals and snacks and allow the 8,19 child to ask for seconds The amount of food eaten will vary day to day depending on the child's appetite, activity level and whether they are experiencing a growth spurt or if they are excited or overly tired 19 Encourage parents to sit down and eat with the child, provide a pleasant setting and leave the TV off during mealtimes 8,19 The use of external cues related to feeding such as prompts or rewards is likely to build resistance, food dislikes and lack of selfregulation 1,18,23 If new food is rejected, offer again. 19 Serial growth measurements have unexpectedly crossed 2 or more centiles 11 BMI-for-age 5th percentile or 11 95th percentile NutriSTEP (parent-administered nutrition screen for 3- to 5-yearolds) score of 26 or greater (i.e., 26 high nutrition risk) Parents are using a highly 18 restrictive approach to feeding Does not self-feed 4,16,18 Not eating a variety of table foods from the 4 food groups in Canada's Food Guide 19 Does not eat at regular times throughout the day (breakfast, lunch, supper and 2 to 3 snacks) 18 Drinking liquids primarily from a baby bottle 16,18 141
142 Table 12.3 Pediatric Nutrition Guidelines for Primary Healthcare Providers, continued Age 3 to 6 years (preschoolers) Developmental Characteristics Guidelines Let the child assume responsibility for how much to eat. Forcing a child to clean their plate may lead to overeating or the development of aversions to certain foods 1,18,19 Encourage parents to involve their child in simple foodrelated tasks (e.g., making muffins together) to encourage them to try these foods 19 Fruit drinks and pop are not recommended as they displace nutrient-dense foods and beverages. Encourage parents to offer water 18 Limit TV watching to 1 to 2 hours or less daily 25 Red Flags Excessive fluid consumption, e.g., milk (more than 24oz daily), 20 juice (more than 4 to 6oz daily), 17 pop and fruit drinks 1,4 More than 2 hours of TVwatching daily 25 General Risk Factors that Indicate the Intervention of a Registered Dietitian (RD) or other Primary Healthcare Provider Family is experiencing problems around feeding, mealtimes are unpleasant, and infant/child refuses many foods, or drinks excessive fluids throughout the day so is not hungry at mealtimes. Parents are possibly force-feeding or offering inappropriate amounts of food. Parents have distorted issues with their own eating and/or body image. Infant/child has medical problems that make eating or drinking a problem such as swallowing issues, gagging or choking. Infant/child has other health problems that may be related to diet such as iron deficiency anemia, constipation, obesity, or body image issues. Family has different beliefs related to foods (e.g., the use of herbal products, exclusion of food groups such as meat and meat alternatives, the use of unsafe products such as unpasteurized milk). Family is low income. In order for families to access foods that will nourish them, they need to have enough money. Family has problems with adequate food storage, cooking facilities or provision of adequate amounts of food because of lack of information. 142
143 Dietary Sources of Important Nutrients Dietary sources of iron: Iron-fortified infant cereal, egg yolk, beef, chicken, turkey, lamb, fish, pork, legumes (beans, lentils, chick peas) and tofu. Iron from meat sources is better absorbed than iron from non-meat sources. However, as a first food, some children may not like the taste or texture of meat and refuse to eat this food. Infant cereal may have a more palatable taste and parents may be more successful starting with this type of food as a first food. Dietary sources of vitamin D: Fortified cow's milk (88IU in 250mL); fortified infant formula (100IU in 250mL); fortified plant-based beverage (80IU in 250mL); fortified margarine (25IU in 5mL); cooked salmon (103IU in 1oz); and egg yolk (25IU in one egg). 7 Choking and Aspiration Hard, small and round, or smooth and sticky solid foods can block a young child's airway. The following foods are not safe for infants and children under 4 years of age: Popcorn, hard candies, gum, cough drops, raisins, peanuts or other nuts, sunflower seeds, fish with bones, and snacks using toothpicks or skewers. The following foods are safer for infants and young children when they are prepared as described: Wieners diced or cut lengthwise, grated raw vegetables or fruit, fruit with pits removed, chopped grapes, and peanut butter spread thinly on crackers or bread. Peanut butter served alone or on a spoon is potentially unsafe because it can stick in the palate or posterior pharynx leading to asphyxia. 4 Bisphenol A Bisphenol A (BPA) is an industrial chemical used to make a hard, clear plastic known as polycarbonate which is used in many consumer products including some baby bottles and reusable water bottles. BPA is also found in epoxy resins, which act as a protective lining on the inside of metal-based food and beverage cans. The main source of exposure for infants is from BPA migrating from the lining of cans into liquid infant formula and migrating from the polycarbonate baby bottles into the liquid inside following the addition of boiling water. Exposure levels are close to the levels where potential health effects could occur; therefore, Health Canada is working with infant formula manufacturers to reduce levels of BPA in the lining of infant formula cans and encouraging the development of alternatives. The following is the Government of Canada's advice for parents and caregivers: Breast milk is the best food for optimal growth. Infant formula is still the best alternative as its nutritional benefits far outweigh the possible risk for BPA exposure. If using a polycarbonate bottle, water used for formula preparation should be boiled and allowed to cool to lukewarm in a non-polycarbonate container before transferring to baby bottles. This advice is consistent with proper instructions for the preparation of infant formula. Polycarbonate bottles can be sterilized according to instructions on infant formula labels and can be cleaned in the dishwasher. They should be left to cool to room temperature before adding the infant formula
144 Pesticides on Vegetables and Fruit A healthy diet rich in vegetables and fruit may help reduce the risk of cardiovascular disease and some types of cancer. 19 To reduce or eliminate pesticide residues on fresh vegetables and fruit, follow these recommendations: Wash all fresh vegetables and fruit with running water. Use a small scrub brush to clean the outer skin of vegetables and fruit, if appropriate (for example, before eating apples, potatoes, cucumbers or other produce in which you eat the outer skin). Peel vegetables and fruit and trim the outer leaves of leafy vegetables, along with washing them thoroughly. 28 References 1. American Dietetic Association, Dieticians of Canada. Manual of Clinical Dietetics. 6th ed. Chicago, IL: American Dietetic Association; Nipissing District Developmental Screen. Nipissing District Developmental Screen Web site. Available at: Accessed February 18, American Academy of Pediatrics Work Group on Breastfeeding. Breastfeeding and the use of human milk. Pediatrics [serial online]. 1997;100(6): Available at: Accessed February 18, Canadian Paediatric Society, Dietitians of Canada, Health Canada. Nutrition for Healthy Term Infants Statement of the Joint Working Group [Health Canada Web site] Available at: Accessed February 18, Exclusive breastfeeding duration 2004 Health Canada Recommendation. Health Canada Web site Available at: Accessed February 18, Lerner C, Pariakian R. Healthy from the Start: How feeding nurtures your young child's body, heart and mind. Zero to Three: National Center for Infants, Toddlers and Families; Vitamin D supplementation for breastfed infants 2004 Health Canada Recommendation. Health Canada Web site Available at: Accessed February 18, American Dietetic Association. Pediatric Manual of Clinical Dietetics. 2nd ed. Chicago, IL: American Dietetic Association; Singhal A, Morley R, Abbott R, Fairweather-Tait S, Stephenson T, Lucas A. Clinical safety of iron-fortified formulas. Pediatrics [serial online]. 2000;105(3):e38. Available at: Accessed February 18, Dietitians of Canada. Food Allergies. Low Risk Infant: Evidence Summary. In: Practicebased Evidence in Nutrition [PEN]. February 6, Available at: Accessed February 19,
145 11. Dietitians of Canada, Canadian Paediatric Society, The College of Family Physicians of Canada, Community Health Nurses Association of Canada. The use of growth charts for assessing and monitoring growth in Canadian infants and children. Paediatr Child Health [serial online]. 2004;9(3): Available at: Accessed February 19, International Lactation Consultant Association. Clinical Guidelines for the Establishment of Exclusive Breastfeeding. 2nd ed. [International Lactation Consultant Association Web site]. Raleigh, NC: International Lactation Consultant Association; Available at: Accessed February 19, Health Canada. Family-centered Maternity and Newborn Care: National Guidelines. 4th ed. [Public Health Agency of Canada Web site]. Ottawa, ON: Minister of Public Works and Government Services; Available at: Accessed February 19, Arvedson JC, Brodsky L. Instrumental evaluation of swallowing. In: Arvedson J, Brodsky L, eds. Pediatric swallowing and feeding: assessment and management. 2nd ed. Albany, NY: Singular Publishing Group, Division of Thomson Learning, Inc; 2002: Dietitians of Canada. Infant Nutrition. Introduction of Complementary Foods: Practice Guidance Summary. In: Practice-based Evidence in Nutrition [PEN]. October 12, Available at: Accessed February 19, Groh-Wargo S, Thompson M, Hovasi Cox J, eds; Hartline JV, consulting ed. Nutritional Care for High-Risk Newborns. 3rd ed. Chicago, IL: Precept Press, Inc; American Academy of Pediatrics Committee on Nutrition. The use and misuse of fruit juice in pediatrics. Pediatrics [serial online]. 2001;107(5): Available at: http ://pediatrics.aappublications.org/cgi/content/full/107/5/1210. Accessed February 19, American Academy of Pediatrics Committee on Nutrition. Pediatric Nutrition Handbook. Kleinman RE, ed. 5th ed. Elk Grove Village, IL: American Academy of Pediatrics; Health Canada. Eating Well with Canada's Food Guide: A Resource for Educators and Communicators. Ottawa, ON: Publications, Health Canada by authority of the Minister of Health; Available at: Accessed February 19, Kazal LA Jr. Prevention of iron deficiency in infants and toddlers. Am Fam Physician [serial online]. 2002;66: ,1227. Available at: Accessed February 19, Dietitians of Canada. Toddler and Preschooler Nutrition: Key Practice Points. In: Practicebased Evidence in Nutrition [PEN]. May 28, Available at: Accessed February 19, Birch LL. Development of food preferences. Annu Rev Nutr. 1999;19: Johnson SL. Improving preschoolers' self-regulation of energy intake. Pediatrics [serial online]. 2000;106(6): Available at: 145
146 Accessed February 19, Skinner JD, Carruth BR, Bounds W, Ziegler PJ. Children's food preferences: a longitudinal analysis. J Am Diet Assoc. 2002;102(11): Psychosocial Paediatrics Committee, Canadian Paediatric Society (CPS). Position statement: impact of media use on children and youth. Paediatr Child Health [serial online]. 2003;8(5): Available at: Accessed February 19, Dietitians of Canada. Preschool Nutrition Screening Tools Background. In: Practice-based Evidence in Nutrition [PEN]. August 15, Available at: Accessed February 19, Government of Canada protects families with bisphenol A regulations [Health Canada Web site]. December 11, Available at: Accessed February 19, Canadian Cancer Society. Pesticide residues on vegetables and fruit [Canadian Cancer Society Web site]. December 15, Available at: Accessed February 19, Resources and Description: Excellent overview of pediatric nutrition guidelines in table format that lists the developmental characteristics, specific nutrition guidelines and potential problems by age group. It has been prepared by the Health Babies Healthy Children Workgroup of the Ontario Society of Nutrition Professionals in Public Health (OSNPPH), first published June 2003 and revised May Description: Overview of pediatric nutrition guidelines that list the developmental characteristics, specific nutrition guidelines and potential problems by age group in text format. 146
147 Section 13 Emergency Preparedness for Childbirth Purpose: This section is presented under the supposition that all hospitals need to recognize the potential for receiving obstetric patients during a disaster and appropriately plan for obstetric mass care. In a disaster event, the following may occur: Obstetric patients might present to ANY hospital. Transfer of patients to specialized hospitals might not be feasible. All hospitals and all providers must be prepared to deliver care to obstetric patients during disasters. It is likely that the Emergency Department will become saturated with patients who are critically or moderately ill or injured during a disaster. Therefore, obstetric patients ready to deliver may be transferred to other units in the hospital. This section is intended to serve as a general guide to staff who may need to assist/perform uncomplicated deliveries outside the Emergency Department or on a nursing unit in a facility, which does not usually provide obstetric services. Section Contents General Guidelines Emergency Obstetric Package for Hospitals that do not Provide Delivery Services Urgent Maternal History Guidelines for Uncomplicated Deliveries The Baby The Umbilical Cord What if the Baby is Coming Bottom First? The Placenta or Afterbirth (Third Stage) Clean-up Breastfeeding Care of the Mother Psychosocial Considerations Appendices o Appendix 13-1 Overview of Newborn Resuscitation o Appendix 13-2 Provide Supplemental Oxygen o Appendix 13-3 Assisted Ventilations o Appendix 13-4 Cardiopulmonary Resuscitation (CPR) 147
148 General Guidelines Pregnant women have unique needs in a disaster, often experiencing greater risk for health complications associated with pregnancy, such as premature labor, premature birth, birth of low birth-weight infants, and neonatal and infant deaths. In emergencies, pregnant women may experience additional stress. Stress, in conjunction with lack of appropriate hydration and nutrition, can result in premature labor and delivery. Emergency situations can disrupt transportation and access to the planned delivery environment. This can result in both physical and psychological implications. Treatment of women and infants can also be complicated by lack of access to medical records, as well as lack of access to necessities, such as diapers, formula, baby bottles and clothing. Without appropriate supports, there is the possibility of increased morbidity and mortality. Each hospital should be aware and contact the Regional Perinatal Center (RPC) in their area. The RPCs can provide telephone guidance in case of emergency. In addition, each hospital should keep a recent edition of one of the standard obstetrics and pediatric texts conveniently located in the ER. 148
149 Emergency Obstetric Package for Hospitals That Do Not Provide Delivery Services The following supplies will help your facility be prepared for birth: Basic supplies for childbirth: 3 curved Kelly clamps 2 Mayo scissors 1 sponge stick 1 needle holder 1 large basin or 1 large kidney basin (for placenta) 1 10-pack sterile gauze sponges 1 Holister cord clamp (If no cord clamp, may use sterile gauze to tie off cord) Suction catheters 1 bulb syringe 4 sterile towels For perineal laceration repair: inch 20-gauge needle 1 10-cc syringe 1% lidocaine Chromic 000 or Vicryl 000 suture Betadine solution Medication for Mother: 2 10-unit vials Pitocin (oxytocin injection) Rhogam [Rho(D) Immune Globulin (Human)], if necessary Medication for Infant: Erythromycin 1% eye ointment Phyponadione 1.2cc for injection (vitamin K) Note: Preassembled kits are available commercially. However, these kits do not necessarily include clamps and scissors. Due to lack of continuous fetal monitoring equipment, neonatal resuscitation must be available and ready to be implemented at every delivery. (See Appendices 13-1 through 13-4 at the end of this section for a review of newborn resuscitation.) Resuscitation equipment should be prepared and checked prior to delivery of the infant. This includes suction catheters (8F or 10F) for suctioning of meconium, and other emergency equipment noted later in this toolkit. The following PDF link contains excerpts from Giving Birth in Place : A Guide to Emergency Preparedness for Childbirth (American College of Nurse-Midwives, 2003) and is reprinted in this modified version with permission: ( 149
150 Urgent Maternal History The first step in developing a plan for managing obstetric patients by a hospital that does not typically handle obstetric patients is to determine how pregnant and laboring women will be triaged and cared for, which may be required during a pandemic influenza outbreak. The following questions may prove helpful in making those determinations. Note: This is not a complete obstetric history. Rather, this is an abbreviated urgent maternal history to help make triage decisions. Determine how pregnant laboring women will be triaged and cared for. Is the baby more than 4 weeks early? What is your due date? What baby is this for you? If this is not your first baby, did you have any complications with your previous delivery? If the water has broken, what color was it? Are multiple births expected? What drugs/medications are you currently taking? Are you allergic to any medications? Have you used any narcotic drugs recently? Do you know your blood type? Have there been any complications during your pregnancy such as high blood pressure, swelling of the hands or feet, severe headaches, gestational diabetes or bleeding? 150

151 Guidelines for Uncomplicated Deliveries Develop a plan for transferring high-risk deliveries or an alternate means of communication with a High Risk Obstetrician Specialist if transfer is not possible. The following are guidelines for an uncomplicated delivery: During labor: First Stage First Stage If the baby has been head down during the last weeks of pregnancy, chances are good that the baby will be head first at birth. This is the most common position for a baby. First labors can last for 12 hours or more while the next babies can come much faster. Keep the mother-to-be comfortable. It is good for her to walk, take a shower, get a massage and move, even if she is in bed. The mother-to-be may want to spend a lot of time in bed, or she may prefer to be on her feet or in a chair. Whatever feels best is OK. Be sure she drinks lots of fluids. Water, tea and juice are the best. Encourage her to go to the bathroom every hour. Maintain a calm and encouraging atmosphere. Use standard precautions. Wash hands often. Decide how to help other members of the family. Will they be present for the birth? What do they need to feel safe? Note: Anyone with any signs of flu should not be allowed into the delivery area. The mother-to-be should have at least one person who can be with her at all times, but other than that, it will be up to the hospital to decide how many can be present. Space may be an issue, and the mother-to-be should be made aware that she might not be able to have everyone present that she wants, due to the nature of flu and how easily it is spread. Reassure the mother-to-be that it is OK to make noise during labor and that this may actually help. Making groaning or crying noise during labor is OK. It can scare her helpers but they have to let her make the noise that helps her cope. 151
 when the mother has a very strong need to push (second stage).")

152 The urge to push: Second Stage Second Stage The longest part of labor is the time it takes for the cervix to open wide enough for the baby to pass into the birth canal or vagina (first stage). You can tell the cervix has opened all the way (fully dilated) when the mother has a very strong need to push (second stage). She cannot hold back that urge and may make sounds like she is going to the bathroom. Once she starts pushing, the baby can be born in a few minutes or a couple of hours. As birth gets closer, the area around the vagina begins to bulge out until the top of the baby's head is seen at the vaginal opening. The mother should be encouraged to push the baby's head out gently in any position that is comfortable for her. She does not have to lie on her back in bed; however, you will feel safer if she is lying down or squatting so the baby can slip gently onto a soft surface. Put on your gloves and get in a place where you can see the baby come out. Remind the mother-to-be to push gently even when she wants to push hard. As the baby comes out, mom will feel a lot of burning around the vagina and this is when she may make a lot of noise. Support the baby's head by gently cradling it in your hands. Remove cord if it is around the neck After the head is born, determine if the cord is around the baby's neck. Reach behind the back of the baby's head, toward the back of the neck with your index finger. If you find a cord around the neck, this is not an emergency. Gently lift the cord over the baby's head, or loosen it so there is room for the body to slip through the loop of cord. If you are unable to unwrap it from around the neck, clamp it in 2 places and cut the cord between the 2 clamps. Otherwise, do not rush to cut the cord. 152

153 Cutting the umbilical cord Continue to lightly cradle the baby's head between your hands. The baby's head will turn to one side and with the next contraction, the mother should push to deliver the body. Gently support the body as it is born. Either bring the baby up to the mother and place her on the mother's chest or if the body does not come out, push firmly on the side of the baby's head to move the head down toward the mother's back. The shoulder will be born. The rest of the body should slip out easily followed by a lot of blood colored water. If the head is born but the body does not come after 3 pushes, the mom must lie down on her back, put 2 pillows under her bottom, bring her knees up to her chest, have her grab her knees and push hard with each contraction. If the head still will not deliver, adopt a CPR Chest Compression Stance just above the mother's pubic bone, apply firm downward compressions, and encourage a strong push. This will release the shoulder that may be impinged behind the pubic bone. After the baby is born, place her or him on the mother's chest and tummy, skin to skin, and cover both with towels. If the baby is not crying, rub her back firmly. If she still does not cry, lay her down so that she is looking up at the ceiling, tilt her head back to straighten her airway and keep rubbing. Not every baby has to cry, but this is the best way to be sure the baby is getting the air she needs. Use a bulb syringe to clear the airway by suctioning the mouth and both nares. Bulb Syringe Note the time the baby was born for the birth certificate. 153
154 The Baby At the time of birth, most babies are blue or dusky. Some cry right away and others do not. If the baby is not crying, gently stimulate by: Flicking 1 finger against the newborn's heel Lightly slapping the sole of the newborn's foot or rubbing the sole of the newborn's foot Gently rubbing the lower back If needed, repeat for 10 to 15 seconds only Never hold the baby upside down, slap the buttocks, squeeze, shake, or immerse in hot or cold water. If the baby is still not breathing, begin resuscitation. (See review of newborn oxygenation/resuscitation in Appendices 13-1 through 13-4 at the end of this section.) If the baby is gagging on fluids in her mouth and turning blue, use the baby blanket to wipe the fluids out of her mouth and nose. Position and suction the baby as pictured below by first positioning the airway with the head slightly lower than the body. Then, elevate the shoulders with a 1-inch pad, turn the infant's head to the side and suction the mouth first with the bulb syringe inserted 1 to 1.5 inches. Do this 2 to 3 times. Follow by suctioning the nose with the bulb syringe inserted 0.5 inches into the nostril. NOTE: If the nose was suctioned before the mouth, the newborn may be stimulated to breathe in, and may inhale any fluid or secretions in the mouth. Once the baby starts to cry, her color will be more like her mother, but her hands and feet will still be blue. Now is the time to keep the baby warm. Dry and warm the baby quickly to prevent heat loss by working quickly and efficiently. Use gentle rubbing to dry the baby thoroughly. Discard the towels used for drying and wrap the baby in a clean, dry towel or blanket. Put a hat on the baby and place the baby on top of the mother. The mother can help keep the baby warm with her body heat. It is also acceptable to place the baby skin-to-skin and cover baby and mother with a blanket. 154
155 The Umbilical Cord The first priorities are to dry, warm, suction and position the baby. There is no rush to cut the cord. All you have to do is keep the baby close to the mother so the cord is not pulled tight. There are no nerve endings in the cord so it does not hurt either the baby or the mother when it is cut. It is very slippery so take your time, as there is no rush. The baby will cry when she is uncovered because she is cold, not because she is in pain. If you pick the cord up between your fingers, you can feel the baby's pulse. The cord should be tightly clamped or tied in 2 places. The first clamp or tie should be approximately 8 to 10 inches from the baby. The second clamp or tie should be approximately 1 inch from the baby. Cut between the 2 clamps when the pulse ceases which will stop within about 10 minutes. Remember the cord is connected to the placenta, which is still inside the mother. After it is cut, place the end of the cord that is still connected to the mother's placenta into the basin. Cover the baby again to keep her warm. What if the Baby is Coming Bottom First? A few babies are born bottom first. You will probably not know this is the case until the mother-to-be pushes and you see a bottom or feet and not a head coming out. At that time, you must: Bring the mother s bottom to the edge of the bed and have her legs pulled up to her chest. Prepare a soft landing spot for the baby on the floor. Let the baby's body and arms come out without touching the baby. You will be looking at the baby's back. Yes, you have to let her little bottom hang down toward the floor even if you are afraid she will fall. If you have to touch something, grab another pillow for the landing zone. When the head slips out grab the baby under the arms and bring her up to the mom. If the baby's arms are out but the head does not come with the next contraction, you should have the mother get out of bed, squat and push. Put the baby to breast: Even if the mother did not plan to breastfeed, one of the safest things you can do for the baby is put the baby to breast. Breastfeeding the baby helps keep the mother from bleeding too much and gets the baby the food it needs right away. If the cord is too short to allow the baby to reach the breast, it is OK to wait until you cut the cord. Once the baby is done nursing and you are awaiting the delivery of the placenta, you may wish to weigh the baby and obtain its length. This is also the time to administer the eye prophylaxis (erythromycin 1% ointment applied to each eyelid) and vitamin K (phyponadione 1.2cc IM injected into the infant's thigh muscle). 155
.")
156 The Placenta or Afterbirth (Third Stage): Third Stage The placenta looks like a big piece of raw meat with a shiny film on one side. On the other side, it has membranes attached to the placenta (the membranes look like skin that has been peeled off). When the placenta is ready to come, you will see a gush of blood from the vagina and the cord will get a little longer. Put the bowl close to the mother's vagina and put more waterproof pads under her bottom. Ask the mother to sit up and push out the placenta into the basin. There will be a lot of blood and water coming after the placenta. Firmly rub the mother's stomach below her belly button while supporting her lower abdomen until most of the bleeding stops (see picture below). This will hurt but needs to be done. The heaviest bleeding should stop in a minute and then the bleeding will be more like a heavy period. If the bleeding increases again, very firmly rub the mother's lower belly until the bleeding slows. When it is firm, you will be able to feel a uterus, which is the size of a large grapefruit, in the lower belly. A firm uterus is a good thing as it will stop the mom from bleeding too much. If the uterus will not stay firm and the bleeding is heavy, give 10 units Pitocin (oxytocin injection) IM in the mother's thigh or gluteal muscle. Continue to massage the uterus until the bleeding is under control. If the bleeding is not under control, then repeat Pitocin. 156
INCIDENT COMMANDER. Date: Start: End: Position Assigned to: Signature: Initial: Hospital Command Center (HCC) Location: Telephone:
 Location: Telephone:") COMMAND INCIDENT COMMANDER Mission: Organize and direct the Hospital Command Center (HCC). Give overall strategic direction for hospital incident management and support activities, including emergency
COMMAND INCIDENT COMMANDER Mission: Organize and direct the Hospital Command Center (HCC). Give overall strategic direction for hospital incident management and support activities, including emergency
INCIDENT COMMANDER. Date: Start: End: Position Assigned to: Signature: Initial: Hospital Command Center (HCC) Location: Telephone:
 Location: Telephone:") COMMAND INCIDENT COMMANDER Mission: Organize and direct the Hospital Center (HCC). Give overall strategic direction for hospital incident management and support activities, including emergency response
COMMAND INCIDENT COMMANDER Mission: Organize and direct the Hospital Center (HCC). Give overall strategic direction for hospital incident management and support activities, including emergency response
MEDICAL-TECHNICAL SPECIALIST: BIOLOGICAL/INFECTIOUS DISEASE
 BIOLOGICAL/INFECTIOUS DISEASE Mission: Advise the Incident Commander or Section Chief, as assigned, on issues related to biological or infectious disease emergency response. Position Reports to: Incident
SUPPLY UNIT LEADER. Acquire, inventory, maintain, and provide medical and non-medical care equipment, supplies, and pharmaceuticals.
 Mission: Acquire, inventory, maintain, and provide medical and non-medical care equipment, supplies, and pharmaceuticals. Position Reports to: Support Branch Director Command Location: Position Contact
MEDICAL CARE BRANCH DIRECTOR
 Mission: Organize and manage the delivery of emergency, inpatient, outpatient, casualty care, behavioral health, and clinical support services. Position Reports to: Operations Section Chief Command Location:
Pediatric Medical Surge
 Pediatric Medical Surge Exercise Evaluation Guide Final Published Version 1.0 Capability Description: Pediatric Medical Surge is the capability to rapidly expand the capacity of the existing healthcare
Overview September 12, 2014
 Western Region Healthcare Emergency Preparedness Coalition ( WR HEPC) WNY Hospital Pediatric Disaster Preparedness Presentation 2014-15 PDP2 Overview September 12, 2014 1 What is the Goal of PDP2? A separate
PATIENT REGISTRATION UNIT LEADER
 Mission: Organize and manage inpatient and outpatient registration. Position Reports to: Medical Care Branch Director Command Location: Position Contact Information: Phone: ( ) - Radio Channel: Hospital
PATIENT TRACKING MANAGER
 PLANNING SECTION Mission: Monitor and document the location of patients at all times within the hospital's patient care system, and track the destination of all patients departing the facility. Date: Start:
STAGING MANAGER. Organize and manage the deployment of supplementary resources, including personnel, vehicles, equipment, supplies, and medications.
 Mission: Organize and manage the deployment of supplementary resources, including personnel, vehicles, equipment, supplies, and medications. Position Reports to: Operations Section Chief Command Location:
PUBLIC INFORMATION OFFICER (PIO)
") Mission: Serve as the conduit for information to internal and external stakeholders, including hospital personnel, visitors and families, and the news media, as approved by the Incident Commander. Position
Mission: Serve as the conduit for information to internal and external stakeholders, including hospital personnel, visitors and families, and the news media, as approved by the Incident Commander. Position
HAZARDOUS MATERIAL SPILL
 SCENARIO A five-gallon holding reservoir for xylene ruptures and spills in an area within your laboratory. The technician in the area attempts to contain the spill by throwing towels over the product.
CASUALTY CARE UNIT LEADER
 Mission: Organize and coordinate the delivery of emergency care to arriving patients. Position Reports to: Medical Care Branch Director Command Location: Position Contact Information: Phone: ( ) - Radio
Mission. Directions. Objectives
 Incident Response Guide: Infectious Disease Mission To effectively and efficiently identify, triage, isolate, treat, and track a surge of potentially infectious patients and staff, and to manage the uninjured,
EXPLOSIVES ATTACK IMPROVISED EXPLOSIVE DEVICE
 SCENARIO The Universal Adversary terrorist group has detonated a vehicle bomb in the parking lot of the community s largest public building during business hours. The building is currently hosting a convention
International TRAINING CENTRE
 _ International TRAINING CENTRE _ INTERNATIONAL TRAINING CENTRE We are pleased to introduce King s College Hospital London - International Training Centre (ITC). Our ITC s vision is to improve overall
BASIC Designated Level
 County Date of Survey BASIC Designated Level Type of Survey Name of Facility Hospital License # Address Telephone ( ) Manager / Director Fax ( ) License / Certificate # # of Bays Surveyor s Signature Date
Incident Planning Guide: Infectious Disease
 Incident Planning Guide: Infectious Disease Definition This Incident Planning Guide is intended to address issues associated with infectious disease outbreaks. Infectious disease incidents can come from
Perinatal Designation Matrix 3/21/07
 Codes: N = Neonatal Criteria M= Maternal Criteria P= Perinatal Criteria (both N & P) Perinatal Designation Matrix 3/21/07 Service/ 1. (N) Minimum NICU bed capacity Minimum of 10 NICU beds. Minimum of 15
INCIDENT COMMANDER. Hospital Command Center (HCC): Phone: ( ) - Fax: ( ) - Signature: Initials: End: : hrs. Signature: Initials: End: : hrs.
: Phone: ( ) - Fax: ( ) - Signature: Initials: End: : hrs. Signature: Initials: End: : hrs.") Mission: Organize and direct the Hospital Command Center (HCC). Give overall strategic direction for hospital incident management and support activities, including emergency response and recovery. Approve
Mission: Organize and direct the Hospital Command Center (HCC). Give overall strategic direction for hospital incident management and support activities, including emergency response and recovery. Approve
FINANCE/ADMINISTRATION SECTION CHIEF
 FINANCE/ADMINISTRATION SECTION CHIEF Mission: Monitor the utilization of financial assets and the accounting for financial expenditures. Supervise the documentation of expenditures and cost reimbursement
INFRASTRUCTURE BRANCH DIRECTOR
 Mission: Organize and manage the services required to sustain and repair the hospital s infrastructure operations: power/lighting; water/sewer, heating, ventilation, and air conditioning (HVAC), buildings/grounds;
South Central Region EMS & Trauma Care Council Patient Care Procedures
 South Central Region EMS & Trauma Care Council Patient Care s Table of Contents PCP #1 Dispatch PCP #2 Response Times PCP #3 Triage and Transport PCP #4 Inter-Facility Transfer PCP #5 Medical Command at
Hospital Care and Trauma Management Nakhon Tipsunthonsak Witaya Chadbunchachai Trauma Center Khonkaen, Thailand
 Hospital Care and Trauma Management Nakhon Tipsunthonsak Witaya Chadbunchachai Trauma Center Khonkaen, Thailand Health protection and disease prevention Needs Assessment Disasters usually have an unforeseen,
American Heart Association Classes CPR ACLS PALS Pediatric Advanced Life Support (PALS)
") ACE 4 EMS educators will be available to teach a course in your area during 2016. The dates are as follows: June 4 & 5, 2016 June 25 & 26, 2016 August 27 & 28, 2016 September 24 & 25, 2016 November 12
ACE 4 EMS educators will be available to teach a course in your area during 2016. The dates are as follows: June 4 & 5, 2016 June 25 & 26, 2016 August 27 & 28, 2016 September 24 & 25, 2016 November 12
CYBER ATTACK SCENARIO
 SCENARIO A disgruntled former hospital employee with exceptional computer skills hacks into the hospital network from their home computer and plants a very aggressive computer virus into the Computer-Aided
St. Vincent s Health System Page 1 of 11. TITLE: Mass Casualty Plan Code Yellow 12/11/07 12/11/07
 St. Vincent s Health System Page 1 of 11 TITLE: Mass Casualty Plan Code Yellow FACILITY: St. Vincent s East FUNCTION: ORIGINATING DEPT: Safety HOSPITAL SHARED POLICY? Yes No DOCUMENT NUMBER: 802 ORIGINATION
Your facility is having a baby boom. The number of cesarean births is
 Clinical management Ensuring a comparable standard of care for cesarean deliveries Your facility is having a baby boom. The number of cesarean births is exceeding the obstetrical unit s capacity. Administrators
TRAUMA CENTER REQUIREMENTS
 California Trauma Center Level III Criteria California Code of Regulations,, Chapter 7 - Trauma Care System with American College of Surgeons (Green Book) references; includes FAQ clarifications TRAUMA
EM-413a HOSPITAL SURGE/OVERLOAD
 Mission: To safely manage periods of limited bed capacity, facilitate the timely admission of patients, and minimize holding time in the emergency department (ED). Directions Objectives Read this entire
Sankei Shinbun Syuppan Co.,Ltd. READI-J-V. Readiness Estimate And Deployability Index Japanese-Version
 Sankei Shinbun Syuppan Co.,Ltd. READI-J-V Readiness Estimate And Deployability Index Japanese-Version Purpose: The purpose of the READI -J-V is to estimate out how ready nurses are for a disaster or terrorist
(Name of Organization) Model Hospital Mutual Aid Memorandum of Understanding 1
 Model Hospital Mutual Aid Memorandum of Understanding 1") (Name of Organization) Model Hospital Mutual Aid Memorandum of Understanding 1 I. Introduction and Background (month, day, year) As in other parts of the nation, (name of city, county, and or state served
(Name of Organization) Model Hospital Mutual Aid Memorandum of Understanding 1 I. Introduction and Background (month, day, year) As in other parts of the nation, (name of city, county, and or state served
DOCUMENTATION UNIT LEADER
 Mission: Maintain accurate and complete incident files, including a record of the response and recovery actions; provide duplication services to incident personnel; file, maintain, and store incident documents
Basic Life Support (BLS)
") Basic Life Support (BLS) The Basic Life Support (BLS) for Healthcare Providers Classroom Course is designed to provide a wide variety of healthcare professionals the ability to recognize several life-threatening
Basic Life Support (BLS) The Basic Life Support (BLS) for Healthcare Providers Classroom Course is designed to provide a wide variety of healthcare professionals the ability to recognize several life-threatening
Hospital Surge Capacity for Mass Casualty Events The Israeli System
 Hospital Surge Capacity for Mass Casualty Events The Israeli System Kobi Peleg, PhD, MPH Head, National Center Trauma & Emergency Medicine Research Head, Disaster medicine Department, School of Public
CODE ORANGE. MASS CASUALTY INCIDENT (MCI) RESPONSE PLAN Covenant Health Edmonton Acute Care Hospitals
 RESPONSE PLAN Covenant Health Edmonton Acute Care Hospitals") Code Orange 1 CODE ORANGE MASS CASUALTY INCIDENT (MCI) RESPONSE PLAN Covenant Health Edmonton Acute Care Hospitals This document contains information specific to Grey Nuns Hospital (page 14) and information
Code Orange 1 CODE ORANGE MASS CASUALTY INCIDENT (MCI) RESPONSE PLAN Covenant Health Edmonton Acute Care Hospitals This document contains information specific to Grey Nuns Hospital (page 14) and information
TABLE OF CONTENTS OVERVIEW... 2 RECRUITMENT... 2 TRAINING... 4 EXERCISES... 6 PARTNERSHIPS... 6 ADVISORY BOARD... 8 NEXT STEPS IN
 TABLE OF CONTENTS OVERVIEW... 2 RECRUITMENT... 2 TRAINING... 4 EXERCISES... 6 PARTNERSHIPS... 6 ADVISORY BOARD... 8 NEXT STEPS IN 2012... 9 OVERVIEW The Stanislaus County Medical Reserve Corps (SCMRC)
II. DEFINITION OF TERMS
 : Pediatric MANUAL: Clinical Page: 1of 10 I. PURPOSE: A. To define a standardized response for pediatric medical emergency or suspected cardiopulmonary arrest. II. DEFINITION OF TERMS: A. Neonate: Infant
Organization and Administration
 rganization and Administration Supersedes: 08-14-06 Effective: 02-23-11 Boston EMS is structured into a series of organizational components that represent functional groupings of employees performing similar
Fifteen Minutes til 50 Patients Rapid Response to Mass Casualty Incidents
 Fifteen Minutes til 50 Patients Rapid Response to Mass Casualty Incidents Christopher Riccardi, CHSP, CHEP, CHCM-SEC Emergency Management Officer & Disaster Preparedness & Project Coordinator Providence
The Basics of Disaster Response
 The Basics of Disaster Response Thomas D. Kirsch, MD, MPH, FACEP Center for Refugee and Disaster Response Johns Hopkins Bloomberg School of Public Health Office of Critical Event Preparedness and Response
LEVEL I PATIENT SURGE
 Incident Response Guide for Response to an external disaster will require the management of potential increases in patient population. The following Incident Response Guide addresses the four levels of
PATIENT EVACUATION PLANNING AND RESPONSE FORM FOR SENDING (EVACUATING) HOSPITALS
 HOSPITALS") PATIENT EVACUATION PLANNING AND RESPONSE FORM FOR SENDING (EVACUATING) HOSPITALS Instructions: This form can be used to planning for and respond to hospital evacuations. Only PURPLE cells can be edited.
PATIENT EVACUATION PLANNING AND RESPONSE FORM FOR SENDING (EVACUATING) HOSPITALS Instructions: This form can be used to planning for and respond to hospital evacuations. Only PURPLE cells can be edited.
Base Hospital Advanced Life Support Program for Durham Region
 Title: Purpose and Goals of the Base Hospital Program Number: 2.1 Category: 2.0 Base Hospital Roles and Responsibilities Written By: M. Epp Approved By: Dr. R. Vandersluis Issue Date: October 2002 Review
Medical Staff Rules & Regulations Last Updated: October University Hospital Medical Staff. Rules & Regulations
 University Hospital Medical Staff Rules & Regulations 1 UNIVERSITY HOSPITAL MEDICAL STAFF RULES AND REGULATIONS The Medical Staff shall adopt Rules and Regulations as may be necessary to implement the
Composition per 24-Hour Coverage. Equipment/ Supplies. Will Vary by Team Type
 : Public Health: Epidemiology (Surveillance and Investigation) Health and Medical : This team identifies, monitors, and investigates disease outbreaks, injuries, or other conditions of Public Health importance.
HENDRICKS REGIONAL HEALTH EMERGENCY MEDICINE RULES AND REGULATIONS
 I. Scope of Service HENDRICKS REGIONAL HEALTH EMERGENCY MEDICINE RULES AND REGULATIONS The Emergency Department offers emergency care twenty-four hours a day with at least one physician experienced in
The State Medical Response System of Mississippi
 The State Medical Response System of Mississippi Define Disaster Needs > Resources = Disaster When the need for resources is (or will be) greater than the resources available, you have a disaster. Response
This Annex describes the emergency medical service protocol to guide and coordinate actions during initial mass casualty medical response activities.
 A N N E X C : M A S S C A S U A L T Y E M S P R O T O C O L This Annex describes the emergency medical service protocol to guide and coordinate actions during initial mass casualty medical response activities.
Oswego County EMS. Multiple-Casualty Incident Plan
 Oswego County EMS Multiple-Casualty Incident Plan Revised December 2013 IF this is an actual MCI THEN go directly to the checklist section on page 14. 2 Index 1. Purpose 4 2. Objectives 4 3. Responsibilities
Neurocritical Care Fellowship Program Requirements
 Neurocritical Care Fellowship Program Requirements I. Introduction A. Definition The medical subspecialty of Neurocritical Care is devoted to the comprehensive, multisystem care of the critically-ill neurological
Part I. New York State Laws and Regulations PRENATAL CARE ASSISTANCE PROGRAM (i.e., implementing regs on newborn testing program)
") Part I. New York State Laws and Regulations PRENATAL CARE ASSISTANCE PROGRAM (i.e., implementing regs on newborn testing program) (SEE NY Public Health Law 2500f for HIV testing of newborns FOR STATUTE)
Part I. New York State Laws and Regulations PRENATAL CARE ASSISTANCE PROGRAM (i.e., implementing regs on newborn testing program) (SEE NY Public Health Law 2500f for HIV testing of newborns FOR STATUTE)
EMERGENCY MEDICAL SERVICES (EMS)
") Bismarck State College 2018-2019 Catalog 1 EMERGENCY MEDICAL SERVICES (EMS) EMS 110. Emergency Medical Technician Credits: 4 Prerequisite: Completion of a healthcare provider level CPR (BLS) Course. Corequisites:
Bismarck State College 2018-2019 Catalog 1 EMERGENCY MEDICAL SERVICES (EMS) EMS 110. Emergency Medical Technician Credits: 4 Prerequisite: Completion of a healthcare provider level CPR (BLS) Course. Corequisites:
Multiple Patient Management Plan
 2018 [NAME OF PLAN] Multiple Patient Management Plan Marin County Health & Human Services Emergency Medical Services Agency Supports the Marin County Operational Area Emergency Operations Plan and Medical
KENTUCKY HOSPITAL ASSOCIATION OVERHEAD EMERGENCY CODES FREQUENTLY ASKED QUESTIONS
 KENTUCKY HOSPITAL ASSOCIATION OVERHEAD EMERGENCY CODES FREQUENTLY ASKED QUESTIONS Question - Why have standard overhead emergency codes? Answer Lessons learned from recent disasters shows that the resources
Yale New Haven Center for Emergency Preparedness and Disaster Response
 Education and Training Yale New Haven Center for Emergency Preparedness and Disaster Response 2008 Fall/Winter Course Guide About Our Courses The Yale New Haven Center for Emergency Preparedness and Disaster
ANNEX 8 ESF-8- HEALTH AND MEDICAL SERVICES. South Carolina Department of Health and Environmental Control
 ANNEX 8 ESF-8- HEALTH AND MEDICAL SERVICES COORDINATING: PRIMARY: South Carolina Department of Health and Environmental Control South Carolina Department of Administration (Veterans Affairs); South Carolina
Effective Date: 7/2004
 MEDICAL STAFF POLICY & PROCEDURE Page 1 of 6 Effective Date: 7/2004 Review/Revised: 9/1/2011 Policy No. MSP 003 Purpose: To assure that physicians at all levels are familiar with their roles during the
Course ID March 2016 COURSE OUTLINE. EMT 140 Emergency Medical Technician (EMT)
") Page 1 of 5 Degree Applicable Glendale Community College Course ID 0005017 March 2016 I. Catalog Statement COURSE OUTLINE EMT 140 Emergency Medical Technician (EMT) EMT 140 is designed to prepare students
Page 1 of 5 Degree Applicable Glendale Community College Course ID 0005017 March 2016 I. Catalog Statement COURSE OUTLINE EMT 140 Emergency Medical Technician (EMT) EMT 140 is designed to prepare students
Mission. Directions. Objectives
 Incident Response Guide: Tornado Mission To provide a safe environment for patients, staff, and visitors within the hospital before and after a tornado impacts the campus, structural integrity of the buildings
S:\Mutual Aid Agreements\Mutual Aid MOU final draft doc
 Hospital Mutual Aid Memorandum of Understanding This Hospital Mutual Aid Memorandum of Understanding is entered into as of, 2006, by, a Maine nonprofit corporation operating a licensed hospital in, Maine.
EMS Subspecialty Certification Review Course. Mass Casualty Management (4.1.3) Question 8/14/ Mass Casualty Management
 Question 8/14/ Mass Casualty Management") EMS Subspecialty Certification Review Course 4.1.3 Mass Casualty Management Version: 2017 Mass Casualty Management (4.1.3) Overview of Emergency Management Overview of National Response Framework Local,
EMS Subspecialty Certification Review Course 4.1.3 Mass Casualty Management Version: 2017 Mass Casualty Management (4.1.3) Overview of Emergency Management Overview of National Response Framework Local,
PEPIN COUNTY EMERGENCY SUPPORT FUNCTION (ESF) 8 PUBLIC HEALTH AND MEDICAL
 8 PUBLIC HEALTH AND MEDICAL") PEPIN COUNTY EMERGENCY SUPPORT FUNCTION (ESF) 8 PUBLIC HEALTH AND MEDICAL LEAD AGENCY: SUPPORT AGENCIES: STATE PARTNERS: Pepin County Health Department Pepin County Emergency Management Pepin County Human
PEPIN COUNTY EMERGENCY SUPPORT FUNCTION (ESF) 8 PUBLIC HEALTH AND MEDICAL LEAD AGENCY: SUPPORT AGENCIES: STATE PARTNERS: Pepin County Health Department Pepin County Emergency Management Pepin County Human
Emergency Support Function (ESF) 16 Law Enforcement
 16 Law Enforcement") Emergency Support Function (ESF) 16 Law Enforcement Primary Agency: Support Agencies: Escambia County Sheriff's Office City of Pensacola Police Department Escambia County Clerk of Circuit Court Administration
Emergency Support Function (ESF) 16 Law Enforcement Primary Agency: Support Agencies: Escambia County Sheriff's Office City of Pensacola Police Department Escambia County Clerk of Circuit Court Administration
(908)
") Atlantic Training Center (ATC), a division of Atlantic Ambulance Corporation, is one of New Jersey s largest providers of emergency medical education. Our courses include: Emergency Medical Technician
Atlantic Training Center (ATC), a division of Atlantic Ambulance Corporation, is one of New Jersey s largest providers of emergency medical education. Our courses include: Emergency Medical Technician
CITY OF HAMILTON EMERGENCY PLAN. Enacted Under: Emergency Management Program By-law, 2017
 CITY OF HAMILTON EMERGENCY PLAN Enacted Under: Emergency Management Program By-law, 2017 REVISED: October 27, 2017 October 2017 2 TABLE OF CONTENTS 1. Introduction... 7 1.1. Purpose... 7 1.2. Legal Authorities...
Professional Education 2018 Courses Where the Pros GO
 2018 Courses Where the Pros GO Take a seat at the head of the class, and your career, with our continuing professional education courses. Our professional education offerings set the standards you need
Contra Costa EMSC Pediatric Emergency Training Program Comparison
 Training Comparison ENPC Nurse Course Directed to Room Nurses. Initial Presents core level Nurses knowledge to and 16 hours Association psychomoter skills with 8 in associated with nursing hour cooperatio
Survey of Nurse Employers in California 2014
 Survey of Nurse Employers in California 2014 Conducted by UCSF Philip R. Lee Institute for Health Policy Studies, California Institute for Nursing & Health Care, and the Hospital Association of Southern
Incident Planning Guide: Mass Casualty Incident Page 1
 Incident Planning Guide: Mass Casualty Incident Definition This Incident Planning Guide is intended to address issues associated with a mass casualty incident and subsequent patient surge, regardless of
CENTRAL CALIFORNIA EMERGENCY MEDICAL SERVICES A Division of the Fresno County Department of Public Health
 CENTRAL CALIFORNIA EMERGENCY MEDICAL SERVICES A Division of the Fresno County Department of Public Health Manual: Subject: Emergency Medical Services Administrative Policies and Procedures Multi-Casualty
Marin County EMS Agency
 Marin County EMS Agency Multiple Patient Management Plan Excellent Care Every Patient, Every Time July 2013 899 Northgate Drive #104, San Rafael, CA 94903 ph. 415-473-6871 fax 415-473-3747 www.marinems.org
Neonatal Rules Webinar
 Neonatal Rules Webinar Today is the Level III Neonatal Intensive Care Unit (NICU) and Level IV Advanced NICU Rules Webinar. Power Point Presentation and Webinar link will be mailed out to participants,
Stanislaus County Healthcare Coalition Mutual Aid Memorandum of Understanding for Healthcare Facilities January 2007
 Stanislaus County Healthcare Coalition Mutual Aid Memorandum of Understanding for Healthcare Facilities January 2007 I. Introduction and Background The healthcare providers located within Stanislaus County
Thank you for your interest in the Johns Hopkins Go Team! To learn more, please read the following information below.
 THE JOHNS HOPKINS GO TEAM Frequently Asked Questions Thank you for your interest in the Johns Hopkins Go Team! To learn more, please read the following information below. What is the Johns Hopkins Go Team?
On Improving Response
 On Improving Response Robert B Dunne MD FACEP The main focus of hospitals in a disaster is to preserve life and health. Disaster preparedness often focuses on technical details and misses the big picture
Internal Scenario 1 BOMB THREAT SCENARIO
 Internal Scenario 1 BOMB THREAT SCENARIO Your hospital main switchboard receives a call stating that an explosive device has been placed within your facility and will detonate within 60 minutes. Based
Emergency Support Function (ESF) 6 Mass Care
 6 Mass Care") Emergency Support Function (ESF) 6 Mass Care Lead Coordinating Agency: Support Agencies: American Red Cross of Northwest Florida The Salvation Army Escambia County Department of Health Escambia County
Emergency Support Function (ESF) 6 Mass Care Lead Coordinating Agency: Support Agencies: American Red Cross of Northwest Florida The Salvation Army Escambia County Department of Health Escambia County
Episode 193 (Ch th ) Disaster Preparedness
 Disaster Preparedness") Episode 193 (Ch. 192 9 th ) Disaster Preparedness Episode Overview: 1) Define a disaster 2) Describe PICE nomenclature 3) List 6 potentially paralytic PICE 4) List 6 critical substrates for hospital operations
Episode 193 (Ch. 192 9 th ) Disaster Preparedness Episode Overview: 1) Define a disaster 2) Describe PICE nomenclature 3) List 6 potentially paralytic PICE 4) List 6 critical substrates for hospital operations
Incident Command System National Incident Management System for Community Based Health Care Centers Staff
 Incident Command System National Incident Management System for Community Based Health Care Centers Staff Kevin O Hara, EMT-P Deputy Chief Instructor Nassau County EMS Training Academy Program is funded
Advanced Cardiac Life Support Provider & Provider Renewal Courses 2018 (ACLS & ACLS-R)
") Advanced Cardiac Life Support Provider & Provider Renewal Courses 2018 (ACLS & ACLS-R) Baptist Health is an authorized American Heart Association (AHA) provider and has approved these courses for Continuing
Advanced Cardiac Life Support Provider & Provider Renewal Courses 2018 (ACLS & ACLS-R) Baptist Health is an authorized American Heart Association (AHA) provider and has approved these courses for Continuing
As Introduced. 132nd General Assembly Regular Session S. B. No Senator Skindell Cosponsor: Senator Williams A B I L L
 132nd General Assembly Regular Session S. B. No. 55 2017-2018 Senator Skindell Cosponsor: Senator Williams A B I L L To amend sections 3727.50, 3727.51, 3727.52, and 3727.53 and to enact sections 3727.80
Wadsworth-Rittman Hospital EMS Protocol
 Wadsworth-Rittman Hospital EMS Protocol Prehospital Advanced Life Support Protocol Revised: May 2004 Version 04.1 DISCLAIMER Every attempt has been made to reflect sound medical guidelines and protocols
Operational Plan in Support of the Finger Lakes Public Health Alliance Intermunicipal Agreement Between the Counties of Chemung, Livingston, Monroe,
 Operational Plan in Support of the Finger Lakes Public Health Alliance Intermunicipal Agreement Between the Counties of Chemung, Livingston, Monroe, Ontario, Schuyler, Seneca, Steuben, Wayne, and Yates
ANNEX 8 ESF-8- HEALTH AND MEDICAL SERVICES. SC Department of Health and Environmental Control
 ANNEX 8 ESF-8- HEALTH AND MEDICAL SERVICES PRIMARY: SUPPORT: SC Department of Health and Environmental Control SC Department of Administration (Veterans Affairs); SC National Guard; SC Department of Labor,
ACS Staffing Plan. Policy
 ACS Staffing Plan Purpose The purpose of the ACS Staffing Plan is to outline a process for identifying and obtaining initial staff and maintaining adequate staffing levels for the operation of an Alternate
POSITION DESCRIPTION COLUMBUS REGIONAL HEALTHCARE SYSTEM CERTIFIED REGISTERED NURSE ANESTHETIST
 POSITION DESCRIPTION COLUMBUS REGIONAL HEALTHCARE SYSTEM JOB TITLE CERTIFIED REGISTERED NURSE ANESTHETIST JOB CODE 0265 DEPARTMENT FLSA (Exempt/Non-Exempt) ANESTHESIA Non-Exempt DEPARTMENT DIRECTOR SIGNATURE
Nursing Unit Descriptions UCHealth Memorial Hospital Central
 Nursing Unit Descriptions UCHealth Memorial Hospital Central ACUTE CARE SERVICES Neuroscience 5C Neuroscience is a 24-bed unit with all private rooms for our patients. The department specializes in acute
CITY OF VIRGINIA BEACH DEPARTMENT OF EMERGENCY MEDICAL SERVICES STRATEGIC PLAN
 CITY OF VIRGINIA BEACH DEPARTMENT OF EMERGENCY MEDICAL SERVICES STRATEGIC PLAN 2015-2020-2030 Published: 10/27/14 Last update: 10/27/14 CITY OF VIRGINIA BEACH DEPARTMENT OF EMERGENCY MEDICAL SERVICES STRATEGIC
Functional Annex: Mass Casualty April 13, 2010 FUNCTIONAL ANNEX: MASS CASUALTY
 FUNCTIONAL ANNEX: MASS CASUALTY The Mass Casualty Plan includes the transfer and tracking of patients from the incident site to a medical care facility, establishment of MOA Alternate Care Sites (ACS),
CAMBRIA-SOMERSET COUNCIL FOR EDUCATION OF HEALTH PROFESSIONALS, INC COURSES. Advanced Cardiac Life Support (ACLS)
") Cambria-Somerset Council G 24 Owen Library Pitt Johnstown 450 Schoolhouse Road Johnstown, PA 15904-2990 Address Service Requested CAMBRIA-SOMERSET COUNCIL FOR EDUCATION OF HEALTH PROFESSIONALS, INC. 2017
Cambria-Somerset Council G 24 Owen Library Pitt Johnstown 450 Schoolhouse Road Johnstown, PA 15904-2990 Address Service Requested CAMBRIA-SOMERSET COUNCIL FOR EDUCATION OF HEALTH PROFESSIONALS, INC. 2017
SAN LUIS OBISPO CITY FIRE EMERGENCY OPERATIONS MANUAL E.O MULTI-CASUALTY INCIDENTS Revised: 8/14/2015 Page 1 of 10. Purpose.
 Revised: 8/14/2015 Page 1 of 10 Purpose The establishment of these procedures is designed to provide an organized, coordinated and expandable resource management approach to be utilized by the numerous
Oklahoma Public Health and Medical Response System Overview
 Oklahoma Public Health and Medical Response System Overview Introduction Oklahoma is a large and diverse state located on the Southern Great Plains of the United States. The State covers an area of 69,903
Office of the Assistant Secretary for Preparedness and Response
 Office of the Assistant Secretary for Preparedness and Response Gregg Lord, MS, NREMT-P Director, Emergency Care Coordination Center HHS/ASPR Office of the Assistant Secretary for Preparedness and Response
Benton Franklin Counties MCI PLAN MASS CASUALTY INCIDENT PLAN
 Benton Franklin Counties MCI PLAN MASS CASUALTY INCIDENT PLAN Adopted January 2000 Revised February 2008 TABLE OF CONTENTS 1.0 Purpose 2.0 Policy 3.0 Definitions 4.0 Organizations Affected 5.0 Standard
PARAMEDIC STUDENT FIELD INTERNSHIP GUIDE
 Through field experience in the emergency ambulance, the paramedic student will develop a more comprehensive understanding of the pathophysiology of disease and trauma, rationale for treatments rendered,
Dear ACLS-A Student, Feel free to contact us if we can be of any assistance. Founder Iridia Medical
 Thank you for choosing Iridia Medical for your Advanced Cardiac Life Support (ACLS) training. Since 1998, Iridia Medical has taken the lead in ACLS programs in British Columbia, delivering ACLS courses
BACKGROUND. Emergency Departments in Smaller Centres and Rural Communities
 EXPECTATIONS OF PHYSICIANS NOT CERTIFIED IN EMERGENCY MEDICINE INTENDING TO INCLUDE EMERGENCY MEDICINE AS PART OF THEIR RURAL PRACTICE CHANGING SCOPE OF PRACTICE PROCESS BACKGROUND The CPSO Ensuring Competence:
North York General Hospital Policy Manual
 ORIGINATOR: Code Blue/Pink Committee APPROVED By: Operations Committee Medical Advisory Committee ORIGINAL DATE APPROVED: September, 1999 DATE REVIEWED: April, 2012 DATE OF IMPLEMENTATION: June 29, 2012
CAH PREPARATION ON-SITE VISIT
 CAH PREPARATION ON-SITE VISIT Illinois Department of Public Health, Center for Rural Health This day is yours and can be flexible to the timetable of hospital staff. An additional visit can also be arranged