USDA. Self-Help Automated Reporting and Evaluation System SHARES 1.0. User Guide
|
|
|
- Buck Anthony
- 6 years ago
- Views:
Transcription

1 USDA Self-Help Automated Reporting and Evaluation System SHARES 1.0 User Guide
2 Table of Contents CHAPTER 1 - INTRODUCTION TO SHARES What is SHARES? Who can access SHARES? Who can I contact for Help?... 7 CHAPTER 2 GETTING STARTED What do I need? How do I access the SHARES Home Page?... 8 CHAPTER 3 GETTING TO KNOW SHARES What screens does each module contain? Grant screen Grant Search screen Grant List Grant Funds screen Offices screen Grant Reviews screen Lots List screen Houses List screen Grant Problems screen Metrics screens Grant Comments screen Borrower Search screen Borrower List Borrower screen Borrower Dates screen Borrower Funds screen Lot screen House screen Construction screen Grant screen (Read-Only) Borrower Comments screen Entity screen Entity List screen Entity screen Entity Address screen Entity Contact screen Entity Individuals screen
3 3.2 What screen controls are available within SHARES? CHAPTER 4 ENTERING DATA INTO SHARES Adding and Updating a Grant Updating a Grant Adding and Updating Grant Funds Adding and Updating RD Offices that service a Grant Adding and Updating Grant Reviews Adding and Updating Lots Adding and Updating Houses Adding and Updating Grant Problems Reviewing Grant Metrics Adding and Updating Grant Comments Adding and Updating a Borrower Entering Borrower Dates Adding and Updating Borrower Funds Adding and Updating Lot from Borrower module Adding and Updating House from Borrower module Updating Construction one Borrower at a time Updating Construction across a Borrower Group Reviewing Grant within the Borrower module Adding and Updating Borrower Comments Adding and Updating an Entity Updating an Entity Adding and Updating an Entity Address Adding and Updating Entity Contacts Adding and Updating Entity Individuals
4 4.4 Deleting data in SHARES Deleting Grant data in SHARES Deleting Grant Funds Deleting Grant Reviews Deleting Lots Deleting Houses Deleting Grant Problems Deleting Grant Comments Deleting Borrower data in SHARES Deleting Borrower Funds CHAPTER 5 - REPORTS SHARES Report SHARES Report Matrix
5 CHAPTER 1 - INTRODUCTION TO SHARES 1.1 WHAT IS SHARES? SHARES is an acronym for Self-Help Automated Reporting and Evaluation System. It is a web-based application designed to manage, track and evaluate the status of the Self-Help Housing Section 523 Grant Program as well share this information with all parties who provide assistance to the program. The application is divided into two our distinct modules. From the SHARES Home page you can access a Table of Contents page that includes a host of topics that provide background information on the 523 Grant program. This background information includes the 523 regulations and exhibits that govern the delivery of the Self-Help Housing program. Other topics link the user to related web sites such as those dealing with building codes or the weather across the nation. The intent was to provide the user with a ready reference to the information related to the 523 Grant program. The second component of SHARES is the automated application itself. The application allows the user to enter Grant related information and generate reports, including the quarterly SHARES Report. Multiple users can access the data using the internet with their web browser though all web browsers may not be supported. This precludes the need to install the application on user computers. The data is stored in a centralized database and thus available for reporting as soon as any updates have been saved to the database by the user entering it. 1.2 WHO CAN ACCESS SHARES? The SHARES system is used by Grantees, Contractors, RD Office employees and RD National Office employees. Security is designed so that Grantees can only see and update their own Grants. Contractors can only see and update Grants associated to Grantees they support. RD Office employees can only see and update Grants that they are set up to service. RD National Office employees can see and update all Grants. To provide greater ease of the use the application is broken up into four major modules, Grant, Borrower, Entity and Reports. Grant module designed for users when they are reviewing, entering or updating Grant level data or want to see all the Houses or Lots related to a Grant single grant. Screens (or tabs) related to the Grant module include; Grant, Grant Funds, Offices (serving that grant), Grant Reviews, Lots, Houses, Problems, Grant Metrics and Grant Comments. Borrower module designed for users when they are reviewing, entering or updating Borrower level data. Screens (or tabs) related to the Borrower module include; Borrower, Dates, Borrower Funds, Lot, House, Construction, Grant (read-only) and Borrower Comments. 5
6 Entity module designed for users when they are reviewing, entering or updating Grantee or Contractor level data. Screens (or tabs) related to the Entity module include; Entity, Address, Contacts, Individuals, Entity Comments. Reports module presents a menu from which the user can select the report they want to generate and then they will be presented with a screen to allow them to select various filters to limit the data displayed on the report selected. 6
7 1.3 WHO CAN I CONTACT FOR HELP? To assist the Grantees use the SHARES application, the USDA National Office has enlisted the help of several Technical Resource Coordinators (TRCs) from each of the four Regions. The TRCs are part of the T&MA Contractor staff. They work closely with the Grantees in their region to assist them in executing the Self-Help program and the SHARES application. They can also provide additional training when necessary. As of the publication of this document below are the names of phone numbers and addresses of the Technical Resource Coordinators that can help you. This list is also available on the SHARES Help page along with a link to this User Guide. Region 1: Florida Non-Profit Housing, Inc. Teresa Hunt (863) fnph@earthlink.net Region 2: Little Dixie Community Action Agency Owyne Gardner (580) ogardner@ldcaa.org Alyssa Pillars (580) apillars@ldcaa.org Region 3: NCALL Research, Inc. Meghan Fitzgerald (302) mfitzgerald@ncall.org Region 4: Rural Community Assistance Corporation Nancy Jacobsen (406) njacobsen@rcac.org 7
 version 8 or greater (other browsers will be supported in")
8 CHAPTER 2 GETTING STARTED 2.1 What do I need? All you need to use SHARES is; a Level-2 eauthid Internet Access strongly recommend broad band access a Web Browser (Internet Explorer (IE) version 8 or greater (other browsers will be supported in later releases) be assigned Rural Development security to your proper SHARES Role (i.e., Grantee, Contractor, RD Office, RD National Office, SHARES Administrator). This will be handled through the RD National Office in conjunction with RD Security 2.2 How do I access the SHARES Home Page? The following url is for the SHARES Home Page. It s useful to save it as a Bookmark in your browser; The site is password protected and the user requires a Level-2 Eauth id in order to gain access. 8

9 After clicking the Login button the user will see the SHARES Home page displayed. Unlike the previous version of SHARES that required a 2 nd User id and password to be entered by the user, the new release will not challenge the user for an id and password other than their Eauth id and password. Resetting the Eauth password can be accomplished using the normal USDA Eauth password reset procedures. 9
10 CHAPTER 3 GETTING TO KNOW SHARES The SHARES application is comprised of the four modules referenced earlier; Grant, Borrower, Entity and Reports. When the user needs to enter, update or delete Grant related information such as Grant, Grant Funds, Grant servicing Offices, Grant Reviews, Lots, Houses, Problems or Comments they start the process by moving their mouse over the Grant option under the Left Navigation panel of the SHARES Home Page. Upon doing so a box with two options will appear; Add Grant and Search-List-Update Grant. If the user needs to enter an entirely new Grant then they will want to click the Add Grant option otherwise they will want to click the Search-List-Update Grant option. 3.1 What screens does each module contain? Below are the screens available within the Grant module; Screen Title Description 1. Grant Search Search for Grants based on various Search criteria 2. Grant List List of Grants that matched a Grant Search s criteria. Allows user to link to a specific grant for inquiry of Grant related details or to update Grant related details 3. Grant Enter and update details related to the Grant 4. Grant Funds Enter, update and delete Funds received and used related to a Grant 5. Offices Associate the RD Offices that service a Grant 6. Reviews Enter, update and delete Reviews related to a Grant 7. Lots Lists Lots related to a Grant and allows the user to add, update and delete Lots and associate Lots to a Borrower 8. Houses Lists Houses related to a Grant and allows the user to add, update and delete Houses and associate Houses to a Lot and a Borrower 9. Problems Enter, update and delete Problems related to a Grant 10. Metrics Displays various metrics related to a Grant related to the Borrowers and Construction status 11. Comments Enter, update and delete Comments related to a Grant 10
11 Grant screen 11
12 Grant Search screen The user can search for a specific or set of Grants by using the Grant Search screen. The screen provides filters on Grant Name, Grantee Name, Region, Status and State. After entering the desired filters and clicking the Submit button to launch the search. 12

13 Grant List Following a successful search the Grants that match the desired search filters will be displayed in a list format in one or more pages. The user can page thru the list using the page controls at the top of the list by clicking on the page numbers or controls of; << << or << or >> or Last. <<<< will return the user to the first page, << will page one page backward, >> will page one page forward and Last will take the user to the last page. The user can click on the Grant Name they desire to update or inquire upon. 13


14 Grant Funds screen Following a successful search the Grant that user wants to update or inquiry and clicking in the Grant Name the user will see the Grant screen by default but the user can click on the Grant Funds tab to add, update or inquire upon the Grant Funds related to the Grant. 14
15 Offices screen Following a successful search the Grant that user wants to update or inquiry and clicking in the Grant Name the user will see the Grant screen by default but the user can click on the Office tab to add, update or inquire upon the Offices servicing a particular Grant. 15
16 Grant Reviews screen Following a successful search the Grant that user wants to update or inquiry and clicking in the Grant Name the user will see the Grant screen by default but the user can click on the Review tab to add, update or inquire upon the Reviews concerning a particular Grant. 16

17 Lots List screen Following a successful search the Grant that user wants to update or inquiry and clicking in the Grant Name the user will see the Grant screen by default but the user can click on the Lots tab to see the Lots associated to a particular Grant and the user can page thru those Lots or click on Lot Number of a particular Lot for update or inquiry of that particular Lot or click on the Add button to add a new Lot. 17

18 Houses List screen Following a successful search the Grant that user wants to update or inquiry and clicking in the Grant Name the user will see the Grant screen by default but the user can click on the Houses tab to see the Houses associated to a particular Grant and the user can page thru those Houses or click on a Borrower Name of a particular House for update or inquiry of that particular House or click on the Add button to add a new House. 18
19 Grant Problems screen Following a successful search the Grant that user wants to update or inquiry and clicking in the Grant Name the user will see the Grant screen by default but the user can click on the Problems tab to see the Problems to date associated to a particular Grant and the user can scroll thru those Problems and update a Problem or add new ones by clicking the icon next to the Problem label to display a list of standard Problem to select from. 19
 metrics related to a particular Grant by clicking the Performance or Borrower radio buttons.")
20 Metrics screens Following a successful search the Grant that user wants to update or inquiry and clicking in the Grant Name the user will see the Grant screen by default but the user can click on the Metrics tab to see the Borrower Income Level and Construction Progress (Performance) metrics related to a particular Grant by clicking the Performance or Borrower radio buttons. Performance Metrics screen: Borrower Metrics screen: 20
21 Grant Comments screen Following a successful search the Grant that user wants to update or inquiry and clicking in the Grant Name the user will see the Grant screen by default but the user can click on the Comments tab to update, inquire upon or add new Comments related to the Grant. 21
22 Below are the screens available within the Borrower module; Screen Title Description 1. Borrower Search Search for Borrowers based on various Search criteria 2. Borrower List List of Borrowers that matched a Borrower Search s criteria. Allows user to link to a specific Borrower for inquiry of Borrower related details or to update Borrower related details 3. Borrower Enter and update details related to the Borrower 4. Borrower Dates Enter, update and Dates related to a Borrower s loan, house and construction 5. Lot Add, update or delete a Lot and associate or disassociate to or from a particular Borrower 6. House Add, update or delete a House and associate or disassociate to or from a particular Borrower 7. Construction Lists the Construction tasks and progress and pledges on those tasks related to the House the borrower is building 8. Comments Enter, update and delete Comments related to a Borrower 22
23 Borrower Search screen 23

24 Borrower List 24

25 Borrower screen 25
26 Borrower Dates screen 26
27 Borrower Funds screen 27
28 Lot screen 28
29 House screen 29
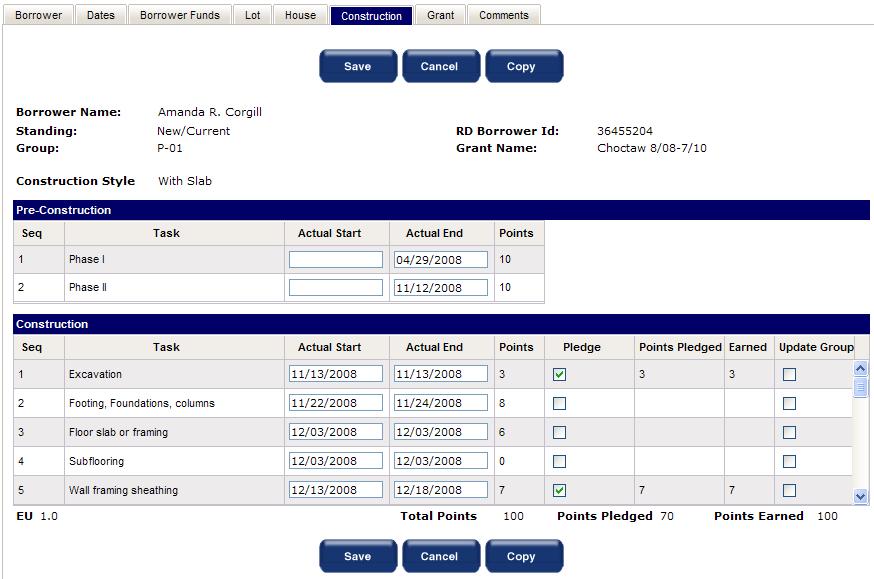
30 Construction screen 30
31 Grant screen (Read-Only) 31
32 Borrower Comments screen 32
33 Below are the screens available within the Entity module; Screen Title Description 1. Entity Search Search for Entities based on various Search criteria 2. Entity List List of Entities that matched an Entity Search s criteria. Allows user to link to a specific Entity for inquiry of an Entity s related details or to update an Entity s related details 3. Entity Enter and update details related to the Entity 4. Entity Address Enter, update and delete an Entity s addresses 5. Entity Contacts Add, update or delete an Entity s contact information 6. Entity Individuals Add, update or delete an Entity s key personnel and roles 7. Entity Comments Enter, update and delete Comments related to an Entity 33
34 Entity screen 34

35 Entity List screen 35
36 Entity screen 36
37 Entity Address screen 37
38 Entity Contact screen 38
39 Entity Individuals screen 39
40 Below are the Report options available within the Report module; 40

41 3.2 What screen controls are available within SHARES? In order to ease the navigation of the SHARES application to enter, update and delete information related to Self-Help Grants, its Borrowers, Home Construction, etc the user has various screen controls available such as; The Left Navigation menu allows the user to switch to a different SHARES module from anywhere in the application. The user can move their mouse over the items in the Navigation menu and be presented with a choice to Add a new Grant or Search for a Grant to Search update its details, Add a new Borrower or Search for a Borrower to update their details, Add a new Entity or Search for an Entity to update its details or be presented with the Report menu. The SHARES application has several buttons to allow the user to acknowledge when they want to Save and other significant actions; The Submit button allows the user to confirm they wish to launch a Search or select one or more items from a list using checkboxes or radio buttons. The Cancel button allows the user to return to the previous screen and cancel out of any changes they have made without saving them to the database. The Save button allows the user save the changes they have made on the current screen and/or previous screens to the database. At some points in the application the user will be required to save changes or fill in required data before changing screens. The Add button allows the user to add another row of fields into which data can be entered. The button is present in Grant Extensions, Grant Funds, Borrower Funds screens among others. 41
42 The Delete row button appears next to items that have a zero or many to one relationship to a higher level data item such as Grant Funds as they relate to a Grant. This button allows the user to delete the row of data that it resides adjacent to. The data will disappear from the screen but in order be deleted from the database the Save button must be clicked. The Delete button allows the user to delete an item of data when there is not a many to one relationship and it s the parent data item such as a Grant or an Entity (Grantee or Contractor). The Copy buttons allows the user to copy selected Construction task data from one Borrower to the other Borrowers within that Borrowers group. 42
43 The SHARES application has several other icon-based controls to allow the user to page thru a list, search for data to associate to a Grant or a Borrower, enter a date, etc; List controls for a page include paging to the first or last from anywhere in the list, paging to the next or previous page or to a specific page in the list. The search icon below when clicked will present the user with a Search screen to enter filtering criteria and then launch a search to produce a list from which to select data to associate to the current Grant or Borrower or other related data elements. The search icon below when clicked will present the user with a Calendar control to allow the user to select a date that once selected will be placed in the date field adjacent to the icon. Drop Down List controls appear throughout the application where a single data element can have a value based on a fixed list of options that will display when the user clicks on the chevron within the control. When the user then clicks on the desired data element from the displayed list the selection will then appear in the field. Radio button controls appear throughout the application when an associated array of data items can only have one value and the user designates which by clicking the button. Check box controls appear throughout the application to either designate an on or off flag situations or to select multiple items from a list by clicking each desired data element adjacent to the checkbox being clicked. Chevron controls appear throughout the application at the top of the List pages to allow the user to change the sorting criteria for the column to or from ascending to descending or vice versa. The bread crumbs are displayed above the screen banner near the top of each screen to the right of the Navigation menu. The bread crumbs display the previous actions from their last Left Navigation selection by the user such as performing a Grant Search entry followed a displayed Grant List and then a Grant being selected from the produced list. As the user rolls their mouse cursor over the individual bread crumb it will become underlined and then can be clicked to return the user to that state such as the Grant List or a Borrower List from a previous Grant or Borrower Search. 43

44 CHAPTER 4 ENTERING DATA INTO SHARES 4.1 Adding and Updating a Grant To add a new Grant into SHARES the user will pass their mouse cursor over the Grant menu item in the Left Navigation Menu and then click left click the Add Grant option. The user will then be presented with an empty Grant screen. The user can then enter the Grant Name, select the Grantee using the search control adjacent to the Grantee Name field, selecting the Status from the drop down list, select the State from the drop down list, select the Contractor from the drop down list and enter the Proposed Number of Homes. These six data elements are required to add a new Grant. The other Grant related can be entered in Add mode or they can be entered later in Update mode. Once the user has completed entering data they can left click the Save button to save the data entered into the SHARES database. Edit and Validation Rules Grant tab Required Fields to add new Grant: Grantee - Required to add or update a Grant, must be a valid Grantee already entered into the system 44
45 Status - Required to add or update a Grant, must be selected from list of valid values in Drop Down list; Predevelopment, Current Grant, Grant for Next Year, Closed, In-Extension. Grant Name - Required to add or update a Grant State - Required to add or update a Grant, must be selected from list of valid values in Drop Down list sourced from FIPS Contractor - Required to add or update a Grant, must be selected from list of valid Contractors maintained in SHARES Proposed # of Homes - Required to add or update a Grant, but can be set to zero if no Borrowers are currently associated to the Grant Edits: Grantee - must be pulled in from a Grantee already in the system via the Search icon and selected from the list. If the Grantee is not already in the system it must be added using the Entity Add functionality. Status - must be selected from list of valid values in Drop Down list; Predevelopment, Current Grant, Grant for Next Year, Closed, In-Extension Grant Name - must be alphanumeric and unique State - Must be selected from list of valid values in Drop Down list sourced from FIPS Contractor - Must be selected from list of valid Contractors maintained in SHARES County - Must be selected from list of valid values in Drop Down list sourced from FIPS, can be one-to-many Counties per Grant Proposed # of Homes - Must be numeric Predevelopment Amount - if entered, must be numeric in currency format Proposed Grant Period if entered, must be numeric, can be zero Predevelopment Start Date if entered, must be a valid date in MM/DD/YYYY format Predevelopment End Date if entered, must be a valid date in MM/DD/YYYY format, must be greater than Predevelopment Start Date Proposed Grant Amount - if entered, must be numeric in currency format Pre-Application Date - if entered, must be a valid date in MM/DD/YYYY format, must be earlier than Predevelopment Start Date Predevelopment Extension Date - if entered, must be a valid date in MM/DD/YYYY format, must be later than Predevelopment End Date Application Date - if entered, must be a valid date in MM/DD/YYYY format, must be greater than the Pre-Application Date 45
46 Grant Start Date - if entered, must be a valid date in MM/DD/YYYY format, must be greater than the Grant Application Date Grant End Date - if entered, must be a valid date in MM/DD/YYYY format, must be greater than the Grant Start Date Initial Grant Amount - if entered, must be numeric in currency format Subsequent Grant Amount - if entered, must be numeric in currency format and cannot be entered unless an Initial Grant Amount is greater than 0 Grant Extension Date - if entered, must be a valid date in MM/DD/YYYY format, must be later than Grant End Date. Construction Supervisors - if entered, must be numeric Number of TA Staff - if entered, must be numeric Required Fields to add/update Grant Extensions: Extension Type - Must be selected from list of valid values in Drop Down list (Pre-Development, Development) Extension Date - must be a valid date in MM/DD/YYYY format Extension Amount - must be numeric in currency format but can be zero. 46

47 Potential errors: Errors detected by the system will always display in the upper left hand corner under the Grant tab. Each Date field has an edit and associated error message if the data is not entered correctly. For example; All Date fields require MM/DD/YYYY format even if the month or day is only a single digit less than 10. Grant Extensions can have these errors, note that Extension is required but can be entered as a 0; 47


48 4.11 Updating a Grant To update an existing Grant into SHARES the user will pass their mouse cursor over the Grant menu item in the Left Navigation Menu and then click left click the Search-List-Update Grant option. The user next can enter one or more filtering criteria into the Grant Search screen of Grant Name, Grantee Name, select a Region from the drop down list, select a Grant status from the drop down list or select a State from the down list and then left click the Submit button or enter no filtering criteria at all and click Submit though there is a limit of 500 Grants. A warning that too many Grants have met the search criteria will be displayed if the limit is exceeded but that is unlikely to happen to most users as their Grantee, Contractor or Office security limits will prevent them from seeing over 500 Grants. The user can enter partial strings into the Grant Name or Grantee Name fields. It is not necessary to entire the Name for either. If the user is not seeing the Grant they want to see in the resulting Grant Search List they may want to consider shortening their search criteria or removing some filters so that more Grants will be displayed. Note for Grantees, the system will by security rule filter out other Grantee s Grants so it s unnecessary for you to enter a Grantee Name filter. This filter is in place for the Contractors and RD Offices to narrow the result set. 48

49 After the Search has been launched the matching Grants are displayed in a list and the user can either use the page controls to page thru the list or click on the Grant Name link to open the desired Grant for update or review; The user will then be presented with a populated Grant screen. The user can then change the Grant Name, modify the Grantee using the search control adjacent to the Grantee Name field, change the Status from the drop down list, change the State from the drop down list, change the Contractor from the drop down list or the Proposed Number of Homes or any of the other Grant related data fields. The same six data elements are required as to save a new Grant. Once the user has completed updating data they can left click the Save button to save the data entered into the SHARES database. 49
50 4.12 Adding and Updating Grant Funds To add or update Grant Funds the user must first open the desired Grant using the same controls described in section 4.11 to update a Grant. Once the Grant is open for update the user can then click on the Grant Funds tab and the user will then be presented with the Grant Funds screen. Any previously entered Grant Funds will be displayed. Funds Received and Funds Used are in two separate sections. To add a new Grant Funds Received the user can then select the Source from the drop down list, enter a Description, enter a Date and an Amount Once the user has completed entering the data they can left click the Save button to save the data entered into the SHARES database. If the user needs or wants to add another line of Funds Received they can click the Add button in that section and a new set of Grant Funds received fields will appear. Please note, that the Add button does not save the data entered to the database. Only the Save button signals the application to save the data entered to the database. 50
51 To add a new Grant Funds Used the user can then select the Source from the drop down list, enter a Description, enter a Date and an Amount Once the user has completed entering the data they can left click the Save button to save the data entered into the SHARES database. Edit and Validation Rules Grant Funds tab Required Fields to add new Grant Fund line: Source - Required to add or update a Grant Funds, must be selected from list of valid values in Drop Down list; 523, Other Description - Required to add or update Grant Funds Date - Required to add or update a Grant Fund Amount - Required to add or update a Grant Fund, Edits: Sources - must be selected from list of valid values in Drop Down list; 523, Other Description - must be alphanumeric Date - must be a valid date in MM/DD/YYYY format Amount - must be numeric in currency format Calculations: 523 Received - Sum of all Funds Received for the Grant from with a 523 Source Other Received - Sum of all Funds Received for the Grant with a non-523 Source Total Received - Sum of all Funds Received for the Grant 523 Used - Sum of all Funds Used for the Grant from with a 523 Source Other Used - Sum of all Funds Used for the Grant from with a non-523 Source 51
52 Total Used - Sum of all Funds Used for the Grant Potential errors: Errors detected by the system entering Grant Funds will always display in the upper left hand corner under the Grant tab. 52

53 4.13 Adding and Updating RD Offices that service a Grant To add or update an RD Office that services a Grant the user must first open the desired Grant using the same controls described in section 4.11 to update a Grant. Once the Grant is open for update the user can then click on the Offices tab and the user will then be presented with the Grant Offices screen. Any previously entered RD Offices servicing the Grant will be displayed. The RD Office that is designated as the check disbursing Office will have the radio button to the right filled. To add more RD Offices servicing the Grant click on the Search icon to the right of the Rural Development Servicing Office column header label. 53


54 The user will then be presented with the Office Search screen and should use the fields and controls to select the desired filters for the RD Office Search and then click Submit. Once the matching list of Offices the user should click the checkboxes on the left adjacent to the Office Name for those they wish to set as Servicing Offices and click Submit. 54
55 After clicking Submit the user will return to the Office tab and the Offices they selected will be displayed. The user can click Save to save these RD Offices as servicing Offices for the Grant. They can also change the check disbursing Office by clicking the radio button to the right of the Office Name and clicking Save. Note that only one Office can be the designated as the Disbursing Office. 55
56 4.14 Adding and Updating Grant Reviews To add or update a Grant Review concerning a Grant the user must first open the desired Grant using the same controls described in section 4.11 to update a Grant. Once the Grant is open for update the user can then click on the Reviews tab and the user will then be presented with the Grant Reviews screen. Any previously entered Grant Reviews concerning the Grant will be displayed. To add a new Grant Review can click the Add button to add a new line (if needed) the user can then select the Review Type from the drop down list, select the Review Period from the drop down list, enter a Review Date, click the High Risk check box, enter an Agreement Date and Risk End Date and a Comment. The user can then left click the Save button to save the data entered into the SHARES database. 56


57 4.15 Adding and Updating Lots To add or update a Lot under a Grant the user must first open the desired Grant using the same controls described in section 4.11 to update a Grant. Once the Grant is open for update the user can then click on the Lots tab and the user will then be presented with the Lots currently associated to the Grant. To update an existing Lot the user can click on the Lot No column in the line containing the information for the Lot they want to update. Once the selected Lot is open for update, the user can update the details they need to change and click Save to save those changes to the database. 57


58 To assign a Lot to a Borrower the user will first select the Lot using the instructions above then click on the Search icon in the Borrower section of the Lot screen to search for the Borrower to associate to the Lot. The user will then be presented with the Borrower search screen. They can fill in one or more filtering criteria using the various fields and drop downs. Bear in mind that partial entries on fields such as Names will present more search results and the more options used will further limit the results. 58


59 The user will then be presented with a list of Borrower that match the criteria. There is a limit of 500 matches. If the user has entered filtering criteria that presents a list of results greater than 500 will be presented with an error and be requested to limit their search criteria further. Below is an example of the 500 limit being exceeded click OK and then Cancel to return to the Borrower Search screen. Following selecting a Borrower the user will be returned to the Lot screen with the details regarding the Borrower filled in. Click Save to complete the association of this Borrower to this Lot. 59
, select the Water, Sewer and Lot Status from the drop down")
60 To add a new Lot the user can click the Add button at the bottom of the Lot list. An empty Lot screen will be displayed and the user can then enter the Lot Number (can be alphanumeric but must be distinct within the Grant), select the Water, Sewer and Lot Status from the drop down lists as required data elements and any other Lot details then click Save to add the new Lot to the database. Required Fields to add a new Lot: Lot Number - Required to add or update a Lot Lot Status - Must be selected from list of valid values in Drop Down list Water - Must be selected from list of valid values in Drop Down list Sewer - Must be selected from list of valid values in Drop Down list Edits: Lot Number Must have a distinct value within the Grant, i.e. the same Lot Number cannot be used twice within the same Grant Sale Price - if entered, must be numeric in currency format Development Fees - if entered, must be numeric in currency format Sold Lot - Y or N, default to N Lot Acquired by 2 nd Borrower - Y or N, default to N 60
61 Potential errors: Errors detected by the system entering Lots will always display in the upper left hand corner under the Grant tab. 61


62 4.16 Adding and Updating Houses To add or update a House under a Grant the user must first open the desired Grant using the same controls described in section 4.11 to update a Grant. Once the Grant is open for update the user can then click on the Houses tab and the user will then be presented with the Houses currently associated to the Grant. To update an existing House the user can click on the Borrower column in the line containing the information for the House they want to update. Once the selected House is open for update, the user can update the details they need to change and click Save to save those changes to the database. 62

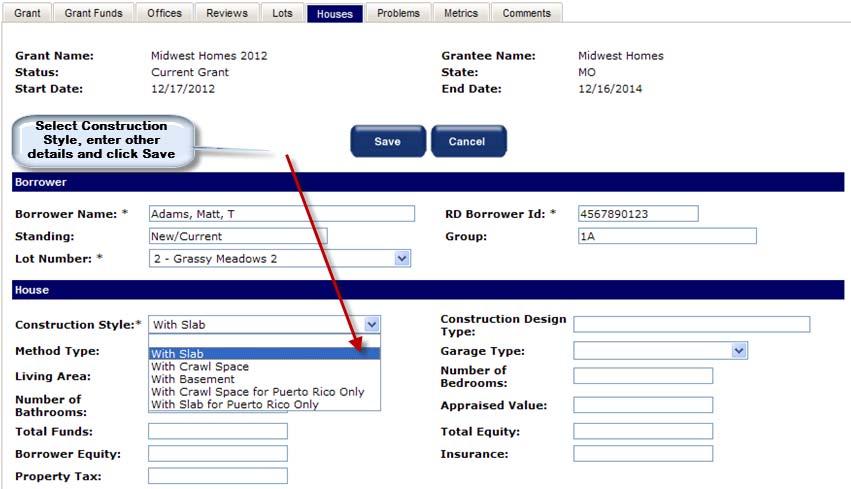
63 To add a new House the user can click the Add button at the bottom of the House list. In order to add a House once on an empty House screen the user must select the Lot Number the House will be built on from the Lot Number drop down list. 63

64 After select the Lot, the Borrower associated with the Lot will populate that portion of the screen. Next select the Construction Style, enter or select from the drop down lists the other known details and click Save. Required Fields to add a new House: Construction Style - Required to add or update a House, must be selected from list of valid values in Drop Down list Borrower - a Borrower must be associated with the House and will be since the system requires that a Lot be associated to the House first and the Borrower is already associated to that Lot or it will not be displayed in the Available Lots Edits: Method Type - Optional but if entered must be selected from list of valid values in Drop Down list Garage Type - Optional but if entered must be selected from list of valid values in Drop Down list Appraised Value - if entered, must be numeric in currency format, required to be entered when Loan has been Closed 502 Loan Amount must be entered when the Primary Source is 502 and the Loan Closed Date is not null Living Area - if entered, must be numeric Number of Bedrooms - if entered, must be numeric Number of Bathrooms - if entered, must be numeric 64
65 Property Tax - if entered, must be numeric in currency format Insurance - if entered, must be numeric in currency format Calculations: Total Funds - Sum of all Borrower Funds Total Equity - Appraised Value minus Total Funds Borrower Equity - Appraised Value minus the Loan Amount 65
66 66

67 After saving the user is returned to the House list and can see the new House in the List. The user can click Add again if they want to add another House and can continue to repeat the process until all the Houses are added. 67
68 4.17 Adding and Updating Grant Problems To add or update Problems that have occurring during the execution of a Grant the user must first open the desired Grant using the same controls described in section 4.11 to update a Grant. Once the Grant is open for update the user can then click on the Problems tab and the user will then be presented with the Problems that are currently associated to the Grant. To update an existing Problem the user enter the changes into the fields on the specific Problem and click Save. To add additional problems the user can click on the Search icon adjacent to the Problem label at the top of the Problem column. 68

69 The user will then be presented with a list of the common Grant related Problems. The user can click the associated checkbox for one of more of them and then click Submit to return to the Problem screen. Upon returning to the Problems tab the user will see the Problems they selected displayed at the top of the list. 69
70 The user can then select the Report cycle from the drop down list and enter the Start and End Dates and enter the Detailed Explanation of the Problems and then click Save to save the new Problems to the database. The Detailed Explanation field can hold up to 2000 characters and can seen by scrolling following entry. Required Fields to add new Grant Problem line: Problem - Required to add or update a Grant Problem, selected from list of common Self-Help program problems can be one to all items on the list for the period being reported Reporting Cycle - Required to add or update a Grant Problem, must be selected from list of valid values in Drop Down list consisting of a Reporting Cycle and Year Start Date - Required to add or update a Grant Problem End Date - Required to add or update a Grant Problem Edits: Detailed Explanation - must be alphanumeric but is not required Start Date - must be a valid date in MM/DD/YYYY format End Date - must be a valid date in MM/DD/YYYY format 70

71 4.18 Reviewing Grant Metrics To review some Grant level metrics related to Borrower Income Level mix, Funds Received and Used and Construction Progress the user must first open the desired Grant using the same controls described in section 4.11 to update a Grant. Once the Grant is open the user can then click on the Metrics tab and the user will then be presented with the Grant level Performance (Construction Progress) Metrics currently associated to the Grant. To switch to Borrower Income level Metrics the user can click on the Borrower Metrics radio button and then click the Performance Metrics radio button to switch back. Performance Metrics: Calculations Grant Metrics view: Cost Per Unit Approved: Total Grant Funds Approved Total All Grant Funds Approved Cost Per Unit Total Grant Funds divided by Proposed Number of Houses Actual Cost Per Unit - Original Grant Period: Total 523 Fund Used - Total 523 Grant Used Funds thru Original Period Total Funds Used Total All Grant Used Funds thru Original Period Equivalent Units summarize all the PreConstruction and Construction EUs earned end of the Original Grant Period by the Cost Per Unit (523 Funds Only) Total Grant 523 Funds Used divided by EUs completed thru Original Period Cost Per Unit (Total Funds) - Total Grant All Funds Used divided by EUs completed thru Original Period 71
72 Actual Cost Per Unit With Grant Extension Period: Total 523 Fund Used - Total 523 Grant Used Funds to date Total Funds Used Total All Grant Used Funds to date Equivalent Units summarize all the PreConstruction and Construction EUs earned to date Cost Per Unit (523 Funds Only) Total Grant 523 Funds Used divided by EUs to date Cost Per Unit (Total Funds) - Total Grant All Funds Used divided by EUs completed to date 72
 Borrowers associated with the Grant designated as Low Income Low Income Borrower Current Percentage - Total of all (Active i.e. Not Withdrawn or Rejected) Borrowers associated with the Grant designated as Low Income divided by Total of all (Active i.")
73 Borrower Metrics: Calculations Grant Borrower Metrics view: Total Number of Borrowers - Total of all (Active i.e. Not Withdrawn or Rejected) Borrowers associated with the Grant Low Income Borrowers Total - Total of all (Active i.e. Not Withdrawn or Rejected) Borrowers associated with the Grant designated as Low Income Low Income Borrower Current Percentage - Total of all (Active i.e. Not Withdrawn or Rejected) Borrowers associated with the Grant designated as Low Income divided by Total of all (Active i.e. Not Withdrawn or Rejected) Borrowers associated with the Grant Low Income Maximum Allowed - Total of all (Active i.e. Not Withdrawn or Rejected) Borrowers associated with the Grant designated as Low Income multiplied by.6 Max Allowed in Dollars - Total RD Funds associated with the Grant multiplied by.6 Total RD Funds for Low Income - Total RD Funds for Low Income Borrowers associated with the Grant Current Usage in Dollars for Low Income Total RD Funds multiplied by Current Low Income Borrower Percentage Very Low Income Borrowers Total - Total of all (Active i.e. Not Withdrawn or Rejected) Borrowers associated with the Grant designated as Very Low Income Very Low Income Borrower Current Percentage - Total of all (Active i.e. Not Withdrawn or Rejected) Borrowers associated with the Grant designated as Very Low Income divided by Total of all (Active i.e. Not Withdrawn or Rejected) Borrowers associated with the Grant Very Low Income Maximum Allowed - Total of all (Active i.e. Not Withdrawn or Rejected) Borrowers associated with the Grant designated as Very Low Income multiplied by.4 Max Allowed in Dollars - Total RD Funds associated with the Grant multiplied by.4 73
74 Total RD Funds for Very Low Income - Total RD Funds for Very Low Income Borrowers associated with the Grant Current Usage in Dollars for Very Low Income Total RD Funds multiplied by Current Very Low Income Borrower Percentage 74

75 4.19 Adding and Updating Grant Comments To add or update Grant Comments that have occurring during the execution of a Grant the user must first open the desired Grant using the same controls described in section 4.11 to update a Grant. Once the Grant is open for update the user can then click on the Comments tab and the user will then be presented with the Comments that are currently associated to the Grant. To update an existing Comment the user enter the changes into the fields on the specific Comment and click Save. To add Comment the user will click the Add button and a new line will added at the bottom of the list of Comments. The user can then enter the Date and Comment and click Save to add the Grant Comment to the database. The Entered By and Organization will fill in based on the user s security profile. Note: these are not the Comments that are included in the Quarterly SHARES Report. 75

76 4.2 Adding and Updating a Borrower To add a new Borrower into SHARES the user will pass their mouse cursor over the Borrower menu item in the Left Navigation Menu and then click left click the Add Borrower option. The user will then be presented with an empty Borrower screen. The user can then enter the Borrower Name, select the Grant using the search control adjacent to the Grant Name field, selecting the Standing from the drop down list, select the Primary Funding from the drop down list, select the Income Level from the drop down list and enter the Household Size. These six data elements are required to add a new Borrower but can be changed later if necessary. The other Borrower related can be entered in Add mode or they can be entered later in Update mode. Once the user has completed entering data they can left click the Save button to save the data entered into the SHARES database. 76
77 Required Fields to add a new Borrower: Borrower Last Name - Required to add or update a Borrower Borrower First Name - Required to add or update a Borrower Standing - must be selected from list of valid values in Drop Down list Funding Source - must be selected from list of valid values in Drop Down list Grant - the Borrower must be associated to a Grant, don t allow the same Borrower to be related to two Active Self-Help Grants Income Level - must be selected from list of valid values in Drop Down list Household Size Required and must be numeric Edits: Borrower Last Name - Required to add or update a Borrower Borrower First Name - Required to add or update a Borrower Standing - must be selected from list of valid values in Drop Down list Grant - the Borrower must be associated to a Grant Income Level - must be selected from list of valid values in Drop Down list Date of Birth - If entered, must be a valid date in MM/DD/YYYY format, must be at least 18 years old Gender - Optional, but if entered must be selected from list of valid values in Drop Down list Ethnicity - Optional but if entered must be selected from list of valid values in Drop Down list Occupation - Optional but if entered must be selected from list of valid values in Drop Down list Annual Income Required for update if Loan is Closed, must be numeric in currency format Annual Adjusted Income Required for update, must be numeric in currency format Dependents Required for update, must be numeric Type of Dwelling - Optional but if entered must be selected from list of valid values in Drop Down list Disabled - Optional but if entered must be selected from list of valid values in Drop Down list Extended Family Y or N, default N 502 Loan Amount Must be entered if 502 as Primary Funds and the Loan is closed. If entered must be numeric and in currency format 77
 Optional, if entered must have First and Last Name Potential")
78 Co-Borrower (s) Optional, if entered must have First and Last Name Co-Signor (s) Optional, if entered must have First and Last Name Potential errors: 78

79 4.21 Entering Borrower Dates To add or update Borrower Dates that have occurring during the execution of a Borrower s Self-Help loan and home construction the user must first open the desired Borrower. To update an existing Borrower in SHARES the user will pass their mouse cursor over the Borrower menu item in the Left Navigation Menu and then click left click the Search-List-Update Borrower option. The user next can enter one or more filtering criteria into the Borrower Search screen of Borrower Last Name and First Name, Borrower Group, Grant Name, Grant Name, select a Loan Status from the drop down list, enter a RD Borrower Id, select a Region from the drop list or select a State from the down list and then left click the Submit button or enter no filtering criteria at all and click Submit though there is a limit of 500 Borrowers. A warning that too many Borrowers have met the search criteria will be displayed if the limit is exceeded. The user can enter partial strings into the Borrower Name or Grant Name fields. It is not necessary to entire the Name for any enterable Search field. If the user is not seeing the Borrower they want to see in the resulting Borrower Search List they may want to consider shortening their search criteria or removing some filters so that more Borrowers will be displayed. 79

80 4.22 Adding and Updating Borrower Funds To add or update Borrower Funds the user must first open the desired Borrower using the same controls described in section 4.21 to update Borrower Dates. Once the Borrower is open for update the user can then click on the Borrower Funds tab and the user will then be presented with the Borrower Funds screen. Any previously entered Borrower Funds will be displayed. To add a new Borrower Fund the user can then select the Fund Type from the drop down list, the Source from the drop down list, enter a Lender, enter a Date and an Amount. Once the user has completed entering the data they can left click the Save button to save the data entered into the SHARES database. 80

81 4.23 Adding and Updating Lot from Borrower module To add a new Lot or update an existing Lot previously associated to the Borrower the user must first open the desired Borrower using the same controls described in section 4.21 to update Borrower Dates. Once the Borrower is open for update the user can then click on the Lot tab and the user will then be presented with the Lot screen. Any previously entered or associated Lot information will be displayed. When there is not previously entered or associated Lot information the user can either add a new Lot by entering the required Lot information of Lot Number, Water, Sewer and Lot Status OR the user can associate a previously entered Lot from a list by clicking on the drop down list next to the Lot number and then clicking on the desired Lot and then click Save. 81
82 Required Fields to add a new Lot: Lot Number - Required to add or update a Lot Lot Status - Must be selected from list of valid values in Drop Down list Water - Must be selected from list of valid values in Drop Down list Sewer - Must be selected from list of valid values in Drop Down list Edits: Lot Number Must have a distinct value within the Grant, i.e. the same Lot Number cannot be used twice within the same Grant Sale Price - if entered, must be numeric in currency format Development Fees - if entered, must be numeric in currency format Sold Lot - Y or N, default to N Lot Acquired by 2 nd Borrower - Y or N, default to N Potential errors: Errors detected by the system entering Lots will always display in the upper left hand corner under the Grant tab. 82

83 4.24 Adding and Updating House from Borrower module To add a new House or update an existing House previously associated to the Borrower the user must first open the desired Borrower using the same controls described in section 4.21 to update Borrower Dates. Once the Borrower is open for update the user can then click on the House tab and the user will then be presented with the House screen. Any previously entered or associated House information will be displayed. When there is not previously entered or associated House information the user can either add a new House by entering the required Construction Style from the drop down list and any other known information and click Save. Required Fields to add a new House: Construction Style - Required to add or update a House, must be selected from list of valid values in Drop Down list Edits: Method Type - Optional but if entered must be selected from list of valid values in Drop Down list Garage Type - Optional but if entered must be selected from list of valid values in Drop Down list Appraised Value - if entered, must be numeric in currency format, required to be entered when Loan has been Closed 502 Loan Amount must be entered when the Primary Source is 502 and the Loan Closed Date is not null Living Area - if entered, must be numeric Number of Bedrooms - if entered, must be numeric Number of Bathrooms - if entered, must be numeric 83
84 Property Tax - if entered, must be numeric in currency format Insurance - if entered, must be numeric in currency format Calculations: Total Funds - Sum of all Borrower Funds Total Equity - Appraised Value minus Total Funds Borrower Equity - Appraised Value minus the Loan Amount 84

85 4.25 Updating Construction one Borrower at a time Once a House has been added for a Borrower the Construction tasks to build that Construction Style of Home have been created and can be updated via the Construction screen under the Borrower module. To update the Construction data associated to the House the Borrower wants to build the user must first open the desired Borrower using the same controls described in section Once the Borrower is open for update the user can then click on the Construction tab and the user will then be presented with the Construction screen. Any previously entered Construction information will be displayed and the user can enter the Actual Start and Actual End Dates and check the Pledge check boxes and click Save to save to the database. The Earned Units (EU), Points Pledged and Points Earned update based on the entry of the Actual End Date for each Construction Task. To see all the Construction tasks the user needs to click, hold and drag down on the scroll bar to the near right. Edits: The Construction rows are all added to the database with the Brief Description and Points populated after the House is added and the Construction Style has been selected and because of this Construction rows are never added manually by the user. If the user modifies the Construction Style after the Construction data details have started to be entered the system will retain the rows of Construction data that are the same between the original Construction Style and the new Construction Style. If a House is moved from one Borrower to another, the points the previous 85
86 Borrower(s) accumulated are awarded to the new Borrower except for the Pre-Construction points because the new Borrower must qualify for the Grant and get their own Loan. Brief Description and Points are system controlled and pre-determined by the Self-Help regulations. Only the system administration can change the descriptions or the points associated with them and what tasks are assigned to each Construction Style. To see and/or edit all the Construction tasks use the vertical scroll bar to left of the task item numbers. The EUs, Total Points Pointed Pledged and Points Earned will remain in place below the bottom task in the displayed array. Pledge - check or uncheck the checkbox to designate if the Borrower has pledged to perform that associated task in that row. Actual Start - required in order to enter an Actual End date, must be a valid date in MM/DD/YYYY format, must be less than or equal to the Actual End (Date) Actual End - must be a valid date in MM/DD/YYYY format, must be greater than or equal to the Actual Start (Date) Dates cannot be future dates i.e. greater than the current system date. Calculations: EUs - summarized by adding to.1 (for Determined Eligible) to (.1 for Loan Closed) to (the Points for each Pledged Task completed by the Borrower multiplied by.8) Total Points Total of all points for all Pre-Construction and Construction Tasks per the Construction Style for the House being built Points Pledged Total of all points for the Construction Tasks per the Construction Style for the House being built where the Pledged check box is checked Points Earned - Total of all points for all Construction Tasks per the Construction Style for the House being built where the Pledged check box is checked and the Actual End Date is populated. 86


87 4.26 Updating Construction across a Borrower Group Once the Houses have been added for ALL the Borrowers in a given Borrower Group the Copy button can be used to copy all the Dates entered and pledge boxes checked to the other Borrowers in the same Borrower Group within that Grant. To initiate the Copy function, enter the data for the first Borrower then click the checkboxes under the Update Group column for the Construction rows to copy, then click the Copy button to copy the data entered on the current Borrower to the other Borrowers in the Group, once the Copy has been completed and the confirmation message has been displayed, click the Save button to confirm saving all the changes across the Borrower Group to the database. Enter data, click Update Group checkboxes then click Copy: After a successful copy function has completed then click the Save button to save to the database: 87
88 Copy Function Edits: The copy Process checks to ensure all the Borrowers in the Group have chosen a Construction Style. If one or more Borrowers have not chosen a Construction Style then the Copy will not proceed and the following error message will be displayed. To rectify the issue the user must either select a Construction for the remaining Borrowers who have not had one entered yet using the House screen or remove the Borrowers who have not chosen yet from the Group using the Borrower screen even if only temporarily and add the Borrower(s) back to the Group later. 88
89 4.27 Reviewing Grant within the Borrower module The Borrower has a Grant tab that will display a Read-Only version of the Grant the Borrower is associated with. No Save button is presented so while the user can enter in some data on this screen there is no way to save it to the database. 89
90 4.28 Adding and Updating Borrower Comments To add or update Borrower Comments. The user must first open the desired Borrower using the same controls described in section 4.21 to update a Borrower. Once the Borrower is open for update the user can then click on the Comments tab and the user will then be presented with the Comments that are currently associated to the Borrower. To update an existing Comment the user enter the changes into the fields on the specific Comment and click Save. 90
 into SHARES the user will pass their mouse cursor over the Entity menu item in the Left Navigation Menu and then click left click the Add Entity option.")
91 4.3 Adding and Updating an Entity To add a new Entity (i.e. Grantee or Contractor) into SHARES the user will pass their mouse cursor over the Entity menu item in the Left Navigation Menu and then click left click the Add Entity option. The user will then be presented with an empty Entity screen. The user can then enter the Entity Name, select the Entity Type from the drop down list and select the Entity Status from the drop down list. These three data elements are required to add a new Entity but can be changed later if necessary. The other Entity related must be entered in Update mode. Once the user has completed entering data they can click the Save button to save the data entered into the SHARES database. 91
92 Required Fields to add a new Entity: Entity Name - Required to add or update an Entity Entity Type - must be selected from list of valid values in Drop Down list Entity Status - must be selected from list of valid values in Drop Down list Edits: Entity Name - Required to add or update an Entity Entity Type - must be selected from list of valid values in Drop Down list Entity Status - must be selected from list of valid values in Drop Down list Potential errors: 92

93 4.31 Updating an Entity To update an existing Entity into SHARES the user will pass their mouse cursor over the Entity menu item in the Left Navigation Menu and then click left click the Search-List-Update Entity option. The user next can enter one or more filtering criteria into the Entity Search screen of Entity Name, Entity Type, Status, Region and State. Then the user can left click the Submit button or enter no filtering criteria at all and click Submit though there is a limit of 500 Entities. A warning that too many Entities have met the search criteria will be displayed if the limit is exceeded but that is unlikely to happen to as new Entities are seldom added and to date there are less than 250 for SHARES. The user can enter partial strings into the Entity Name field. It is not necessary to entire the Name for either. If the user is not seeing the Entity they want to see in the resulting Entity Search List they may want to consider shortening their search criteria or removing some filters so that more Entities will be displayed. 93

94 After the Search has been launched the matching Entities are displayed in a list and the user can either use the page controls to page thru the list or click on the Entity Name link to open the desired Entity for update or review; The user will then be presented with a populated Entity screen. The user can then change the Entity Name or any of the other Entity details. Once the user has completed updating data they can left click the Save button to save the data entered into the SHARES database. 94
95 4.32 Adding and Updating an Entity Address To add or update an Address for an Entity the user must first open the desired Entity using the same controls described in section 4.31 to update an Entity. Once the Entity is open for update the user can then click on the Address tab and the user will then be presented with the existing Addresses currently associated to the Entity. To update an existing Addresses the user can enter or change the Addresses and click Save. 95
96 4.33 Adding and Updating Entity Contacts To add or update Contacts for an Entity the user must first open the desired Entity using the same controls described in section 4.31 to update an Entity. Once the Entity is open for update the user can then click on the Contacts tab and the user will then be presented with the existing Contacts currently associated to the Entity. To update an existing Contacts the user can enter or change the Contacts and click Save. To add additional Contacts the user can click on the Add button and a row within which the user can enter an additional Contact will appear. The user can add as many Contacts as needed and click Save to save all the Contacts to the database. 96
97 4.34 Adding and Updating Entity Individuals To add or update Individuals for an Entity (typically these will be the people work for the Grantee or Contractor) the user must first open the desired Entity using the same controls described in section 4.31 to update an Entity. Once the Entity is open for update the user can then click on the Individuals tab and the user will then be presented with the existing Individuals currently associated to the Entity. To update an existing Individuals the user can enter or change the Individuals and click Save. To add additional Individuals the user can click on the Add button and a row within which the user can enter additional Individuals will appear. The user can add as many Individuals as needed and click Save to save all the Individuals to the database. 97

98 4.4 Deleting data in SHARES 4.41 Deleting Grant data in SHARES To delete a Grant in SHARES the user must first open the desired Grant using the same controls described in section 4.11 to update a Grant. Once the Grant is open for update the user can then click on the Delete button to delete the Grant. However, deciding to permanently delete a Grant is a careful matter. As such, the SHARES system is designed to check for existing Grant related data that is associated with the Grant the user has decided to delete. The system will not allow the deletion of a Grant unless all the data associated to the Grant of; Grant Funds, Grant Reviews, Borrowers, Lots, Houses or Problems is deleted first. If all the related data is deleted the system will request a confirmation as well and the user must click OK on the confirmation pop up screen to proceed with the deletion and finally the user must click Save to finalize the deletion. The user can also click on the Delete (X) buttons to left of the Grant Extensions they wish to delete. To finalize all the deletions the user must finally click Save. 98
 buttons to left of the Grant Fund they wish to delete.")
99 4.42 Deleting Grant Funds To delete Grant Funds in SHARES the user must first open the desired Grant using the same controls described in section 4.11 to update a Grant. Once the Grant is open for update the user can then click on the Grant Funds tab and the click on the Delete (X) buttons to left of the Grant Fund they wish to delete. Deleting Grant Funds does not display a pop up for confirmation just clicking the Save is sufficient. 99
100 4.43 Deleting Grant Reviews To delete Grant Reviews in SHARES the user must first open the desired Grant using the same controls described in section 4.11 to update a Grant. Once the Grant is open for update the user can then click on the Reviews tab and the click on the Delete (X) buttons to left of the Grant Review they wish to delete. Deleting Grant Reviews does not display a pop up for confirmation just clicking the Save is sufficient. 100
 buttons to left of the Lot they wish to delete.")
101 4.44 Deleting Lots To delete a Lot in SHARES the user must first open the desired Grant using the same controls described in section 4.11 to update a Grant. Once the Grant is open for update the user can then click on the Lots tab and the click on the Delete (X) buttons to left of the Lot they wish to delete. Be sure to delete any House on the Lot before attempting to delete the Lot. In general, Lots should not be deleted unless Lots are combined or entered by mistake. Lots should rather be updated or re-assigned to other Borrowers if one falls out of the process. The system will request a confirmation for a Lot deletion as well and the user must click OK on the confirmation pop up screen to proceed with the deletion and finally the user must click Save to finalize the deletion. 101
 buttons to left of the House they wish to delete.")
102 4.45 Deleting Houses To delete a House in SHARES the user must first open the desired Grant using the same controls described in section 4.11 to update a Grant. Once the Grant is open for update the user can then click on the Houses tab and the click on the Delete (X) buttons to left of the House they wish to delete. Houses should rather be updated or re-assigned to other Borrowers rather than be deleted as deleing results in a loss of Equivalent Units for the Grant. Deleting the House will not delete the Borrower. The system will request a confirmation for a House deletion as well and the user must click OK on the confirmation pop up screen to proceed with the deletion and finally the user must click Save to finalize the deletion. 102
103 4.46 Deleting Grant Problems To delete a Grant Problem in SHARES the user must first open the desired Grant using the same controls described in section 4.11 to update a Grant. Once the Grant is open for update the user can then click on the Problems tab and the click on the Delete (X) buttons to left of the Problem they wish to delete. Deleting Grant Problems does not display a pop up for confirmation just clicking the Save is sufficient. 103
 buttons to left of the Comment they wish to delete.")
104 4.47 Deleting Grant Comments To delete a Grant Comment in SHARES the user must first open the desired Grant using the same controls described in section 4.11 to update a Grant. Once the Grant is open for update the user can then click on the Comments tab and the click on the Delete (X) buttons to left of the Comment they wish to delete. Deleting Grant Comments does not display a pop up for confirmation just clicking the Save is sufficient. 104

105 4.5 Deleting Borrower data in SHARES To delete a Borrower in SHARES the user must first open the desired Borrower using the same controls described in section 4.11 to update a Borrower. Once the Borrower is open for update the user can then click on the Delete button to delete the Borrower. However, deciding to permanently delete a Borrower is a careful matter. As such, the SHARES system is designed to check for existing Borrower related data that is associated with the Borrower the user has decided to delete. The system will not allow the deletion of a Borrower unless the Borrower Funds associated to the Borrower is deleted first. Deleting a Borrower who has Equivalent Units will result in the removal of those Equivalent Units from the Grant and the system but moving a Borrower from one Grant to another Grant will result in the retention of the Earned Units to the Borrower overall but will reduce the Grant Equivalent Units from the sending Grant and an increase in the Equivalent Units in the receiving Grant. The system will request a confirmation for a Borrower deletion as well and the user must click OK on the confirmation pop up screen to proceed with the deletion and finally the user must click Save to finalize the deletion. 105
 buttons to left of the Borrower Fund they wish to delete.")
106 4.51 Deleting Borrower Funds To delete Borrower Funds in SHARES the user must first open the desired Borrower using the same controls described in section 4.11 to update a Borrower. Once the Borrower is open for update the user can then click on the Borrower Funds tab and the click on the Delete (X) buttons to left of the Borrower Fund they wish to delete. Deleting Borrower Funds does not display a pop up for confirmation just clicking the Save is sufficient. 106
107 To delete Borrower Comments in SHARES the user must first open the desired Borrower using the same controls described in section 4.11 to update a Borrower. Once the Borrower is open for update the user can then click on the Borrower Comments tab and the click on the Delete (X) buttons to left of the Borrower Comments they wish to delete. Deleting Borrower Comments does not display a pop up for confirmation just clicking the Save is sufficient. 107


108 CHAPTER 5 - REPORTS To run reports in SHARES the user will pass their mouse cursor over the Reports menu item in the Left Navigation Menu and then click left click the Search-List-View Reports option. The user will then be presented with the Reports Menu. To execute the desired report the user will pass their mouse cursor over the Reports Menu item and then click the link. This will expose the Filter page for the chosen Report. The user will enter the desired filters such as Grant Name, Grantee Name and sometimes other filters like Date Ranges and then click Submit to execute the report. Using the Grant Funds Report as an example; 108

109 After clicking Submit the system will display a pop up for the file download. Click Open to proceed to download the report itself. The report will then render into an Excel spreadsheet and can be saved, altered or printed using Microsoft Excel functionality. 109

110 5.1 SHARES Report When the user has entered all the data needed to generate a Quarterly SHARES report they will do so in the same manner as which they create the other reports except they will need to enter the Date Range for the period being reported on in addition to the Grant Name and Grantee. If the reports seems incomplete the user should check to ensure the desired Date Range was entered and that all the Grant Funds, Borrowers, Borrower Funds, Houses, Lots, Construction, Problems and Reviews have been entered and entered correctly. The Date Range is very important as it ties back to which Problems, Grant Reviews and Review Comments are pulled in for the report in addition to the Construction Progress. When the user has entered all the data needed to generate a Quarterly SHARES report they will do so in the same manner as which they create the other reports except they will need to enter the Date Range for the period being reported on in addition to the Grant Name and Grantee. The data remains in the database but is not necessarily static and as a result the Grantee user should date and save their report to a local or network driver for future reference and for sharing with their T&MA Contractor and supporting RD Offices as the official version. A good naming convention to use for cross SHARES program consistency would be Grantee Name-Grant Name-End Date for example Midwest Homes-Midwest Homes /31/2012 with exception for a file name length that would exceed 259 characters. The reason for an official copy becomes important for the following reasons. The EUs are calculated using the Start and End Dates of the report and will be the same regardless of when they were entered (with exceptions when the user has altered any Construction Start and/or End Dates for any homes under construction since the official version was created) but some of the other calculations could be using data entered following the creation of the official version. 110
User Guide on Jobs Bank Portal (Employers)
") User Guide on Jobs Bank Portal (Employers) Table of Contents 1 INTRODUCTION... 4 2 Employer Dashboard... 5 2.1 Logging In... 5 2.2 First Time Registration... 7 2.2.1 Organisation Information Registration...
User Guide on Jobs Bank Portal (Employers) Table of Contents 1 INTRODUCTION... 4 2 Employer Dashboard... 5 2.1 Logging In... 5 2.2 First Time Registration... 7 2.2.1 Organisation Information Registration...
User Guide on Jobs Bank Portal (Employers)
") User Guide on Jobs Bank Portal (Employers) Table of Contents 4 Manage Job Postings... 3 4.1 Create Job Posting... 3 4.1.1 Publish Job Posting... 10 4.2 Create Job Posting As Third Party Employer... 11
User Guide on Jobs Bank Portal (Employers) Table of Contents 4 Manage Job Postings... 3 4.1 Create Job Posting... 3 4.1.1 Publish Job Posting... 10 4.2 Create Job Posting As Third Party Employer... 11
Medical Assistance Provider Incentive Repository. User Guide. For Eligible Hospitals
 Medical Assistance Provider Incentive Repository User Guide For Eligible Hospitals February 25, 2013 Contents Introduction... 3 Before You Begin... 3 Complete your R&A registration.... 3 Identify one individual
Kansas University Medical Center ecrt Department Administrator Training. June 2008
 Kansas University Medical Center ecrt Department Administrator Training June 2008 KUMC Process Timeline Effort Reporting Period 3 Week Pre-Review Period 3 Week Certification Period Post Certification Period
Effort Coordinator Training. University of Kansas Summer 2016
 Effort Coordinator Training University of Kansas Summer 2016 Agenda 1. Effort Reporting Overview 2. Effort Workflow and Basic Information 3. Effort Coordinator: Pre-Review 4. PI/Self-Certifier: Certification
Vanderbilt University Medical Center
 Vanderbilt University Medical Center Credentials Application Tracking System User s Guide Table of Contents Table of Contents... 2 Document Change History... 2 How to Use this Guide... 3 Need Help?...
EFIS. (Education Finance Information System) Training Guide and User s Guide
 Training Guide and User s Guide") EFIS (Education Finance Information System) Training Guide and User s Guide January 2011 About this Guide This guide explains the basics of using the Education Finance Information System (EFIS). The intended
EFIS (Education Finance Information System) Training Guide and User s Guide January 2011 About this Guide This guide explains the basics of using the Education Finance Information System (EFIS). The intended
Chapter 4. Disbursements
 Chapter 4 Disbursements This Page Left Blank Intentionally CTAS User Manual 4-1 Disbursements: Introduction The Claims Module in CTAS allows you to post approved claims into disbursements. If you use a
User Guide on Jobs Bank (Individuals)
") User Guide on Jobs Bank (Individuals) Table of Contents 1 Individual Dashboard... 3 1.1 Logging In... 3 1.2 Logging Out... 5 2 Profile... 6 2.1 Make Selected Profile Information Not Viewable To All Employers...
User Guide on Jobs Bank (Individuals) Table of Contents 1 Individual Dashboard... 3 1.1 Logging In... 3 1.2 Logging Out... 5 2 Profile... 6 2.1 Make Selected Profile Information Not Viewable To All Employers...
Medical Assistance Provider Incentive Repository. User Guide. For Eligible Hospitals
 Medical Assistance Provider Incentive Repository User Guide For Eligible Hospitals February 25, 2013 Contents Introduction...1 Before You Begin...2 Complete your R&A registration... 2 Identify one individual
Overview What is effort? What is effort reporting? Why is Effort Reporting necessary?... 2
 Effort Certification Training Guide Contents Overview... 2 What is effort?... 2 What is effort reporting?... 2 Why is Effort Reporting necessary?... 2 Effort Certification Process: More than just Certification...
State of Florida. Department of Economic Opportunity. One Stop Management Information System (OSMIS) Regional Financial Management User Manual
 Regional Financial Management User Manual") State of Florida Department of Economic Opportunity One Stop Management Information System (OSMIS) Regional Financial Management User Manual Date: February 20, 2013 (Final) Version: 11.06 Table of Contents
State of Florida Department of Economic Opportunity One Stop Management Information System (OSMIS) Regional Financial Management User Manual Date: February 20, 2013 (Final) Version: 11.06 Table of Contents
Reimbursements: Submit a Flat Rate Reimbursement
 Reimbursements: Submit a Flat Rate Reimbursement Overview Tax-Aide volunteers may elect to receive a one-time, flat-rate expense reimbursement for which volunteers receive $35 and volunteer leaders receive
AIRPORT SPONSOR USER GUIDE
 AIRPORT SPONSOR USER GUIDE Table of Contents Section 1: Introduction... 2 1.1 What is BlackCat Grant Management System?... 2 1.2 This User s Guide... 2 Section 2: Getting Started... 3 2.1 User Access...
Certification of Employee Time and Effort
 Procedure: Policy: Number: Completing a Personnel Activity Report (PAR) Certification of Employee Time and Effort GP1200.3 ( ) Complete Revision Supersedes: Page: ( ) Partial Revision Page 1 of 21 ( X
Instructions for Navigating Your Awarded Grant
 Instructions for Navigating Your Awarded Grant proposalcentral s Post-Award allows grantees to submit progress reports, project documents, financial/budget information, communicate with the funding organization,
2017 ANNUAL PROGRAM TERMS REPORT (PTR)/ALLOCATIONS INSTRUCTION MANUAL
/ALLOCATIONS INSTRUCTION MANUAL") 2017 ANNUAL PROGRAM TERMS REPORT (PTR)/ALLOCATIONS INSTRUCTION MANUAL Public Burden Statement: An agency may not conduct or sponsor, and a person is not required to respond to, a collection of information
2017 ANNUAL PROGRAM TERMS REPORT (PTR)/ALLOCATIONS INSTRUCTION MANUAL Public Burden Statement: An agency may not conduct or sponsor, and a person is not required to respond to, a collection of information
RETRIEVAL AND CRITICAL HEALTH INFORMATION SYSTEM
 RETRIEVAL AND CRITICAL HEALTH INFORMATION SYSTEM USER GUIDE November 2014 Contents Introduction... 4 Access to REACH... 4 Homepage... 4 Roles within REACH... 5 Hospital Administrator... 5 Hospital User...
RETRIEVAL AND CRITICAL HEALTH INFORMATION SYSTEM
 RETRIEVAL AND CRITICAL HEALTH INFORMATION SYSTEM USER GUIDE May 2017 Contents Introduction... 3 Access to REACH... 3 Homepage... 3 Roles within REACH... 4 Hospital Administrator... 4 Hospital User... 4
Site Manager Guide CMTS. Care Management Tracking System. University of Washington aims.uw.edu
 Site Manager Guide CMTS Care Management Tracking System University of Washington aims.uw.edu rev. 8/13/2018 Table of Contents INTRODUCTION... 1 SITE MANAGER ACCOUNT ROLE... 1 ACCESSING CMTS... 2 SITE NAVIGATION
Disaster Recovery Grant Reporting System (DRGR) Action Plan Module Draft User Guide
 Action Plan Module Draft User Guide") Disaster Recovery Grant Reporting System (DRGR) Action Plan Module Draft User Guide May 9, 2011 U.S. Department of Housing and Urban Development Office of Community Planning and Development DRGR 7.2 Release
Disaster Recovery Grant Reporting System (DRGR) Action Plan Module Draft User Guide May 9, 2011 U.S. Department of Housing and Urban Development Office of Community Planning and Development DRGR 7.2 Release
CHILDREN AND YOUTH SERVICES
 Procedural Manual for Municipalities Using the Family and Community Support Services (FCSS) On-line System CHILDREN AND YOUTH SERVICES Table of Contents TABLE OF CONTENTS 2 THE FCSS PROGRAM HANDBOOK 3
Purpose: To create a record capturing key data about a submitted proposal for reference and reporting purposes.
 Kuali Research User Guide: Create Institutional Proposal Version 4.0: vember 206 Purpose: To create a record capturing key data about a submitted proposal for reference and reporting purposes. Trigger
2017 ANNUAL PROGRAM TERMS REPORT (PTR)/ ALLOCATIONS INSTRUCTION MANUAL
/ ALLOCATIONS INSTRUCTION MANUAL") 2017 ANNUAL PROGRAM TERMS REPORT (PTR)/ ALLOCATIONS INSTRUCTION MANUAL Public Burden Statement: An agency may not conduct or sponsor, and a person is not required to respond to, a collection of information
2017 ANNUAL PROGRAM TERMS REPORT (PTR)/ ALLOCATIONS INSTRUCTION MANUAL Public Burden Statement: An agency may not conduct or sponsor, and a person is not required to respond to, a collection of information
Regional Transit Authority User Guide. 1 February 13, 2013 Leading the Nation in Transportation Excellence
 Regional Transit Authority User Guide 1 February 13, 2013 Leading the Nation in Transportation Excellence www.mass.gov/massdot Table of Contents Section 1: Introduction... 2 1.1 What is BlackCat Grant
Effort Reporting & Commitments (ERC) Application Training: Departmental Administrators
 Application Training: Departmental Administrators") Effort Reporting & Commitments (ERC) Application Training: Departmental Administrators Sponsored Program Services Fall 2015 Training Agenda Effort and Effort Reporting Basics ERC Access, Training and Navigation
Effort Reporting & Commitments (ERC) Application Training: Departmental Administrators Sponsored Program Services Fall 2015 Training Agenda Effort and Effort Reporting Basics ERC Access, Training and Navigation
User Guide on Jobs Bank Portal (Employers)
") User Guide on Jobs Bank Portal (Employers) Table of Contents 7 Manage Interviews... 3 7.1 Send Interview Invite... 3 7.2 Sort Interview Invites... 6 7.3 Filter Interview Invites... 8 7.4 Confirm Applicant
User Guide on Jobs Bank Portal (Employers) Table of Contents 7 Manage Interviews... 3 7.1 Send Interview Invite... 3 7.2 Sort Interview Invites... 6 7.3 Filter Interview Invites... 8 7.4 Confirm Applicant
Peoplesoft Effort Certification. Participant s Manual
 Peoplesoft Effort Certification Participant s Manual Version 1.3.7 Revised April, 2007 TABLE OF CONTENTS COURSE OVERVIEW... 3 INTRODUCTION... 4 LEARNING OBJECTIVES... 4 MODULE 1: WHY COMPLETE EFFORT REPORTS...
PATIENT PORTAL USERS GUIDE
 PATIENT PORTAL USERS GUIDE V 5.0 December 2012 eclinicalworks, 2012. All rights reserved Login and Pre-Registration Patients enter a valid Username and secure Password, then click the Sign In button to
Mobile App Process Guide
 Mobile App Process Guide Agency Setup and Management Copyright 2018 Homecare Software Solutions, LLC One Court Square 44th Floor Long Island City, NY 11101 Phone: (718) 407-4633 Fax: (718) 679-9273 Document
Chapter Contents. Manage Résumé Screen
 17: Manage Résumés Chapter Contents Create a Résumé... 17-1 Search for Résumés... 17-1 Staff-Specific Search Criteria... 17-2 Match Résumés to a Job... 17-4 Virtual OneStop includes tools to help staff
Entering Direct Service & Fundraising Hours in the My Service Log System
 Entering Direct Service & Fundraising Hours in the My Service Log System A Step by Step Overview 1 This presentation will show you how to enter hours that you serve in the ADVANCE AmeriCorps program participating
C. The Assessment Wizard
 C. The Assessment Wizard The Assessment Wizard in CAPS 2 is used to record service eligibility determination information. The Assessment Wizard information is only one part of the three components of a
Psychiatric Consultant Guide CMTS. Care Management Tracking System. University of Washington aims.uw.edu
 Psychiatric Consultant Guide CMTS Care Management Tracking System University of Washington aims.uw.edu rev. 8/13/2018 Table of Contents TOP TIPS & TRICKS... 1 INTRODUCTION... 2 PSYCHIATRIC CONSULTANT ACCOUNT
System Performance Measures:
 April 2017 Version 2.0 System Performance Measures: FY 2016 (10/1/2015-9/30/2016) Data Submission Guidance CONTENTS 1. Purpose of this Guidance... 3 2. The HUD Homelessness Data Exchange (HDX)... 5 Create
MASSAid School User Guide. Table of Contents
 Table of Contents Introduction... 1 1 System Requirements... 1 1.1 Operating Systems... 1 1.2 Hardware and Software... 1 2 System Users... 2 2.1 School User Roles... 2 3 Login and Account Management...
Recruiting Solutions 9.1 User Guide
 Recruiting Solutions 9.1 User Guide Updated 9/15/2015 www.hr.uconn.edu IMPORTANT: Hire Request is not submitted for approvals until both steps are completed. In order to submit the hire in SmartHR, the
Psychiatric Consultant Guide SPIRIT CMTS. Care Management Tracking System. University of Washington aims.uw.edu
 Psychiatric Consultant Guide SPIRIT CMTS Care Management Tracking System University of Washington aims.uw.edu rev. 9/20/2016 Table of Contents TOP TIPS & TRICKS... 1 INTRODUCTION... 2 PSYCHIATRIC CONSULTANT
MPF Philanthropy Community User Guide
 MPF Philanthropy Community User Guide Table of contents MPF Community Login Pages... 2 How to Register to MPF Community... 2 How to Login to MPF Community... 2 How to Reset Password on MPG Community...
Coeus Release Department Users Enhancements and Changes
 Coeus Release 4.4.3 Department Users Enhancements and Changes Coeus is compatible with Java 1.6 COEUS is now compatible with Java version 1.6. If you do not already have the recommended java (version 6
Office of Clinical Research. CTMS Reference Guide Patient Entry & Visit Tracking
 Se Office of Clinical Research CTMS Reference Guide Patient Entry & Visit Tracking Table of Contents Logging into CTMS... 3 Search and Recruitment / Quick Search... 4 How to Configure Quick Search Fields...
Care Manager Guide SPIRIT CMTS. Care Management Tracking System. University of Washington aims.uw.edu
 Care Manager Guide SPIRIT CMTS Care Management Tracking System University of Washington aims.uw.edu rev. 12/4/2017 Table of Contents TOP TIPS & TRICKS... 1 INTRODUCTION... 2 CARE MANAGER ACCOUNT ROLE...
N C MPASS. Clinical Self-Scheduling. Version 6.8
 N C MPASS Clinical Self-Scheduling Version 6.8 Ontario Telemedicine Network (OTN) All rights reserved. Last update: May 24, 2018 This document is the property of OTN. No part of this document may be reproduced
Teacher Guide to the Florida Department of Education Roster Verification Tool
 Teacher Guide to the 2016-17 Florida Department of Education Roster Verification Tool Table of Contents Overview... 1 Timeline... 1 Contact and Help Desk... 1 Teacher Login Instructions... 2 Teacher Review,
New York State HOME Local Program Small Rental Development Initiative (SRDI) Community Development Online (CDOL) Application System Instructions
 Community Development Online (CDOL) Application System Instructions") New York State HOME Local Program Small Rental Development Initiative (SRDI) Community Development Online (CDOL) Application System Instructions OFFICE OF COMMUNITY RENEWAL ANDREW M. CUOMO, GOVERNOR RUTHANNE
New York State HOME Local Program Small Rental Development Initiative (SRDI) Community Development Online (CDOL) Application System Instructions OFFICE OF COMMUNITY RENEWAL ANDREW M. CUOMO, GOVERNOR RUTHANNE
Care Planning User Guide June 2011
 User Guide June 2011 2011, ADL Data Systems, Inc. All rights reserved Table of Contents Introduction... 1 About Care Plan... 1 About this Information... 1 Logon... 2 Care Planning Module Basics... 5 Starting
Module Proposal Creation
 Proposal Creation 1 Module 5 1 2 Objectives In this module you will learn how to: Create a new proposal Navigate the proposal Assign proposal permissions Validate and track errors Lock/Break Lock Copy/Transform
Overview...2. Example Grantee...3. Getting Started...4 Registration...4. Create a Scenario... 6 Adding Background Information.. 6 Adding Spending...
 Grantee Economic Impact Analysis Tool User Guide Table of Contents Overview....2 Example Grantee....3 Getting Started...4 Registration...4 Create a Scenario... 6 Adding Background Information.. 6 Adding
Guide to Enterprise Zone Pre-Certification
 This user guide provides web screen shots to reach the application portal from OEDIT s website, navigate the application portal, and complete an Enterprise Zone Pre-Certification application. The OEDIT
Employee Matching Gift Program Online Registration and Application Guide
 TABLE OF CONTENTS Registering and Accessing the Online Matching Gift System 2 Starting and Submitting a Matching Gift Application 5 Viewing Your Matching Gift Status and History 8 Nonprofit Gift Confirmations
Grants Application Completion Report Instructions. Table of Contents
 Grants Application Completion Report Instructions Table of Contents Overview... 1 Step 1 - Logging into Grants Application Completion Report Portal... 1 Step 2 Loading a New Budget... 2 Step 3 Processing
Educational Grant and Outcomes Database User Guide
 Educational Grant and Outcomes Database User Guide June 06 Table of Contents Getting Started System Tips and Useful Hints p.3 Where to Find Us p.4 Logging in as a Registered User p.5 Registering as a First-Time
Research Accounting Banner System Procedures. Table of Contents... 2
 Human Resources/Finance Information Systems Research Accounting Manual Table of Contents Table of Contents... 2 Section A: Introduction... 3 Overview... 3 Process Introduction... 4 Terminology... 5 Section
Optima 101: PARTICIPANT GUIDE
 Optima 101: Introduction to Care Operations Management (COM) PARTICIPANT GUIDE 2017 Optima Healthcare Solutions Page 1 CONTENTS CONTENTS... 2 ABOUT THIS GUIDE... 3 LEARNING OUTCOMES... 4 1. LOGGING INTO
KN-CLAIM. Kansas Nutrition - CLaims And Information Management. Quick Reference for Fresh Fruit & Vegetable Program (FFVP) Reimbursement Claims
 Reimbursement Claims") KN-CLAIM Kansas Nutrition - CLaims And Information Management Quick Reference for Fresh Fruit & Vegetable Program (FFVP) Reimbursement Claims Child Nutrition & Wellness Kansas State Department of Education
KN-CLAIM Kansas Nutrition - CLaims And Information Management Quick Reference for Fresh Fruit & Vegetable Program (FFVP) Reimbursement Claims Child Nutrition & Wellness Kansas State Department of Education
AbbVie Grant Management System (GMS) Requestor Training, Grant Request Training: General Program Support
 Requestor Training, Grant Request Training: General Program Support") AbbVie Grant Management System (GMS) Requestor Training, Grant Request Training: General Program Support After Reviewing this Module, You Will be Able to: Log Onto the GMS Setting up Your Security Password
AbbVie Grant Management System (GMS) Requestor Training, Grant Request Training: General Program Support After Reviewing this Module, You Will be Able to: Log Onto the GMS Setting up Your Security Password
Homelessness Prevention & Rapid Re-Housing Program (HPRP) Quarterly Performance Reporting Updated April 2010
 Quarterly Performance Reporting Updated April 2010") Homelessness Prevention & Rapid Re-Housing Program (HPRP) Quarterly Performance Reporting Updated April 2010 Version 3.0 Table of Contents Introduction... 1 Module Objectives... 1 HPRP Quarterly Reporting
Homelessness Prevention & Rapid Re-Housing Program (HPRP) Quarterly Performance Reporting Updated April 2010 Version 3.0 Table of Contents Introduction... 1 Module Objectives... 1 HPRP Quarterly Reporting
CLINICIAN MANUAL. LATITUDE Patient Management System
 CLINICIAN MANUAL LATITUDE Patient Management System Table of Contents LATITUDE PATIENT MANAGEMENT INTRODUCTION........................... 1 Intended Use..........................................................
Hire SELRES / Depot (Cape May)
") Accessions Hire SELRES / Depot (Cape May) Introduction This section provides the procedure for completing the accession of a member into the Coast Guard Reserve. Procedure Follow these steps to complete
Accessions Hire SELRES / Depot (Cape May) Introduction This section provides the procedure for completing the accession of a member into the Coast Guard Reserve. Procedure Follow these steps to complete
CareerLink Guide Students Alumni Employers
 CareerLink Guide Students Alumni Employers For accessibility features, please download PDF. CareerLink Overview Students Login, Update Profile Upload Resume, Cover Letter or Transcript Searching for Jobs
NURSINGCAS CONFIGURATION MANAGER HELP GUIDE
 NURSINGCAS CONFIGURATION MANAGER HELP GUIDE The Configuration Manager Help Guide is designed to help you navigate through the NursingCAS Configuration Portal, which is the tool you will use to set up your
Korus Ordering Frequently Asked Questions
 Korus Ordering DEMOGRAPHICS Q. How do I transfer patients to sister facilities? A. Patients can be transferred to a sister facility from Patient Registration. Starting on the Dashboard, enter the patient
Grants, Contracts and Consultancies Reporting
 Grants, Contracts and Consultancies Reporting ANU Insight User Reference Guide May 2016 The Australian National University 1 of 26 Table of Contents Background... 3 Access to the Grants Reports... 4 How
YOU MUST READ THIS MANUAL BEFORE ACCESSING THE PECO CASH DISBURSEMENT SYSTEM AT NWRDC
 FLORIDA DEPARTMENT OF EDUCATION FACILITIES BUDGETING ACCOUNTING INFORMATION SYSTEM ON-LINE PROJECT DISBURSEMENT REQUEST MANUAL YOU MUST READ THIS MANUAL BEFORE ACCESSING THE PECO CASH DISBURSEMENT SYSTEM
Optima POC PARTICIPANT GUIDE
 Optima POC Point of Care PARTICIPANT GUIDE 2017 Optima Healthcare Solutions Page 1 CONTENTS CONTENTS... 2 ABOUT THIS GUIDE... 3 LEARNING OUTCOMES... 4 1. ACCESSING POINT OF CARE... 5 2. CLOCKING IN...
Effort Certification Training Guide
 Effort Certification Training Guide September 2010 This training guide explains the process for certifying effort reports in the University s effort reporting application, housed in the PAWS system (PeopleSoft).
OFFICE OF RESEARCH AND SPONSORED PROGRAMS. Grants Resource Center User Guide
 OFFICE OF RESEARCH AND SPONSORED PROGRAMS Grants Resource Center User Guide Created: August 23, 2012 Updated: November 6, 2015 Contents Introduction... 1 Login... 2 GrantSearch... 3 Academic Category and
Guide to Using the Common Intake and Assessment Tool
 Volume 1 THE CENTER FOR APPLIED MANAGEMENT PRACTICES, INC. Florida Association for Community Action, Inc. Guide to Using the Common Intake and Assessment Tool THE CENTER FOR APPLIED MANAGEMENT PRACTICES,
FY 2014 Amendments Instructional Guide for Recipients
 e-snaps Training Series FY 2014 Amendments Instructional Guide for Recipients Completing e-snaps step C1.9b 2015, Version 1 Table of Contents Introduction... 2 Objectives... 2 Overview of the Amendment
New Jersey Department of Community Affairs Grant Application Instructions
 New Jersey Department of Community Affairs Grant Application Instructions Before you get started, make sure that Your Agency Information is up-to-date, including your Board of Directors list, if applicable
Development Coeus Premium. Proposal Development
 Development Coeus Premium Proposal Development Exercise Guide Day 1 [Type the company name] IS&T Training Coeus Premium: Proposal Development - Page 2 - Coeus Premium 4.3.2 Coeus Premium : Proposal Development
LOGIN TO INFINITE CAMPUS: A. In Chrome or Firefox, copy and paste the following URL and hit return and the IC login window will open
 A staff member that has been given IC rights to review and approve the application. Usually Office Support or staff member certified in Census/Enrollment. The staff member can only approve applications
HELP - MMH Plus (WellPoint Member Medical History Plus System) 04/12/2014
 04/12/2014") MMH Plus Help Topics Home/Communications Eligibility Facility Report Lab Results Report Care Alerts Report Search Professional Report Pharmacy Report Medical Management Report Patient Summary Report Basics
MMH Plus Help Topics Home/Communications Eligibility Facility Report Lab Results Report Care Alerts Report Search Professional Report Pharmacy Report Medical Management Report Patient Summary Report Basics
19: Manage Labor Exchange
 19: Manage Labor Exchange Chapter Contents Mass Job Referrals... 19-2 Assigning Referrals to Job Orders... 19-3 Finding a Candidate for the Job Order Referrals... 19-3 Referral/Notifications Details Screen...
14: Manage Labor Exchange
 14: Manage Labor Exchange Chapter Contents Mass Job Referrals... 14-2 Assigning Referrals to Job Orders... 14-3 Finding a Candidate for the Job Order Referrals... 14-4 Referral/Notifications Details Screen...
Booking Elective Trauma Surgery for Inpatients
 ADT31 Version 3.1 Trauma Team Operational Areas Included Trauma Co-ordinator Roles Responsible for Carrying out this Process All other areas Operational Areas Excluded GEN01 Logging into Lorenzo GEN02
School Energy Efficiency Project Grant IWAS Application Instructions
 School Energy Efficiency Project Grant IWAS Application Instructions Illinois State Board of Education School Business Services Division (Revised September 2013) James T Meeks, Chairman Tony Smith Ph.D.
Privacy (PPI) Training
 Training") Privacy (PPI) Training This training is mandatory. In other words, anyone working in Home and Community Care must take the Privacy Training. This is a 2-3 hour course taken online. You only have to take
Privacy (PPI) Training This training is mandatory. In other words, anyone working in Home and Community Care must take the Privacy Training. This is a 2-3 hour course taken online. You only have to take
Use the following to enter new patients into Horizon and to establish a patient for a pending admission. All referrals will be entered into Horizon.
 REFFERAL AND INTAKE SUMMARY Use the following to enter new patients into Horizon and to establish a patient for a pending admission. All referrals will be entered into Horizon. ROLES Supervisor/Nurse The
Trigger / Timing / Frequency: When a new award is received by the University and OSP determines that the award can be accepted.
 Kuali Research User Guide: Create a New Parent Award Version October 06 Purpose: To create a new parent award record in the system. Trigger / Timing / Frequency: When a new award is received by the University
MEDICAL SPECIALISTS OF THE PALM BEACHES, INC. Chronic Care Management (CCM) Program Training Manual
 Program Training Manual") MEDICAL SPECIALISTS OF THE PALM BEACHES, INC. Chronic Care Management (CCM) Program Training Manual September 2017 Table of Contents CCM PROGRAM OVERVIEW... 4 3 STEPS TO BEGIN CCM:... 5 Identify the Patient...
MEDICAL SPECIALISTS OF THE PALM BEACHES, INC. Chronic Care Management (CCM) Program Training Manual September 2017 Table of Contents CCM PROGRAM OVERVIEW... 4 3 STEPS TO BEGIN CCM:... 5 Identify the Patient...
Integrated Disbursement and Information System (IDIS) Online
 Online") Integrated Disbursement and Information System (IDIS) Online U.S. Department of Housing and Urban Development (HUD) Office of Community Planning and Development (CPD) IDIS Online Reports User Guide October
Integrated Disbursement and Information System (IDIS) Online U.S. Department of Housing and Urban Development (HUD) Office of Community Planning and Development (CPD) IDIS Online Reports User Guide October
Table of Contents. System Web Address: widot.blackcatgrants.com
 System Web Address: widot.blackcatgrants.com Table of Contents Section 1: Introduction... 3 1.1 What is the BlackCat Grant Management System?... 3 1.2 This User Guide... 3 Section 2: Getting Started...
Introduction to the Provider Care Management Solutions Web Interface
 Introduction to the Provider Care Management Solutions Web Interface Release 0.2 Introduction to the Provider Care Management Solutions Web Interface Purpose Provider Care Management Solutions (PCMS) is
Chapter 5 ACTIVITY FUNDING
 Chapter 5 ACTIVITY FUNDING Once you complete the setup screens for an activity, it is ready to be funded. The purpose of funding is to specify the amounts and the types of funds to be used for the activity.
Texas Commission on Environmental Quality
 Texas Commission on Environmental Quality Instructions: Applying for a Use Determination for Pollution Control Property through STEERS There are now two ways to apply for a Use Determination for Pollution
ORIS Reports User Guide Catalog of Reports Coeus Premium Dated: October 22, 2013
 ORIS Reports User Guide Catalog of Reports Coeus Premium Dated: October 22, 2013 1 List of Reports First-time users, start here: Pages 5-7. Returning users, this table is a complete listing of current
Fulbright Specialist Program: Host Institution Application Instructions
 Fulbright Specialist Program: Host Institution Application Instructions Thank you for your interest in submitting a project for the Fulbright Specialist Program. These instructions are intended to guide
RD Apply Automated Intake Application System for Water and Environmental Programs December 2015
 RD Apply Automated Intake Application System for Water and Environmental Programs December 2015 Michele J. Cardwell, Acting State Director and Community Programs Director Jane Patchin, Rural Development
INTERACTANT Therapy Scheduler Enhancement
 Health Care Software, Inc. INTERACTANT Therapy Scheduler Enhancement 2011 Health Care Software, Inc. MDS 113001 Page 1 The INTERACTANT Therapy Scheduler option has been enhanced to allow unlimited ARDs
D. PROPOSAL DETAILS CREATE A NEW PROPOSAL GENERAL INFO ORGANIZATION ADD INVESTIGATORS AND KEY PERSONS CREDIT SPLIT SPECIAL REVIEW D.3.
 D. PROPOSAL DETAILS D. D. D.3. D.4. D.5. D.6. D.7. D.8. D.9. D.10. D.1 D.1 CREATE A NEW PROPOSAL GENERAL INFO ORGANIZATION ADD INVESTIGATORS AND KEY PERSONS CREDIT SPLIT SPECIAL REVIEW ABSTRACT OTHER YNQ
Volunteer Management Information System Army Volunteer Corps Volunteer User Guide
 Volunteer Management Information System Army Volunteer Corps Volunteer User Guide January 2010 Notice This manual and all of the information contained herein are confidential and proprietary to U.S. Army
How to Review Scholarship Applications in STARS. USF University Scholarships and Financial Aid Services (USFAS) January 28, 2014
 January 28, 2014") How to Review Scholarship Applications in STARS USF University Scholarships and Financial Aid Services (USFAS) January 28, 2014 Agenda Troubleshooting STARS Browser Issues Assigning Review Committee Members
How to Review Scholarship Applications in STARS USF University Scholarships and Financial Aid Services (USFAS) January 28, 2014 Agenda Troubleshooting STARS Browser Issues Assigning Review Committee Members
VOW Group Scheduling User Guide. Virtual OfficeWare, LLC 111 Ryan Court, Suite 200 Pittsburgh, PA Ph:
 VOW Group Scheduling User Guide Virtual OfficeWare, LLC 111 Ryan Court, Suite 200 Pittsburgh, PA 15205 Ph: 888.950.0688 www.vowhs.com Table of Contents Summary... 2 Prerequisites... 2 Launch VOW Group
Research Administration & Proposal Submission System (RAPSS) Central Office Quick Reference
 Central Office Quick Reference") Research Administration & Proposal Submission System (RAPSS) Central This document is intended for Grants Specialists and Authorized Organization Representatives. Software Overview and Basic Navigation...
Research Administration & Proposal Submission System (RAPSS) Central This document is intended for Grants Specialists and Authorized Organization Representatives. Software Overview and Basic Navigation...
Module 1. Desktop Readiness
 CAYUSE AT EMORY 2 Module 1 Desktop Readiness Objectives 3 In this module you will learn: Browser critiques Where to obtain detailed instructions on getting your desktop ready Firefox 4 Recommended browser
Sponsored Project Life Cycle Management. Evisions SP User Reference Manual. Document version 1.5
 Sponsored Project Life Cycle Management Evisions SP User Reference Manual Document version 1.5 Last updated 4/12/2016 Trademark, Publishing Statement, and Copyright Notice 2015 Evisions, Inc. All rights
C R R S. Claims Reimbursement and Reporting System
 C R R S Claims Reimbursement and Reporting System NSLP Sponsor Manual National School Lunch Program, School Breakfast Program, After School Care Snack Program, Seamless Summer Waiver, and Special Milk
10.3 PR 01 HUD Grants and Program Income
 10.3 PR 01 HUD Grants and Program Income Folder Content Report PR01 HUD Grants and Program Income Grid Report (Refer to Section 5 for types of reports). This report displays financial data for all grants,
DonorCentral Handbook
 DonorCentral Handbook www.stlgives.org Click on My Fund to log in The St. Louis Community Foundation s DonorCentral provides you online access to your fund activity and history. Depending on the parameters